Garage Ideas: DIY Gadgets for the DIYer
The word "motorist" today is not just a term for the owner of a personal vehicle. A motorist is a lifestyle. The modern garage is the mainstay of the do-it-yourselfer.
Peculiarities
The specificity of the arrangement of the garage space is that the layout, the height of the ceilings, the number of floors, the area of the garage, the number of cars "lodging" in it are purely individual. There is no recipe for all occasions - everyone decides for himself what he likes.
You just need to take care of:
- dryness and heating of the room;
- good ventilation;
- protection from thieves;
- arrangement of a desktop and storage systems;
- good lighting.
Depending on the dimensions of the building, the area occupied by equipment, fixtures, communications should not be more than 20% of the garage area. And the distance from the side rack to the parked car should be no less than the width of its doors.
Recommendations for delimiting space
The garage is a multifunctional space. To correctly delineate it, define the work areas. So you can understand if you have enough space to accommodate everything you need. It is better to disassemble the things that have accumulated in it in advance and throw out all unnecessary things.
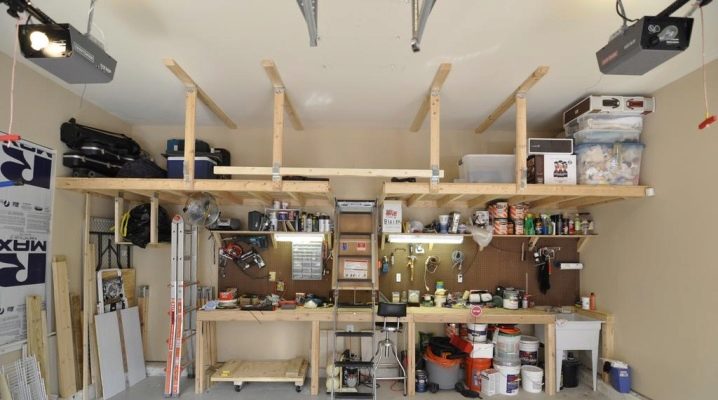
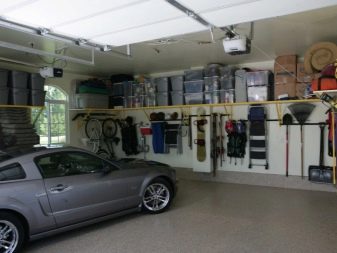
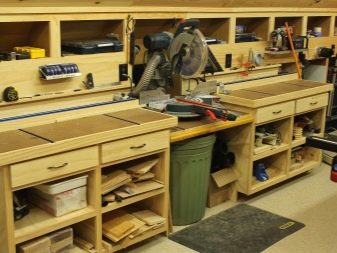
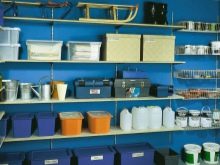
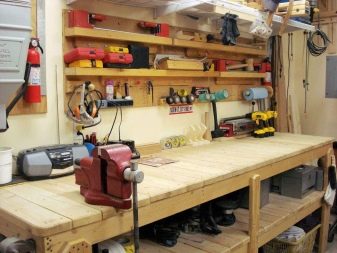
Naturally, a garage is unthinkable without a workshop area. A workbench set against the far wall is useful for repairs and hobbies. Place tools and finished crafts on a shelf directly above your work area.
It is convenient to store hardware, dowels and other small items in transparent jars, glued with a lid to the shelf. Another little trick is that a magnetic stripe glued to furniture can be a great way to save space.
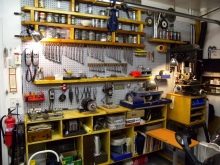

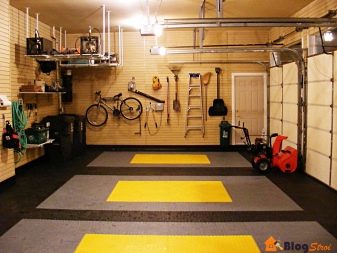
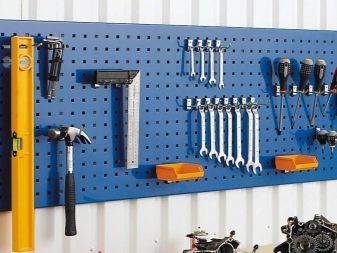
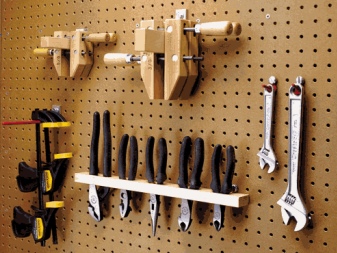
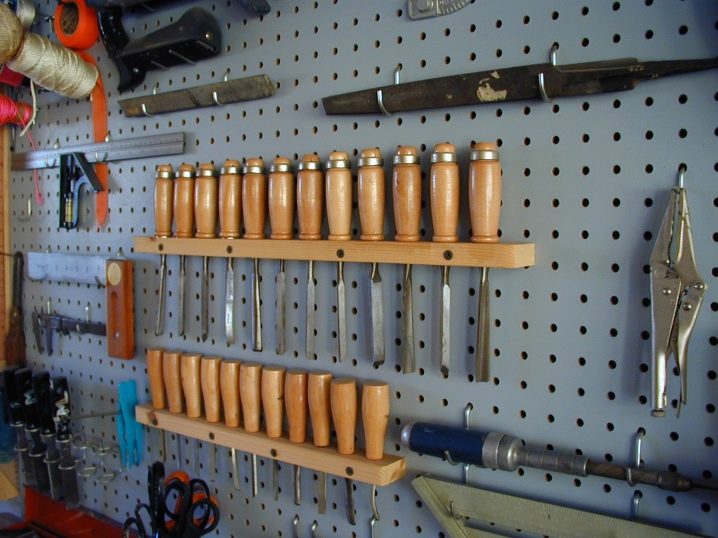
Where and how to place the tools?
The order in the workshop is impossible without the proper placement of the tools.
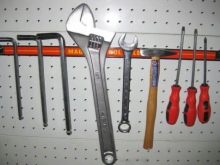
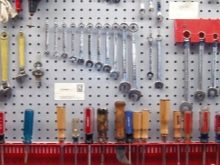
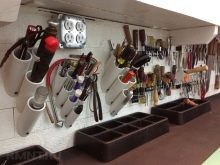
Place the essentials on the board or hanging shelves above the workplace so that everything is at hand. It is convenient to store the necessary tools vertically on plywood boards with holes drilled in them. Heavier utensils will snuggle up on the shelves.
Holders made of PVC pipes are easy to manufacture and convenient.
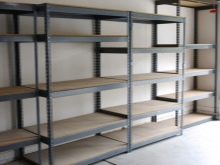
Homemade shelving
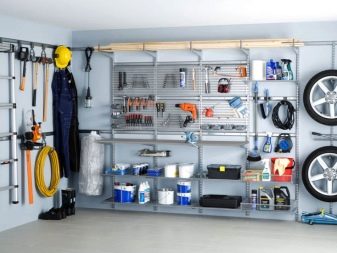
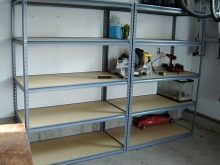
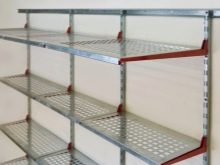
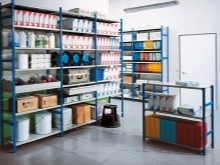
Wooden and metal shelving will be the best option for a garage, as plastic quickly breaks down and cannot withstand heavy objects.
Racks are:
- stationary - mounted on the wall for stability;
- collapsible - if you have not yet decided where it is better to put the rack, you can always disassemble and mount it in another place;
- mobile - on wheels to move without unloading;
- cantilever - for storing long items.
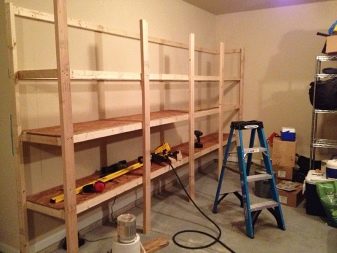
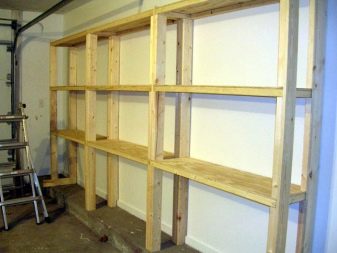
The advantage of wood furniture is the relative ease of manufacture. It can be assembled using a standard carpentry kit without the need for specialist assistance. It is easy to make a wooden rack of any size and shape, and a broken shelf can be easily replaced without disassembling the entire structure. In addition, it is cheaper to make a rack from wood than from metal.
The disadvantages of a wooden product include its fire hazard and stationarity.
It is better to mount a wooden rack immediately "thoroughly", since it will loosen from movement.
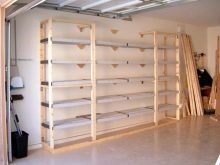
The most budgetary and easy-to-handle wood is pine. It does not rot, does not crack when dry. But the pine also quickly decays. If you don't want to change furniture every five years, choose a harder wood. Oak and larch are harder and also do not rot.


For maximum functionality, the rack should be placed along the entire length and height of the wall. Just be sure to leave a gap of 5-10 cm between the wall and the rack to make it easy to install.
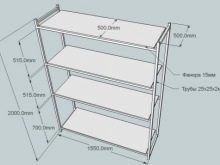
We make the width of the shelves such that it is safe to walk past the rack with the car parked in the garage. It is not worth doing a great depth of the shelves, as it will be inconvenient to use them. The optimal size is 50-60 cm.
We cut out the supports from a bar with a section of 10 by 10 cm, the crossbeams from a bar are thinner - 5 by 5 cm in section. The distance between the racks is about a meter and no more, so that the shelves do not bend or break under the weight of the equipment. We make shelves from a bar, or a thick plywood sheet. We apply the markings for attaching the crossbars to the wall along the height of the future shelves. Be sure to measure the evenness of the marked with a level and tape measure.


Fasten the boards securely to the wall with self-tapping screws every 40-50 cm. Attach the boards of opposite crossbars to the fixed crossbars. Attach the vertical boards to the horizontal ones, carefully so as not to screw them to those that are nailed to the wall. We put aside the workpiece, cut the crossbeams for the shelves. We hang them on the frame every meter. We fix the assembled workpiece and measure the final size of the shelves, cut it out and fix it with self-tapping screws.
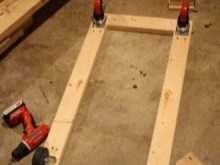
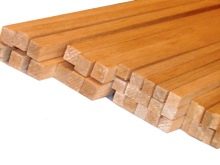
Anyone who is engaged in carpentry work will need a mobile shelving for storing lumber.
To build it you will need:
- square;
- screwdriver;
- electric jigsaw;
- clamp;
- self-tapping screws;
- 4 furniture casters;
- 4 boards 2.5 meters long.
Decide on the parameters of the rack and draw up a working drawing. Measure and cut to the desired size. Make two identical side pieces, like a stepladder. The distance between the rungs is equal to the height of the shelves.
Assemble the base frame. It should be strictly rectangular. To align, secure the pieces to the table at a 90 degree angle using a clamp and square. Attach the wheels to the base. Fasten the side elements at a slight angle, like a stepladder.

A simple rack of two boards will perfectly cope with the storage of long garden tools.
You just need:
- mark the hole of the holders according to the given dimensions;
- drill through holes on a carpentry machine;
- carefully cut out the inclined part;
- paint or varnish ready-made holders and hang on the planned shelf space.
Metal furniture can withstand heavy loads and last longer than wooden furniture. To save time and effort, you can order ready-made racks, but it's cheaper to make them yourself. You don't have to buy new metal, take what you already have. For example, water pipes that you got on the occasion, but were not useful in the household.

Most often, the frame is welded from shaped pipes and corners.
This is done like this:
- We outline the position of future shelves on the vertical racks. Make sure they are on a par with each other. The distance between the lower shelves is greater than between the upper ones. At the top, just right to reserve a place for a high shelf for storing light oversized items.
- For the base slats, take a corner 5 by 5 or 5 by 7 cm, it will protect things from accidental falling or slipping. The span between the uprights is no more than a meter.
- We weld the corners, control the level of all corners - they must be straight.
- We check the diagonals of the welded frame, and at the back we install crosshairs made of reinforcement for additional rigidity of the structure.
- Coat the welded joints with an anti-corrosion agent, prime and paint the furniture with wear-resistant paint.

The upper shelves are used for lighter items, they are covered with plywood, it is advisable to cover the lower ones with a steel sheet. It is better to strengthen the shelves for storing especially massive items with several stiffening ribs.
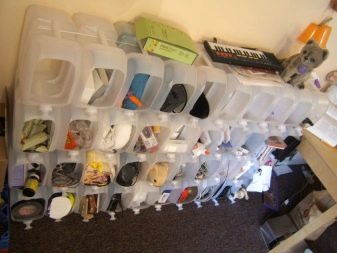
It is also permissible to store various small and not very heavy things in a plastic rack. It is easy to assemble from empty canisters.
This option will come in handy for everyone who does not have enough space in the garage or finances to install a rack. And small things will stop scattering around the room in disorder.
To do this, you need to take the canisters, wash them well so that no traces of their contents remain. The same canisters can be used as dividers or pull-out shelves on the finished rack, but then the side must be cut off so that the handles remain.
Also, a PVC pipe rack is suitable for storing light items.

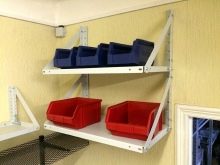
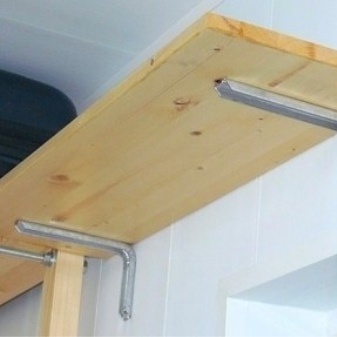
Manufacturing of hanging shelves
For the DIYer, a garage shelf can be more than just a tool storage, but also a place for an exhibition of finished works.
The hinged shelf can be assembled by yourself in the same way as the rack. It is even easier to install a shelf from corners - metal or wood.
Also, baskets hung on the wall can play the role of hinged shelves.

It is worth plastering the walls in advance before installing the shelf. This will prevent condensation from forming on the walls after installing the shelves.
You can attach the shelves anywhere where no one will cling to or hit them:
- above the windows, if any;
- above the workplace;
- under the ceiling.
Today the market offers various new items such as shelves with a lifting mechanism that can be hung under the very ceiling and lowered down when needed.
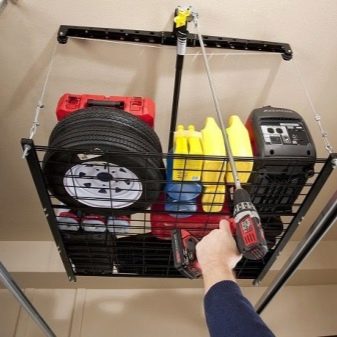
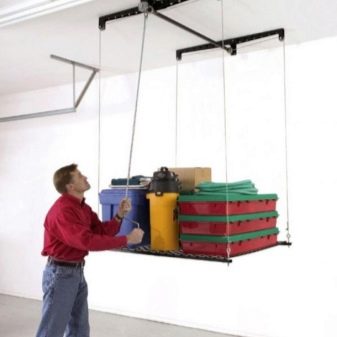
It is easy to make a suspended ceiling structure yourself by assembling shelves from thick sheets of plywood or fiberboard onto studs.
For this you will need:
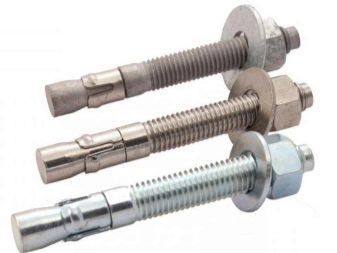
- large anchors (4 pcs.);
- hex nuts-couplings for screed (4 pcs.);
- simple nuts (12 pcs.);
- studs (4 pcs.);
- large diameter flat washers (8 pcs.);
- Grover washers (4 pcs.;
- drill;
- puncher;
- spanners;
- screwdriver;
- level;
- electric jigsaw.


First, we cut out the shelves of the required size from the plywood sheet. They can be reinforced at the edges with a metal profile.
We retreat 5-7 cm from the edge of the tile and make holes into which we will thread the pins. Such an indent is necessary so that the edges of the shelves do not crumble during operation. So that the shelf does not bend from prolonged use, it is better to put load-bearing studs every 60-70 cm.
Through the drilled holes we make markings on the ceiling in the place where we will hang the shelf. According to the marking, we drill holes for the anchors, remove the dust from them, hammer the anchors to the end and tighten the nuts.
Now we connect the studs with the anchors using the nut-sleeves. We strengthen the connection with ordinary nuts.

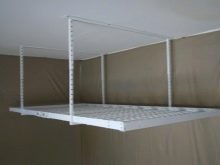
Next, we attach the shelves:
- screw a nut on a hairpin fixed to the ceiling, after it a washer;
- string the shelf onto the ends of the studs;
- we fix it with a Grover washer and a control nut, or better with two locknuts.
A ceiling shelf will make your garage easier to use. She has only one drawback - a movable structure. It is better to fix the shelf with an iron corner. We attach one edge to the wall, the second to the base of the shelf. Now it will not loosen and will last longer.
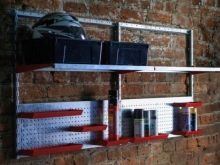
Shelf-shield for storing tools with your own hands
The Shield Shelf is a more compact alternative to the regular wall shelf and will help you organize your tools inside your garage so that they can all be seen.
It is quite easy to put together a panel shelf from plywood and wooden blocks.
Process description:
- cut out a shield of the required size from plywood and mark the position of the shelves;
- put together shelves with side walls along the length of the shield;
- fix the shelves on the shield with self-tapping screws;
- then there are two options: we install the bracket on the back wall and hang it on hooks mounted in the wall or fix it on the support posts of the desktop.
A locksmith's workbench is more suitable not a wooden shelf, but a metal shield with holes, on which it is convenient to hang both shelves and tools on hooks.
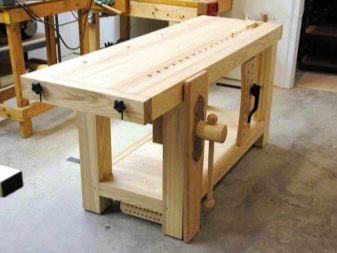
How to make a workbench yourself?
A workbench is a must-have item for a garage workshop. On it, you can sort out machine parts, and solder radio equipment, and cut out with a jigsaw.
Making a workbench usually starts with a detailed design drawing.
Measure the area of your workspace and the height of your workbench.
The optimal workbench height is usually 90 cm, but this is not an absolute figure and depends on the height of the craftsman and whether he prefers to work standing or sitting.
To make a workbench yourself, you will need:
- jigsaw or hacksaw;
- drill and a set of drills for wood and metal;
- screwdriver;
- carpentry square;
- roulette;
- level;
- spanners.


When choosing wood, make sure that it is free of cracks and knots.
Before getting started, prepare:
- bars 10 by 10 cm for legs;
- two thick plywood sheets;
- boards with a section of 5 by 15 cm;
- bolts (take furniture with a square head so that they do not turn);
- nuts and washers;
- self-tapping screws.


Draw a drawing according to your measurements, indicate the exact dimensions of the parts so as not to be mistaken.
First, we make a top frame with a center brace. We strengthen 6 supports on the frame. Place the leg in the corner of the frame and drill two through holes through the leg and side board. Then secure with long bolts. Measure thirty centimeters from the bottom edge of each leg and fix horizontal boards at this height for greater stability of the structure. They will also become the base of the bottom shelf or drawers.
Screw the countertop flush with self-tapping screws. Cover the finished countertop with a layer of hardboard. For greater wear resistance, hardboard can be replaced with steel sheet.
We measure the gap from the central to the end supports, set the shelf according to the measurements. We cut out the grooves for the support legs with a jigsaw or a hacksaw. Drawers can be installed instead of the lower panel. To do this, you will have to buy guides, handles and more plywood sheets. Screw the guides to the supports with self-tapping screws and install the knocked-down boxes on them. Make sure to match the sizes.
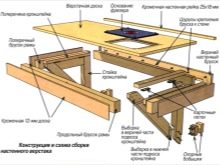
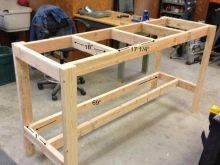
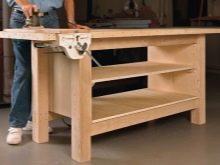
Instead of a shelf, drawers can be installed. Above the workbench, install a shield or hinged shelves with a margin for new tools that will appear in the future.


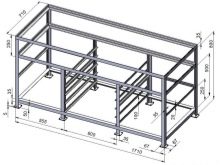
If locksmith work is expected, only a metal work table is suitable.
To build it you will need:
- "Grinder" with cutting and grinding discs;
- level;
- electric jigsaw;
- measuring instruments;
- post beams of small size made of profiled pipes - for the frame part;
- steel strips - for welded struts in the corner area;
- shaped pipes with a wall thickness of 3-4 mm;
- corner;
- ISK;
- plywood one and a half centimeters thick and drawer guides;
- drill;
- screwdriver.


We weld the frame first. To prevent the frame from leading, the beams should be spot welded, spread out on a flat surface. Welding seams are made in turn on one side and on the other at the joints.
We mount the racks and a horizontal beam from the back side to the base. Check all corners are even. If the corners are not straight, they can be tweaked with a hammer.
A tabletop is collected from the boards and impregnated with a refractory compound. We tighten the bars with screws and glue them. A steel sheet is laid on top.
A shield for placing tools is mounted on vertical rack parts, wooden boxes are equipped in the pedestals. Treat wooden elements with a fire-resistant compound.

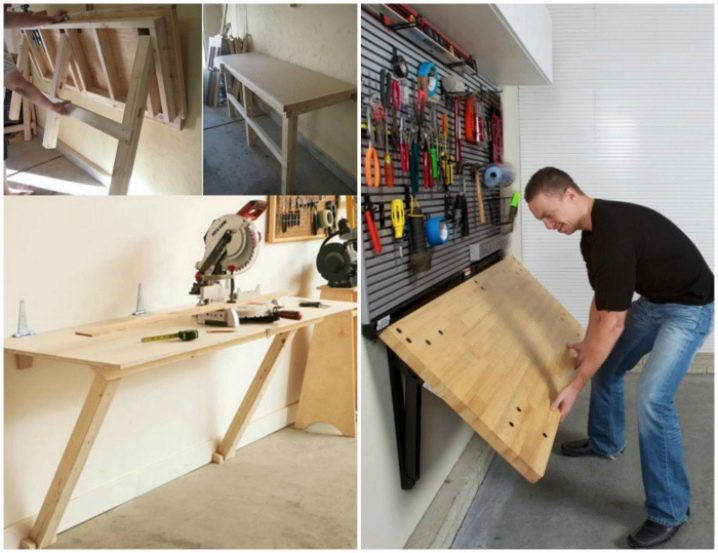
If your garage space is very small, build a foldable workbench.You will need a tabletop, a board along its length, screws, dowels, a drill, a screwdriver, legs and door hinges.
First, fix the board to the wall at the level of the future countertop. Screw the door hinges to the board with self-tapping screws. Attach the tabletop to the door hinges so that it goes down. When raised, it will be held by the legs.
It would be ideal to carve grooves for the legs in the tabletop with a chisel so that they do not slip.
Tips & Tricks
For car owners, property on wheels is of great concern. Today, the lock is no longer the most reliable protection against car theft.
If you have an old push-button telephone left working. Make it a simple electronic alarm. When intruders enter the car garage, the "smart" GSM alarm will call you or send you a pre-dialed SMS.


The alarm is soldered from:
- wires;
- push-button mobile phone with a quick call function;
- magnet;
- closed sealed contact;
- toggle switch or push-type switch.
You should hide your mobile phone more securely. Also, take care of timely recharging or power the phone from the mains.
We mount the alarm:
- set up speed dialing to the desired number;
- remove the front panel to provide access to the keyboard matrix;
- solder one wire to the hang-up button, the second to the shortcut button, then connect the wires to the reed switch. One wire must be with a switch;
- imperceptibly install a magnet and a reed switch on the gate leaves, so the contacts were closed when opening;
- hide your phone and wires so that intruders won't notice them.


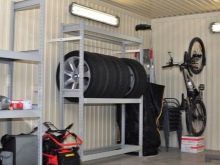
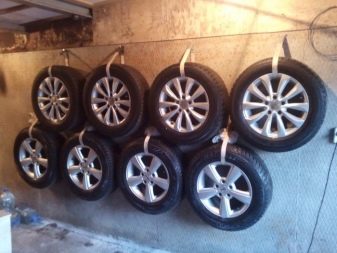
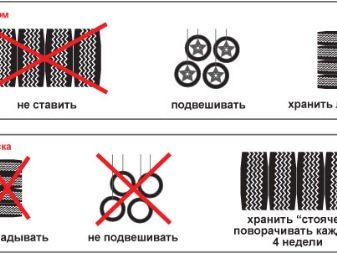
How to store tires correctly?
A seasonal set of tires is not only a bulky and bulky item, but also requires special storage conditions. Sets of tires with and without disks are stored differently. It is better to suspend tires on disks. At the same time, it is not necessary to buy special hooks for tires. You can collect suspensions from scrap materials.
Prefabricated wheels can also be stored lying down, but tires without disks are stored only "standing", and, moreover, they are turned once a month.
A place for storing "lying" or "standing" tires can be equipped under the ceiling or on one of the shelves of the rack or under its lower shelf. The ceiling rack for tires can be assembled from profiles and corners - you only need a drill and a grinder, and if you have a welding machine, you can weld it.
Useful Gadget Ideas
Garage masters come up with many interesting inventions to make work easier.
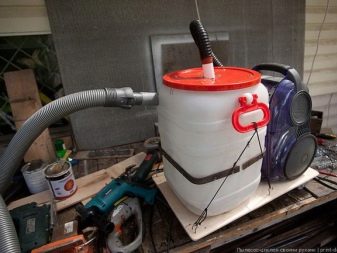
For example, a cyclonic vacuum cleaner. We take a dense plastic or metal container (or a 5 liter bottle), and make two holes in its upper part - one at the edge and the other in the center. The diameters of the holes must match the section of the hoses that will be connected to the device.
The inlet pipe is on the edge. We will mount a plastic elbow into it, which will provide cyclonic air movement. We insert the hose from a conventional vacuum cleaner into the central upper hole.
Such a vacuum cleaner will easily suck up small stones, sawdust, dried dirt, and all solid dirt will remain in the tank.

Another useful "homemade" - "bottle cutter", can be made using a drill from scrap materials. All you need is a piece of board or plywood, a stationery knife blade and a couple of bolts and nuts.
Mark the centers of the washers by placing them in the middle of the board. Drill the holes, and be sure to re-drill them from the back so that the bottle cutter does not rotate during use. Install the bolts.
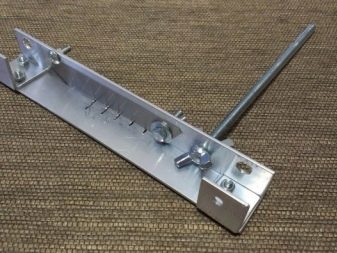

The life hack should be applied like this:
- we put several washers on the protruding ends of the bolts. The more there are, the thicker the rope is;
- on top of the washers we put a clerical knife or at least a fragment of it, and for reliability we fix it on top with nuts;
- take a plastic bottle, cut off the bottom and make an incision so that you can pull the resulting "tail";
- place the blank under the knife and pull the “tail” into a full rope.
From one two-liter bottle, you will get about 25 meters of strong, very useful rope in the household. A strong rope from a bottle will be useful for you and for pulling reinforcement for concrete pouring, and for wrapping the sliding handles of the tool, and even for weaving baskets. In order not to cut herself, it is better to work with gloves.


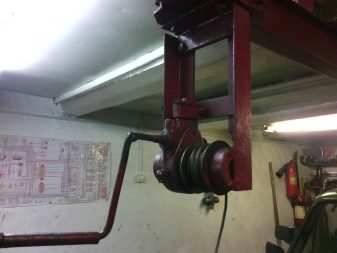
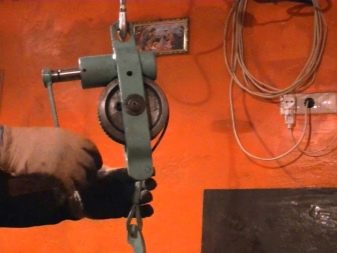
The garage winch is a simple mechanism that will help you drag bulky and bulky loads. The oldest and simplest winch is manual. The cable is wound around it using a long lever. It is relatively compact, does not depend on electricity, is inexpensive, and by increasing the lever, you can increase its pulling power.
The disadvantages include the need to apply considerable physical effort and some inconvenience when working in cold weather, in mud or in cramped conditions.
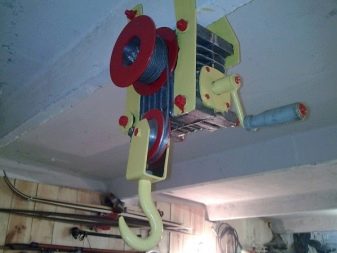
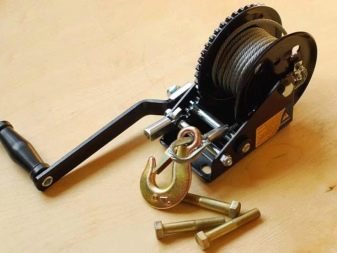
To build, purchase:
- short pipe;
- axis of rotation;
- lever arm;
- cable;
- hook-carabiner.
Assemble the winch from the prepared elements:
- drive the axle securely into the ground;
- weld the pipe to it;
- on one side with a loop, fix the cable on the axle so that it twists on it when turning, and on the other, hang the hook.
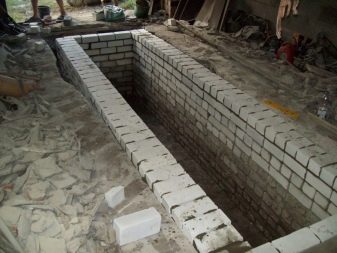
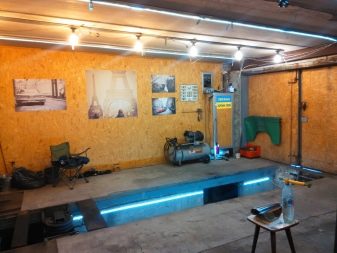
Cellar device as a viewing pit: pros and cons
Any motorist who knows how to independently service his car and wants to reduce the production costs of repairing it needs an inspection pit.
Despite the additional costs of arranging the pit, experienced drivers will only benefit as they can:
- independently inspect the steering, chassis and brake parts and identify possible malfunctions in time;
- change oil;
- save on minor repairs that they can carry out themselves;
- protect yourself from unnecessary costs associated with the dishonesty of car service mechanics;
- the presence of an inspection pit increases the cost of the motorhome if it is sold;
- For many car owners, self-examination of the car and its repair is an exciting hobby.

The organization of an inspection pit in the garage can be hindered by:
- groundwater level: if it is higher than 2 meters, water will flood the pit;
- instability of the ground;
- the complexity of the organization of the drainage system in the finished garage.
It is ideal to plan an inspection pit even at the design stage of a garage, for example, a country house. But often the need for it arises when the garage has already been purchased and it is either without a cellar at all, or with the so-called "vegetable pit".
In the first case, you will have to carry out a thorough study of the type of soil, establish the level of occurrence of groundwater and check for the presence of underground communications in the place designated for the pit.
It is better to entrust all research to professionals. This will allow you to quickly assess the situation, saving time and effort.
Work can be started if the technical plan of the area allows you to dig deep into the depth of 3 m or more - then the deep foundation will be protected from erosion. Otherwise, the foundation will be flooded.
If a vegetable pit is already equipped in the garage, part of it can be converted into a viewing pit, it will even be somewhat easier than digging a pit from scratch.
First, you need to move the entrance to the cellar to a convenient place and build on the missing walls with bricks.
The dimensions of the inspection pit are calculated:
- length - machine length plus 1 m;
- width - the width between the wheels is minus 20 cm so that the car does not fall through while driving into the pit;
- depth - the driver's height plus twenty centimeters.
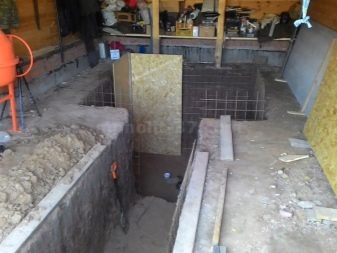
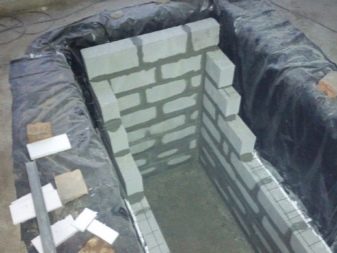
If the depth of the vegetable pit is more or less than this value, it is better to build on or deepen the bottom. All elements of the pit and cellar outside must be insulated with expanded polystyrene and a drainage system should be carried out, if it was not previously equipped.
It is better to take care of the wiring for future lighting right away. Also, do not forget to equip a tool niche in the wall.


After the completion of the work, the garage floor will have to be redone.The problem will be solved by concrete pouring, which can be done independently if you first install reinforcement or guides.
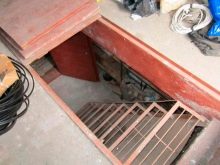
This gives us a separate entrance to the cellar, where you can store the products of a private household, and a separate inspection pit, covered with a boardwalk or sectional door.
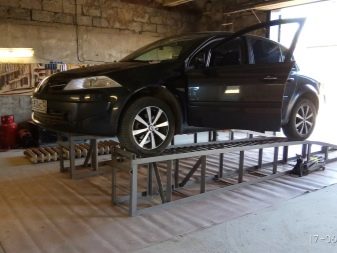
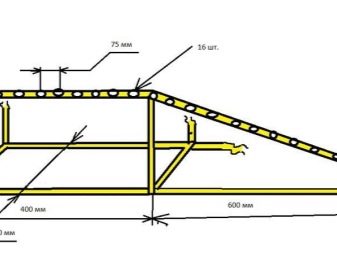
If it is impossible to equip an inspection pit, with a sufficient height of the garage ceiling, a homemade overpass can become an alternative to the inspection pit.
They are:
- full-size (designed for the entire length of the car);
- mini-overpasses (allow you to raise the front or rear axle of the machine).
The simplest mini-overpass is welded from profiles and fittings.
Lighting
To work comfortably in the garage, you need the right lighting. The illumination of the garage depends not only on the number and type of lamps used and the power density of the network per 1 m2, but also on its area, height, number and nature of working areas, even on the color of the walls. A room with dark walls requires brighter lighting.
A multi-level lighting system for a garage is considered the most optimal. It involves the installation of a central lamp in the middle of the room and spot lighting in the working areas.
Calculating the height for multi-level lighting:
| Level | Height, m |
| 1 | ceiling base |
| 2 | 1,8 |
| 3 | 0,75 |
| 4 | 0,4 |
It is easy to check the correct installation of the lamps - just look at the car. It should not cast a shadow in either direction.
Formula for calculating the power of ceiling lighting: "P = S x W / N":
P is the total required power, W / m2. W is the power of one lamp, W. N is the number of lamps (luminaires), pcs. S is the area of the room, m2.

For LED and halogen lamps, the optimal indicator is 16-20 W / m2. This value is suitable for rooms with a ceiling height of no more than two and a half meters. For higher ceilings, this figure should be multiplied by 1.5.
Halogen lamps are similar in principle to incandescent lamps, but they give more light. They also have a longer service life - 4 thousand hours. The fluorescent tube is filled with an inert gas. The inside of the glass is covered with a phosphorescent compound that glows under the influence of an arc discharge.
Lamps must be in shades. You should also take care of the voltage surge stabilization system.
The most expensive lighting is LED. But it is more economical than fluorescent lamps by 50%, and the service life of LED lamps is 50 thousand working hours. And they do not need plafonds, since LEDs do not contain toxic components and give light that is closest to natural.
When illuminating the inspection pit, low-power LED or halogen lamps can provoke an electric shock due to condensation that settles on them. LED bulbs are more convenient because halogen bulbs get very hot. Make the luminaire retractable so it won't be harmed by accidental dropping of the tool into the pit.

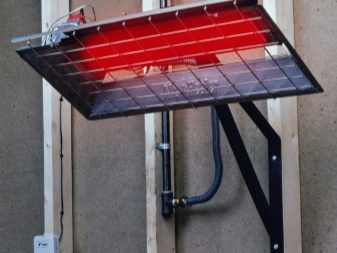
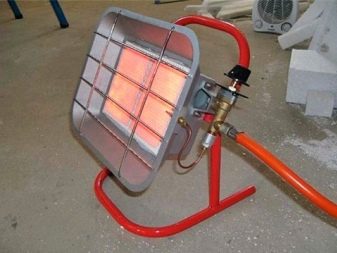
Heating devices
Before choosing the device itself, determine whether you will heat the garage around the clock, maintaining a certain temperature, or turn it on only for the duration of the work.
Good ventilation should be done in advance. When installing any kind of garage heating, this is necessary for safety precautions and the norms of Russian legislation.
An excellent option is to connect the garage to the home heating system, but it is only suitable for a personal building on the territory of a private land plot.
The most popular option is compact heaters. Many motorists choose to buy them, thinking that it will cost more to assemble them by yourself.
In reality, it is possible to assemble a compact heater from quite budget materials. The overwhelming majority of home-made heating units work efficiently due to thermal film. Thermal film is a multi-layer electric heater that can be assembled from laminated plastic or carbon fiber.It heats up quickly with low energy consumption.
To check the functionality of the assembled device, you will need a multimeter. The rest of the parts can be purchased at a hardware store or found in your home pantry.
You will need:
- two-core wire with a plug;
- laminated paper plastic (area of one element is 1 m2);
- epoxy glue;
- graphite, crushed to powder.
First, we prepare an epoxy-graphite mixture. How well the device will heat up depends on the amount of graphite chips. On average, the temperature reaches 60-65 degrees.
Apply the mixture to the rough side of the plastic sheets in zigzag strokes. We fasten the sheets with epoxy glue with the front side to each other. Make a frame around the outline of the sheets to further fix them.
Next, attach the terminals to the graphite conductors on opposite sides of the heater. If you want to regulate the temperature, you can mount a dimmer in the wire. To avoid a short circuit, the assembled device is thoroughly dried. Then test the device (a multimeter is useful for this), measure the resistance and power. If it turns out that a homemade heater is safe enough, you can use it.
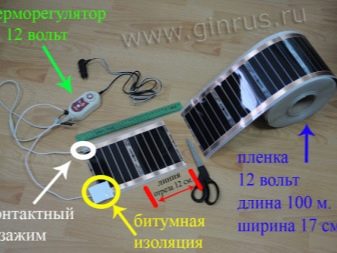

The electric heater, made independently by the type of thermal film, can be used both in a vertical, and in a horizontal and inclined position.
The main thing is to observe safety precautions:
- you must not leave the included heater unattended;
- you should not entrust the supervision of him to children;
- do not place the device near flammable objects.
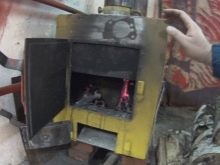
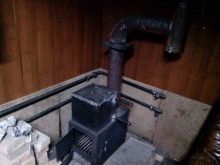
If you decide to equip a stove-type heating in the garage, you must obtain permission from the fire service and the garage association.
However, fire inspections rarely give permission to use self-made "stoves", and in the case of their unauthorized installation, all responsibility for any damage will fall on its owner.

Examples and variants
There are many options for using free space in the garage.
The most popular ones are:
- Workshop. The garage is an ideal place for activities that did not find a place at home - noisy locksmithing, flammable lamp-working and soldering with an unpleasant smell of burnt rosin will finally find a cozy refuge.
- Warehouse. In every home there is a lot of necessary things that you don't want to keep at home - seasonal sports equipment, children's sledges, even off-season clothes and family photo albums.
- Garden corner. The garage is often used by hobby gardeners to store bulky and oversized garden supplies.
- Storage for homemade products. And also a strategic stock of potatoes, carrots, cereals and salt.
- Rehearsal base.
See below for useful ideas for arranging a garage.


A lot of useful things.
The comment was sent successfully.