Potato planters for a mini-tractor: features and subtleties of choice
Planting potatoes is a very troublesome and time-consuming task. And if you have not a small plot, but a large vegetable garden, then planting these root crops turns into a rather serious challenge. That is why many are thinking about purchasing an attachment for a mini-tractor, which can greatly facilitate the work of farmers - such a device is called a "potato planter".

Appointment
The potato planter is a machine that provides quick and easy growing of potatoes on agricultural land. During the work, the planting material is distributed in the dug out furrow quite evenly, which increases the yield of the crop. The unit is attached to a mini-tractor and does not require any assistants, so a single operator can easily handle it.

The potato planter is used for planting potato tubers that have not yet sprouted and for fertilizing all types of soils. At the same time, the mechanism is suitable for operation in any natural and climatic zones other than mountainous regions. In one go, the potato planter performs several operations at once:
- forms a furrow in the soil using a plow;
- introduces tubers into the ground at the required distance from each other;
- with the help of special discs with a certain angle of inclination, forms a bed.

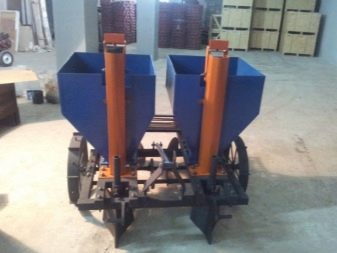
The use of a potato planter greatly facilitates and ennobles the work associated with the cultivation of vegetables. With proper operation, the tubers are placed in the hall in even rows at the required depth. This mini tractor attachment allows you to efficiently work on small to medium sized plots of land. Depending on the number of planting lines, potato planters are single-row and double-row.


Specifications
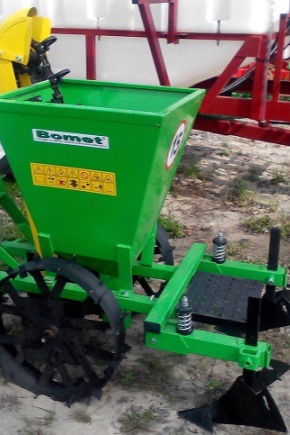
The vast majority of potato planters have approximately the same design and include the following elements.
- Seed tank - made of galvanized metal with a thickness of 0.9 mm. Capacity - not less than 20 kg of seed.
- Frame with wheels - performs the functions of the main supporting frame, it is the place of attachment of all the main elements of the installation, the frame, as a rule, is single-point, less often it is displaced.
- Support wheels - are needed to complete the U-turn of the transport of the mechanism on the site.
- Coulters - are necessary for making a furrow.
- Landing gear drive - works by rotating the wheels with the transmission of torque to a metal chain, can be additionally equipped with spoons or cups fixed on the leveling brackets.
- Covering discs - special devices to cover the cultivated furrows with soil.

All these mechanisms can be purchased at any large store selling agricultural machinery, but some craftsmen prefer to make them with their own hands - it should be noted that the effectiveness of the latter is in no way inferior to factory products. The potato planter has a slightly different design, suitable for planting sprouted potatoes that already contain sprouts. This design is characterized by the absence of a loading hopper, as well as installed vice versa. This machine is more focused on physical labor, however, and seedlings are obtained much faster too.

In addition to the above features, many mini tractor planters have some additional adjustment options:
- landing depth control;
- adjustment of the distance between tubers;
- setting the row spacing;
- adjustment of hillers.
In addition, factory models are supplemented with specialized containers that contain fertilizer for the earth; during work, mineral feed is poured into the holes, where potatoes are then planted.

Advantages and disadvantages
Mini tractor attachment - potato planter has its own pros and cons. The pluses include:
- the possibility of completely abandoning the application of physical efforts and the use of such a working tool as a shovel;
- reducing the time required for sowing;
- the possibility of laying tubers at the same depth with an equal pitch;
- if desired, the potato planter can be used to grow other crops.

Among the disadvantages are the following:
- the inability to work on rocky ground;
- inability to load tubers on the go;
- the need for constant maintenance.
However, all these shortcomings are not so significant. Feedback from users shows that the potato planter is considered a very useful and necessary device with a high speed range. The mechanism has a fairly affordable price, and all the costs of its purchase are more than paid off within 1-2 seasons.

How to do it yourself?
If you do not have the financial opportunity to purchase a potato planter, then if you wish, you can cook it yourself. It is no secret that buying a mini-tractor is a very costly business, after which there is practically no free money left for the purchase of all kinds of attachments, in this case the manufacture of a planter will be quite justified, since the device can be made from those scrap materials that you will have at your disposal ...


The sequence of actions, regardless of the type of mini-tractor, is approximately the same.
- First of all, it is necessary to make a frame, since all other components are already welded to it. To do this, it is necessary to prepare several channels, from which a pair of longitudinal spars must be welded, fixed to each other by transverse metal strips.
- An arch with forks for fasteners is hooked into the front of the frame - they should be directed to the central force of the installation.
- The frames should be additionally reinforced with inclined beams fixed in the center of the arch, then a support is mounted on which fun will be installed in the future - for this, steel corners are used.
- It is imperative to weld a plastic bracket to the inclined beams, where the tuber hopper will be attached.


- The hopper is made of 4 sheets of plywood, it is best to take sheets with a thickness of 12 mm. The same parts are cut from them, and then fastened together with metal corners. It is advisable to cover the structure with linseed oil, and when the composition dries, a waterproof emulsion is applied.
- A rubberized coating is placed inside the hopper - this is important, otherwise the tubers will be beaten against the walls of the container.
- The reservoir is bolted to the bracket.
- Place and adjust the wheel axle and ripper at the bottom of the frame.
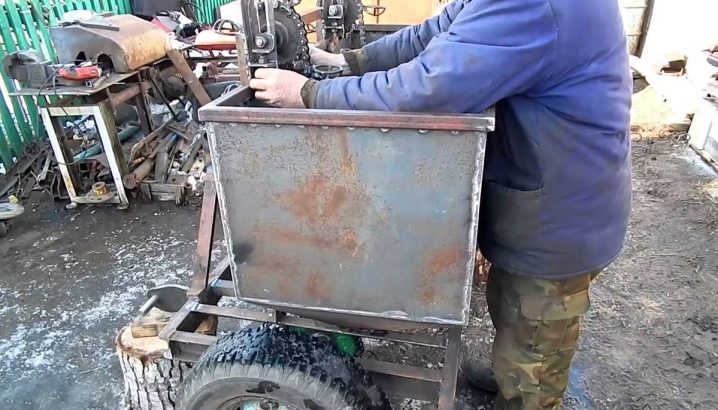
- For the manufacture of the wheel axle, the most common steel pipe is used, along the edges of which the trunnions are attached.
- Special holes are made in the pipe for the pins, where the spikes are subsequently installed, as soon as the assembly process is completed, they should be welded.
- The wheel axle is fixed with fixed clamps and additionally bolted.
- Hubs are welded to the wheels, on each of them there is a pair of bearings for each wheel.
- After that, the bearings are put on spikes, reinforced with a felt gasket, so that no dirt penetrates into the attachment points.

Thus, you can make a semi-automatic potato planter, assembled at home. It is called a semi-automatic because it will accommodate a person who will have to manually throw the tubers into the seed tube. Therefore, the design must be complemented with a seat on which you can sit comfortably. Usually it is made from the most ordinary boards and covered with foam rubber and leatherette. There are quite a few diagrams and drawings with dimensions on the Internet, following which in work greatly simplifies the task of assembling a potato planter.

For an overview of a homemade potato planter, see the next video.
User manual
All recommendations for working with potato planters are similar to each other, regardless of the model used, the difference remains only in some points. The main recommendations are as follows.
- Do not add more seed to the tuber hopper than indicated in the instructions for use.
- Do not move the potato planter fully loaded.
- Before starting to use, make sure that the wheel track of the potato planter and the mini-tractor is the same.


- Be sure to carry out preliminary soil preparation. The land must have a loose structure, for this you will need to plow it first.
- After passing through the very first belt, you should adjust the depth of the openers, the parameters of laying the tubers and the distance between the planting sites.
- Every 8 hours, a visual inspection of the functional areas of the device should be carried out.

- At the end of the work, the mechanism is brought into normal working condition, that is, it must be cleaned of dirt, residues of vegetation and dust by all means.
- It is important to check the fasteners, if necessary, the bolts must be tightened.
- After the end of the sowing session, you need to prepare the nozzle for "hibernation" - for this, reduce the pressure in the tires and remove all roller chains.


The comment was sent successfully.