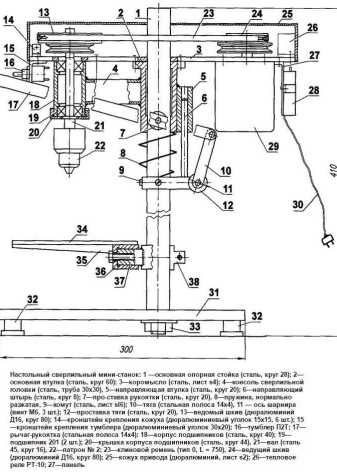
Do-it-yourself drilling machines

The drilling machine does not require special, expensive components. It is assembled on the basis of a conventional drive removed from any household appliance, be it a washing machine or a mixer. It is even easier to assemble it on the basis of a drill or screwdriver - in this case, you will receive a ready-made drilling unit.

Creating a machine from a washing machine engine
Finding freely available drawings with already marked dimensions is as easy as shelling pears. You just need to enter a similar search query, and you will be presented with an almost ready-made assembly diagram of the drilling machine. Assembled with your own hands, it will serve for more than a dozen years. The washing machine, in addition to a direct drive mechanism or an electric gear drive, already contains ready-made suspensions - shock absorbers that do not allow the drum to noticeably deviate from the axis of its rotation during washing, otherwise it would have rolled on its side at increased speeds. In addition to the engine, the master will need:
- steel pipe;
- steel corner;
- strip of steel;
- shock absorber, or so-called. gaslifter;
- plywood or aluminum pulleys;
- drive belt.


Step-by-step instructions for assembling the machine are as follows.
- Start by making a reinforced frame. For it, they use not a round, but a square pipe. However, a non-circular sample is not suitable for all machine modifications. Using a grinder, cut off the components, referring to the drawing. Weld them with a welding inverter, then grind the irregularities. Grinder discs made of corundum and fiberglass are suitable for cutting and grinding steel - their abrasive coating is sufficient for sawing most steels. Weld the reinforced frame to the post, which is also made from the same angle and round tube. This base must have sufficient reliability and strength so that the drill drive does not rip it off when drilling holes in parts.
- Collect the dynamic component from the remaining corner and steel strip... She makes translational movements up and down - along the rack. In other words, this is a power-fed carriage.
- Assemble the fastener to which the engine itself will be fixed. This component is joined by welding seams on the carriage.
- Assemble the spindle gear... It includes a drill chuck. Help here will be provided by a piece of threaded stud at the end - it will serve as a shaft (axis of rotation). Thread a ball bearing onto it, then tighten with nuts. Slide a piece of tubing onto the hairpin. Screw the second bearing onto the same tube. Cut off the same piece of the tube - but make a longitudinal cut along its entire length. Thread it onto the bearings. Weld the longitudinal groove so that there are no holes left. Screw the chuck onto the resulting shaft.
- Weld the spindle cover to the steel plate. Install the same plate on the movable part.
- Place the lever to complete the spindle assembly.
- Instead of a spring returning the mechanism to its original position put in a cushioning insert.
- Make a stage (stand) on which the workpieces are placed... To set this table (platform) correctly and accurately, use a homemade slider in the design that moves along the rack.Weld a circular platform to it - as this component, it is permissible to use a worn circular saw blade. Additionally, he will need a holding element.
- Create a pair of pulleys from a single piece of solid wood or plywood... Place one of them on the motor axis, the other - fasten the spindle component to the shaft. Tension and align the belt.
Paint all parts of the drill unit, then reassemble the unit. Put on the start / stop button. The assembled unit can be tested.


How to make from a screwdriver?
The machine for drilling blanks from a screwdriver is suitable for "home-made" people who have neither a drill nor a washing machine that have served their time. A screwdriver is a ready-made functional device, and here any simple one is suitable, which can be drilled at a second (increased) speed. Most screwdrivers already support the speed switching mode - they already include a gearbox with nylon gears. There is no need to expect great performance from them - but to try to work with technological breaks so that the rubbing and sliding parts of the mechanism have time to cool down, there is a way out of this situation.
- Make a base. A pipe is also used here - but already a square or rectangular profile. The base is not a solid layer of steel, but a grating. For this, weld a rectangle from a professional pipe, weld a segment from it from the inside at a short distance. Weld the stand to the base.
- Assemble the carriage. A screwdriver will be attached to it. To do this, after checking the drawing, cut out the segments from the professional pipe. Additionally, you will need a fastening tie - it will fix the screwdriver.
- From the sections of the professional pipe, weld the two components in the form of the letter G... Weld the tie at the end.
- Assemble the carriage from the next sections of the profile pipe by putting on the ball bearing kits on the axle. Paint the parts to be assembled. Also prepare bolts with nuts and washers, self-tapping screws.
- Using two pieces of tubing, studs and a few nuts, assemble the limiting module for carriage movement... Place it at the bottom of the stand, having marked in advance the desired level to which it will rise - and where it will be fixed. Screw the carriage assembly onto the rack.
- Apply a shock absorber for a rebound effect at the end of drilling. In the simplest case, it will be replaced by a spring.
- Sand and paint your product. Rust primer may be required.
- Install and secure the screwdriver in the screed.


The machine is ready for testing. The advantage of the assembled device is the small space it occupies. It's easy to work with. But for setting the process to a wide flow, the drilling machine obtained in this way will not work - if the screwdriver was bought in a universal network hypermarket (and not in a construction store) and cost several times cheaper, then it is prohibited to overload it.
Work in this mode: drilled for 10-15 minutes and withstand an almost hour break. Excessively cheap devices are not designed for intensive and frequent workloads.
If the device turned out to be branded, and not cheap consumer goods, work at a much faster pace, without fear of burning it down.


Manufacturing from plywood
The drilling machine, the frame and pulleys of which are based on structural steel, is very durable. But not every craftsman can afford a professional apparatus - even if it is also home-made. The frame of the device may well turn out to be wooden - for a beginner who is just mastering a business and just yesterday entered the local market, the "plywood" machine will allow drilling holes and gaps no worse in accuracy than in similar factory blanks.
It is not recommended to use chipboard, MDF for the machine - it is better to take plywood or laminated veneer lumber. In addition to her, you will need:
- furniture corners and profiles;
- edged (simple) board;
- plastic legs;
- fixing tie;
- a strip of steel or aluminum (the latter should be thick-walled).

The step-by-step guide for the manufacture of this device is as follows.
- Remove the inner sliding strips from the two pieces of furniture... Fix them to plywood blanks. Fix them, in turn, on parts with a large width.
- Fix the second two sections of the profile on the plywood sheet (piece). They will be located between the side profiles. Remember to remove the inner trims.
- Assemble the mount for a drill or high-speed screwdriver... First, saw off the steel plate and weld the tie to it. Install additional holders, which are round or square pieces of steel. The welding machine is no longer needed.
- Make a movable platform. To do this, cut a piece of plywood sheet by checking the drawing. Attach to it the internal professional metal with which you worked before. Connect the resulting parts.
- Attach a piece of plywood to the movable platform, on which a steel plate with a tie is fixed.
- Make the base for the future unit from the same plywood - and install the plastic feet.
- Mount the rack, made from a fragment of a board. Fix the just assembled part of the machine on it.
- Install the return spring. Secure the electric drill to the screed.
The device is ready for testing.


More ideas
You can find a lot of components that serve as sources for a drilling machine. Connect your imagination and ingenuity - for example, spare parts are taken from a car that has served its life and cannot be repaired.


From the steering rack
This product - a steering rack - is a rather massive product in terms of weight. A drill or screwdriver, fixed on it, will snap into place very steadily and reliably. However, the drilling unit obtained in this way is recommended to be installed on a locksmith's workbench. The elements will be connected by welding - it is much stronger in terms of the dynamic effect exerted during operation than bolted fastenings. Assemble the frame and support leg from the U-section. Alternative - U-shaped, C-shaped profile, square or rectangular pipe, corners welded together, etc. The thickness of the walls should not be less than 0.5 cm. The steering rack is fixed on the rack - that exceeds it in length by 7 ... 8 see The place of attachment is the lugs of the steering column of the machine.

For more convenient use of the machine, the adjustment module (or step switching) of the drive speed is placed in a separate compartment. Before the final fixation of the drill, control the verticality of its position. Having placed the profile guides, make sure that the rollers that roll over them do not form a gap at the point of contact, otherwise the structure will begin to dangle, as a result of good accuracy of drilling holes in the parts, you will not get.
To fix the workpieces to be processed, it is allowed to install mini-vices on the machine or use clamps.


From car racks
For the manufacture of a machine from auto supports you need:
- building corner;
- car rack;
- Sheet steel;
- spring - shock absorber substitute.
A steel pallet is used for the base of the unit. In the absence of a ready-made specimen, the sheet steel - its fragment - is sawn at the corners, bent to form the sides, and scalded. To give the pallet the greatest rigidity, corners and an additional piece of sheet steel are placed inside (along the perimeter). Weld the parts together - and weld the resulting structure to the pallet.


Collect a pair of ties from strip steel (fragment is taken). To do this, attach them to each other, while fixing the pipes on the segment. Use the same accessory from the machine for the machine stand. Screw a double brace onto it and fix it to the bolted connection.Drill a hole in the lower part, put a stand, fixing the spring on it. Secure it with a nut connection. Place - and lock in - a drill or high-speed screwdriver into the adjacent screed.
The machine is assembled, test it in operation. The advantages of the installation are ease of assembly, low cost of components and parts. It is also permissible to use rolled steel trimmings. The device has proven itself well in drilling wood and non-ferrous metal.
For steel drilling, it is recommended to use more high-performance and reliable devices.


From shaped tubes and bearings
In this version, a square professional pipe is also one of the leading foundations of a drilling machine. In addition to her, the master will come in handy:
- threaded hairpin;
- bolts, washers and nuts;
- steel corner;
- ball bearing nozzles;
- spring (replaces the shock absorber);
- section of the channel profile;
- steel strip.


Detailed instructions for making such a version of the unit - at home or in a garage - are as follows.
- Assemble the rack using a plate and a couple of sections of profile pipe (2 * 2 and 2.5 * 2.5 cm). The length of the segments is 4 dm. Drill holes for fixation in the steel strip. Weld two sections of the profile to this plate.
- Assemble the carriage. We need sections of a square shaped pipe 1.5 * 1.5 cm. Fasteners are bolts with nuts, and for smooth running - bearing factory assemblies.
- Slide the carriage onto a large rack. Install the roller slider on the second stand, welded from 2 * 2 cm cuts. Cut a hole in it.
- Weld on the extended sleeve. Reinforce the joint with additional steel plates. Secure the roller slider with the lug nut.
- Lock the angle lever to the slider. Weld the handle from the professional pipe to it.
- Use a channel section for the base of the machine.... Cut holes in it, fix the plate and the stand on it.
- Assemble the tie for the drill or high speed screwdriver... She, in turn, is fixed on one of the named units. Mount and secure the power hand drill. For spontaneous retraction at the end of drilling, a spring-return part is used.
The benchtop machine is ready. Test it in action. Do not use burned out and restored (in a service center) electric drives during assembly - not all of them will last long.


For information on how to make a drilling machine with your own hands, see the next video.


The comment was sent successfully.