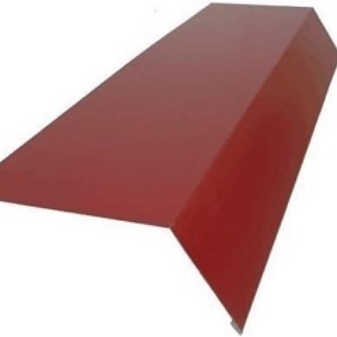
Cornice strips for corrugated board

The roof structure assumes that the plane is equipped with additional elements. Any, even an ordinary roof of a simple design cannot do without them. Elements allow you to protect the building from wind and moisture. The building planks fill the openings where the roof joins the side walls and gables.
Description and purpose
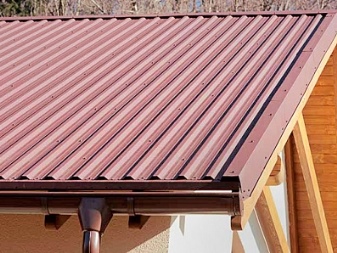
The end of the roof extending beyond the outer walls of the building is called the overhang. Facades are protected by frontal overhangs installed on roofs with one or two slopes. Eaves overhangs are equally important in a building. They, unlike the front ones, protrude above the side parts of the building. The basis of the structure is made up of rafters that extend beyond the roof to a distance of up to 60-70 cm. If the slopes are high, a narrower bevel is allowed.
To support the overhang on the legs of the rafters, builders attach pieces of small-section wooden planks to them. The connection of auxiliary parts with the lathing makes it possible to install a frontal board. An end piece is then mounted on it - a cornice strip. Such slats increase strength and stability, and have a number of protective functions. Strengthening the surface of the coating, addons give the entire structure a finished and aesthetic appearance.
Outwardly, they are no different from flooring and tiles, since they are made of materials identical to the coating.

The eaves plank is an important element on the roof... If there is heavy rainfall or snowfall, the metal structure will protect the house and prolong the life of the roof. Experts name the useful functions of the bar.
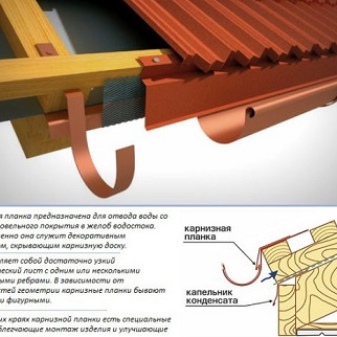
- Protection of the building from excessive moisture. Accumulating, streams of warm air in large quantities rush up to the roof. According to the laws of physics, as a result of the collision of warm air masses with the cold surface of the corrugated board, condensation appears on it and settles under the roof. Since the inside of the roofing cake contains wood blocks, moisture is hazardous. Rotting processes can occur on the beams of the crate. Mold and mildew can thrive in unhealthy environments. Small droplets are blown out by air and blocked by waterproofing, but this is not enough. In order to protect against moisture, the overhang is equipped with an L-shaped eaves strip. The part is mounted on the cornice and goes vertically under the plane. The main part of the accumulated water flows down along it and goes down the gutter to the ground. The design is complemented by two more details: a perforated canvas or soffits mounted under the overhang, and a cover plate, fixed to the cornice, with a section in the shape of the letter J.
- Resistance to gusts of wind. The cornice plank belongs to the wind class, along with the drip and the ridge of the roof. The joints of the flooring with the gutter are completely covered by the construction unit. Therefore, the wind does not penetrate under the roof and does not bring in small drops of rain, does not tear off the roof. As many years of practice show, without a plank, the roof is not held and will inevitably undergo deformation. Water and snow are also thrown away from the overhang obstruction. Precipitation falls down and the roofing cake stays dry even in heavy rain.
- Neat and aesthetic appearance. The rafters and edges of the wooden lattice are closed from external influences during installation. With an element such as a cornice batten, the roof looks complete. If the plank is chosen in the same color as the cover, the kit will be perfect.


Eaves strip and drip - similar in appearance additional elements of the roof structure... They are sometimes confused as both parts contribute to drainage. But the strips are attached in different places and are needed for different purposes. The place where the drip is installed is the rafter leg. The strip is installed so that it goes directly under the layer of the waterproofing membrane. The dropper hangs down and removes a small amount of moisture that has accumulated inside the insulation. Thus, moisture does not linger on the crate and front board.
They begin to install the drip at the initial stage of building construction, as soon as the installation of the roof plane began, and the rafters appeared. After the roofing cake is equipped from the necessary layers, the finished structure is completed with a cornice strip. The part is attached at the very top, under the corrugated board or tiles. The product is brought to the gutter, while the drip remains underneath, protecting the walls.


Overview of species and their sizes
Industrial cornice parts are produced in several types.
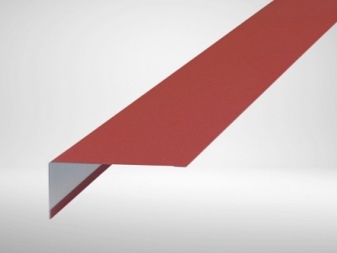
- Standard... The products are two steel strips, which are located at an angle of 120 degrees. The name suggests that the structure is suitable for almost any roof. The length of one side of the corner is from 110 to 120 mm, the other - from 60 to 80 mm. Less commonly, parts with an angle of 105 or 135 degrees are used.


- Reinforced... Increasing the larger side of the rail results in increased wind resistance. Even in a harsh wind, moisture does not get under the roof if the main shoulder is extended to 150 mm, and the second is left within 50 mm.

- Profiled... Specially shaped planks with 90 degree bent shoulders. Profiles are rarely used for metal roofing. They are produced with stiffening ribs, which significantly improves resistance to wind gusts. The cut of the product is bent to fix the pipe and the connection to the drainage system.


Most often, planks are made made of galvanized steel. They are lightweight and inexpensive, so they are popular with builders. Budget details made of plastic or with plastic veneer use less often. Copper acts as an elite and expensive material. Planks are heavier and not available to everyone.
At the same time, copper curtain rods are not subject to corrosion and are durable, therefore they are preferable.

How to fix it?
Roof installation works are carried out at a height, so they are better handled by professionals. Compliance with all safety regulations is also important. The builder is forbidden to work alone, without equipment and insurance. Climbing to the roof, he must immediately take a set of tools with him.
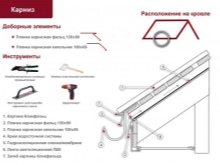
For installation, in addition to the strips themselves, you will need:
- pencil and cord;
- roulette;
- scissors for metal;
- self-tapping screws or nails with a flat top, at least 15 pieces per meter;
- hammer and screwdriver;
- laser level.


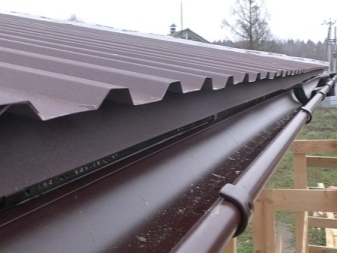
Before starting work, pre-check the roof drainage system. It consists of gutters, funnels, pipes and other intermediate elements. The water channels constantly clean the roof of adhering snow and accumulated water. In most cases, drain parts are used from metal, since brittle plastic may not withstand low temperatures. First of all, you need to attach the hooks and brackets, place the gutters. Hooks are installed 2-3 centimeters below the plane of the roof slope. The closer the holder is to the downpipe, the more indentation is made during fastening... This achieves the optimal level of slope of the gutters so that moisture does not linger and drain. The throughput capacity depends on the area of the catchment areas and their design features.
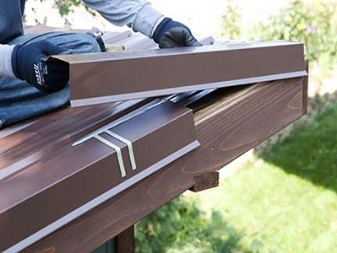
Hooks and brackets are fixed at a distance of 90-100 centimeters. To remove all the liquid from the 10 m long gutter system, a discharge pipe with a diameter of at least 10 cm is mounted. The next step is to prepare overhead strips. Galvanized thin metal slats have an average thickness of no more than 0.7 mm. The dimensions depend on the dimensions of the roof.If there is a 60 mm wide board under the edge of the corrugated board, use reinforced profiles with a long vertical shoulder. An experienced craftsman can make a piece of steel tape by bending it on a workbench with a mallet. Then a homemade plank with the desired angle is sized and painted to protect the galvanized steel from sand damage.
If a finished part is purchased, take into account the length of the overhang and the working overlap (approximately 100 mm). One rail is on average 200 cm.

Next, several actions are performed.
- Draw a straight cornice line... For this, a level and a tape measure are used. At a distance of 1/3 and 2/3 of the overhang, two lines are applied. They are needed to drive nails evenly in the upper part.
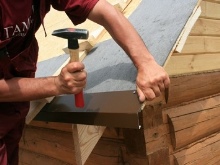
- The ends of the rafters are cut and the cornice board is attached. It is assembled from parts left over from the installation of the lathing. Nail the panel along the markings using a cord. Wooden parts are impregnated with a special compound or painted over at the ends from decay.
- You need to start mounting the strip, stepping back 2 cm from the end, where the first nail is driven in.... The following nails are driven in at a 30 cm pitch, along both lines, so that a checkerboard pattern is obtained.
- Now you can overlap the rest of the plank, it is advisable to additionally fix the joints with nails so that they do not warp... The last part of the lining is folded onto the end and fastened, stepping back from the edge of 2 cm. Self-tapping screws or screws along the entire length are recessed inward so that the heads do not interfere with the further laying of the corrugated board.
The operation of installing the eaves plank is not considered by the builders to require special skills. With a good tool and basic skills, it takes no more than two to three hours.


The comment was sent successfully.