The process of installing socket outlets in drywall
When planning any repair work and the construction of new structures from drywall, you need to be prepared for the need to install additional elements. Often, lighting is mounted in new walls or partitions, but sockets and switches are still the main elements. Without certain knowledge and skills, it will be problematic to establish any of these elements.
Peculiarities
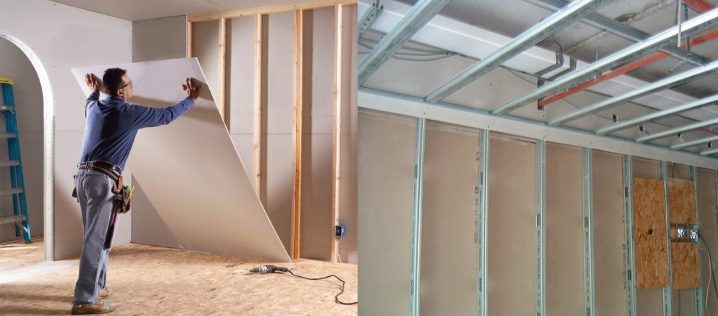
Carrying out repair work is inextricably linked with the technologies that are currently available. If earlier brick walls were erected to change the layout or plywood partitions were created, now there is a more convenient solution. The use of drywall made it possible to solve a lot of problems and make repairs quick, convenient and feasible even for a beginner. A distinctive feature of such a material is its strength and at the same time lightness. Depending on the size of the wall or a new design, you may need from one sheet of gypsum board to several.
The dimensions of drywall are quite large, therefore, often one sheet can be sewn up one wall, and the other with the other. Thanks to this, material is saved, and the time for work is significantly reduced. In order for the sheets to hold tightly, and the wall is no different from the main one, a base is created from metal profiles. Its design can be very diverse, which allows you to embody any fantasies of the owner of the room.
The convenience of drywall and its safety make it possible to use the material in any room: in the bathroom, kitchen, living room, bedroom and even in the nursery. In order for the wall to fulfill a functional role, in addition to dividing the space in the room, it is possible to provide for wiring inside, install a switch, socket or lighting. If there is often no need for additional switches, then sockets are not superfluous in the house.
To install sockets in drywall walls, it is important to choose the right socket for them. This element will be the most important in the installation process. The safety of the use of all electrical appliances depends on the correct choice. By correctly installing the necessary equipment, you can protect your home from the possibility of a fire or short circuit.
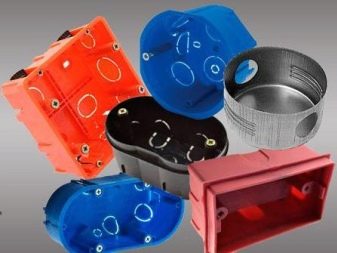
Round-shaped sockets are considered traditional, but there are other options, the choice of which depends on the specific situation. Boxes of a square and rectangular shape are placed if additional distribution of wires will occur inside. This feature is associated with an increase in the space in the box where all the necessary wires can fit.


Dimensions (edit)
Erecting a structure made of plasterboard with its subsequent operation as a working wall, where there will be additional elements, the simplest option is to install a socket. In order for this process to be done qualitatively, it is important to choose the right-sized socket boxes. They often have the same dimensions, but there are also slight differences.
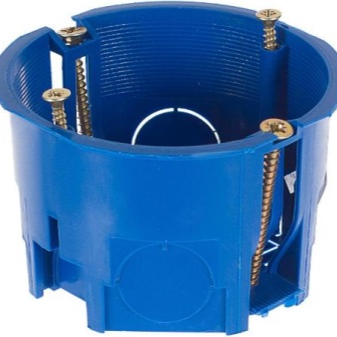
The most common option is a box diameter of 68x45that fits all standard sockets. If the new walls are too deep, then you can choose a different one, where the depth will be greater. The process of fixing such boxes is quite simple and consists in the fact that a circle of the required diameter is drilled using a cutter of the required size.

If there is a need to install more than one socket, then you will need to purchase a double socket. The distance that will separate the two holes in the drywall will be 71 cm. The outer side will be one centimeter more even. These conditions are suitable for boxes with a width of 65 cm and a depth of 40. In order to install the flush plate in a plasterboard wall, its internal width must be at least 45 cm.
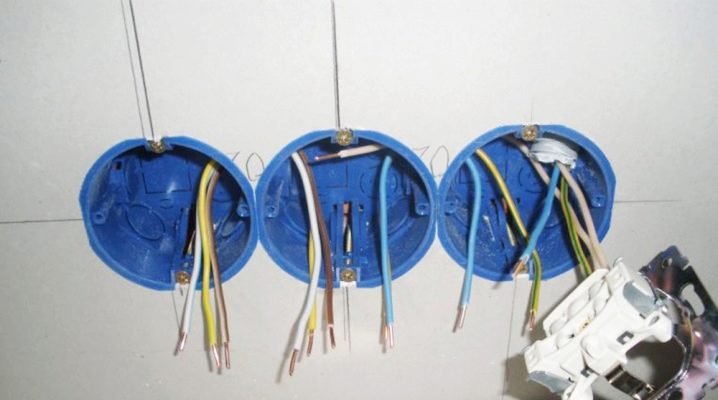
Special ears are used to attach the socket-outlets., located on boxes, which protrude when the bolts are tightened and pressed against the inner walls of the sheet. If several outlets are planned, then the socket boxes are best fixed to each other using special connectors. They help to make the structure more durable and reliably fix all the elements to each other. In the case of using several elements for electrical systems, this option is recommended for use by specialists.


External socket boxes with box dimensions 86x86 have a different size, for which you need to purchase the corresponding sockets. Depending on the room and the options for operating the electricity systems, it is necessary to select all the elements. Then they will be able to provide high-quality and full-fledged operation of any device at home.
Preparing for installation
When preparing to install a new outlet on a plasterboard wall, it is important to know that no additional tools are required for this process. This refers to the building materials used to work with solid walls: concrete, cement, putty.


The socket is, most often, ordinary plastic. It suits its functions well. The popularity is mainly due to the low price. However, there are also disadvantages that relate to the fire hazard of such boxes.
To solve this problem, self-extinguishing plastic was invented. Before any such product hits store shelves, it is tested at maximum loads. It is safe enough to mount such products inside a plasterboard wall.

Preparation for work
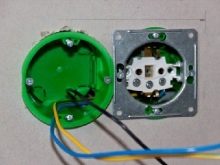
For a main wall, there are two options for installing an electrical system, and for a drywall - four. From the outside, there will certainly be screws that clamp the socket to the front side. As soon as the plastic part is installed, the metal part is fixed to it. The cogs are located deeper, the presser feet are fixed and the box is attached to the wall on both sides.
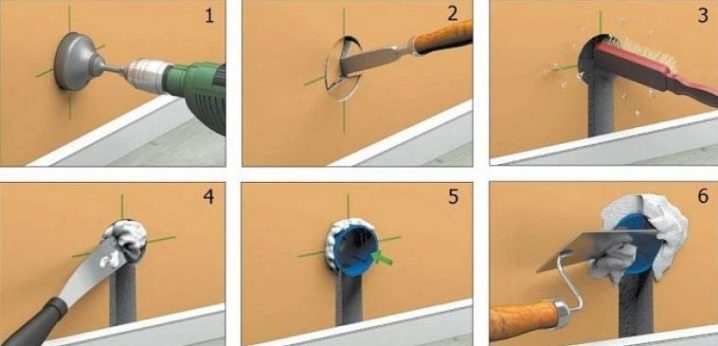
There are holes for wires inside the boxthrough which the wiring will be connected so that you can install an outlet or switch. To carry out these actions, it is important to initially make a hole of the required diameter in the drywall sheet. The first step is to determine the exact location of additional structures and only after that use a special tool. To get the hole in the correct and desired shape, a 68 mm crown is used, which easily drills a recess and punches the sheet completely, forming a place for a new device. This is exactly what the preparatory work for installing the outlet looks like.


Please note: when the installation of outlets is planned in the kitchen near the work surface, then the placement should be 15-20 cm higher than the work table. If we talk about switches, then they can be lowered up to 90 cm from the floor level. This is especially convenient if there is a child in the house. If necessary, you can lift up to 150 cm. Elements are installed next to the doorway - twenty centimeters from it, no more.
How to install?
To get a good result of installing the outlet on a drywall wall, it is important to know a clear sequence of actions. The first step is to lay the cable, determine its length. It is worth thinking about how exactly it is better to place it inside the wall, at what height to place the outlet.The next step is to install the cable and prepare the socket.
Installation process:
- The first step is to choose the right socket. It is best if the material from which it is made is self-extinguishing.
- Next, you need to lay the wiring inside the plasterboard wall frame. For this, holes are drilled in vertical profiles the size of a cable, or a little more.
- An important step is to work with the surface of the wall. The putty will strengthen the coating material, which is important during the drilling process. It will be correct to prime the plane of the structure. This will help prevent the sheet from crumbling when drilled. Once all the materials applied to the wall are completely dry, you can start working.


- The next step is the process of choosing a place for a future outlet from the floor:
- in the room - at least 30 cm;
- for a bathroom - at least 100 cm;
- in the kitchen, the optimal height is 120 cm.
If we are talking about a switch, then it has its own standards, which, if necessary, can be easily changed for specific operating conditions.
- The next step is to make holes. In order not to be mistaken in size, the box is placed on the wall with the back side and outlined with a pencil. It is best to work with dedicated hardware to make the installation quick and easy. It is very important to take into account that the size of the hole must be identical to the box; there are no gaps or slots between them.
- The inner edges of the hole are also puttyed, which increases the adherence of the socket to the wall.
- All jumpers must be removed in the box so that it is ready for contact with the wires.
- The next step is to insert the socket into the drywall sheet and bolt it from the outside. Next, internal elements are attached to help fix the structure to the back of the wall. Often the plastic box has a round shape, and a square piece of metal is superimposed on top, which is used to fix it from the outside.
- When everything is installed, wires need to be inserted into the prepared holes, which tightly holds the connector. Having completely installed the box, you need to additionally putty it in order to seat it more tightly in the wall.


Manufacturers
When planning the installation of an outlet in a plasterboard wall, it is most important to take care of the safety of the entire structure and the living space itself. Due to the fact that gypsum boards are a combustible material, then you need to carefully select the internal equipment, socket boxes and wires for it.
To obtain the proper result, it is best to buy parts from well-known companies, one of which is Schneider Electric.


Schneider Electric products are one of the best sockets to be installed in drywall. It has a degree of protection against dust and moisture IP20. These boxes have a unique design that makes it easy to install. The materials are of high quality, therefore the service life is very long.
The system of fastening to the wall from the inside consists of special mounting feet, which have a screw with a special thread. This innovation allows you to make the installation as fast as possible.
A special feature of the box is the presence of four protrusions, which, at the time of installation and after it, do not allow it to rotate. The attachment points are at a standard distance of 60 mm.
There are also such eminent manufacturers as Hegel, Legrand, Gusi... You can try products from other companies, but no one will guarantee the reliability of the products.


Advice
For a high-quality repair and operation of all devices, upon completion of the installation, there are a number of rules that should be followed. When choosing sockets and sockets with switches, it is best to buy all the components from one company, so as not to suffer from non-standard shapes and sizes. It is preferable to choose a well-known brand that has long established itself in the market for this product.
Plasterboard walls can have different thicknesses, based on which you need to select boxes for wires for the outlet. For wider walls, the depth of the box will be 45 mm, and for narrow ones, only 40.
Considering various material options, it makes sense to pay attention to high-strength polypropylene. It is from it that the strongest and safest boxes are made. If there are none, it is important to purchase a socket made of non-combustible material. The shape of the purchased product may vary: have the form of a circle, square, oval or rectangle.

To install multiple switches or sockets in a row, it is best to use a laser level to help make holes at the same height. The size of the holes should be equal to the dimensions of the box, and not the metal plate that presses the socket from the outside. Fire safety is also worth taking care of. For wooden walls, which are located behind a sheet of drywall, you need additional putty. If there is a concrete wall behind the gypsum board, then such activities can be omitted.
When arranging wires, it is important to arrange them so that they do not collect at the base of the box. To protect the wiring inside the structure, it is threaded into a metal corrugated pipe. The cable for the sockets is a three-core double insulated cable.


To install an outlet in a new plasterboard wall, it is not necessary to call a master, you can do it yourself. The main thing is to strictly follow all the rules and recommendations.
For information on how to install the socket outlets in drywall with your own hands, see the next video.


The comment was sent successfully.