Frame from a profile for drywall: pros and cons
Nowadays, drywall is widespread. It is often used for indoor finishing work. Due to its versatility, structures made of this material allow not only to align the walls and ceiling, but also make it possible to create any shape of arches and partitions. The frame is the basis of the structure. Therefore, it is important to know what types of frame from a profile for drywall are and what are the main pros and cons.

Peculiarities
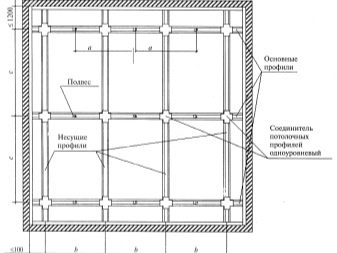
It is worth familiarizing yourself with the features of the profiles in more detail. One of the main profiles is the abutment or guide. It has its own designation - PN. Its shape resembles the letter P. Main dimensions: 40 * 50 * 55, 40 * 65 * 55, 40 * 75 * 55, 40 * 100 * 55. Such profiles are installed around the perimeter of the entire structure.
The guide profile fixes the rack. It is the main one, and it is from its installation that the appearance of the rest of the structure will depend. The main purpose of the abutting profile is to create the skeleton of a new sheathing surface. This profile is attached over the entire area of the main frame. The first indicator of the strength of the profiles is the volume of metal used in the manufacture: the higher the thickness of the steel, the stronger the profile.


The bearing profile is used for the final construction of the frame device, it carries the bulk of the weight, therefore drywall is attached to it. He is also responsible for the strength of the frame. It is made of metal of various thicknesses. If the metal is too thin, more fasteners are needed. The profile size is usually 60 * 25 * 3000 or 60 * 25 * 4000 mm.

Installation on the corners of stair steps is carried out using a sliding profile, which consists of aluminum. This profile serves as an anti-slip element and provides additional safety.

A rack or galvanized profile is used to create frames, arches and other surfaces that have a bend. The ceiling guide profile is also important in the installation. Its dimensions are 27 * 60.


You can use other profiles, such as a corner profile, to create even corners. It is designated by the abbreviation PU. This profile makes the frame stronger, prevents external influences, and facilitates the application of plaster in the corners. The main sizes are 31 * 31, and 25 * 25 and 35 * 35 are less common.


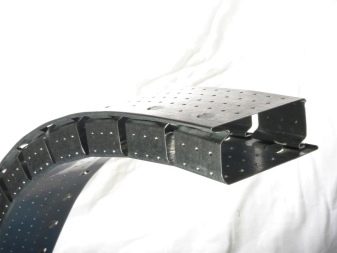
The profile for creating arches with a bend - arched, is widespread. It is often weakened and has a large number of cuts and holes. The main dimensions are 60 * 27. Designated as PA. Due to its flexibility, it creates absolutely any complex structure. Do not exceed the bending radius by more than 50 cm, as there is a risk of destruction of the structure.
It is divided, as a rule, into two types:
- convex;
- concave.

The connector connects the profiles that are perpendicular to each other, and the extension connects the various segments.
Profiles for creating partitions, unlike other profiles, are large in size.

Advantages and disadvantages
The profile has pluses and minuses, which influence the future design of the premises.
Let's start with the pros of using a profile.
- There are no flaws in appearance. They have an even shape, in contrast to the timber, which must be well prepared (leveled) before use.
- The profile is not prone to deformation due to the presence of moisture or temperature changes. It always retains its shape, but as for the tree, it, on the contrary, changes its shape, for example, from moisture.
- Long service life of metal. The bar does not have such an advantage, since it is unstable to external influences.

- It is a durable material.
- Easy to purchase.
- No preliminary leveling of the walls is required.
- The use of galvanized steel is possible.
- It is easy to replace or restore a damaged profile.
- Non-flammable, resistant to fire, when using special drywall, fire safety increases.


Disadvantages.
- the first and most important disadvantage is the high price compared to the same wood;
- easy to pull out fasteners due to the small number of threads;
- material may corrode.


GKL is a material used in construction, which is very famous, it is often used in various fields, it helps to build not only large elements, but also small extensions, with its help it is easy and quick to level the surface of the wall in the house, you can also build partitions that have certain shapes.

Advantages.
- Available. Drywall can be purchased at all hardware stores at an affordable price.
- Lightweight. There are differences in thickness and light weight. For ceiling structures, there are lighter options - this is very helpful in the work.
- Simple installation. The layers are fixed with screws to the frame or with glue. In this regard, you can install them yourself.
- Durable. Withstands loads of various types, due to which it has a long service life.
- Wide range of applications. It is used not only in constructions, but also in decor.
- Simple to handle. It is easy to work with him, he has the ability to create any shape.
- It makes it possible to mount the LED strip in any way, as well as built-in lamps.


Views
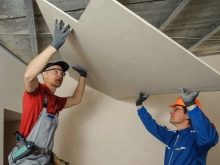
Let's consider the main types of frames using the example of ceilings.
Sibling
This ceiling can be part of the interior or be the basis for other ceilings: complex, with many levels. The creation of this structure will not be difficult, the main thing is to fix the profile well to the base. The final stage is the installation of sheets on the profile.
It is important to use additional measuring instruments, observe the horizon and take care of the installation of various communications and wiring in advance. It is necessary to leave a space under the light with a margin of 10-15 cm, so it will be easier to connect it.


The main advantages of a single-level view:
- preservation of the appearance of the lined surface, despite changes in the foundation and its subsidence;
- minor changes in the height of the room used;
- hides the imperfections of the ceiling, makes it possible to hide the electrical wiring;
- protection from the noise of neighbors living on the floor above.


Multilevel
These types, as a rule, are fastened with concrete slabs or a ceiling, consisting of one level. Then each is attached to the previous level. It is important that they work well with each other.


The main advantages of two or more levels:
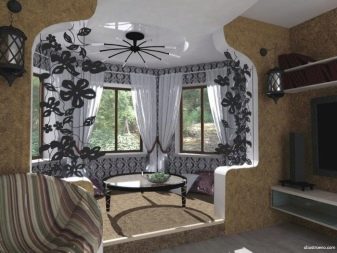
- visualization of space, the ability to create the illusion of increasing or decreasing the room;
- creation of an original author's ceiling;
- functional zoning of space;
- looks good in rooms with a height of more than three meters.


Non-standard and more complex designs are similar to single-level and multi-level varieties, differ in a more complex structure, and retain the ability to create unusual shapes.
The main advantages of non-standard and more complex designs:
- the uniqueness of the design style;
- the possibility of replacing individual structural elements.


Instruments
The installation of the lathing must be done after purchasing special tools and materials.
The main tools are the following:
- ruler;
- hammer;
- pencil;
- dowels;
- roulette;


- puncher;
- a plumb line with a load;
- self-tapping screws;
- building level;


- screwdriver;
- connectors, both cruciform and straight;
- suspensions;
- metal profiles.


Materials (edit)
When making a metal frame, guides are needed, as well as steel elements. Sheets cannot be fixed without using a special fastener, which will serve as the base. Basically, they are screwed to the crate or fixed with glue. For gluing, as a rule, nothing is needed but glue. Another thing is the creation of a full-fledged lathing. For this, various profiles and connecting elements are used, without which no installation of a complex structure is possible.

The main types of mounts:
- wooden beam;
- metallic profile.
The use of a wooden beam in the construction of a structure has a number of features. This material is popular, but the timber must be processed before installing it. A metal profile is the most convenient material for building structures. Instead of profiles, when constructing a drywall frame, many other parts are used. They are needed to connect the main frame to the main plane.


The holder is a metal perforated sheet. Its main purpose is to fasten the participating walls and ceiling with a profile frame. The center of the bracket is attached to the sheathing plane, and the ends are fixed to the base profile with screws.
Swivel hanger is the opposite solution to the bracket. In a situation where the usual size of the holder is not enough to install the frame, it is replaced with a swivel suspension. It is divided into two parts: a suspension and a profile, which are fastened to each other with a spring. During the installation itself, the location of this part relative to the location of the horizon is easily changed with the help of a spring. A flaw is that over time the spring becomes weaker, as a result of which the ceiling sags. When installing walls, it is not used.


The CD combiner makes the profiles longer. The installation begins with it.
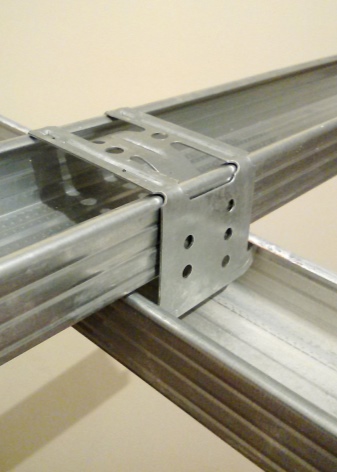
The cross-shaped ceiling bracket (crab) is used for the installation of lintels among the abutting main profiles with a cross connection. The crab is fixed in the profile and then attached with self-tapping screws. As for the lintel, it is placed in a similar way: it is fixed in two cross-shaped ceiling brackets. They are found on other main profiles. Most often, about 7-8 screws are used for this part.


A two-layer connector is rarely used., it is often necessary only in one situation: for assembling the skeleton, when the holder has a moving base, for example, a wooden floor. First, the first level of the CD connector is installed, which remains active, then the other level of profiles. It is positioned as a regular base, then fastened using the two presented connectors. These rather sophisticated fasteners exist to remove differences in wood size due to temperature changes and humidity.

Subtleties of installation
Before installing drywall on a profile, you need to assemble a technically correct crate, on which it will be attached in the future. This material is quite simple, but often it is in the construction of the structure that difficulties arise. The frame is the basis, without it, the construction will be impossible, therefore it is necessary to set the frame evenly.
This design must be depicted on paper in the form of a drawing.to have an idea of what and where will be erected. With regard to the frame, it is important to understand where it will be located. The frame can be mounted on walls or ceilings. Since such a frame makes it possible to fix the surface and make it even, they resort to its use quite often.

If the frame will be mounted on walls and ceilings, you must start from the ceiling.

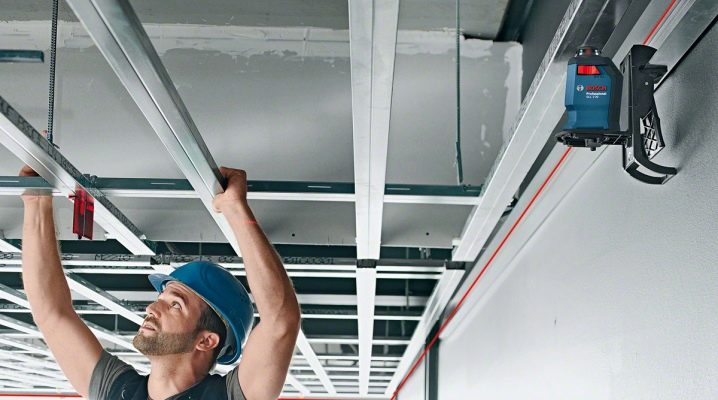
Marking is done with a tape measure in the lowest place. It is important to consider that the wiring is carried out in advance. Next comes the installation of the profiles on the ceiling: the bearing profile must be set horizontally. A conventional connector is used to lengthen the metal profile to the required length. To fix the places where the profiles intersect, you need a variety of it - a crab. When leveling the ceiling, a two-level crab is used for good fixing of the lower level profile to the ceiling profile. When using an anchor suspension, if there is a shortage of the length of other suspensions, for example, straight, it can be increased.
It is extremely rare for a room to have perfectly flat corners. In such situations, after leveling the walls, the plasterboard sheets on the ceiling are very difficult to adjust to the required parameters. If you start from the ceiling, there will be no gaps. The convenience of using the profiles lies in the fact that they can be joined with a slight overlap.


Hangers are fixed for installing fasteners on screws and dowels, the distance of steps is about 60 centimeters.
The next step is to install the guides around the entire perimeter of this room using threads attached to the profile.

We conventionally divide the ceiling into equal squares, approximately 0.5 * 0.5 m each. Further, the bearing parts are located. On the fixed threads, they are connected to the main profiles and fixed with screws. Crab connectors are installed crosswise on the fasteners. When the installation of the frame on the ceiling is complete, you can move on to the walls. In general, the technique for installing profiles is similar.

It is necessary to measure the distance that will correspond to the width of the sheet. Next, a mark is made where the profile will be located. You should start by installing guides around the entire perimeter of the wall. This is done with threads. The only thing worth considering is that the distance will be more than 60 centimeters than on the ceiling. The grinder cuts transverse jumpers about 60 cm long and they are also fastened with self-tapping screws. A supporting profile is installed in the control profile and fixed to the walls. You can use a pitch of 0.6 m. Pre-prepared profiles with holes are available for sale, they are perfect for beginners. The bearing profiles must be connected to the hangers. In the future, transverse are installed with an interval of about 60 cm.


When all the work is completed, proceed to the stage of installing drywall sheets using screws. The main thing is to deepen the sheet of the cap by no more than 4 mm, the distance between the screws is about 10-30 cm. The sheets are fixed along the entire perimeter of the profile from top to bottom. It is important for the mobility of the structure to make a gap of 1 cm between the sheet and the floor, and 0.5 cm between the ceiling. The seams are closed closer to the floor, the gaps are hidden by the baseboard.


After installing the ceiling, the walls are covered with putty. At the beginning, a reinforcing mesh is used, the seams at the joints are closed, then the entire wall is putty. For various openings, such as window, door, arched, other additional profiles are used.


How to make a doorway?
A doorway is usually built using several types of structures. Sometimes it is necessary to change the dimensions of the opening itself, for example, to reduce the width or height. Additionally, two types of profiles are used: rack and start, they differ in their main functions.
The first rule is to determine the size. If it is necessary to slightly move the doorway, it is recommended to install an additional rack from the side of the wall, a vertical element is fixed at the edges of the opening, which is screwed in with self-tapping screws.


Wall profiles are needed to reduce the height, they will serve as the main support. After installing the profiles, drywall is cut into main sheets, the main thing is that its edges are located in the middle of the profile. Fastened with self-tapping screws.
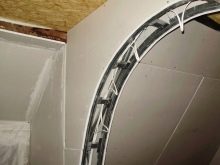
Create an arch using metal profiles. In order to do this work with your own hands, the materials must be given an unusual shape.
With these materials, you can create an arched structure of any complexity: ellipse, non-standard or asymmetrical, straight portal, round extended arch. The profiles must be bent according to the project's idea. The profiles are cut with special scissors for metal, and in order to bend the drywall and give it a given shape, they are passed over it with a needle roller and slightly moistened with water, then the position is fixed.

If the shape of the doorway needs to be slightly tweaked, the wall is covered with a layer of plaster. When leveling a large area is necessary, it is better to use drywall. The main thing is to measure the basic dimensions for drywall and fix it inside the opening itself and on the slopes. Various defects are then hidden with plaster, special profiles are used in the corners, for example, a corner profile.
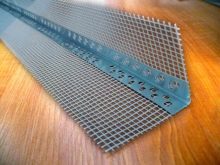


For the finishing stage of finishing, a masking net and putty are used.
You can divide all the work into several stages.
- Primer. The entire working area is primed and dried.
- Removal of various defects. The seams and the places where the screws are screwed are sealed with a serpentine so that the transition from the structure to the wall is invisible.
- Shared layer alignment. It is necessary to wipe the putty after it is completely dry, then apply a second coat.

- Creation of a box and other elements using a profile. The box well hides various wires and pipes, which can be closed in two ways:
- pipes only;
- the whole wall.


If only the pipes are to be closed, then the process does not take much time. This is done quite simply and does not require special financial costs. In the second case, the entire plane is closed, but it can be used by creating shelves for storage in this place.
If the pipes are in the corner, the box will have only two faces, if the riser is in the middle, then three faces. It is important to create a drawing with all kinds of connections. This will help you calculate the required material. The gap between the structure and the pipes should be about 30 mm.


The next stage is marking. First, you need to find the most convex places of the pipes, which will create the boundary of the new structure. Next, we mark them: from the main mark on the ceiling, draw lines perpendicular to the walls. We lower the plumb line from the main mark, this will help to find the main mark on the floor. From this mark we lay transverse lines to the walls. Next, we connect all the lines along the walls and get a straight line, on which the rack profile will be installed.
Next, you need to install the base of the box. Using a drill, we make holes, where later, using a hammer, we place plastic rods. We attach this profile with bolts to the wall, and fix the control profile to the ceiling or walls. We start by installing the front side of the box, which is located at the junction of the abutting profiles on the ceiling and floor. Everything is fastened, as a rule, with the help of screws, then plasterboard sheets are installed. It is important to place the joints on the same line, forming one common surface for the edges of the structure, otherwise there will be distortions.


When installing drywall on the building, first we cut the sheets into sides, mark the correct size of the side that remains, and cut the strip so that it converges with the rest. The sheet is attached to the metal profile with screws to the main posts. Do not forget about such a hole as a hatch.


As this construction is completed, you can putty it. As for materials for decoration, you can use any material.
The convenience of plasterboard structures also lies in the fact that with their help you can create various partitions, thereby zoning the space and separating the working area from the recreation area.


Important nuances
Basic rules that must be followed when building a structure:
- before lining the cardboard, it is important to wire the electrical cable and all plumbing pipes;
- the structure must be quite stable and rigid in order to withstand absolutely any load;
- GK plates are staggered in height;
- all subsequent sheets are connected in the center of the profile.


Before laying drywall, it is necessary to fasten the entire crate with self-tapping screws. Particular attention should be paid to the corners and their preparation. It is imperative to take into account when calculating that for the strength of structures it is necessary to set an angle and sheathe it with plasterboard in increments of at least 30 cm.
It is worth paying attention to the durability of the material and use only high quality raw materials. When marking the frame for both the walls and the ceiling, one condition must be taken into account: all the joints of the drywall sheets must be on the profile. Taking into account the recommendations, we can say that this profile frame is an excellent solution for finishing repair work. Thanks to its multitasking ability, the wireframe can help bring any idea to life.


Tips & Tricks
It is necessary to correctly observe the technology of construction work, the quality of the repair depends on it. Builders and people who do these works on their own often make technological mistakes, trying to reduce the time of work or save on goods in the store.
Let us dwell in detail on the main mistakes that should be avoided in the manufacture of a structure.
- Incorrect calculation of the length of the profiles. If it is done incorrectly, this construction will be built with errors.
- Errors in the installation technique of the frame. If you do not follow the technique in using the profile, use the profiles for other purposes, you can make very gross errors in the work.
- When fixing ceiling materials, it is imperative to use suspensions: the smooth side should be down, it is this side that is the base to which the drywall is screwed.

- Incorrect cutting. You can not use a grinder, this contributes to the burnout of galvanized, which will lead to corrosion in the future. For this, special scissors for cutting metal are suitable. They are of two types: manual and electric.
- Using the profile for other purposes in the design. For example, if you apply a profile to the ceiling to build partitions. In this case, it is correct to use the abutting profile.
- The absence of suspensions when building a ceiling of more than two levels. This will lead to the formation of cracks around the entire perimeter of the ceiling. If you follow the technology, then the supporting profile will be fixed from the walls used with a length of about 10 cm. It is imperative to use suspensions in the suspended ceiling.


- Securing the sheet with the wrong side. For example, if you use GKLV (protects against moisture) incorrectly, then this will affect its positive properties, which will not be able to manifest themselves due to improper installation.
- Incorrect plasterboard connection. It is not recommended to use small pieces of sheets. The main thing is to fix large sheets in order to prevent destruction of the material.
- It is necessary to exclude the use of special profiles for the corners in order to protect the corners from moisture and external damage. The use of an outer profile is recommended here.

It is worth noting that before the repair, it is necessary to study the surface where the structure will be installed again, decide on the type of the future project from the metal profile and make the drawing correctly. It is also important to understand the types of profiles and their fastening.
For information on how to make a frame from a profile, see the next video.


I have three meters from the ceiling to the frame, there are no such suspensions. Can I make them from profiles?
The comment was sent successfully.