All about drywall partitions

Plasterboard partitions are very popular and widespread. Such structures have different bases and are mounted in different ways. In this article, we will learn all about plasterboard partitions, their pros and cons.


Device
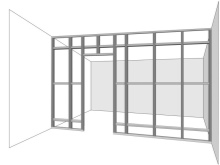
The construction of the partitions under consideration is relatively simple. Here, a frame base is provided and the sheet material itself is attached to it. Despite the fact that there are a lot of different schemes for mounting the frame under the gypsum board, there are general principles for all situations in the structure of the frame. It can be metal or wood.
- A strapping-type beam is attached along the contour of the partition (if the frame base is constructed of wood) or a guide profile (if the frame is metal).
- In the areas where doorways are located, the most even and strong bars or post profiles, reinforced with bars, are fixed.
- The gap between the rack-type profiles depends on the number of plasterboard layers.
The very design of partitions directly depends on the requirements that are imposed on them. If the room needs to be partitioned off for a long time, then they turn to the most durable self-supporting structure. In other situations, it makes sense to design lightweight collapsible partitions that are reusable.


Advantages and disadvantages
Partitions built from plasterboard sheets have a lot of positive and negative qualities. Before building such a structure, it makes sense to familiarize yourself with the first and the second. First, we will find out what are the main advantages of drywall partitions.
- One of the most important advantages of such structures is their very low weight. Lightweight plasterboard construction will not put too much stress on the surrounding base.
- When assembling a plasterboard partition, the master does not have to deal with the so-called "wet" work. This greatly simplifies the process and saves time.
- Installation of a plasterboard partition wall is quick and easy. Such work does not take much time and does not require professional knowledge and skills. It will not be difficult to build such a partition on your own, even if the master is a beginner in such matters.
- A properly manufactured plasterboard partition can effectively hide ventilation ducts or electrical wiring. Thanks to such solutions, the environment becomes more neat and attractive, because unsightly communications are well hidden.
- The room, which is built from the partitions under consideration, can be well insulated and even soundproofed. Plasterboard sheets make the room more comfortable.
- The design of plasterboard partitions can be very different - not only even, but also having beautiful curves, arched lines, niches. Everything here is limited only by the imagination of the owners of the dwelling.
- Drywall is the material that does not need special complex care. It does not need to be treated with antiseptics or other protective solutions. It is enough to remove dust from its surface.
- GKL ceilings can be supplemented with different finishing materials. Most often it is paint or wallpaper.


Despite the sufficient number of advantages, plasterboard floors also have some disadvantages.
- Even the highest quality and correctly built plasterboard partition will not withstand heavy weights. In order to hang a TV, massive shelves or cabinets on such a base, the frame base will need to be additionally strengthened, and the material itself must consist of two or three layers.
- Drywall is a material on which it is easy to leave mechanical damage. Strong blows should not be applied to it, since they will certainly lead to sheet breakage. This is a significant drawback that discourages many users from using plasterboard partitions.
Plasterboard partitions have no other serious disadvantages.


Species overview
Partitions built using drywall sheets are different. Each of the types has its own distinctive features and features of the installation work. Let's get acquainted with them.
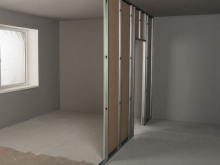
- Deaf partitions. These structures are considered the simplest and fastest to build. In them, the frame base is completely covered with sheet material.

- Combined. In most cases, these are structures that are built in 2 layers: opaque (drywall itself) and transparent or translucent (for example, frosted, patterned or colored glass).
There are also such combined designs, which are supplemented with elements built into them, for example, cabinets, shelves or shelves.

- Curly. Partitions of this type can have almost any shape and structure. Curved, semicircular, arched, angular, as well as designs with open niches (often complemented by lighting), cutouts, wavy ends and other elements look beautiful.

Also, plasterboard partitions differ in the type of frame. The frame base can be:
- single;
- double (these structures are designed to be reinforced in the form of heat and sound insulation);
- double spaced (this is an option in which free space is still left between the two parts of the frame structure for placing communications there).
The structures under consideration are also subdivided according to their content. In most cases, heat-insulating and sound-insulating materials are present in such partitions. Most often these are panels and slabs made of glass wool, mineral fiber, expanded polystyrene. However, when only decorative structures of very small thickness are built, then the use of such filling turns out to be unnecessary. The considered subspecies of partitions are also divided by the number of sheets used. In residential areas, in most situations, constructions are built that have single-layer or double plasterboard cladding.
The degree of its impact resistance, as well as the calculation of the required material, will depend on the selected type of structure.


What profiles should I use?
For the installation of plasterboard structures, it is imperative to choose special fittings. We are talking about reinforced guides, as well as rack metal profiles. The guides are used for high-quality fastening of the main frame frame to the floor or ceiling. These elements are divided into 4 main types, based on their section - from 5x4 cm to 10x4 cm. The vertical components of the frame base are also made from the profile. The selected fittings are also divided according to their section into 4 varieties:
- minimum - 5x5 cm;
- maximum - 10x5 cm.
The length of the upright profile part is 300-400 cm. The master needs to choose the right profiles with the appropriate dimensions for the construction of the partition structure. If you do not make a mistake anywhere in the calculations, then there will be no further problems during the construction of the frame.

How to choose drywall?
Before proceeding with the independent design of partitions, it is necessary to choose the right type of drywall sheets. There are several types of sheet material, each of which has its own performance characteristics and features.
If drywall will divide living rooms (used for interior partitions), then you can use the simplest gray-brown gypsum board. Such material is used for finishing dry and heated areas.

On sale you can find other subspecies of drywall sheets. Let's take a closer look at them.
- GKLV. These are green sheets, which are characterized by a high level of moisture resistance. Such materials are recommended to be used for wall decoration, as well as the construction of partitions in rooms where there is a high level of humidity, as well as temperature drops. We are talking about bathrooms, laundries, showers, unheated terraces. If the partition in such conditions will be supplemented with ceramic tiles, then it is also better to build it from such material.


- GKLO. This designation is carried by pink sheets, which are fire resistant. Such materials can be used in the arrangement of boiler rooms and other areas with special requirements for fire safety in private houses.
The choice of a suitable material directly depends on where it will be mounted. In this case, mistakes cannot be made, since even the highest quality drywall sheets will not last long in the wrong conditions.


Required tools
Before starting the construction of a high-quality plasterboard partition, the master will need to prepare all the necessary tools. These are the following subjects:
- level (the best are bubble and laser building levels, which are most convenient to use);
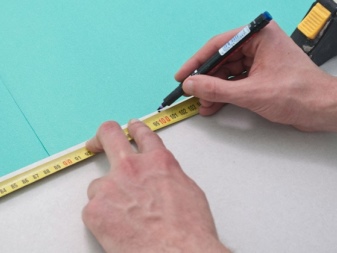
- roulette;
- plumb line (needed to correctly transfer all marks from the floor to the ceiling base);
- pencil or marker;
- chalk;
- strong rope;
- screwdriver;
- perforator with a drill (if there are reinforced concrete walls or ceilings in the dwelling);
- special scissors for cutting metal;
- hammer (required for driving spacer nails);
- special construction knife.
It is strongly recommended to use only high quality and properly working tools. Otherwise, the installation work can become very complicated, and the master runs the risk of making many mistakes in working with drywall.
It is advisable to place all the tools directly at the place of installation work. In this case, the master will always have everything you need at hand, so you don't have to look for the right tool for a long time, wasting extra time.


Markup
When all the tools and materials are ready, you can proceed to the beginning of the installation work. The first stage will consist in drawing up an accurate and correct marking of the future structure. Let's divide this important work into several points.
- Using a chopping cord, you need to mark the line of the future partition on the floor. With the help of a plumb line, the line should be transferred to the ceiling base: you will need to apply the thread of the device to the overlap, connecting the tip of the load with the beginning, and then with the end of the line on the floor.
- The tags will need to be connected on the ceiling using a chopping cord.
- Immediately, you will need to apply the position of the doorway and pillar profiles. The spacing of the posts should be 600 mm.
- If the structure is single-layer, and then begins to be finished with tiles, then this figure should be 400 mm.
- It is convenient to start marking the rack profiles from the main walls with a selected suitable step, and evenly distribute the rest of the space at the door opening, adding one auxiliary rack on each side.
- If the plasterboard partition or part of it will have to be a continuation of the load-bearing wall in the room, then it will be necessary to take into account the thickness of the sheets when making the markings.
If this is not done, then after sheathing, the planes of the wall structures may not coincide.

Calculation of materials
In order to correctly calculate the number of gypsum plasterboards for the construction of a partition, it will be necessary to calculate the total area of the interior wall on one side, excluding the openings. If the sheathing will occur in only one layer, then the resulting value will need to be multiplied by 2. If the construction is two-layer, then it will have to be multiplied by 4. The resulting number must be divided by the area of one sheet of drywall. For example, for a material with parameters 2500x1200, the resulting figure will be 3 cubic meters. m.
Do not forget about the stock. The coefficient here will directly depend on the dimensions of the room. If the area is less than 10 sq. m, then it will be 1.3, and when less than 20 m2, then 1.2. If the area is more than 20 sq. m, then the coefficient will be 1.1. The previously obtained figure should be multiplied by the appropriate coefficient, rounded to the nearest whole value (upwards). Thus, it will be possible to determine the exact number of required gypsum plasterboards.

Step-by-step construction instructions
Having prepared all the necessary materials, having made accurate markings, you can proceed to the construction of a drywall partition with your own hands. The assembly of such a structure will consist of several stages. Let's dwell on each of them in more detail.

Choice of fasteners
The plasterboard structure will need to be properly secured. It is very important to purchase high-quality fasteners, with which it will be possible to establish a reliable and stable sheet material structure. Let's find out what fasteners are needed to make the partition wall high-quality and strong enough:
- dowel-nails - will be needed to fasten the frame to a brick or concrete base;
- wood screws - will be needed to fix the profile on a wooden base;
- "Seeds" or "bugs" - useful for fixing the frame components;
- additional jumpers;
- reinforcing tape (serpyanka).


Installation of profiles
Let's consider in detail the technology of mounting profile bases.
- The guides should be fixed along the lines marked during the marking. This should be done on the floor.
- To increase the level of sound insulation, a sealing tape should be glued to the back of the profile or a special silicone glue should be applied.
- Further, based on the specific type of base, it will be necessary to fix the profile elements with concrete dowels or wood screws. The step between these elements should be no more than 1 m.
- Fastening should be done so that there are at least three fastening points per profile part.
- In a similar way, it is necessary to mount the guide profiles on the ceiling base.
- After that, the rack-mount profiles of the frame are fixed, the doorway supports are mounted.

Strengthening the frame
To strengthen the frame base of the partition, they resort to reducing the distance between the posts. You can also use wooden embedded blocks. The use of a double PS profile is acceptable. An auxiliary profile, fixed inside the rack or in the immediate vicinity of it, will also strengthen the partition device.
In the areas of attachment fasteners, the frame can be effectively reinforced with embedded parts - wooden blocks, pieces of plywood 2-3 cm thick.


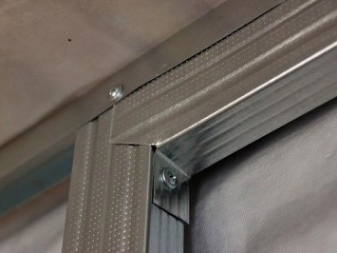
Doorway and cross member installation
The upper half of the doorway can be easily formed by means of a guide profile. It should be cut so that the design length is 30 cm longer than the opening width indicator. A couple of marks are left on the outside of the resulting workpiece, keeping a distance of 150 mm from the edge line of the cross member.Both risks must necessarily be noticeable on the lateral bases of the profile. According to the marks, the profile will be cut away from the edges of the sidewalls to the mark on the bend of the profile part. Then both edges of the profile will need to be bent at right angles. You will get an n-like crossbar. It will easily move along the racks, as well as screw onto them with self-tapping screws.
In the same way, horizontal cross-members will be prepared. They are used as effective reinforcements for the frame, as well as for joining gypsum plasterboards if the height of the partition is not very large. For this reason, for sufficiently high wall structures, it is recommended to make 2-3 rows of horizontal transverse parts. In accordance with all the rules for fixing the jumpers, the shanks of the adjacent strips must be bent in different directions.
In this case, the crossbars themselves should be staggered. This is done so that the horizontal joints of adjacent slabs do not coincide and do not have cruciform seams.


Sheathing and finishing
When the manufacture of the frame (wood or aluminum) is completed, it will be necessary to correctly install the drywall sheets. Consider the scheme for carrying out these works.
- For cladding, use sheets with a width of at least 12.5 mm, as well as with a side bevel.
- The front side of the sheets is determined by the bevel. Each of them is screwed to three support posts: two at the edges and one more in the center.
- The joints of the sheets will be in the middle of the profile parts.
- If there is no factory chamfer, then it is advisable to make it yourself in order to assemble the finished structure.
- If the cladding is done in 2 layers, then the second row of sheets is shifted horizontally in accordance with the pitch of the racks, and vertically by no less than 400 mm. The same displacement must be done when installing the starting row of gypsum plasterboards, but already on the back of the construction.
- If it is planned to build a partition with a height of 3 m or less, then there may not be horizontal joints between the sheets. To make a gap near the floor, the gypsum board is supported on a temporary gasket with a thickness of 10 mm, and then fixed with self-tapping screws.


Let's understand the features of the partition decoration.
- The joints between the sheets must be reinforced with a serpyanka. It is glued to the base without additional agents and solutions.
- Next, a universal putty is applied to the reinforcing layer. Then the solution will need to be leveled, remove all excess.
- To protect the outer corners of the partition, they must be supplemented with a perforated corner profile. On top of this profile, putty is laid in several layers. When the solution is dry, sanding will be required.
- The putty will also need to cover the heads of the self-tapping screws.
- When the putty layer is dry, the partition must be treated with an acrylic primer.
As you can see, it is not difficult to build a plasterboard partition in a house or apartment. All major structural units are assembled simply, without the use of expensive professional equipment.
The main thing is to properly prepare the markup, the frame, and then correctly put and fasten the sheet material itself.


For information on how to make a drywall partition with your own hands, see the next video.


The comment was sent successfully.