How to choose a profile for drywall?
It is necessary to choose a profile for drywall with great care. To make the right choice, you need to study the features of the profiles, their types and sizes, and also pay attention to several more important nuances.

Peculiarities
The profile for drywall has a completely transparent purpose - maintaining the entire drywall structure. An ordinary metal profile is not suitable for these purposes. A mandatory requirement is the weight of the structure. It is unacceptable that the profile frame is too heavy. At best, the plasterboard structure will stagger and creak, at worst it will collapse.
It is believed that an experienced craftsman can use any profilewhile getting an excellent result. This statement is only partly true. Only profiles designed for work with drywall are suitable for the construction. The profile of the required type may not be at hand, and then an experienced craftsman can remake an unsuitable profile into the desired one.

These metamorphoses are caused by the choice of materials from which the profile samples are made. Flexible metals are used. Most often, galvanized steel constructs are used, but there are also aluminum ones. They are not very popular because they are quite expensive. Steel is much cheaper.
Types and sizes
If a house from a bar, for example, can be built completely without using metal profiles, then in the case of drywall, this luxury is not available. Metal profiles for gypsum boards are produced in a huge variety.
All of them can be divided into two large groups according to the type of attachment point:
- wall-mounted;
- attached to the ceiling.


Depending on the purpose, the classification is as follows:
- profiles used for finishing work;
- options for the design of new partitions.
Each of the subspecies includes many shaped elements that differ in length, thickness and width, the degree of bearing capacity, and bending. Separately, it is worth highlighting the profiles for arches, which are very different due to their shape. Experts even put them in a separate category.
Some of the profiles are interchangeable and can be dispensed with. The use of each specific sample greatly simplifies the work. So, if you do not have enough experience, then it is best not to try to save a lot, but to buy everything you need. If you already have the knowledge and have practiced such editing, feel free to experiment.


UD or MON
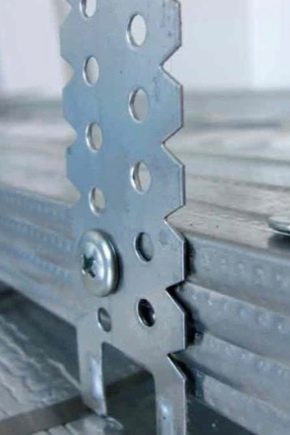
This type of profile can be safely called the main one. On its basis, the entire frame is mounted due to the high strength characteristics of the product. This metal profile is load-bearing. Reinforced with stiffeners, it can not only have a smooth structure, but also be perforated. By the way, this option is much more convenient, since you do not have to make holes for the screws yourself. If you fix this type of profiles correctly, then the whole structure will be reliable, it will not creak and wobble.
As for the dimensions, the strips of the UD or PN type have the following dimensions: the height of the channel itself is 2.7 cm, the width is 2.8 cm, the thickness varies between 0.5-0.6 mm. The weight depends on the length and is 1.1 kg for profiles with a length of 250 cm and 1.8 kg for a profile of 4.5 m.And also models with a length of 3 m and a weight of 1.2 kg and four-meter models with a weight of 1.6 are produced. kg.Please note that the most popular is the Knauf model with a section of 100x50 mm and a length of 3 m.


UW or Mon
A profile of the guide type, which is used to create all kinds of plasterboard partitions. It attaches to the wall. With its help, a plasterboard sheet is fixed. It is made from a metal strip, the material of which is galvanized steel. In the future, UW or PN is used as a guide for the rack profile.
Interestingly, these profiles are only used in interior furnishings. So, with their help, only interior partitions can be erected.


Despite the similarity with UD or PN, this model has different dimensional characteristics. Here the height of the channel is 4 cm. The width may vary depending on the partition being erected. Available in 50mm, 75mm and 10mm widths. The thickness is the same as that of UD or PN - 0.5-0.6 mm. It is logical that the mass depends not only on the length of the profile, but also on its width: a 5x275 cm profile weighs 1.68 kg, 5x300 cm - 1.83 kg, 5x450 cm - 2.44 kg, 5x450 cm - 2.75 kg. The mass of wider samples is as follows: 7.5x275 cm - 2.01 kg, 7.5x300 cm - 2.19 kg, 7.5x400 cm - 2.92 kg, 7.5x450 cm - 3.29 kg. Finally, the weight of the widest profiles is as follows: 10х275 cm - 2.34 kg, 10х300 cm - 2.55 kg, 10х400 cm - 3.4 kg, 10х450 cm - 3.83 kg.

CW or PS
This category refers to rack-mountable, however, the role of this component is slightly different than that of UD or PN. CW or PS profiles are used to strengthen the frame, give it rigidity and stability. They are fixed on the guides. The step, the distance between them is determined individually, but the standard indicator is 40 cm.
The dimensions of the profiles are very different from others, since here the count goes to tenths of a millimeter. This is about the width. It can be 48.8 mm, 73.8 mm or 98.8 mm. The height is 5 cm. The standard thickness is 0.5-0.6 mm. Weight also varies depending on the length and width of the profiles: 48.8x2750 mm - 2.01 kg, 48.8x3000 mm - 2.19 kg, 48.8x4000 mm - 2.92 kg, 48.8x4500 mm - 3.29 kg ; 73.8x2750 mm - 2.34 kg, 73.8x3000 mm - 2.55 kg, 73.8x4000 mm - 3.40 kg, 73.8x4500 mm - 3.83 kg; 98.8x2750 mm - 2.67 kg, 98.8x3000 mm - 2.91 kg; 98.8x4000 mm - 3.88 kg, 98.8x4500 mm - 4.37 kg.
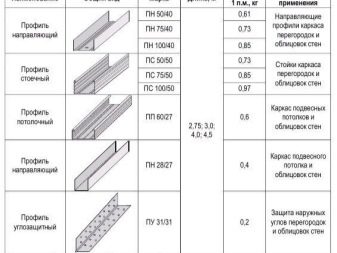
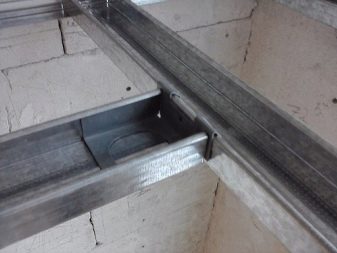
CD or PP
These profiles are carriers. This means that they bear the entire weight of the structure and cladding material. Such profiles are suitable not only for indoor installation, but also outside. Mostly these varieties are used for ceiling mounting. By the way, the PP marking stands for "ceiling profile", which most directly indicates the main purpose.
As for the dimensional characteristics, the profile height is the same as the previous one - 2.7 cm. Available in only one solution in width - 6 cm. Standard thickness - 0.5-0.6 mm. The weight depends on how long the profile is: 250 cm - 1.65 kg, 300 cm - 1.8 kg, 400 cm - 2.4 kg, 450 cm - 2.7 kg. Thus, it will be possible to select the most suitable profiles both in length and in weight, and the frame structure will still remain relatively light and durable.

Arched
Arch profiles are a unique product. Initially, the craftsmen tried to design arched openings using ordinary straight profiles, but nothing came of it. Then one of them came up with the idea to make cuts and fold the profile into an arc. Initially, the arc was angular rather than smooth, but that's better than nothing.
Eminent manufacturers picked up the idea, and so there were samples for processing arched openings. Both elements are produced that are well bent by the workers themselves, as well as profiles with a fixed curvature. The second case provides for a concave and convex profile, so that in which case you can attach curly elements to it. So, convex and concave elements are produced in the same standard sizes: the length can be 260 cm, 310 cm or 400 cm, the radius of curvature is from 0.5 m to 5 m.


PU
These profiles are angular. They are designed to protect the outer corners of the plasterboard structure from impact or destruction. A distinctive feature is abundant perforation. The task of the holes is not so that through them it is possible to ensure the attachment of the profile with self-tapping screws to the drywall, as in other cases. Here the holes help the plaster to better adhere to the metal element, reliably sealing it between the rough surface and the plaster layer.Only when fully fitted will it provide adequate protection.
The dimensional characteristics here will be special, since the corner profiles differ from the wall and ceiling profiles. So, the dimensions of the blades are 25 mm, 31 mm or 35 mm each, and the thickness is 0.4 mm or 0.5 mm, depending on the cross section. The standard length is 300 cm.


PM
Beacon profiles of this variety are used in the direct carrying out of finishing work, in particular, plastering. They are needed so that the rule glides as smoothly as possible, smoothing the plaster layer. So, the profiles are glued to the gypsum plasterboard directly with plaster mortar after a complex hanging procedure has been carried out. This is done in order to ensure an even application of the material layer, while avoiding unreasonable labor and financial costs.
The dimensions of the beacon-type profiles are slightly different from others. They are similar to the corner ones. Here the cross-section can be 2.2x0.6 cm, 2.3x1.0 cm or 6.2x0.66 cm with a length of 3 m. Please note that if it is necessary to increase the length (although this usually does not occur), the profiles are spliced.


Corner protection
In addition to standard PU, there are also various types of drywall profiles, the purpose of which is to save the corner sides from unnecessary damage. Of interest is a profile, in many ways similar to PU, but here, instead of perforation, wire weaving is used. This ensures the best adhesion of the element to the plaster, while it has a much lower weight and cost. The fact is that it is best to buy standard PU aluminum, while the improved analog can be made of galvanized steel.
The dimensions of the modernized corner protection profiles are the same as those of the standard ones. Their length is 300 cm, and their cross section is 0.4x25 mm, 0.4x31 mm, 05x31 mm or 0.5x35 mm. The weight is about 100 g against the weight of 290 g of the usual PU corner profile. The weight difference is obvious, and if you do not plan to apply a thick layer of plaster, this option is best.

Hat
This profile for drywall is very different from all the others, both in its task and in the type of fastening. It is used in cases where it is necessary to provide high-quality insulation of the partition. The hat profile can be attached independently without the use of anchors or guides. It is usually used for arranging ceilings, but you can also attach it to the wall. It is made of zinc coated with a polymer layer.
The abundance of varied options is amazing. The thickness of the profiles can vary from 0.5 to 1.5 mm. The profile section depends on which model is selected. So, for profiles of the KPSh type, the cross section can be 50/20 mm, 90/20 mm, 100/25 mm, 115/45 mm. For PSh profiles, the values are partially similar: 100 / 25mm or 115/45 mm. Models of type H have completely different indicators: H35 - 35x0.5 mm, 35x0.6 mm, 35x0.7 mm, 35x0.8 mm; Н60 - 60x0.5 mm, 60x0.6 mm, 60x0.7 mm, 60x0.8 mm, 60x0.9 mm, 60x1.0 mm; Н75 - 75x0.7 mm, 75x0.8 mm, 75x0.9 mm, 75x1.0 mm.

Z profiles
The so-called Z-profiles are used as additional stiffeners. Usually they are purchased for roofing structures, but they can also be used to strengthen plasterboard suspensions, which has recently become more common. The manufacturers claim that it can replace two C-profiles. This will help save
Sizes can vary and depend on the type of instance.
- Z100 has a height of 100 mm, the width of the blades for all Z profiles will be the same - 50 mm each, thickness varies from 1.2 mm to 3 mm. The weight per meter of such a profile will also differ depending on the thickness: at 1.2 mm - 2.04 kg, at 1.5 - 2.55 kg, at 2 mm - 3.4 kg, at 2.5 mm - 4 , 24 kg, at 3 mm - 5.1 kg.

- The height of the Z120 profile is 120 mm, the thickness can be from 1.2 mm to 3 mm. Weight - 2.23 kg for 1.2 mm, 2.79 kg for 1.5 mm, 3.72 for 2 mm, 4.65 kg for 2.5 mm, 5.58 kg for 3 mm.
- The height of the Z150 is 150 mm and the thickness is the same as the previous versions. Weight varies: 2.52 kg for 1.2 mm, 3.15 kg for 1.5 mm, 4.2 for 2 mm, 5.26 kg for 2.5 mm, 6.31 kg for 3 mm.
- The Z200 profile is 200 mm high. Weights vary considerably: at 1.2 mm - 3.01 kg, at 1.5 - 3.76 kg, at 2 mm - 5.01 kg, at 2.5 mm - 6.27 kg, at 3 mm - 7.52 kg.
Higher options are usually not applicable to drywall applications.


L-shaped profile
An L-shaped profile is often referred to as an L-shaped profile, so keep in mind that this means the same thing. They belong to the corner, however, they perform a different function than PU or coal protection. L-shaped options are part of the carrier system. They are manufactured from galvanized steel. Their thickness starts from 1 mm, as a result of which the strength of the parts is achieved. Such profiles would be heavy, but the strong perforation eliminates this disadvantage. It is the L-shaped element that is used as the finishing or starting element of the entire construct.
The length of the L-shaped profiles can be 200, 250, 300 or 600 cm. Samples with the following thickness are presented on the market: 1.0 mm, 1.2 mm, 1.5 mm, 2.0 mm, 2.5 mm, 3 mm. Please note that it is possible to manufacture profiles of this type to order. This applies only to the length of the parts, the thickness should be chosen one of the suggested. The width of the profiles varies between 30-60 mm.


Additional elements
To carry out installation work completely, only profiles are not enough. We need some more details, with the help of which all the components are fastened into a crate box. Be sure to pay attention to the choice of these components, because if you choose the wrong one, the frame may turn out to be fragile and creak.
Some of the auxiliary elements, this partly refers to the connecting ones, can be made independently.


Extension cords
Numerous details are on sale in order to slightly extend the profiles. After all, buying a whole element for the missing 10 cm is not the most rational decision. It is not at all necessary to buy a special extension cord. To do this, you can use unnecessary trimming of the existing profile tape. For splicing, a guide profile is suitable, which will give the joint additional rigidity.
All that is needed is to insert a guide profile of the appropriate size inside and shape it with the pliers. Then it remains only to fasten the entire structure with self-tapping screws. You need to act carefully, constantly checking the evenness of the resulting profile.


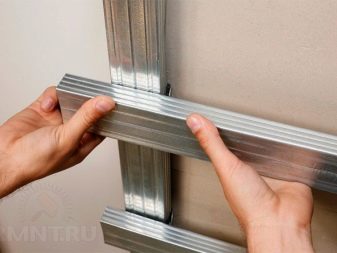
Connecting elements
They are used if it is only necessary to connect two profiles without changing their length. These profiles can either lie in the same plane or form a multi-tiered frame. Different solutions are provided for each of these cases. Some of them can be made from the remnants of a profile part, others must definitely be bought, third ones can be completely dispensed with, but still they greatly simplify the work. However, it is necessary to understand all types in order to know which ones belong to which category.
There are 4 types of connectors. Three of them are used to connect profiles lying in the same plane, and only one is used for multilevel parts.

Longitudinal bracket
Above, it has already been said about the lengthening of the profiles with the help of an additional part of the profile. For such needs, there is a special device - a connecting longitudinal bar. With its help, you can simultaneously connect two profiles to each other and lengthen them slightly. Therefore, this part belongs to connecting, not extension cords.
The longitudinal bracket is a spring that abuts against the end parts of the profiles. It is manufactured by hot-dip galvanizing. Thus, the manufacturers tried to give the parts more rigidity. For its final fixing, self-tapping screws or bolts are used. Sometimes the connecting bracket is not made of smooth metal, but of pimpled metal. It is believed that this will allow it to better adhere to the profile, especially if it is also uneven. In fact, this innovation only complicates the work.


Two-level bracket
These details are often referred to as "butterflies". These elements are among those that allow you to fix profiles of different levels.So, with the help of two-level brackets, overlapping parts are connected to each other, while their full fit and a rigid joint are guaranteed.
Two-level brackets refer to fixtures that are designed to facilitate the work of builders. Their fastening does not require the use of self-tapping screws: the design itself provides for special protrusions with which it is attached to the profiles. However, old-style elements still require special fixing means.


"Butterflies" are sold in a straightened form, but during installation they will need to be bent with the letter P and secured.
Corner
Corner connectors allow you to combine parts in the shape of the letter T. It is worth noting that such a connection is possible only in cases where the parts are on the same level, and not in different ones.
You can make such parts yourself. The homemade item was named "boots" because of its characteristic L-shaped shape. For this, ceiling rails are used, which are ideal for this due to their rigidity. So, parts of the profile of the required length are cut off, after which they are connected at right angles using self-tapping screws. Pay attention to the strength of the resulting joint. The joint must be as rigid and strong as possible to ensure the stability of the structure.

"Crab"
With the help of "crabs", the elements are connected crosswise only within the same level. In fact, the "crab" serves the same as the two-level brackets. "Crabs" provide rigidity of the connection, its strong fixation.
You can also do without "crabs" by replacing them with a homemade analogue. For this, two sections of the bearing profile are taken and screwed to the already fixed profile from the side of the channel. It turns out that the pieces of the profile seem to lie on their side. In the future, the profile, which should cross the existing one, is fixed inside such self-made grooves using self-tapping screws.


The resulting design is in no way inferior in functionality to specially purchased elements, so builders often resort to this method of fixing.
Plinth strip
This element can be attributed to fasteners. So, the plinth strip marks the border of the plasterboard structure being erected from below, from above, from the side, and the edges are more aesthetic. The end parts of the planks have perforations, which are needed in order to make it easier to plaster or otherwise process them before attaching the topcoat to the front side.
Plinth trims are made of aluminum or plastic. PVC elements are more comfortable. Cutting such planks is easy. So, you can cut off the required amount with scissors, while the edge will still remain even, it will not crack. There are two-piece PVC base / plinth elements that allow you to better form the joint between the plasterboard partition and the floor, since they have a sealing part.

How to choose the right one?
When choosing a profile, it is important to focus not only on its labeling, but also on the price and manufacturer, as well as on the material from which it is made. Before buying, you need to calculate the number of profiles. Ideally, you need to have a finished project on hand.
Pay attention to whether the parts are intended for walls or ceilings. Without taking this factor into account, it is impossible to choose a truly suitable option. Even if it is of excellent quality, it is not a fact that it will withstand loads for which it is not intended.


Check out manufacturer reviews. It so happens that domestic profiles turn out to be of better quality than foreign ones, while there is a good chance to save money without overpaying for the brand.
Fasteners
Installation is carried out by means of many parts, including both profiles intended only for gypsum board and universal ones. Before you go shopping, you need to calculate the number of fasteners. This requires a ready-made plan.The lathing can be complex or simple, and the required amount also strongly depends on this.


Fasteners are designed not only to fasten profiles together, but also to attach the entire structure to a wall or ceiling. Therefore, they must be strong to support such a great weight. When constructing a drywall module, you will need the entire list of parts listed.
Screws, dowels, screws
Not all of these elements are suitable for connecting profiles. There are three factors that affect the selection of fasteners: the material, its thickness, and the location of the position to be fastened.
Profiles can only be fastened together with self-tapping screws, belonging to the categories of drilling or piercing, respectively, marked LB or LN. These options allow you to work on metal, but you will have to make an effort to drown the hat and achieve evenness. By the way, these screws are called "bugs".

You will need longer screws to attach drywall. Their length should be between 25 mm and 40 mm, depending on the number and thickness of the layers. TN products are ideal here.
To attach the profiles to a wall or ceiling, you need reinforced nylon mushroom dowels. Self-tapping screws are already included.
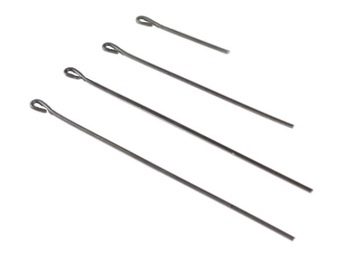
Hangers
Regardless of the type, with the help of hangers, you can fix the profile frame to the wall or ceiling. The hangers are made of thin and flexible galvanized steel, ensuring that the weight of the part is only 50-53 g. Despite the seeming fragility, the hangers can successfully withstand the weight of the structure. When working with them, you need to be careful. They do not withstand mechanical stress, and with awkward movement, the gimbal can easily be bent.
Direct suspensions are more often used, but there are also anchor ones. If the former can be called universal, since they are suitable for both walls and ceilings, the latter are used only for ceiling mounting.


Anchor
Ceiling anchor suspensions with clips are lightweight - only 50 g, nevertheless, they are able to withstand an impressive mass, while not deforming and not falling off the ceiling.
Anchor suspensions have other advantages as well.
- Low price. It is 8-10 rubles apiece.
- Versatility. Ceiling hangers, although they are intended only for ceilings, can be mounted in corners, and at joints with walls, and in open areas of the ceiling.
- High quality steel. The strength characteristics of galvanized steel and its flexibility are beyond praise, since the fasteners are responsible for the reliability of the entire structure.
- Simple installation and use. Installation of anchoring pieces is easy due to their intuitive design.
- Light weight.


Straight
Straight hangers are more versatile. They can be attached not only to the ceiling, but also to walls and other elements. They are suitable for both indoor and outdoor use. The price of straight elements is much lower than the anchor ones: it starts from 4 rubles per piece. Manufacturers have foreseen many of the needs of builders, so they have provided suspensions with a small perforation pitch, which opens up a wide range of heights that can be worked with.

Direct hangers are used not only in working with drywall, but also with wood, concrete, metal and other materials. The quality of the steel and its strength remain high.
Traction
Pulls are needed if the height of ordinary suspensions is not enough. Their length starts from 50 cm. This means that the plasterboard structure can be located 50 cm below the ceiling. Ceiling rods are made from thick spokes with a diameter of 4 mm. Their correct installation allows you to ensure that the weight of the suspended plasterboard structure is evenly distributed.

Brackets
These components are needed in order to secure the profiles in the best possible way. There are reinforced mounting brackets and U-shaped. Both are applied with the corresponding profiles.The presence of a bracket is optional, however, if the weight of the structure is large, then it is still better to carry out installation using them.


How to calculate the quantity?
To calculate the required number of details of the PN profile, you must use the following formula: K = P / D
In this formula, K means the number, P - the perimeter of the room, and D - the length of one element.
Let's look at an example. With a room perimeter of 14 m (walls, respectively 4 m and 3 m) and the length of the selected profile of 3 m, we get:
K = 14/3 = 4.7 pieces.
Rounding up, we get 5 PN profiles


To calculate the number of PP profiles for a simple lathing, you should use several formulas:
- L1 = H * D, where L1 is the number of running meters of the PP, H is the number of elements depending on the step, D is the length of the room;
- L2 = K * W, where L2 is the length of the transverse PP profiles, K is their number, W is the width of the room;
- L = (L1 + L2) / E, where E is the length of the element.
For example, take a step of 0.6 m.Then L1 = 4 (the length of the room) * 5 (the length of the room must be divided by a step and subtract two side profiles: 4 / 0.6 = 6.7; 6.7-2 = 4, 7, rounded up, we get 5). So, L1 20 pieces.

L2 = 3 (width of the room) * 3 (we are looking for the quantity in the same way as in the previous formula) = 9 pieces.
L = (20 + 9) / 3 (standard length of elements) = 9.7. Round in the big direction, it turns out that you need 10 PP profiles.
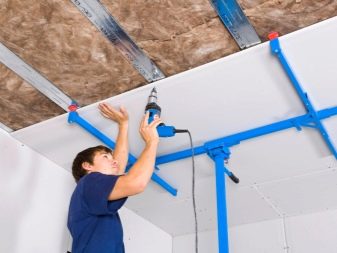
Mounting
Installation work is carried out in accordance with the existing plan. From the profiles, both simple and complex frame structures can be made.
The installation should be started by securing the bearing profiles along the perimeter, gradually moving from the sides to the middle. This gradual filling will help to avoid uneven weight distribution and, as a result, sagging of the structure.


Installation of a complex frame, especially if it is carried out using traction suspensions, is best entrusted to a professional. He will be able to accurately and clearly calculate where and how many profiles can be attached, so that the structure turns out to be truly strong and does not collapse some time after construction.
Advice
Sometimes it is not that easy - it is impossible to distinguish between a defective product and a quality one. Sometimes the marriage is determined only during installation.
There are several recommendations that will partially facilitate the selection procedure.
- It is better to refuse to purchase a cut-in profile. There is a great risk that in drywall it will begin to dangle over time. If you have no choice, bump it into a concrete wall.
- Check the thickness of the metal, it should exactly match the declared one. To do this, use a vernier caliper.


- Check the profile for evenness by looking at it along. Flaws will be visible immediately.
- There should be no rust. Its presence indicates the use of low-grade steel.
- Pay attention to self-tapping screws and screws when choosing. They should be sharp, with a clear deep carving.
Manufacturers
Today, the most popular are two brands: Knauf (Germany) and Giprok (Russia)... The first manufacturer produces the most convenient devices, but the price for them is twice as high as those of Giprok... The product quality is about the same.


For information on how to mount a frame from a profile and its components for drywall, see this video.


The comment was sent successfully.