Bathroom renovation: interesting ideas and work sequence

When organizing repairs in the bathroom, the choice of finishing materials and knowledge of the sequence of work are very important. Redecorating the premises can turn into a major modernization. This article will explore some interesting bathroom renovation ideas.


Difficult task
A bathroom design project is composed in two ways. You can provide the dimensions of the company premises. The craftsmen will calculate the total cost of the renovation, taking into account the selected style. Further, several models of possible options for converting the interior space of a room are provided. The area of the toilet can be included in the development project.
The cost of such work depends on the popularity of the company. Many clients may not be satisfied with the finished product. You can choose the style, colors and fixtures yourself. This will not only save money, but also prove yourself as an interior designer.
A sketch of the future bathroom and toilet can be drawn based on samples from construction magazines. It is important to study all the characteristics of materials and devices.


Competent repair depends on the consideration of the following subtleties.
- Procedure. It is necessary to draw up a work plan in advance. This will help not only to reduce the repair time, but also to prevent possible technological violations.
- List of equipment and materials. It is important to calculate the amount of raw materials and make an approximate estimate.
- Sketch. Drawing with detailed placement of all interior items. You also need to create a color scheme. This will help you quickly navigate in the process of work. Masters are advised to sketch from different angles.
- Communication scheme. The plan for connecting the power cables, the layout of the water and sewer pipes is important. The location of these networks and their connections determines the location of plumbing and electrical appliances.
- Equipment dimensions. The plan should be drawn up to scale, taking into account the dimensions of all planes of the room.


The smaller the room, the more detailed the plan. This principle will help to avoid difficulties with the placement of devices and will help to reduce the cost of purchasing cladding materials. The space should be as functional as possible. It is necessary to provide an unobstructed approach to any point in the bathroom. To visually expand the space, masters recommend using gloss in the cladding.
The more reflective surfaces in the room, the larger the room appears. Large mirrors will visually expand the space. Glossy panels are mounted to the ceiling, increasing the height of the walls. The use of light colors in the cladding materials will also help create the illusion of a large apartment.
It is important to understand that white and its derivatives reflect light well, which makes the room wider.


Among the most popular styles of bathroom decoration are the following:
- Classical. This direction is suitable for those who wish to decorate a room in light shades. Furniture should be refined and elegant. Much attention should be paid to the decor.The classics cannot be imagined without candlesticks, gilded handles by cupboards and mirrors in a baguette.


- High tech. The style of connoisseurs of minimalism and functionality. The room is decorated with cold colors, straight lines and sharp corners. Furniture is chosen with a minimum of decor: simplicity and practicality are appreciated. Plumbing fixtures must be multifunctional.


- Romanticism. This style puts comfort first. Elegance in furnishings and plumbing is important. The highlight of the style is the abundance of hand-painted and ornamental patterns. The decor should make the room feel cozy. Many people buy decorative shelves and cabinets, wicker baskets and soft carpets.


When carrying out work on your own, it is important to familiarize yourself with the sequence of their implementation. The first step is to draw up a sketch of the room, taking into account all communications. It is important to decide whether you need to change the bath bowl. The device can be updated with acrylic. If it is necessary to free up space, it is recommended to install a shower stall. In the modern plumbing market, you can buy a shower with a corner bath.


After drawing up plans and estimates, dismantle the old finish and disconnect unnecessary devices. The bathroom bowl must be removed even if it will not be replaced. The dimensions of the device interfere with finishing work. All construction debris is taken out, the surfaces are completely cleaned.
Assess the condition of the walls: whether there is a need for a complete replacement of the cladding. If the coating is not very deformed, then the finish can be partially corrected.


An empty room is completely measured. Based on the data obtained and preliminary sketches, an estimate is made. Calculate the total amount of materials and tools. Craftsmen recommend purchasing finishes with a reserve of about 15 percent. The list includes pipes and plumbing fixtures.
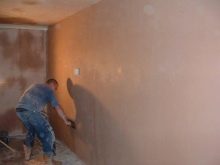
Further, the surface is repaired. The laying of pipes and electrical cables must be carried out according to a previously drawn up plan. In some cases, you will have to cut through the grooves and seal them at the end of the installation of the pipes. The walls are plastered, leveled. The floors are poured with concrete if necessary. The issue of the placement of ventilation is decided when carrying out work on the processing of the rough surface.


The decoration of the premises is done after the installation of ventilation ducts. Work begins with the design of the ceiling, then moves along the walls and completes the repair with the finishing laying of the floor. After complete drying of the room, plumbing fixtures are installed. All joints are treated with a sealant. The room is dried again, electrical appliances are connected.
The final stage is the placement of accessories. The list of these works is quite impressive, but it is not too difficult to cope with the repair on your own. It is enough just to follow the instructions and not violate the work technology.
It is very important to choose quality materials and not skimp on protective equipment.


How to Prepare?
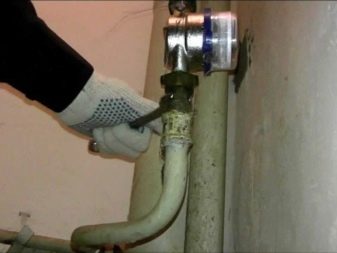
The preparatory stage includes drawing up drawings and carrying out work to dismantle old coatings and devices. In a panel house or in a "stalinka", in order to disconnect the pipes, it is necessary to shut off the water. Further, with the help of a welding machine, obsolete pipe sections and risers are cut off. The work must be done carefully - there is a risk of damage to communications in the house.
Dismantling can be done by hand, but it is better to contact a specialist.
The holes from the communications are covered with foil to prevent debris from entering during the repair process. Next, remove the old finish from the surfaces of the room. It is advisable to clean up to the concrete base. A new coating on a concrete sub-wall will last longer. The paint and plaster are removed with a metal brush, the ceramics are crushed with a perforator. You can reduce the amount of dust by moistening the surface.Remember to wear a protective mask.


If a crunch is heard under pressure on the tiles, the ceramic panel has come unstuck from the surface. This mosaic is immediately removed. The tiles on the walls are tapped. A booming sound means there are voids. Fragments with visible cracks must also be dismantled. If the room has a suspended ceiling, remove it. The door is removed along with the box.
There are several ways to dismantle the old cladding. With a sparing method, the grout is soaked. Soft glue does not hold the ceramic well, so the fragment can be carefully removed. The necessary tools in this work are a hammer and a chisel.
The emergency method consists in dismantling the ceramics using a perforator. This process is quite noisy and leaves a lot of dust, but it saves time. Many employ a team of craftsmen. The work is carried out in record time, leaving a perfectly cleaned surface.


On the basis of the drawn up plan for laying communications in the walls, grooves are punched. They are intended for fastening the pipeline. In order not to make holes in the walls, it is necessary to transfer the pipes to the sanitary area of the bathroom. After complete cleaning of the surfaces, you can start leveling the walls and floor.
You should not save on the purchase of plumbing fixtures. Inlet taps must be of high quality, since it is quite difficult to replace the system. Removing taps involves detaching risers and is not cheap. The pipes should be immersed in the walls. The process can take a long time, but the protruding parts of the communication will not spoil the interior of the room. For electrical wires, similar grooves are cut in the wall.


Some nuances should be taken into account in the work:
- Avoid cavities between finishing materials and main structures. Due to the high humidity in the bathroom, fungus quickly forms in the spaces. Walls should not be covered with plastic panels.
- The materials must have a high protection against decay. It is not recommended to purchase hygroscopic analogs. Dyes must have an anti-corrosion effect.
- If the bathroom is small, then it can be combined with a bathroom. Such redevelopment should be agreed with specialists. You cannot dismantle capital walls.


Professionals can be hired to do some of the jobs. Certain repair steps are easy to carry out with your own hands. To save the budget and build a reliable structure, experts advise alternating the work of professionals with work with their own hands.
When carrying out cosmetic repairs, this advice remains relevant. The owners can carry out painting and finishing on their own. It is better to entrust communications with masters.
Before starting work, it is necessary to turn off not only the water supply, but also the electricity. The apartment must be completely de-energized before cutting the cables. During work, it is important to remember the safety rules. They work with materials according to the attached instructions. The room to be treated must be regularly ventilated. Do not apply the material to a surface that is not intended for this.


New communications
Home communications include sewerage, plumbing and wiring, ventilation. During the repair process, the ventilation ducts are not touched. You can change the grill if a lot of dirt has accumulated on the old one and the draft has decreased. The grille should match the surrounding finish.
In an old house, for example, in "Stalinka", the sewage system consists of cast iron pipes. Such structures must be dismantled. Heavy communications are replaced with plastic products.
It is important to organize the piping to all water supply points. The location of the washbasins, bathtub and washing machine is planned in advance. On the basis of the received scheme, pipe laying is planned.


The lower the pipes are laid, the more freely the water moves along them. The minimum slope of the drain is 5 degrees.To obtain the desired slope, the shower cabin can be installed on the podium. Plastic products are soldered with special equipment. It can be rented. Strong kinks in communications should be avoided.


Estimate
A preliminary estimate will allow you to consider various options for possible finishes and choose the best one. With the help of well-calculated costs, you can get the most budgetary repair option.
The calculation of the cost of work begins with the choice of the contractor. You can entrust the work to professional workers. Their services will cost a separate amount. You can repair a bathroom cheaply and beautifully with your own hands. In this case, most of the costs are the purchase of building materials. The amount of raw materials is calculated based on the area of the room. The repair calculator is perfect for this task.


To work in the calculator you need:
- Measure all bath surfaces.
- Make a drawing to scale, taking into account the actual dimensions of the walls, ceiling and floor.
- Find the right facing material.
- Find out in what form the material is being sold. These can be packages or bags. The panels are sometimes purchased individually. It is important to know the volume or weight of the material.
- Calculate the estimated consumption of the required material. The calculator finds the desired value based on the data on the size of the material and the surface area.
- Add fasteners to the raw material to support panels or pipes.


The data obtained is added up and the total cost of the repair is obtained. To reduce costs, you can purchase some of the cladding materials from the economy class store. But you shouldn't buy plumbing there.
Linear measurements are taken with a tape measure. Each surface is measured in one meter increments at several fixed points. This will increase the accuracy of the work. Some older houses have complex geometries. To measure the floor of such an apartment, it is necessary to divide a complex area into simple shapes, calculate the size of each component and add up the results. The value must be rounded up to the nearest whole number.
Next, the height of the walls is measured, the resulting value is multiplied by the dimensions of the floor, and the area is considered. After all the values are found, a plan of each plane in the room is drawn. Based on the calculated values of the areas, the total amount of materials is calculated.


The most common finish for a bathroom and a bathroom is tiles. The tiles are available in various sizes, square and rectangular. Most often, squares with a side of 0.3 meters are purchased on the market. The area of such a fragment is 0.09 square meters. The area to be covered with tiles is divided by 0.09 and the required number of fragments is obtained. Craftsmen are advised to purchase tiles with a margin.
When choosing a finishing material for walls, it is advisable to take rectangular tiles. The dimensions of such fragments are 0.2x0.3 meters. The area of the piece is 0.06 meters squared. Tile consumption for wall cladding is calculated in the same way as for floor decoration. Before laying the panels on the wall, it is customary to level it. The amount of surface treatment material depends on the unevenness of the wall.
It is preferable to arrange the ceiling in rooms with high humidity with a suspended structure with aluminum panels. These ceilings have many color options. Another option for decorating the ceiling is to trim it with plastic without seams. Economy class ceiling - plastic under the lining. Its cost is significantly lower than its aluminum counterpart.


In order to save on building materials without losing the quality of the structure, the masters advise you to follow the following rules:
- Refusal of expensive finishes. Cheaper counterparts most often have no less high crack resistance. Modern companies produce ceramics with imitation of natural stone. Natural material is expensive, but mosaics are much cheaper.
- Phased work.The masters suggest that you first purchase all the facing materials and decorate the room. The second stage is the purchase of sanitary ware and its installation. Some time may elapse between these stages.
- Carrying out work on your own. In this case, they save on the refusal of the services of construction companies.


When attracting masters, it is necessary to carefully study the provided estimate. The best option in this case is to work together on calculations. This will avoid unnecessary waste.
If the work is supposed to be done on their own, then the cost of the work is zero, if with the involvement of specialists, then everything depends on the list of work performed. The calculation also needs to include the cost of work. It is better to entrust work with electricity to specialists.
The masters distinguish the following types of this work:
- electrical wiring - cable routing and fixing;
- installation of sockets and switches.


You should be prepared for the fact that the final costs may be a quarter higher than the estimated values. Additional material is often required to eliminate defects that have arisen in the process. Sometimes you have to re-screed the floor or install the panels. A change in design can increase costs.

Materials (edit)
Old cast iron and metal bathroom pipes need to be replaced. There is no need to buy new steel structures. Metal is inconvenient to deliver and install, such an installation is not reliable. In addition, prices for steel pipes are quite high. Craftsmen recommend using polypropylene or metal-plastic.
Metal-plastic communications cannot be hidden in the wall. The joints of such pipes are quite vulnerable. The risk of leaks is high. If such a structure is covered with wall panels, then the destruction of the pipes cannot be detected and quickly strengthened. Leaks can cause fungus. The pipes will collapse, and communications will have to be completely dismantled.


Polypropylene is connected by special welding. The resulting cast structure can be safely sealed into the wall. Polypropylene pipes have a large assortment of products, allowing you to get a design of various levels of complexity. The system with many branches is able to cope with the high pressure of water, so its service life is quite long.
Installation of polypropylene pipes is quite simple. The pipes should be connected by welding on a special device. Such a tool will have to be purchased additionally.
It can be rented - many construction companies provide equipment to novice craftsmen.


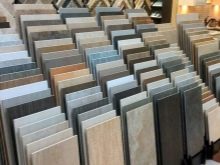
Another equally important material for bathroom renovation is tiles. The choice of ceramics should be taken seriously.
Consider the following points:
- Tiles for installation in rooms with high humidity should have a water absorption coefficient of no more than 3%.
- Consider the size of the tiles. Large fragments are not suitable for finishing a small room. In order to get a drawing of the desired size, you will have to cut the ceramics into pieces. Too much waste is generated during such work. The larger the panel size, the more difficult it is to lay it flat.
- Do not purchase packages from different batches. Such samples may differ slightly in shade. In natural light, this color difference can distort the look of the bathroom. The sizes of tiles from different batches may also have some differences. The difference between ceramics can be up to several millimeters. Such tiles should not be laid on the floor.


- Check the kits for cracked and broken tiles. It is important to avoid a variety of chips and damage. Do not believe that there are no packages without defects. Choosing a good product can cut costs.
- The reserve for laying tiles in horizontal lines should be ten percent of the total number of tiles.When choosing a diagonal masonry, it is necessary to increase the reserve to 15 percent. Diagonal laying is not obtained by beginners the first time.


Each type of tile is marked with a specific color. The first grade corresponds to red, the second - blue. Tiles of the third grade are marked in green. Among the ceramics of the first grade, a 5% deviation can be found. This phenomenon is permissible. Among the tiles of the second grade, a defect may contain a quarter of the entire batch. When choosing a batch of the third grade, you will notice that each fragment is slightly different from the norm.
For laying the floor, porcelain stoneware is best suited. Floor tiles must have a rough surface and high strength. When choosing a material for rooms with high humidity, it is necessary to evaluate the samples for the presence of surface cracks. Flaws in the form of dots or microarcs are also unacceptable. Even the smallest cracks will significantly reduce the strength of the surface and can lead to mold growth.
It is impossible to clean such a surface. Masters advise to immediately weed out fragments even with the smallest defects at first glance.


PVC panels are great for wall cladding. The material has a wide palette of shades and is suitable for every decorative solution. Standard panel lengths range from 2,400 to 3,700 millimeters, and sample widths from 125 to 300 millimeters. The thickness of PVC does not exceed 12 millimeters, so the material is easy to process. This option is perfect for installation in a small bathroom.
The panels are moisture resistant and hygienic. It is customary to install the coating on a frame made of wooden beams or galvanized beams. PVC adheres perfectly to the concrete rough surface.
But such walls must first be carefully processed, to smooth out all the irregularities. The ribbed surface will not support the panel.


PVC is connected to each other using tenon grooves and locks. Such panels are attached to the frame with brackets and self-tapping screws. Complete with the panels, special profile elements are purchased - corners and strips. The finished surface looks monolithic, since the connecting seams are practically invisible.
Some of the panels in the corners have to be cut, so it is necessary to purchase 2 panels more than the estimated value. PVC is attached to a smooth treated surface with liquid nails or staples. Plastic corners are suitable for masking gaps between the panel and the adjacent surface.
Masters recommend pre-drawing the future drawing on the wall in order to avoid mistakes and waste of material.


Decorative plaster is suitable for bathroom interior decoration, as it tolerates saturated humid air well. Modern materials are resistant to chemicals in detergents. An important rule of applying plaster: the coating must be laid on a smooth surface. Rough walls must be well leveled.
You can prepare the wall using sanitizing plaster - the material provides the necessary waterproofing.


Venetian plaster is a favorite of many construction companies. The smooth surface has a wide range of shades and colors. The material does not absorb moisture, it is able to maintain its original appearance for a long time.
Unlike Venetian plaster, textured plaster retains moisture droplets. It is better to leave such material for the decoration of bedrooms and living rooms. In conditions of constant contact with water, it will quickly collapse.


Before decorating the ceiling, you need to decide on its type. Craftsmen distinguish stretch, rack and plasterboard ceilings. PVC panels for ceiling cladding are chosen by those who wish to reduce repair costs. Plastic is installed on rails and profiles, the installation of which does not require a lot of money and time.On the market you can find panels with an unusual design - glossy gilded surfaces.


Ceiling panels are available in various colors and shapes. Rectangular or square pieces will allow you to embody any daring design idea at a minimum cost.
To obtain a complex multi-tiered structure, craftsmen use drywall. With the help of this material, you can get complex shapes in which lamps are mounted. It is important to understand that such a system will only look spectacular in a large room.
Among the materials, experts distinguish moisture-resistant drywall. Its surface is painted green.


Stretch ceiling - elastic vinyl. Basically, this design is used when decorating living rooms, but there are exceptions. The reflective surface of the film visually raises the ceiling.
The glossy surface accumulates condensation, so experts advise giving preference to a matte stretch ceiling. It goes well with ceramic or plastic wall cladding.


The choice of floor material is made last. Any impact-resistant material with a rough surface will do here.
Most often they use for this:
- Linoleum. The most economical floor covering material. The appearance of this coating is quite simple.


- Laminate. When choosing this type of cladding, it is necessary to focus on its moisture resistance. If the panels do not have this property, then the floor will have to be changed very soon.


- Tile. The most optimal choice of flooring. The tiles must be laid in a joint without seams and cavities. Each piece must be tapped after laying.
You should not choose a mosaic with a glossy surface - it is too traumatic. An interesting option is pebble tiles.


- Parquet. This material is durable and environmentally friendly. Careful care for such a coating is required.


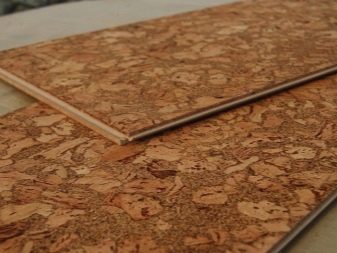
- Cork. The surface of such a floor will be soft. Cork is a natural material, so the price can be high. As with laminate flooring, a moisture resistant sample should be selected.

- Fill. Self-leveling floor is a novelty in the modern materials market. Such a surface can be both finishing and serve as a base for subsequent painting. The floor with a three-dimensional pattern will look interesting.


Calculations
The calculation of all the necessary facing materials was described earlier in the preparation of the estimate. After dismantling the old coatings and completely cleaning the premises, the height of the walls and the floor area are measured. To obtain accurate measurements, the room is repeatedly measured from different control points. Experts advise choosing at least three points.
The choice of plumbing is an important step. The technique must be included in the estimate. The correct selection of equipment plays an important role. The duration of the work can be significantly reduced by choosing the appropriate instruments. Installation of water supply largely depends on the choice of taps and mixer.
It is important to first familiarize yourself with the installation features of each type of device. Built-in appliances cannot be used in panel houses - it is impossible to install a wall niche in such a room.


The calculation of the pipeline is an equally important task. The connection of each device to the water supply and sewerage system should be reflected in a preliminary estimate. It is important to take into account the normalized pipe laying angles, which ensure uninterrupted water flow. It is possible to design the laying of communications, relying on the old arrangement of devices. If the devices were inconveniently located, then a new scheme is drawn up. In this case, it is important to outline the location of future pipes on the wall and measure everything.
Further, the estimate includes the number of pipes and valves. To connect pipe fragments in the room of a panel house, it is necessary to use plastic fittings.Metal parts are installed at the joints of the pipeline with devices that consume water. These fasteners provide a vacuum connection to the pipes. Leakage of plastic fittings is not a problem.


When laying PVC pipes, plastic fittings are used. The mechanisms are soldered into the plumbing made of polymers. The connection of the reinforcement to the metal is provided by a carved branch pipe with thickened walls. This technique ensures long-term operation of the devices. All materials must be purchased in accordance with the area being designed. It is important to take pipes and fittings with a margin.
Purchasing a sufficient amount of tile adhesive is an equally important task. The consumption of material for wall cladding is approximately 3-4 kilograms per square meter. The substance must harden slowly so that installation errors can be corrected.


What is the right way to start?
It is necessary to start repairing with the preparation of plumbing. They remove everything old, disconnect communications in those places where replacement of pipes is necessary. The laying of new circuits will be carried out according to a previously drawn up plan. At the initial stages, the steel structures are cut off, the holes are closed from debris.
It is important to remember about the preliminary shutdown of water and electricity.

The process for preparing the floor and walls is the same. First, the old material is removed, the debris is removed and the surface is leveled. A high-quality concrete screed should not be removed. The process of pouring concrete is very time-consuming and laborious. In addition, cosmetic repairs include only work with facing materials.
Renovation is carried out in accordance with existing standards. If the screed meets all the necessary requirements, then re-pouring is not necessary.


You can improve the coverage by applying a self-leveling mixture. The thickness of the concrete on the floor, in accordance with the building regulations, must be up to 3 centimeters. In a panel house, you can arrange self-leveling floors. This will significantly save money. The resulting coating can be either finishing or rough for subsequent drawing. Colored pigments are often added to the fill to create a beautiful colored floor.
The floor is leveled before pouring. To prevent possible damage to the coating, it is necessary to isolate the surface from contact with water. Polyethylene is not the most reliable material for protecting floors from moisture. It is used for economy class work. For rooms with high humidity, polyester is recommended. The film sheets are overlapped on top of each other.


Polyester joints are fused under high temperature. For this, a construction hairdryer is useful in work. The edges of the film are brought onto the walls with the formation of folds in the corners. Properly laid insulation can withstand the influence of about 4 tons of water over ten squares of area.
In order for the protruding pipes not to spoil the interior of the bathroom, the water supply wiring is placed in specially drilled grooves. This option is quite time consuming, the work is dirty. In addition, not every wall can be drilled. In new buildings, the device of grooves is strictly prohibited - you cannot change the integrity of the structures.
In this case, the masters recommend to bring all the pipes into a bundle and lay it around the perimeter of the room. When the correct location of the communications is found, and the pipes are fixed, they are covered with galvanized slopes. The resulting box is decorated with PVC panels and treated with a sealant.
With this method of positioning communications, it is better to select pipes from polypropylene - the material excludes leaks.


Maintenance of pipes in the box is not very difficult. The mixer can be repaired as follows. To do this, the slope is carefully cut, defects are eliminated, the panel is glued to its original place. The dimensions of a standard bathroom allow you to make a box with a length of about one meter.The rest of the pipes will not be visible due to appliances or a washing machine.
The process of dismantling communications begins with the sewerage system. The piping to the plumbing fixtures is hidden under the corrugation. The structure can be coated with paint. For a heating device, it is recommended to make a choice in favor of purchasing metal-plastic pipes. This material bends easily. From these pipes, the towel dryer can be easily assembled.


When facing walls, it is necessary to maintain equal gaps between the panels. For this, special plastic crosses are installed on the plane. They define the width of the seam. Holes are drilled in advance in the places where the communications are output. The corners and joints are filled with silicone sealant. It is necessary to apply the glue mass carefully. The dried composition will be very difficult to remove from the surface.


A solvent must be used to remove dry sealant. After applying it to the glue, it becomes soft and can be easily cleaned with a rag. The chemical composition of the substance may cause some damage to the coating. To avoid this, the masters advise using mechanical cleaning. Grouting with dry sponges and spatulas should be done carefully. Strong pressing can leave scratches on the finished surface.
The tile adhesive must be water resistant. Using a notched trowel, the substance is gently spread over the surface. Do not take a tool with too large teeth. The evenness of the masonry of each element is checked by the level.


The tile should not protrude too much, such fragments are driven into the surface with a hammer. If these manipulations do not bring any result, then the fragment is disconnected and excess glue is removed. Sagging mosaics, on the other hand, require the addition of a sealant.
After the cladding has frozen, work is carried out to install plumbing and ventilation devices. The connection of electric bulbs and the installation of sockets is carried out in parallel.


Procedure
The step-by-step procedure for overhauling a bathroom includes the following steps:
- Drawing up drawings and diagrams. The project should include the selection of all materials and devices, the calculation of the total amount of raw materials, taking into account the stock. Drawing up a color scheme of the interior.
- Preparatory work. This set of measures includes cleaning the premises from unnecessary items and installations, cutting pipes and cables and dismantling the existing cladding.


- Analysis of the condition of the floor. Assessment of the quality of the concrete screed allows you to draw up a work plan to eliminate coating defects. Installation of thermal insulation and moisture-proof film. Re-pouring a concrete screed with subsequent leveling or installation of a flooded floor on a rough base.
- Laying of contours of water supply and electrical wires.


- Rough finishing of walls with plaster, laying of insulation panels with subsequent finishing. Ceiling decoration.
- Laying the finishing floor covering.


- Installation of ventilation and installation of plumbing equipment.
- Furnishings.


The most budgetary option for finishing the ceiling is leveling with subsequent painting. The paint can be applied in several layers throughout the entire life of the room. In this case, leaks from neighbors are not terrible and can be easily eliminated. If desired, you can install a complex plasterboard structure.
Tiered ceilings are suitable for owners of large apartments. It will be interesting to look at the alternation of glossy panels with matte ones. A complex ceiling must be drawn to scale in advance. Attention should be paid to the location and installation of luminaires in such a system.


If you want to depict a complex tile pattern on a wall or ceiling, you must also first draw up a sketch of it. There are several ways of laying tiles, and the craftsmen will help you choose the least complicated and most beautiful option for this interior.
If oil paint was previously applied to the rough surface, then the area must be treated with "Betonkontakt". This mixture will increase the adhesion of the ceramic to the wall.


The installation sequence of plumbing fixtures depends on their type. Installation must be carried out in accordance with the attached instructions. It is necessary to check that the bath bowl is positioned horizontally. The device is leveled by adjusting the length of the legs.
If you want to close the side of the bath with ceramics, it is important to leave the hatch. The dimensions of this inspection hole must be able to control the water supply.


When connecting the bath to existing engineering systems, work begins with the supply of a siphon. Work is carried out using a corrugated hose. To assess the tightness of the device, experts advise passing about 20-30 liters of water through the siphon. The hose is pre-wrapped with a dry cloth. If the test is successful and there are no wet spots left on the rag, then the bowl is grounded.
The installation of a washbasin depends on its waste system. With a combined bathroom, a toilet is connected to the room. The connecting line must be hidden so that the bathroom interior does not deteriorate. Suspended systems of plumbing fixtures are widely used. The use of such units saves space.
It is important to know that such a system is not applicable in panel houses.


Beautiful examples of interiors
To make it easier to navigate when planning repairs and drawing up drawings, you need to familiarize yourself with ideas that have already been implemented. Bathrooms in typical houses are equipped according to a similar principle. With the right style, you can change the room beyond recognition.


Residents find it difficult to relate the room before and after installation work. Here are some interesting bathroom design ideas.
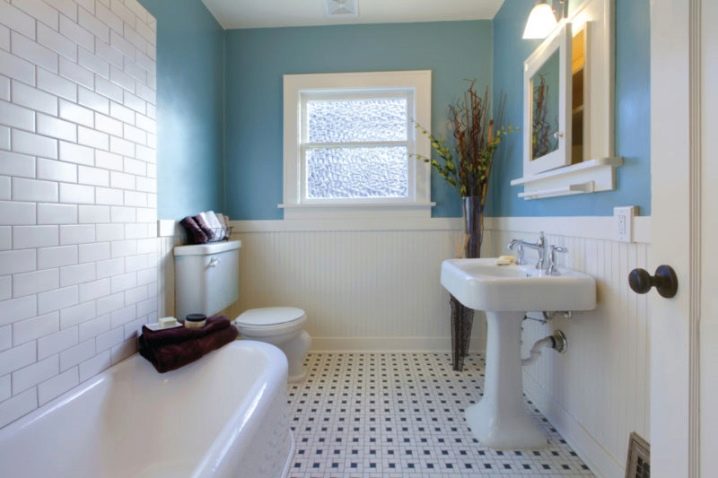
Combined option
The owners of this room carried out the necessary work to combine the bath and toilet. The space visually expanded, there was more free space. The combination of light tiles with blue wall paint creates a delicate look. To enhance the effect of a spacious room, the wall next to the bathroom is completely tiled with light tiles.
The wall cabinet has a similar design to the window. This creates a kind of symmetry in the interior. Color accents are set using decor. A tall vase of artificial flowers brings the room to life. Floor tiles with small patterns do not create ripples, on the contrary, they complete the look of the room.
High tech style
The bathroom in the photo is made in high-tech style. All devices are multifunctional. The cladding and furnishings have clear lines and sharp angles. Soft color transitions or objects with rounded edges are almost completely absent. The abundance of glossy surfaces reflects light, therefore visually expands the space.
The location of the mirror opposite the opening creates a kind of mirror maze. This gives the apartment an even larger scale. The combination of gray and white is a classic trick in the design of a strict bathroom. Mirrors of an unusual shape with illumination add mystery to the room.

Marine panel
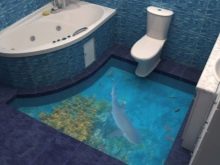
The bathroom walls are fully decorated with the image of the underwater world. The drawing was also applied to the door, so that nothing would get out of the general picture of the depths of the sea. A pleasant drawing seems to give calmness and serenity. The floor masonry is a continuation of the painting. The drawing transfers to the surface so smoothly that the boundaries of the floor and walls are erased.
The elegant blue bath bowl does not stand out from the overall color. The walls are additionally decorated with paintings depicting the inhabitants of the sea. It is worth noting the interesting texture of the floor tiles. Light streaks imitate the reflection of the sun's rays on the water surface. An unusual room completely immerses residents in the ocean world.

Two tiers
The peculiarity of this interior is the use of a podium to visually divide the space. To increase the area of the bathroom, the owners have combined this room with a bathroom. It became necessary to divide the room into functional zones. In this case, the podium was the best fit. The highlight of the interior is the illumination of the podium steps.
The raised structure not only visually emphasizes the bathroom area, but also helps to achieve the desired angle of inclination of pipes near the bathroom and shower. The use of dark panels along the contour of the shower stall visually deepens the room. Wood is also used in decorative elements - in paintings, plinths. The decor of the room looks very rich and elegant.

Nice golden
In this interior, gold-like tiles are widely used. The pleasant shade and glossy surface of the mosaic create harmony. The wide floor tiles contrast with the small fragments on the walls. Gold is well combined with white furniture elements. A sink built into the cabinet saves space.
The main feature of the interior is the bathroom built into the wall. Gold tiles cover the structure like a fabric. With this solution, the wide bowl seems narrower, so the room looks harmonious. There is not enough furniture in the room, but everything is located correctly.

Deep green
This option is an example of smart bathroom design in small sizes. A very economical option looks laconic and tasteful. The green color on the walls soothes and creates a pleasant twilight. White ceramic looks bright against such a dark background. The towel hook panel is made of transparent plastic that does not create unnecessary color stains.
A bright accent is obtained using a yellow towel. Yellow and green go well and complement each other. Ceramic appliances with simple shapes and soft edges give the room a cozy feel. The mirror reflects the opposite green wall, creating an unusual effect. It is important to know that wall cladding paint is waterproof. Such a bathroom will serve its owners for many years.

For information on how to make a bathroom renovation, see the next video.


The comment was sent successfully.