Ceramic bathroom corners: selection criteria and installation methods

The ceramic corner is a necessary finishing element when installing the bathtub. It prevents water from entering the wall gap and gives the bathroom an aesthetic appearance.
Peculiarities
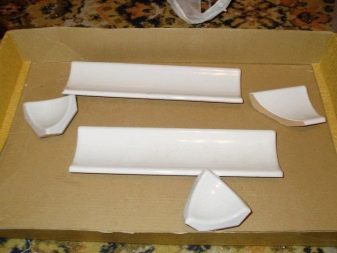
The ceramic corner is produced in the form of separate parts with a length of 20 to 25 centimeters. The width of the products varies from 3.5 to 5 cm and depends on the purpose of the border. Narrow models are designed to close gaps up to 2 cm wide, and wider specimens are able to eliminate a gap of up to 4 cm. The cost of one part is 40-60 rubles.


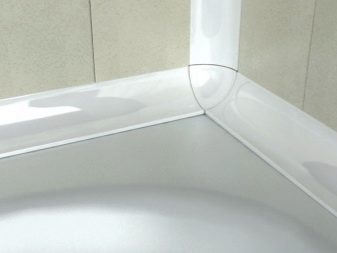
Corner elements that ensure the joining of adjoining parts are called "stars". Products are available in different sizes and cost an average of 40-50 rubles. To create a complete image, the ends of the corners of the extreme elements are closed with decorative plugs that have left and right executions. The cost of such parts is on average 45 rubles. To form corners without using stars, there are ready-made corners, also available in left and right versions. They allow you to create a seamless connection and look the most attractive. The most famous manufacturer of a ceramic corner is the Keramin company, which produces a large number of models of skirting boards and borders, including floor and staircase options.

Advantages and disadvantages
The popularity and high consumer demand of ceramic corners are due to a number of indisputable advantages of the material.
- High tensile strength and resistance to deformation ensures a long service life of the curbs, and guarantees the preservation of the original shape throughout the entire period of operation.
- Environmental safety of the material is achieved due to the absence of poisonous and toxic substances in their composition.
- High thermal and moisture resistance, as well as resistance to temperature fluctuations, makes it possible to use the border in hot and humid rooms


- Attractive appearance and wide range of products allow you to choose a corner for your bathroom in any color and style. Ceramic products are highly resistant to ultraviolet radiation and do not fade from moisture. Thanks to this property, the surface of the corner is able to retain its original color throughout its entire service life.
- The material is durable and abrasion resistant, which allows it to maintain a presentable appearance for a long time.
- High resistance to chemicals makes it possible to process the material with any cleaning agent.

The disadvantages include the high cost of a ceramic corner in comparison with its plastic counterparts, as well as low impact and weight resistance. The brittleness of the material is partially neutralized by the high-quality adhesive on which the curb is mounted: it slightly increases shock absorption and increases impact resistance.
There is also a large expenditure of time, as well as the need to possess certain skills in finishing work. When installing the curb on acrylic bathtubs, it should be remembered that there is a risk of cracking the corner due to thermal expansion of the bath and, as a result, a violation of the integrity and tightness of the joint.


Varieties
Ceramic curbs come in several shapes and sizes.
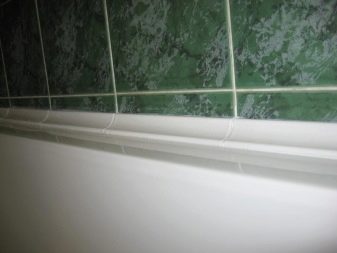
- "Pencil". The product is made in the form of a thin convex ceramic strip used to eliminate small-width gaps between the wall and the bathroom. This type of border is often used for decorative edging of mirrors, for dividing a bathroom into zones, as well as for designing author's architectural solutions. The corners are presented in a wide range of colors, which allows you to choose them for any interior, and are available in standard sizes 200 x 15 and 250 x 15 mm.


- Corner border. The model has a triangular cross-section, which greatly simplifies its installation and ensures a reliable connection of the corner to the surface of the wall and bath. The product is designed to close gaps of medium width. Available in a huge variety of colors, textures and patterns. Often comes complete with ceramic tiles, exactly repeating its texture and color. Installation of the curb is carried out with glue. The size of the products is 200 x 55 and 250 x 55 mm.


- "Frieze" is an ordinary tile, which has a protrusion in its lower part, with the help of which the wall gap is closed. It is produced in a wide range with a wide variety of relief texture and pattern.


Installation steps
Laying a ceramic corner is a time-consuming and complex process that requires a certain amount of experience in cladding. Installation is carried out using a grinder, spatulas, masking tape, tile crosses, silicone sealant and a gun for its application, as well as adhesive for ceramic tiles and solvent. Installation of the curb is done in two ways.


Installation under tiles
The corner installed in this way looks more aesthetically pleasing and beautiful, and the connections are very reliable and tight. Work should begin with a thorough preparation of surfaces, which consists in removing dirt from the adjacent sections of the wall and bath, as well as dusting and degreasing them. The next step is to apply sealant to the gap and then level the mortar with a rubber or plastic spatula. If there is no spatula, leveling can be done with a hand soaked in soapy water. The use of a sealant as a base for a corner is allowed in the case of a very narrow gap or its visual absence.
If there is a large gap, the laying technique will be different. In this case, masking tape should be glued along the entire perimeter of the junction of the bathtub and the wall. It will reliably protect the edge of the bowl from polyurethane foam. The distance from the edge of the bath should be 2-3 millimeters. Then the gap must be filled with foam and left to dry completely. This can take 2-12 hours, depending on the thickness of the layer and the brand of foam, the excess of which is cut off with a knife. Then you need to start preparing the glue, strictly following all the recommendations specified in the instructions. In consistency, the glue should resemble thick sour cream and adhere well to the spatula without dripping from it.


Laying the corner must be started from the corner. On the reverse side of the curb, put glue using a narrow spatula, and attach a corner to the joint. Excess glue must be removed immediately without allowing it to seize. When laying the corner, it is recommended to press the curbs to each other as much as possible, adjusting them with a rubber mallet. In the inter-end spaces, crosses should be installed, the thickness of which should coincide with the thickness of the crosses used when laying ceramic tiles.
You can cut the elements to length with a grinder equipped with a diamond disc for tiles. A day later, the laid corner is poured abundantly with water, due to which the strength of the glue increases significantly. If you need to speed up the process of initial setting and hardening of the glue, it is allowed to use a hairdryer. After the glue is completely dry, you can begin the process of wall cladding with ceramic tiles.


Installation on tiles
This method is a practical solution to the problem of a poor-quality joint with walls already tiled with tiles. It can be used to close the wall gap between the wall and the bathroom without removing the tiles from the walls. However, it should be borne in mind that aesthetically, this option will noticeably lose to the method of laying the corner under the tiles.
Start installing the curb by cleaning the adjacent sections of the wall and bath by dedusting and degreasing surfaces. Next, you need to apply liquid nails to the wall and leave the composition for the time specified in the instructions. Then you need to start installing the corner, pressing it tightly against the wall and holding it in this position until the initial seizure occurs. Then you should remove excess adhesive and leave a corner for the glue to dry completely. To evenly fix the curbs, you should use the building level. After the glue has dried, the seams must be treated with a trowelled filler.

Useful Tips
Before purchasing material, you should calculate the required number of elements. For this, the sides of the bath are measured, which will adjoin the walls, after which the sum of the lengths of the sides is divided by the length of one border, determining the required number of parts. It is recommended to add 4 more fragments to the obtained value, which may be needed in case of accidental damage to the corner during installation or as a result of improper cutting of elements. You need to know that the curb, the length of which is equal to the length of the ceramic tile, looks the most harmonious.
When choosing the color of the corner, if it is purchased in more than one set with the tile, the compatibility of the surface structure and the color of the materials should be taken into account. If you cannot find the required tone, you can purchase a white corner. This color is considered universal and tends to blend harmoniously with any shade of walls and plumbing.


When forming the joint of two parts, they usually use a special corner connector or use a ready-made plinth made in the form of a right angle. In the absence of such elements, the ceramic strips of the corner should be cut at an angle of 45 degrees. The cut site is carefully sanded, and the joint seam after the elements are glued is processed with grout.
In the case when there are no ready-made curbs, you can make them yourself. This will require tiles, a grinding tool and a grinder with a diamond disc for ceramic work. The tile is lined into strips of the required width, after which it is carefully cut, and the places of the cut are sanded.
A ceramic bath corner needs careful selection and correct installation. However, with strict adherence to the installation rules and a competent combination of colors and textures, it can be used to create beautiful combinations, focusing on the bath, emphasizing the geometry of the space and the style of the room.


For information on how to self-install a ceramic corner on a bath or shower stall, see the next video.


The comment was sent successfully.