Preparing walls for tiles: solutions for a bathroom
If you decide to glue the tiles in the bathroom, then you need to start not with the purchase of the latter, but with the preliminary preparation of the walls. Tiles glued to the untreated surface of walls or floors will not last long. Over time, it will begin to fall off or become covered with small cobweb-like cracks. Today, for one reason or another, many prefer to make repairs in the apartment on their own, especially since construction stores are full of various materials, and video tutorials on the Internet will help solve any problem. When starting a renovation without resorting to the help of specialists, do not forget that renovation in the bathroom requires a special approach, since it is here that moisture and dampness "live" like nowhere else.

Peculiarities
Modern tile adhesive allows you to glue it to almost any surface, even paint. But the peculiarity is that high-quality repair does not depend on glue and tiles, but on the preliminary preparation of the walls. They should be close to a perfectly level state, without any "wobbly" areas. Only then can you start laying the tiles.
Thus, in spite of the fact that minor drops, not exceeding 5 centimeters, can be leveled with cement-based glue or special mortar, it is still recommended to take a spatula or sandpaper and clean the surface of dust, dirt, "hanging" plaster or paint. In addition, so that your work is not in vain, do not forget to cover up insignificant, at first glance, defects (cracks and so on).


With a substantially uneven wall, the alignment must be planned either using plaster, requiring a large consumption of material, or you will have to do plasterboard cladding (GKL), which sometimes significantly reduces the space of the room. It all depends on what method of sheathing you decide to use: sheets of gypsum board can be glued, or you can erect a frame structure.

Advantages and disadvantages
So, there is an alternative - drywall or plaster. If we talk about saving the budget and simplicity of the process, then the most inexpensive and fastest way that does not require special skill is drywall alignment. However, it must be borne in mind that sheathing a room with sheets of gypsum board can significantly reduce the space. In addition, here it will be necessary to reckon with thermal and waterproofing.


If the area of the bathroom is small, or there are slight irregularities, then it is more advisable to stop at leveling with plaster. Working with plaster, unlike drywall, can cost a little more (it all depends on its consumption). At first, beginners will have a hard time, since a certain skill is needed here. In addition, the plastered wall needs time to dry, which, depending on the applied layer, sometimes takes up to 7 days. There are often cases when, in order to save money, it is appropriate to combine the use of drywall and plaster.


Materials (edit)
After assessing the condition of your walls, and having correctly identified the alignment method that suits you best, you can go to hardware stores and get acquainted with the available materials.
Drywall
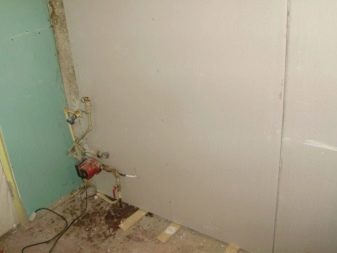
Drywall or gypsum plasterboard sheets are presented in hardware stores in various colors.They are great for quick and perfect alignment. Although for the bathroom, you should buy green sheets endowed with an increased level of moisture resistance. They are quite durable, therefore they are able to withstand even decorative tiles. They are easy to use and cut during assembly, which contributes to quick use and economical use of material. Before installing them, given that we are talking about a bathroom, it would be more correct to prime the wall with an antifungal primer, despite the fact that they have already been treated with a special antiseptic.

On perfectly flat walls or walls with minor cracks and roughness, drywall can be glued. In this case, it is recommended to first remove any bumps and seal up the existing holes. It is very important here to dilute the glue correctly, strictly according to the instructions. The fact is that over time, poorly glued sheets weighted with tiles, as well as gypsum boards glued to improperly diluted glue from dampness, will begin to lag behind the wall.
If the space of the room allows, then it is better to strengthen the drywall with screws both horizontally and vertically on a frame erected from specially galvanized metal. The erection of the frame is a simple procedure, you need to stock up on a level, a drill and beacons that can be made from ordinary thread.


Whichever method of fastening drywall you choose, it is important to seal up the joints of the sheets. For this, a special mesh is sold (there is also a self-adhesive one), which must be glued to the resulting seam, after which a small layer of putty is applied to it.
Sometimes, instead of drywall with concrete walls, PVC panels are used., which are also easy to install and also marginally cheaper. But here it must be remembered that this material is highly flammable and is capable of accumulating moisture, after which it emits an unpleasant chemical odor.


Plaster: which is better?
Some builders, wanting to save money, prepare their own plaster mixture by combining cement with sand or clay. For beginners, it is better to buy ready-made mixtures, the range of which in stores is wide enough (from clay to gypsum). When self-manufacturing, for example, a cement-sand mortar, you can make a mistake in the required ratio, which will affect the quality of the repair and significantly complicate it. The greatest demand of buyers is for modern powders based on cement and gypsum. The plaster mixture is diluted strictly according to the instructions. Too liquid solution will be poorly fixed, flowing down, and excessively thick is taken in lumps, which are difficult to smear.
In addition, remember that you should not immediately dilute too much powder, since the diluted mixture hardens in about 30 minutes, this is the time during which you need to quickly apply the plaster mixture, when you can still adjust the application.


Cement-based plaster, unlike gypsum, is suitable for both indoor and outdoor use. The cement mortar has high strength and moisture resistance, which is suitable for use in the bathroom. However, it is quite heavy, so it is not recommended to apply a large layer. There are cases when tiles fell off together with a thick layer of cement applied. In order to avoid such cases, it is recommended to plaster the wall not by applying a thick layer of cement plaster, but to pre-level it, removing the bulges. Then a relatively flat wall is brought to the desired state with a moderate layer of cement plaster.

You should not buy gypsum-based plaster for finishing your bathroom, as it can become damp, absorbing excess moisture over time. The use of such a solution is permissible if the plaster is treated with a waterproofing primer before laying the tiles.When buying plaster, you can be guided by the manufacturer (domestic or imported), but you definitely need to look at the compliance with the material from which your wall is made, which will ensure a quality repair. Before starting work, the wall can be treated with a special primer with the addition of any anti-mold agent.
According to builders, copper sulfate powder effectively protects against the appearance of any kind of fungus. In addition, it is sold at an attractively inexpensive price in comparison to other modern products.

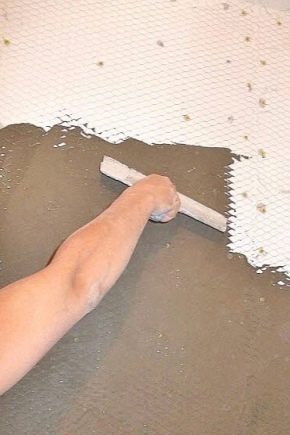
If, nevertheless, you need to apply a thick layer, then it is recommended to use a cement-lime mortar., which involves the installation of plaster mesh made of steel. Such an alignment dries completely after about a month, the laying of the tiles is permissible no earlier than 7 days after tiling. When buying a mixture, you need to look at the composition of the surface finish declared by the manufacturer: thin or thick. If the mix is correct, setting the mesh to apply a thick layer may not be necessary.
Special plaster for application of a thick layer has a high viscosity index.

The subtleties of working with different surfaces
There is another important nuance that affects the good and high-quality preparation of the walls for laying tiles. We are talking about the material from which the walls, partitions, and the house as a whole are made (brick, wood, concrete, and so on).
Brick
Old brick houses, for example, consist of only one load-bearing partition, while the rest are made of plasterboard floors. Such structures were most often plastered with cement mortar on a metal mesh, due to which there may be noticeable discrepancies in height, reaching up to 10 cm. Wall treatment in such conditions consists in the complete or partial removal of poorly adhered plaster.

After that, in order to avoid irregularities, the wall must be well cleaned and treated with the same solution. To prevent the corners from losing their shape, it is advisable to purchase metal corners, on top of which plaster is applied. Before finishing the wall, it is advisable to treat it with a coating material (a kind of insulation) that protects the brick from moisture.


Wood
Old plaster can be easily removed from a brick partition, but wooden plaster is difficult to clean. In such cases, in order to achieve a flat wall surface, it is easier to use a special moisture-resistant green drywall (see above). Having removed everything that could be removed from the surface, it is recommended to plaster it with almost any solution (lime, clay, cement). In this case, wood is an unpretentious material, but clay mortar is still an ideal option, since it will not require large expenses. To prevent the plaster from slipping, it is necessary to attach a metal mesh or so-called shingles to the wooden surface. After the tree is hidden by you behind a small layer of clay plaster, you can start plastering the room with drywall, which will give it a perfectly even look.


Concrete
In panel houses, demolition of walls for the purpose of erecting new ones is not carried out due to the peculiarities of the structure of the house (the house is erected from strong reinforced concrete floors), so the walls here will most likely be relatively flat. If it is nevertheless necessary to level the walls, then the use of cement or gypsum mixtures will be appropriate. It all depends on your needs and the curvature of the walls. It is easier to work with a gypsum-based solution, since you do not have to constantly wet the surface. Gypsum, in contrast to cement, gives a lighter and more even surface. Cement makes it rough and dark. Since we are talking about laying tiles, the color of the treated surface, as well as the roughness, does not matter. In such cases, cement-based mortar will be more moisture resistant than gypsum mortar.
With very slight irregularities, not exceeding 5 millimeters, it is easier to touch up the walls with ordinary construction putty.


Monolith
If you are leveling in a monolithic house, then get ready for plastering work. The fact is that such houses are made of different materials (foam concrete and concrete, tongue-and-groove blocks), therefore, only with the help of plaster, you can quickly, budget and qualitatively correct some roughness of a diverse surface. Most likely, one cannot do without a laser level and beacons here, because such houses shrink, which is reflected in the differences in the wall. In such cases, the alignment method will depend on the curvature of the walls. If the differences are insignificant, then a gypsum solution is quite suitable. If a thick layer of plaster is required, then it is better to give preference to mixtures based on cement.
It's up to you which alignment method to choose. The main thing is to take into account the main points that affect a quality repair.


Tips & Tricks
It is up to you how to level and prepare the walls before tiling.
Any method you choose will be effective if some basic rules are followed.
- It is necessary to clean the wall well from old weakly adhering plaster, paint, and so on.
- For amateurs, it will be safer to buy a powdery mixture for leveling than to prepare it yourself, since you can make a mistake and not maintain the required proportions.
- Choose your plaster based on the material your home is made of.

- When buying a mixture, pay attention to the composition declared by the manufacturer and compare it with your needs (for applying a thick or thin layer).
- Prepare the solution strictly according to the instructions. Remember that it dries quickly, so don't aim too much at once.
- In order for the leveled wall to serve for a long time, do not forget to treat it with a primer and let it dry well.
- Remember that you are working in a damp environment, so an antibacterial and antifungal primer is simply indispensable.
- The best results are obtained when using a primer and a mixture of the same brand.

In the next video, you will see how to plaster the walls with your own hands and how to properly align the walls with the lighthouses.


The comment was sent successfully.