All about attaching rafters to the Mauerlat

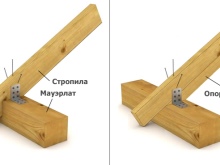
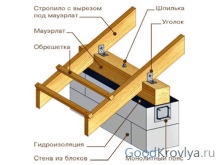
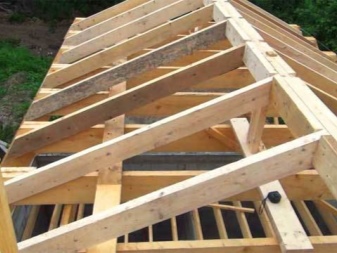
The reliability of a roof structure is often completely dependent on the correct installation of its entire supporting mechanism. And the main parts of such a mechanism will be the rafters. The structure itself usually consists of the so-called rafter legs, which are the support of various additional parts, among which are side girders, struts, support-type struts, stretch marks and crossbars. The rafter legs are usually connected at the top on a ridge-type beam, and the lower parts should be mounted on the Mauerlat.
Let's figure out in more detail how the rafters are attached to the Mauerlat and what options are there for securing the supports.
Fundamental rules
If we talk about the basic rules, when installing such a system, The following aspects should be taken into account.
- When using bolts and studs, it is required to place washers under them. Such actions will make it possible to significantly increase the strength of the connection of any rafter leg.
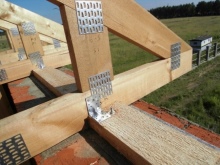
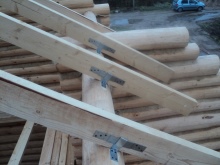
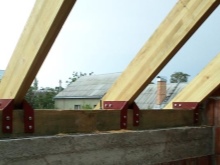
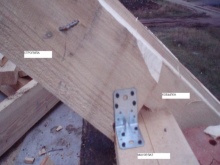
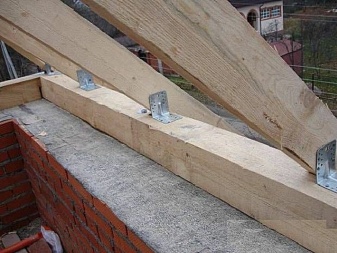
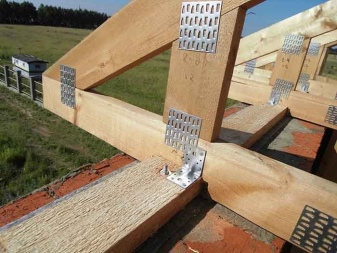
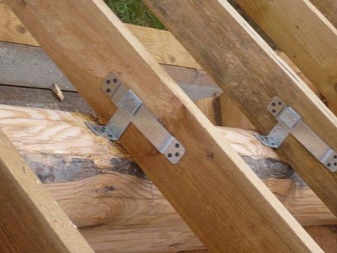
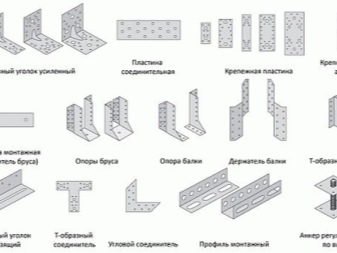
- To attach the rafters to the Mauerlat, special fasteners are used - corners... They are attached using suitable screws or nails.
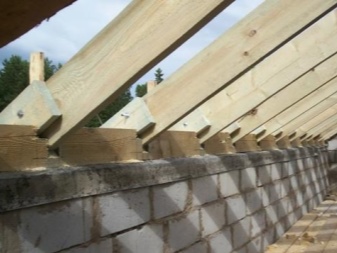
- The rafter gash to the Mauerlat is created by 25 percent of its thickness. It would be better not to destroy the integrity of the wood, because it will need to withstand quite serious loads. The stiffer type of fastener is usually used for the hanging type mechanism.
- When installing rafters on walls made of aerated concrete or brick, the beams must be fixed to the Mauerlat using sliding-type fasteners... Such a solution will be highly demanded for mechanisms with a massive roof. For example, for a hipped roof.
- Fixing the Mauerlat and rafters using self-tapping screws and nails does not always make it possible to obtain a high-quality result. To make the connection really reliable, you can take a metal corner with several holes in the slats.
There are also some rules for creating a good fastening of rafters to the Mauerlat.
- Any metal fasteners must securely and efficiently fix all the necessary elements.
- The dimensions of the cuts need to be measured well. Fasteners will be of the highest quality if their depth is not less than 1/3 of the timber thickness. This usually applies to material with dimensions of 15 by 15 centimeters or more.
- The depth of the saw in the rafters cannot be more than 25% of the width of the boards. Such a knot is often used for hanging legs, and therefore requires additional fastening with metal corners.
- To connect all the wooden parts, in addition to the bolt, you also need a special metal plate or a washer... Such elements make it possible not to sink the fastener head into the wood, which will prevent the weakening of the structure.
- You should not use only nails or self-tapping screws, because the reliability of such an attachment will be low... Be sure to reinforce them with plates, corners and other metal elements.
- If the roofing material has a large mass, then regardless of the type of rafter mechanism, you should use sliding type connections.
The next point - you need to choose the correct distance between the beams.... Usually it is calculated by the space between the bar section, the support points and the roofing scheme.
But if problems arise with this, then you can calculate it according to SNiP, which contains the required calculations.
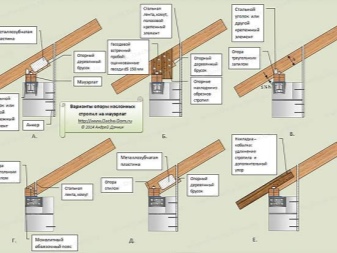
Overview of types of support nodes
Now let's try to figure out what are the nodes that carry out the support on the Mauerlat. Note that the review will be carried out according to the following criteria:
- type of stop;
- connection type;
- the presence or absence of cuts.
By connection type
If we talk about the methods of connection, then it should be understood that in the case of iron connections, the nodes will be rigid and will not move in any way. At the same time, the wood has great softness and dynamism. This material can be deformed, swell and dry out. For this reason, professionals recommend making support-type nodes, taking into account the possibility of changing the tree shape. Such nodes can have connections with different mobility.
- Null... Such an attachment will be rigid on 2 sides, and the abutment of the joint elements will be tight. Naturally, any mobility is simply excluded here.
- With the first degree of mobility. In this case, the beam can rotate in a circle.
- With the second degree... Not only circular rotation is possible, but even displacement. Here it will be correct to install the skids or special sliders.
- Third degree... Any movement is possible here - horizontally, vertically and in a circle.
It should also be added that for a node with any mobility, you need to use at least a couple of fixing options.
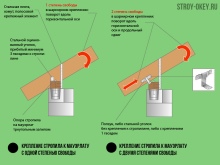
For example, slats of a hacked type should be additionally secured from the inside using a support type bar, and dynamic connections are reinforced with special corners made of steel and bolts.
By type of stop
According to this criterion, it is possible to distinguish for a variant of mechanisms:
- layered;
- hanging.
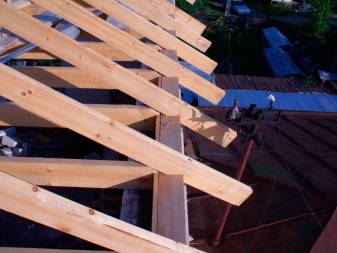
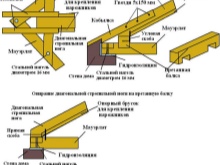
The first category has one or more points of support, in addition to the walls of the load-bearing type. For this reason, some of the load from the walls located on the sides disappears. Then, as secondary supports, side racks and "headstock" are used, which support the ridge and are attached to the beam ceilings. And the beams themselves will simultaneously perform the tightening of the structure, which also transfers some load from the rafter mechanism to the walls of the bearing type.
This version of the rafters is attached to the Mauerlat, usually using sliding joints. They can move when the walls are deformed or the building is shrinking, which makes it possible to leave the roof completely intact. This will be especially important in new buildings, because any recently erected building will definitely shrink under the influence of temperature fluctuations and ground movements.

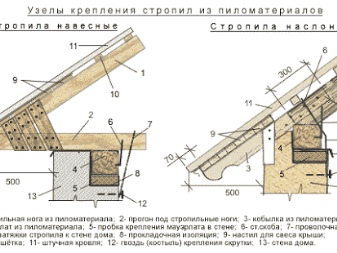
The second category of rafters got its name due to the absence of any other supports, except for a pair of load-bearing type walls on the sides. That is, in fact, such a system seems to hang over the inner space of the building. Then the load from the frame structure will fall on the Mauerlat.
To fix this type of rafters, rigid mounts are used, where there is no freedom of movement, because the frame structure has only a couple of anchor points. This rafter mechanism is spacer, as it exerts serious pressure on the walls.
To remove a little load from the walls of the building, various additional elements, allowing to pull the mechanism to the ridge bar and to carry out an even distribution of pressure on the walls. If you do not use additional elements, then the structural reliability will be a big question.
By the presence of cuts
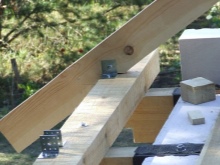
To connect a sliding nature, it is not necessary to make cuts on the beams. An ordinary corner will be enough here. Usually, a similar method is not used on a pitched roof, but is used to overlap a hipped roof type with not too large spans.
To get a reliable support unit, you can file the support or form a blocking type tooth. The inset is made on the rafter leg for 25% of the product's thickness. Note that there are several methods for creating a cut or gash:
- fastening of a rigid type - here work takes place to compress the inner part of the beam, which is a support;
- the mount is of a movable type - it is obtained if the cut is made from the outside of the timber.
You can not cut anything, but make such a persistent beam that is nailed to the beam. Another point - something should be cut not on the Mauerlat, but on the rafter legs. Cutouts on the Mauerlat will cause a significant weakening of the structure.
It is also possible not to use cuts. But then each rafter leg will be with a filly, which will create an outlet for the eaves.
How to fix it?
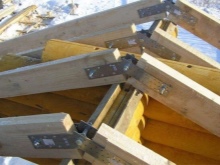
Today there is no consensus on which fasteners will be the best solution for connecting such structures. But no one fixes such elements with brackets, and plates are used only when creating certain types of connections. And that is not always the case. The most commonly used are nails and screws. Each of these fasteners has strengths and weaknesses.
For the manufacture of the rafter mechanism, galvanized self-tapping screws are used, which are not subject to corrosion. They are very easy to screw on. Even a simple screwdriver is suitable for this. Their disadvantage will be long removal, if the structure needs to be dismantled for some reason.
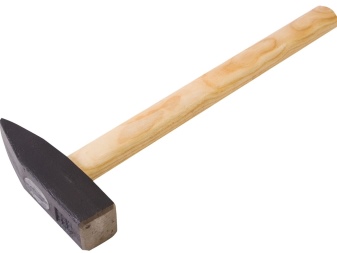
They like to work with nails because they have different sizes, and to hammer them in, you just need a hammer. To fix the rafters, it will be best to use special nails with notches, which allows you to create the highest quality connection with the wood.
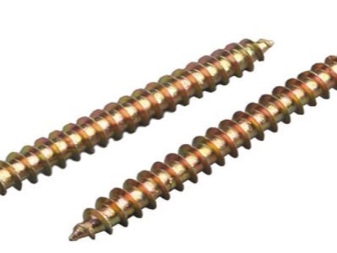
By the way, speaking of nails, polished galvanized nails have become very popular lately. It is optimal to use models that are 3-5 millimeters larger than the thickness of the wood.
How to install?
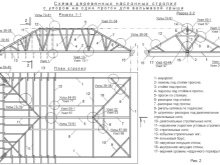
Now let's talk about how the rafters are laid. Their installation starts with the installation of the Mauerlat. The purlin needs to be fixed to the walls using support bolts. Fastening the rafters to the Mauerlat is carried out according to the following algorithm.
- First you need create a design template rafter legs that are planned to be received. This is very simple to do, because it will be enough only to connect boards of the same length using a nail.
- The resulting construction follows fix where there will be places for fixing the rafter legs. After that, you need to fix everything in the "scissors" position using another board, which will run parallel to the beam floor. This will make it possible to fix the angle of the structure.
- Now we create another template... But it should be made from plywood sheet. Its application will make it possible to determine the size of the side-off of the beams at the points of support on the Mauerlat.
- The previously created templates must be used to create installation cuts in order to make the connection of the beams at the required angle. This will create a so-called roof truss.
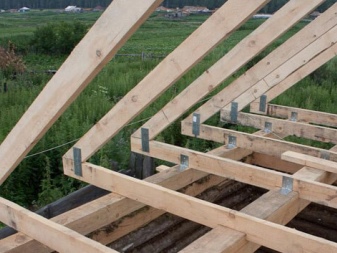
- The trusses need to be lifted to the roof and secured to the Mauerlat. It is required to start with the installation of structures along the edges. After that, in the upper areas of the trusses, it is hammered in a nail and the cord is pulled. The rope will serve as a beacon for the installation of the following structures of this type. The remaining rafter structures must be installed at a calculated distance, but not less than 600 millimeters between adjacent beam-type ceilings.

All about attaching the rafters to the Mauerlat in the video below.


The comment was sent successfully.