What if my Epson printer prints with stripes?

When an Epson printer prints with stripes, there is no need to talk about the quality of documents: such defects make the prints unsuitable for further use. There can be many reasons for the appearance of the problem, but almost always they are related to the hardware part of the technology and are fairly easy to eliminate. It is worth talking in more detail about what to do and how to remove horizontal stripes when printing on an inkjet printer.
Malfunction manifestation
Printing defects are not uncommon with inkjet and laser printers. Depending on what exactly caused the problem, they will look different on paper. The most common options are:
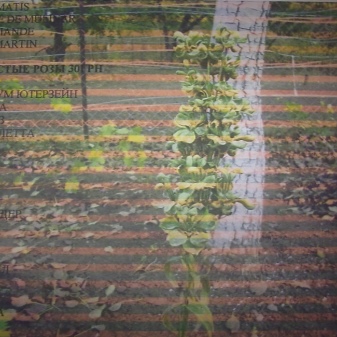
- Epson printer prints with white stripes, the image is displaced;
- horizontal gray or black streaks appear when printing;
- some colors disappear, the image is partially missing;
- vertical stripe in the center;
- defect at the edges of the sheet from 1 or 2 sides, vertical stripes, black;
- the stripes have a characteristic granularity, small dots are visible;
- the defect is repeated at regular intervals, the strip is located horizontally.


This is a basic list of the printing defects encountered by the owner of the printer.
It is also important to consider that troubleshooting on laser models is easier than on inkjet models.
Causes and their elimination
Color and black-and-white prints become unreadable when printing defects appear. There are many questions about what to do and how to remove them. The solution to the problems will be different, it all depends on whether it is an inkjet printer or a laser one. When using dry dye rather than liquid ink, proceed as follows when streaking occurs.
- Check the toner level. If a streak appears in the center of the sheet, this may indicate that there is not enough of it. The wider the defective print area is, the sooner a refill will be needed. If during the check it turns out that the cartridge is full, then the problem lies in the supply system: you will have to contact the service center with it.

- Check the toner hopper. If it is full, stripes made up of many small dots begin to appear on the sheet. Emptying the hopper yourself is pretty easy. If the problem persists, it is worth checking the positioning of the metering blade: it is most likely in the wrong position when installed.

- Check shaft. If the stripes are wide and white, there may be a foreign body on the surface. It could be a forgotten paper clip, piece of paper, or duct tape. It is enough to find and remove this item for the defect to disappear. If the stripes fill the entire sheet, have deformations and bends, then, most likely, the surface of the magnetic roller is dirty or the optical system of the device requires cleaning.


- Check the magnetic shaft. Its wear is indicated by the appearance of transverse black stripes on the sheet. They are lightly colored, evenly distributed. It is possible to eliminate the malfunction in the event of a breakdown only by replacing the defective assembly: the entire cartridge or directly the shaft.


- Check the drum unit. The fact that it requires replacement will be indicated by the appearance of a dark strip along 1 or 2 edges of the sheet. A worn-out part cannot be restored, it can only be dismantled to install a new one. When equidistant horizontal stripes appear, the problem is that the contact between the drum unit and the magnetic roller is broken.
Cleaning or completely replacing the cartridge will help solve the problem.


In case of laser printers there are usually no special difficulties in restoring the operability of the device. It is enough just to check all possible sources of malfunction of the device step by step, and then eliminate the causes of the stripes.
V inkjet the models are a little more complicated. It uses liquid ink that dries up with prolonged downtimeMost of the defects are associated with this.
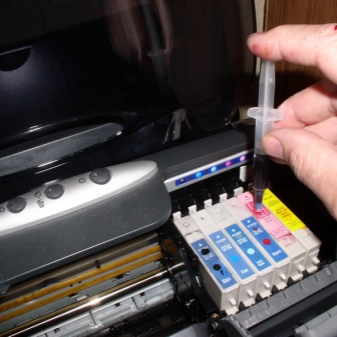
In case of printing equipment, which uses CISS or a single cartridge for monochrome printing, the stripes do not appear by themselves either. There are always reasons for their occurrence. Most often they are associated with the fact that the ink in the reservoir is trite: their level can be checked through a special tab in the printer settings or visually. If the device is rarely used, the liquid dye can thicken and dry inside the print head. In this case, it will have to be cleaned programmatically (suitable only for separately installed elements) in the following order:
- place a supply of blank paper in the printer tray;
- open the service section through the control center;
- find the item "Cleaning the print head and checking nozzles";
- start the cleaning process;
- check the print quality 2-3 hours after its completion;
- repeat the operation if necessary.


In models of inkjet printers, the head of which is located in the cartridge, only complete replacement of the entire block. Cleaning will not be possible here.
Streaks in inkjet printers can also be caused by depressurization of the cartridge... If this happens, when the part is removed from its housing, paint will spill out. In this case, the old cartridge is sent for recycling, installing a new one in its place.
When using CISS, the problem with stripes on the print is often associated with the system loop: it could be pinched or damaged. It is quite difficult to diagnose this problem on your own, you can only make sure that the contacts have not come off, there are no mechanical clamps.


The next step in diagnosing an inkjet printer is inspection of filters of air holes. If ink gets into them, normal operation will be disrupted: dried paint will begin to interfere with air exchange. To remove streaks during printing, it is enough to replace clogged filters with serviceable ones.
If all these measures do not help, the cause of poor printing and image misalignment may be encoder tape... It is easy to find: this film is located along the carriage.
Cleaning is carried out with a lint-free cloth soaked in a special solution.


Prevention measures
As a preventive measure recommended for use on printers of different models, you can use periodic cleaning of the most vulnerable blocks. For example, before each refueling (especially independent), the cartridge must be cleaned, removing traces of dried ink from the nozzle. If the design has a waste toner bin, it is also emptied after each new refueling.
If you find dirt on the surface of the nozzle or printhead, it is important not to use plain water or alcohol to clean it. It is optimal if for these purposes a specialized liquid is purchased, intended for cleaning the units of office equipment. As a last resort, it can be replaced with a window cleaner.
On inkjet printers, it is worth checking the head alignment periodically. Especially if the equipment has been transported or moved, as a result of which the carriage has changed its location. In this case, stripes will appear just after changing the location of the printer, while the cartridges will be normally filled, and all tests will show excellent results. Entering the control center with the subsequent launch of automatic calibration will help to correct the situation. The print head will snap into place, and with it the defects displayed on the paper will go away.


For how to repair a stripe Epson printer, see the following video.


The comment was sent successfully.