Stretch ceilings with plasterboard: subtleties of combinations
Combined ceilings made of special stretching material and gypsum plasterboard are quite popular today. Such designs open up endless possibilities for interior design. Various compositions that amaze the imagination allow you to choose a combination for almost any style.


A win-win for home and apartment
Combined designs with drywall look fresh and sophisticated. They allow you to create a modern interior with a strong personality.
Such coatings emphasize the dignity of any room, giving a zest to the atmosphere.


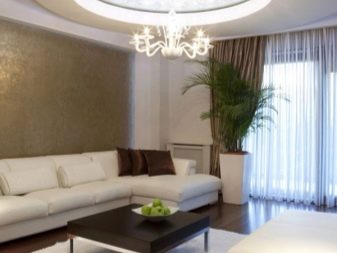
The main feature of such a ceiling is the combination of the usual matte surface of the gypsum board and a shiny stretch canvas. The composition of such different textures allows you to implement various lighting scenarios, playing with lighting and all kinds of devices.
As a result, unique optical effects can be obtained.


Plasterboard ceilings with stretching material inserts are now in great demand. Many famous designers use similar options. With their help, interior designers can easily turn an ordinary bedroom into a unique boudoir, and a living room into an elegant hall.


It is better to trust the installation of such structures to professionals. They will help you choose the ideal option for your case, draw up a project, make the necessary calculations and perform high-quality installation.
Their experience will help to bring any design ideas to life.


Advantages of combined ceilings
The popularity of such designs is due to their obvious advantages.
- The surface of stretch fabrics and gypsum boards are suitable for any type of premises. They also retain their original appearance for a long time without requiring repair.
- Such ceilings help hide irregularities and defects in ceiling panels, enhance the thermal insulation and sound insulation of the room.
- There is a wide variety of colors and textures on the market. In one project, you can combine several different tones, forming original compositions. It is also possible to use integrated, open lighting systems of different intensities. This way, you can design an endless number of options.
- For the organization of lighting, it is possible to use different types of lighting devices (overhead, spot, hanging lamps, etc.).
- Structures visually enlarge the room, allow effective and unusual zoning.


Possible options
There are quite a few combination ideas; any of them can be easily implemented with drywall.
The type of ceiling design depends only on your imagination, financial resources and technical features of the room.


Today, there are several main options:
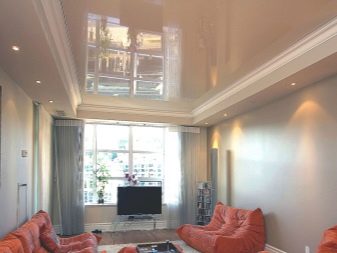
- Stretch ceiling, which has a plasterboard box around the perimeter. This finish is common. Its peculiarity is the installation of a prefabricated box with right angles along the edges of the ceiling. A profile is attached to the box, which is necessary for tensioning the material. Chandeliers or spots are mounted in a frame. You can choose lighting devices according to your taste. Thus, sufficiently bright lighting is provided, and an interesting decorative effect is also achieved.
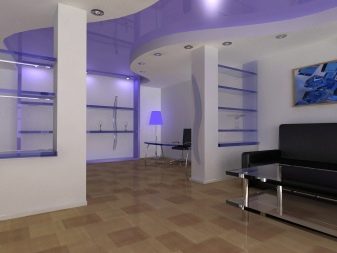
- Construction with an oval plasterboard box.In rare cases, the box may be round. This method of ceiling decoration is quite complex, but the result is worth the effort. The only drawback is that the corners are essentially "concealed" and the volume of the room is visually reduced.


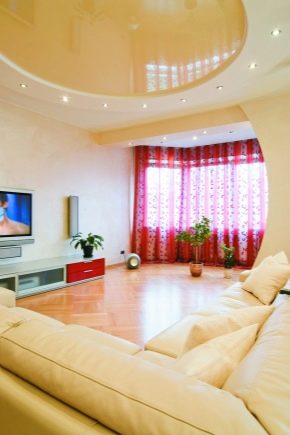
- A plasterboard box is installed on the ceiling along the perimeter. In the center of the ceiling is a sun-shaped structure. Less commonly, the shape of the tablet can be seen. This part contains a light source such as a luminaire. All remaining gaps are covered with a stretch ceiling film.
- The last method is the separation of structures. This development is used in premises with a large area. In such rooms, it is quite difficult to install a stretch canvas, therefore, there is often a division of the ceiling covering into parts from gypsum plasterboard.


Installation difficulties
The easiest way to install a plasterboard box is around the perimeter. Almost all owners choose this option.


Preliminary activities
Before starting the installation, you need to remove the curtains, remove all the paintings from the walls and free the room from furniture. You also need to remove the lighting fixtures by insulating the ends of the wires with a special tape. The floor must be covered with magazines or newspapers. For this, plastic wrap is also suitable, which can be purchased at any hardware store.

The preparation of the base is carried out in the same way as for the installation of a conventional stretch ceiling:
- Remove unsuitable paint, plaster, wallpaper, or other coating (if applicable) from the surface.
- It is important to cover all roughness and crevices with a high-quality putty.
- Next, it is worth priming the ceiling. This procedure will increase the vapor barrier and waterproofing properties. You will notice that there is less dust in the room.

It is also necessary to purchase materials for further work in advance.
To install a plasterboard structure, you will need:
- guide profile;
- bearing profile;
- connector;
- dowels of different sizes;
- high quality self-tapping screws;
- sheets of 9 mm;
- construction shovel for filling and baguette.


You will also need a heat gun. With its help, you will stretch the ceiling.

Decide on the material. The cloth can be made of fabric or film. The second option has increased moisture resistance.
Drawing development
Installation work should only be carried out according to a special scheme.
- Determine the length and height of the corners, walls and find out the location of the central location of the ceiling.
- Mark the distance between the canvas and the ceiling itself, the height of the first level.
- Thoroughly sketch out the outlines of the two levels.
- Select the profile attachment lines in the drawing.
- Highlight the path of laying absolutely all communications and suspensions.

After that, you should transfer the landmarks from the drawing to the ceiling. In the areas that are marked, the ceiling system is easier to install. For transfer, you can use a chop level and a building tape.
Installation of the lattice structure
Before installing the guide ceiling profile, you need to make sure that there are holes for the fasteners. The distance between them should be 0.4 m. If there are no such holes on the profile, they must be made with a drill.
The frame should be installed according to a specific plan:
- In accordance with the drawn lines, starting profiles are installed on nails with dowels. The first nail should be ten centimeters from the edge. The last nail should be placed at the same distance. The spacing between the rest of the nails should be 40 cm.
- The main guides are installed in the starting profile. They are secured with screws.
- Then you need to check the horizontalness of the product using a stretched construction cord.
- To make the structure strong and durable, transverse profiles are installed between the guide profiles. The interval between them should be 40 cm.The corrugated board must be carefully cut with scissors and attached to the guide profiles using metal products.
- Where the tension web is adjacent to the gypsum board, another mortgage profile is installed.

After installing the lattice structure, you should begin the process of carrying out communications. The wires are placed in corrugated pipes and fixed to the base cover. In those places of the room where it is supposed to install lamps, chandeliers, lamps, conclusions must be drawn.

Remember that any electrical work should be started only after a power outage in the building.
GKL sheathing
Prior to installation, the plasterboard must adapt to the room temperature and humidity. The material must be carefully laid out on the floor so that it can "lie down" there.
The base is sheathed according to a certain order:
- The drywall sheet should be fixed in the corner of the room with screws. If the size of the sheet is slightly larger than the area of the frame, you need to move the contours of the structure to the gypsum board and cut the necessary part.
- Then you need to attach the second sheet to the rest of the profile. It is important to leave a distance of 0.5 cm between the wall and the gypsum board. The screws are screwed in at a distance of 30 cm from each other.
- GKL cover the entire vertical part of the frame. For installation in curved places, bend the drywall and make small cuts on the back. The drywall sheet should be slightly moistened and the moisture should be distributed over its entire surface using a needle roller. Before installing, the gypsum board should be dried, fixing the desired shape of the part.
- The joints of the gypsum board with the wall and between the individual canvases should be covered with a layer of serpyanka.
- Fasteners and gaps must be putty.

- Decide where the chandeliers and lamps will be located in the room. Drill holes in the corresponding locations with a diamond core drill.
- Then on the surface of the drywall you need to apply a layer of fiberglass and putty. The putty layer should be one and a half centimeters.
- Sand the dry filler with sandpaper.
- Wipe the surface.
- For additional protection of the top layer and to improve the bonding process, the product should be primed.
- Do the final finishing work on the box. It is advisable to cover the structure with a layer of acrylic-based paint.

Fastening the tension cloth
This process begins only after the painted parts of the gypsum board have completely dried. When buying a stretch film, try to choose a material with a harpoon fastening method.
The film web is also installed according to the scheme:
- On the vertical part of the drywall, it is necessary to mark the level of placement of the canvas.
- In the place of the drawn line, you need to attach the ceiling plinth. The distance between the parts should be 7 cm. When installing a curved structure, it is necessary to make cuts on the profile, process them with sandpaper and bend them.
- Then raise the temperature in the room to + 40 ° using a heat gun. Expand the material. Remember that you must not bring the heat fan close to the stretch fabric, as this can provoke the appearance of stains. Gloves should also be worn when working with a glossy canvas.
- When the room temperature reaches + 60 °, the base angle harpoon should be tucked into the ceiling plinth. Then the opposite corner of the canvas and two side ones must be fixed.
- After successfully fixing the corners, the harpoon should be tightened into the ceiling plinth around the entire perimeter of the frame.
- The folds that have appeared on the canvas can be completely smoothed out if the area is heated with a heat fan again.

The tensioning material must be connected to the gypsum board in the joint. Around the perimeter, you can install a wooden plinth with decorative elements or patterns.
This combination looks good both in the room and in the hallway.

Installation of a stretch ceiling in combination with a drywall construction, see the video below.


The comment was sent successfully.