How to glue a stretch ceiling?

Today you will not surprise anyone with a stretch ceiling. Unfortunately, this material is quite fragile and can be easily damaged. The most common reasons for a stretch ceiling rupture are moving furniture, changing curtains or curtains, opening champagne (when the cork just flies into the ceiling) and others. The question immediately arises - how to fix the situation and try to glue the stretch ceiling?
Necessary materials
First, you need to determine the extent of the damage and their nature. Next, we determine how we can improve the situation.
A standard repair kit looks like this:
- glue for painting work or, if one is not at hand, the super-glue familiar to everyone will do;
- special tape for glass surfaces;
- a needle with a nylon thread;
- scissors (both regular and office scissors are suitable).


There are several types of glue that can be used to repair stretch ceilings. Its choice should be approached very responsibly, because the result of the repair depends on the quality of this substance.
The all-purpose adhesive is most commonly used to bond a wide variety of materials. Can be used for gluing non-woven or vinyl wallpaper. The composition includes special resins that allow it to be used during repair work.
Special glue is used only for a certain type of wallpaper and textures. Manufacturers produce three types of glue: light (designed for gluing light materials), medium (can be used for gluing fabric or acrylic wallpaper) and heavy (used for gluing vinyl and non-woven wallpaper).


Try to use transparent glue. This will help you visually hide the repair site and the defect in the ceiling.
You will need glue at the initial stage of the stretch ceiling installation. It is necessary to prepare and fix in advance the plastic overlays for stretching the canvas. The canvas will need to be tucked into the profile directly.

Do not forget that you should undertake repairs yourself only if the hole is less than ten centimeters.
If the hole is larger, use the services of a professional installer.
If the hole is very small, you can use regular white tape. This option of easy repair may be suitable if the hole is not more than two centimeters, otherwise it is fraught with the fact that the edges will still disperse in the future and the hole will already be much larger.


Repair options
First of all, you should make a patch from the same material as the stretch ceiling. The size of the patch should be slightly larger than the hole itself. Next, apply a layer of glue to the patch and press it against the hole in the ceiling. Remember that you should not press in the patch, otherwise the excess glue will come out and be visible to everyone around you. Smooth out the patched area gently.
In case you have no material leftovers, you can try to find a canvas that will match your ceiling in color.
First you need to thoroughly clean the place for sticking the adhesive tape. from dust and accumulated dirt. Cut a small piece of duct tape and attach it to the hole. If the hole is large, use a cloth. Place a piece of material over the hole and glue it well with tape.


If glue is selected for repair, you must carefully study the instructions for it.Stick to it, and then your patch will be securely fixed to the surface of the stretch ceiling.
If the interior design allows you, you can stick the patch in the form of an original applique, or turn on your imagination and even make a mosaic. But the most correct solution in this case is to contact professionals who will make repairs and seal the hole in the stretch ceiling without any problems. If you cannot glue the ceiling with improvised simple means, the material should be completely replaced.


You can also make fake ventilation - stick a small plastic grill on the hole where the hole is formed. Those who do not know the true reason for the appearance of this ventilation grill will think that it should be so.
Another winning option for filling a hole in the ceiling is to install primary or secondary lighting. If you do not need additional lighting, you can make a decoration - for this you will need to hang a plafond or lamp in the place where the hole formed. The installation of the decoration may be appropriate even if the electrical wiring is not provided in this place.


If you decide that you need a real chandelier that will provide lighting, then remember that you need to hang it on a special hook that is attached to the main ceiling. That is, if you do not have a hook, and also do not have electrical wiring, you will have to completely disassemble the ceiling, hang the chandelier and re-mount the stretch canvas. In this case, it will be cheaper to completely replace the torn stretch ceiling with a new one.
If a hole has formed at the seam, then you need to contact the company that installed the stretch ceiling. This will subsequently be much cheaper for you in material terms than independent attempts to correct the situation, because then you still have to contact the installers.


How to minimize damage?
To avoid damage to the tensioning material, you must remember what basic actions lead to the appearance of holes:
- Installation of cornices. If the curtain rods are inaccurately installed, there is a possibility that tears may appear on the surface of the tensioning material. To minimize their appearance, it is necessary to install a small soft cloth spacer between the ceiling and the sharpest edges of the cornice. This will protect the material from possible holes and unnecessary holes.
- Children's pranks. Children love to throw a variety of objects up. Some of them may have sharp corners or ends, which lead to unnecessary holes in the ceiling.


- Champagne. Inability to open a bottle of champagne or the tilt angle of the bottle is not the right one, and the cork bounces upward from the bottle with great force and tears the tension cover.
- When works related to installation, do not tighten the canvas too much. In the future, this will contribute to the divergence of the material precisely along the line of the seams.


- It is imperative to fix all the profiles and structures on which the canvas is stretched. Otherwise, in the future, they can move away from the wall and thus you will get a torn canvas.
- When installing luminaires, do not forget to select the appropriate power. High wattage luminaires can simply melt the thin web. This rule applies not only to built-in models, but also to pendant lamps.


How to do it yourself?
The easiest to repair damage are those located directly at the edge of the web.
The work algorithm in this case will be as follows:
- It is necessary to pull the edge of the film out of the baguette (about thirty centimeters on both sides of the place with the defect). The edge should be pulled out closest to the holes.
- Using a sharp knife, cut off the strip that was tucked into the profile when the ceiling was first installed.
- Cut off the bottom of the harpoon (strip tucked in profile).
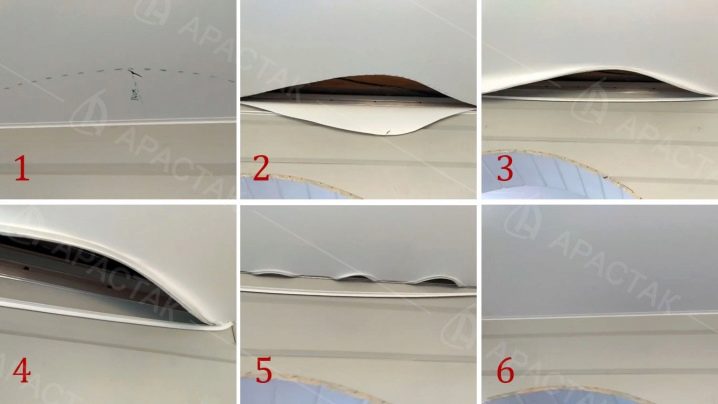
- Using a sharp knife, cut the defective film so that you get a curved line.
- Apply glue to the harpoon strip. Glue the canvas to this strip.
- Heat the film with hot air (use a regular hair dryer). Tighten it with a spatula and tuck the harpoon into the baguette.
These repair actions are suitable if the hole in the stretch ceiling, for example, from the Cosmofen company, is not very large. If the unnecessary hole is near the lighting or far from the perimeter of the ceiling, the situation becomes more complicated and requires the help of professionals.


Precautionary measures
The most common options for the appearance of unnecessary holes in a stretch ceiling version are improper operation, the use of low-quality materials, and unprofessional installation.
To minimize damage, you should follow the rules for installing and operating tensioning blades:
- It is necessary to use only high quality materials. Use the services of specialists and companies that guarantee the quality of their work. The most common causes of ruptures that do not occur due to mechanical intervention are deformation of the working surface, which is formed due to improper attachment of the profile and its lagging from the wall. This can only happen due to improper installation.


- Try to prevent children from tossing toys. Remember that even a regular ball can cause the tensioning web to deform. Such deformations can also occur due to too sharp raising of hands up by tall people.
- A curtain rod or a baguette must be installed very carefully. Try to use cushioning pads that are placed between the film and the baguette.
- The PVC stretch ceiling looks very nice and stylish. However, it requires careful maintenance. Unfortunately, even a small flood may require a complete replacement of the stretch ceiling. Such a canvas can protect your apartment from water, but it will need to be changed immediately - it deforms and stretches very quickly.


- If, when installing a stretch ceiling, cheap and low-quality materials were used, then in the future this is fraught with sagging of the material or retraction (when the material of the stretch ceiling sticks to the concrete ceiling base). If the installation was carried out by a reliable company, then such a defect belongs to the warranty. We remind you that warranty cases are usually eliminated free of charge. A cut is not one of these situations.
Do not forget also that it is better to eliminate the defects that have appeared as soon as you find them. This will allow you to quickly and without visible consequences to correct the situation.
For information on how to eliminate a cut on a stretch ceiling, see the following video.


The comment was sent successfully.