How to make a plasterboard box on the ceiling?

The ceilings of other rooms are oversaturated with all kinds of communications: ventilation systems, hoods, water pipes, electrical wiring, communication cables. All these elements look unattractive, there is a need for their disguise. The easiest way to disguise them is to make a plasterboard box on the ceiling. By means of gypsum plasterboard (GKL), structures of almost any size and configuration can be constructed. Such a construction will fulfill a practical function, as well as decorate the interior.


Peculiarities
The plasterboard box on the ceiling is a striking element of the room, it hides all kinds of problem areas, including electrical wiring and communications. A colossal plus is the ability to mount additional lighting devices in the box, which is especially important for many rooms. Virtually any number of light bulbs and switches can be placed in such a structure in order to be able to highlight a specific area of the room.


Views
It is possible to mount the structure of a one- and two-level plasterboard box in any room. These can be decorative walls and partitions, non-standard ceilings, curvilinear structures, various decorative details. Let's consider each separately in more detail.


Ceiling construction
This category of structures is the most popular and popular. On their basis, the formation of one- and two-level suspended ceilings is carried out. By creating a simple box, you will safely hide the roughness and small imperfections of the ceiling., cover individual communications. The backlit two-level box constructions make it possible to enjoy subdued, even decorative lighting emanating from the spotlights embedded in the plasterboard. Only a good specialist is able to correctly perform such a difficult and time-consuming work, although, having tried, you can create such a structure yourself.


On the wall
The technique of making a plasterboard box on the wall is simpler than the construction for the ceiling, but it provides for the basic skills of working with gypsum boards, maximum accuracy in calculations and scrupulousness during work. A box made of gypsum plasterboard on the wall, in addition to leveling and thermal insulation of the surface, solves other problems: it creates non-standard shelves and niches, decorative components of the interior decoration (for example, a plasterboard box for a television receiver).


Corner
A vivid example of a corner design is a decorative fireplace box. The creation of such a structure is carried out using a special technology after detailed development. This takes into account the calculation of parameters, the amount of raw materials and a number of traditional architectural and construction issues.


To the bathroom
Plumbing or sanitary box - a structure made of gypsum plasterboard in the form of a specialized compartment for laying sewer, water pipes and ventilation systems. Often, it is installed in washrooms to create the appearance of built-in plumbing, when the toilet bowl or sink is fragmentarily placed in the wall. By means of these boxes in the bathroom, they mask measuring instruments and taps, decorate the interior with new mezzanines and shelves.It is worth remembering that to create such structures in a bathroom or toilet, it is necessary to use a material that is resistant to high humidity.


Under the hood
The design for the hood is an unpretentious construction of an exact rectangular configuration, which makes it possible to safely hide the ventilation duct or grate. The design includes a frame made of metal profiles and gypsum board.
The assembled hood box can have:
- L-shaped configuration and adjacent to the corner of the wall;
- U-shaped and fixed on the ceiling;
- be fully lined with gypsum plasterboard and held on specialized suspension devices.


For heating radiator
The design for the battery has the simplest structure that even a beginner can assemble. This product is a conventional frame box based on a metal profile covered with zinc and pre-cut drywall parts. The radiator box is mounted along the perimeter of the heating radiator, fastening is carried out to the floor and the lower section of the window sill or to the wall surface, behind the battery. In the assembled structure, special slots are made for the outlet of the heated air flow. The decorative finish of the box will perfectly fit the structure into the overall atmosphere of the room.


How to calculate material consumption?
When calculating the materials necessary for the work, it is necessary to take into account the type and type of drywall used, its footage, the purpose of the room. Sheets are usually produced in standard lengths. The material can vary in thickness, width, weight. The optimum thickness for a false ceiling is 8-9.5 mm. Let's consider two methods of calculating the consumption of materials - graphic and mathematical.


Graphic technique
Calculation of a plasterboard box for the ceiling in this way provides for the creation of a visual image on paper. This will allow you to accurately place the profiles, count them, and place the gypsum board correctly so that the amount of waste is minimal.
A graphic project consists of several stages:
- Draw a plan for the ceiling, apply a grid on it with thin lines of 10 cm and lines fatter - 1 m.
- Perform the distribution of gypsum boards, first solid sheets, then fragments.
- Round up the resulting integer calculation. If it is difficult to visualize this process, it is worth spreading the gypsum board on the floor of the room in which it is planned to create a hanging box.
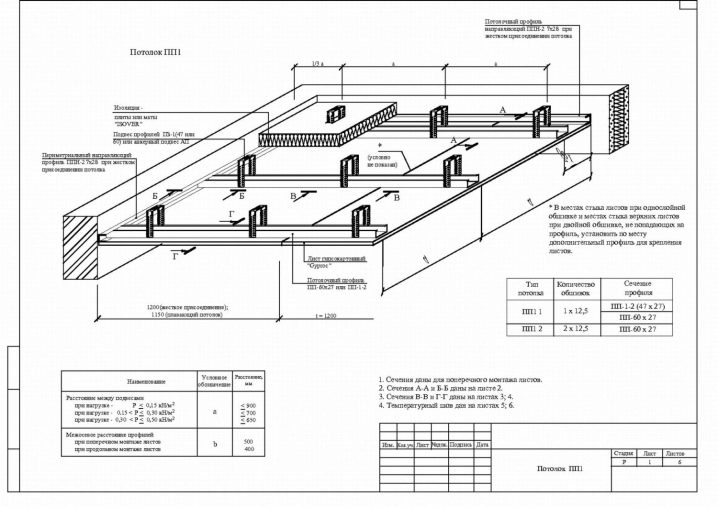
- After that, you need to transfer the result in the form of a diagram to a sheet of paper. In your mind, you can perform the calculation as follows: divide the total footage by the quadrature of one gypsum board (3 m2).
- Then you need to draw the lines for the location of the profiles. These calculations should be approached rationally, guided by a schematic drawing of the placement of drywall.
- Marks are set at the points of mounting the suspensions. If this number is doubled, the required number of dowels will come out.
- Cross-members from CD or PP profile are marked. At the points of intersection of the metal profile mating lines, it is necessary to mount "crabs" (four 18-mm self-tapping screws for each).

The perimeter of the room is the total length of the PN (or UD-27) profile. Calculate perpendicular and longitudinal PP-60 metal profiles (or CD-60). The footage of the profiles is summed up, the number of joints multiplied by 6 cm (guide width) is subtracted. All this should be divided by 3 or 4 m and rounded up.
The guides are fixed with an interval of 25 cm. 4 pieces are required for 1 meter. It follows that the entire perimeter must be divided by 4 and add 8 to the resulting number (fasteners for corners). This simple calculation technique will help to correctly establish the number of required materials for a suspended plasterboard box.


Mathematical method
If you know the area of the room and the required list of materials, you can calculate the components in half an hour by means of mathematical calculations.GKL butt joints must be located on the surface of the profile, and not hang in the air. Based on this and the dimensions of the drywall sheets, we calculate the distance between the metal profiles.
Calculation of drywall
To calculate the gypsum plasterboard, we calculate the footage of the ceiling and divide by 3 - this is the square of the drywall sheet. Round up to a whole number (up).
Calculating profiles
Guiding metal profiles are easy to calculate: you need to keep in mind that the length of the profile is 3 - 4 meters. We calculate the number of profiles, starting from the perimeter of the room. Separately, they calculate how many 3-meter profiles will be needed, what 4-meter ones. UD or PN are produced at 3 and 4 meters. It is easier to mount them across the width of the room. If the step between them is 60 cm, dividing the length of the room by 60, we get the number of required profiles.


Jumpers
Jumpers are specialized connectors that facilitate the rigid adhesion of two profiles to each other. Jumpers with a profile form squares 60x60 cm. The distance between the profiles is 60 cm. To calculate, take the CD-60 profile and subtract 3 cm from the bottom and from the top. For easy assembly, remove another 0.5 cm. Remains 53.5 cm - the size of the base jumper. Having established the number of lintel belts, we multiply it by the length of the room. So let's find out what footage of the profile will be required for the lintels.


Hangers
This calculation is not difficult, but it must be taken into account that suspensions are mounted every 0.5 meters. It turns out that 8 suspensions are required for each 4-meter profile. Knowing the number of metal profiles, multiply by 8 and get the required number.

Number of screws and dowels
All fasteners must be purchased with a small reserve. The cost of such material is low. If it remains after installation, over time it may come in handy on the farm. For one "crab" you need 4 self-tapping screws, 2 - for each supporting and ceiling element, 4 - for vertical suspensions.
The number of suspensions is multiplied by 2, since 2 dowel-nails are used for 1 suspension. The guide piece is installed with a step of 300 mm, so we measure the perimeter, which must be divided by 300. Summing up the figures obtained by multiplying the suspensions and dividing the perimeter, we find out the required number of dowels. Do not dismiss the calculations: it depends on how much you will spend on repairs if you make it yourself.

Preparatory work
To avoid any complications during installation, you cannot do without surface preparation before starting work. The base needs to be leveled. To do this, cover it with several layers of plaster. Then apply a primer and paint the ceiling. This is done to prevent the formation of corrosion, which will significantly reduce the operating time of the installation.
If the work is carried out in a room with high humidity, experts advise to treat the surfaces with an antiseptic, which protects the base from the effects of dampness.

When the paint dries, the preparatory work continues. The next step is marking. To make it correct, take into account the width and length of the profiles, the thickness of the drywall sheets. After completing the markup, you can start the main work.


Mounting
A step-by-step guide on how to mount a drywall box with your own hands on the ceiling will help you do the work yourself, without the help of specialists. It consists of several stages.

We carry out the markup
We draw lines with a pencil, controlling their evenness using a building level. Lines for fixing the guides of metal profiles are drawn on the walls and ceiling.

We prepare pipes
If pipes are located on the ceiling, primer and paint work must be carried out before packing them into a plasterboard structure.
We drill holes
Along the contour, where the guide profile will be localized, we drill holes for fasteners at the required distance. This will require a puncher.

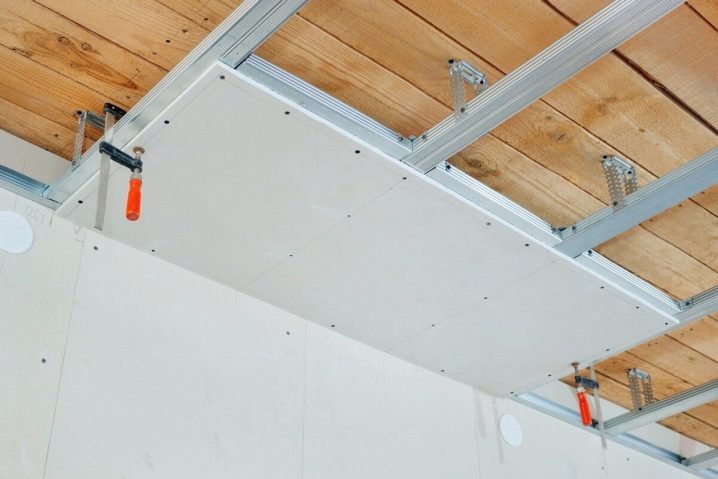
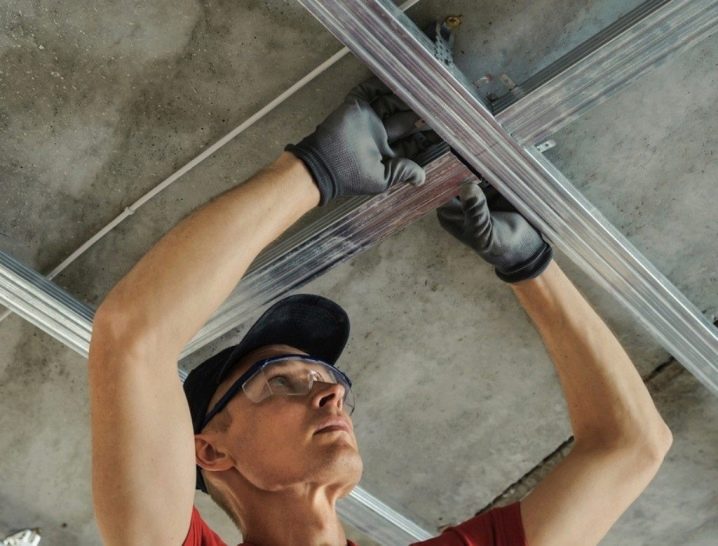
Fixing the guides
First, it is necessary to fix with dowels to the surface of the ceiling those metal profiles that form the upper part of the future box. Install UD profiles. It is necessary to screw the guide profiles along the perimeter: this will be the base of the structure, therefore it is important to maintain the evenness of the horizontal position of the structure. The fixation of these elements is performed with self-tapping screws.

We fix the suspensions
It is easy to cut them with scissors for metal (along the entire length of the box). The supporting CD profile is fixed to the lower segment of the suspensions using self-tapping screws. The main share of the load falls on these load-bearing profiles, it is necessary to carefully monitor the accuracy of the work, even a slight distortion must not be allowed.


We prepare the wiring
If you plan to install spotlights in the future, you must lay the wires in advance and fix them directly to the ceiling surface.

We fix the transverse details
They are fastened perpendicular to the wall, the step between them should not be less than 60 cm. The work on the construction of the frame under the GKL box has been completed, you can proceed to the installation of drywall sheets.
Box sheathing
Before installing the cladding, thermal insulation is laid, if it is designed. Plasterboard sheets are cut according to the dimensions of the box. The butt joint of two adjacent sheets must be located on one PP-profile. First, the lower segment of the structure is sutured, and then the lateral one. The material is fastened with self-tapping screws, the heads of which must be recessed by 1–2 mm in order to simplify the putty.


Finishing
Finishing work on shaped boxes, rectangular structures, as well as a soaring ceiling made of gypsum board begins with covering the entire surface with a primer. After it dries, it is the turn of the initial putty. Putty application is a responsible process. Incorrect finishing will spoil the overall effect of the external appearance of the structure. For high-quality work, specialists use two spatulas: auxiliary and working. Auxiliary putty is applied, workers evenly distribute it over the surface.
The corners of the hinged box are closed with a perforated cornerfixed to the starting putty. It is necessary to press down on the part to ensure a close abutment to the box. After removing the corners, the joint seams are glued with a mesh and filled with putty material. When the joints dry out, putty the entire structure. When the putty dries out, process the box with sandpaper until a flawlessly even surface is obtained.


If the result does not suit you the first time, you can apply another layer of putty, then sand it again.

Useful Tips
Drywall is a modern finishing material. It consists of a gypsum mixture and various additives, which are localized between 2 sheets of special paper. From it you can make any structure in height, width, configuration, similar to wood and even brick. Plasterboard sheets can be used to decorate a loggia, an attic, an attic.


Subtleties when using
Sheets of drywall are cut with an ordinary office knife with replaceable retractable blades. To do this, it is enough to cut the layer of paper and gypsum by a few mm. You don't need to put much effort on the knife. After cutting, the sheet breaks freely. Do not try to remove an incorrectly wrapped self-tapping screw from the drywall. It is better to screw it deeper so that it does not stick out above the surface and does not leave a hole.
It is better to knead the putty in small portions. Do not be lazy to knead by hand. You can do this with a puncher, trying to block high speed. Putty, mixed at high speeds, sets much faster, but loses a lot in quality.

After using up a portion of the putty, thoroughly rinse the mixing container before the next batch. This will eliminate structure heterogeneity. When working with gypsum boards, it is better not to use bars untreated with an antiseptic if a wooden frame is sheathed. To create lathing from wood, as a rule, they use bars with a thickness of 40 mm with a moisture saturation level of no more than 20%.
For information on how to make a drywall box on the ceiling, see the next video.


The comment was sent successfully.