How to make a two-level backlit plasterboard ceiling?
The ceiling is the main component of any interior. Unlike other types of surfaces, it is always visible, so this finish must be perfect. The fashion for traditional plaster and whitewash has long passed; today, two-level, backlit plasterboard structures are very popular in ceiling design. They not only allow you to hide all the defects of the base, but also give the room a beautiful look. The installation of such ceilings is not particularly difficult, so every owner of the house will be able to do it independently. To do this, you must first create an original sketch, then purchase the necessary building material.


Peculiarities
The two-level ceiling is a unique structure that is created from two tiers of plasterboard. The installation of the decorative composition is carried out in such a way that allows you to simultaneously hide not only all communication systems, electrical wiring, but also makes the coating even. In addition, performing even the simplest apartment renovation, with the help of such ceilings, you can rationally plan the room, visually dividing it into separate zones.


The only drawback of structures is that they reduce the height of the space, so it is advisable to install them in spacious rooms. You can, of course, perform such an installation in small rooms, but then you will need to apply special design tricks: expand the boundaries of the room due to light shades in the decoration of the walls and flooring.


Before installing two-level ceilings, you should consider the following features:
- Humidity level. In the event that a constant temperature drop and high humidity are observed in the room, it is recommended to choose a moisture-resistant drywall for work. You can also assemble a structure from ordinary sheets, but then they will have to be additionally treated with a protective primer.


- Features of the layout of the room. Depending on the shape and size of the room, the appropriate ceiling model is selected. At the same time, we must not forget that the installation of the frame will reduce the height of the space by about 10 cm. To save height, you can simply install the second tier on a leveled covering.
- Lighting system. Installation work should begin with a design, which will indicate the placement of lighting fixtures. Great attention must be paid to this point, since the general appearance of not only the suspended composition, but also the interior as a whole, will depend on the correct installation of lamps and lamps.


Views
Bunk false ceilings are perfect for modern designs. They look stylish and effective in the premises, creating an unusual atmosphere of comfort and warmth in the space.
Today there are many options for installing such structures, the most popular of them are:
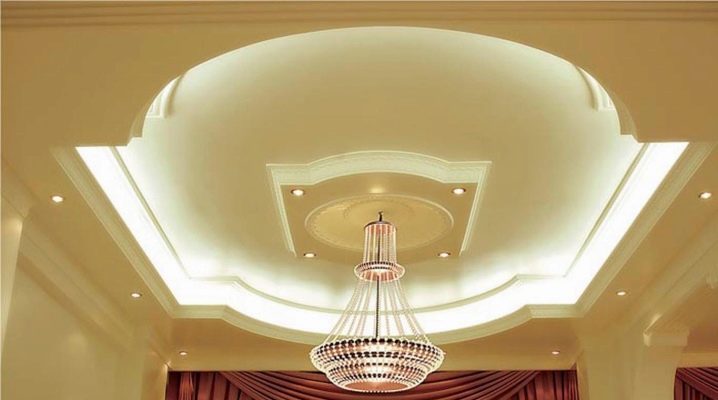
- Frame bunk ceiling. It looks like a box with one step. Such compositions, as a rule, are chosen for rooms whose height exceeds 3 m, since the device of the box requires a free space of 50 cm.The ceiling often has a figured shape, and both hidden illumination from LED lamps and spot lighting can be installed along its perimeter ... Such designs also look beautiful, complemented by large chandeliers in the center.Thanks to the box structure, the corners of the room are well lit and the interior is bright and interesting.


- Diagonal. The device of this composition is striking in its originality. The design scheme looks like this: the first level is attached, and then the second level is attached from it, which protrudes to the side. In this case, the dividing line runs horizontally along one side, smoothly merging with the second tier, the delimitation can be done using both straight and wavy lines. Thanks to its unusual shapes, the ceiling allows you to visually expand the space. In this case, multi-colored LED lamps are recommended as a backlight, which can be combined with night lights.
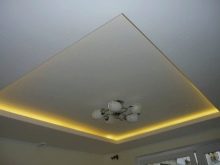
- Zonal. This view allows you to beautifully highlight a certain area of the room. The structure is fixed in such a way that it has the same level throughout the room, and a second tier is mounted above the area that needs to be emphasized. A similar system is chosen for living rooms and bedrooms, where you need to distinguish between a workplace, a rest and sleep area. The ceiling is also well suited for combined rooms, the style of which provides for visual boundaries.


In addition to traditional types of suspended ceilings, complex two-level systems are in great demand. In their structure, they are similar to the above models, but they are complemented by a variety of patterns, shapes and complex decorative elements. Thanks to such designs, you can create an unforgettable and exotic interior. As a rule, designers choose curly, abstract and soaring ceilings for modern projects.


The figured composition consists of two levels, which are set in the form of plants, drawings, patterns or geometric shapes, with the first tier being the main one, and light-emitting diodes are attached along its edges. The result is a stunning effect, while additional elements can be illuminated by spotlights. Such ceilings fit perfectly into any style, therefore they are considered universal. Most often they are chosen for Baroque and Empire style, in the design of which the presence of a simple decor with clear lines is important. A good option are designs for minimalism and high-tech, where rigor is presented in everything.


Soaring ceilings deserve special attention among the two-tier drywall structures. Their system is made suspended, LED lamps are installed along the contour, and the second level plays the role of decoration. In addition, this system creates a visual effect in which the ceiling looks weightless, "floating" in the air. Therefore, if the interior of the room needs to be filled with a magical atmosphere, there is no better option for decor.


As for abstract ceilings, they are most suitable for those home owners who love unusual shapes. There are many design options for such structures, but systems with a spiral second tier are the most popular in modern design.


In order for the composition to acquire an original look, it is best to use several colors when decorating it, you can also make inserts with bright shades.
Lighting
A plasterboard ceiling of two levels will look stylish if supplemented with good lighting. You can install lighting devices with your own hands, since this is not particularly difficult. All that needs to be done for this is to first draw drawings for the placement of devices, as well as choose the most suitable version of the lamp or luminaire.


To date, the following devices are most often chosen for mounting the backlight of two-tier systems:
- Spotlights. They allow you to make both main and additional lighting, beautifully highlighting individual areas in the room.
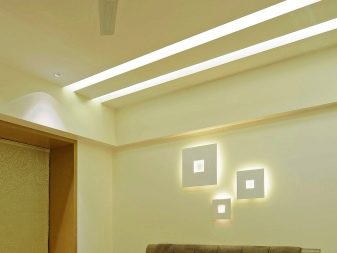
- LED strips. They are used to illuminate the perimeter ceiling.The ribbons differ from each other in the color spectrum, therefore, depending on the design of the room, you can choose ribbons that create light with different shades.

Preparation
Installation of a two-level plasterboard ceiling is carried out in stages, while construction work must be carried out correctly, in compliance with all installation technologies. In order for the structure to reliably serve for many years, surface preparation is performed before fixing it, after which only the frame can be assembled. Therefore, first you need to control the surface of the coating, remove the old plaster, carefully seal the cracks. When the rough finish is completely dry, the base is primed.

The next stage of preparation will be the choice of a frame project, according to which it will be possible to assemble the structure in the future.
As a rule, step-by-step instructions are used to make the frame, according to which the assembly of the suspension system is carried out in two ways:
- First of all, the system of the first level is installed, then the second tier is attached.
- The second level is being prepared, it is fixed on special suspensions, after which the first level is mounted.


Each of the above assembly technologies is good in its own way, but if you do the installation work yourself, then its choice will depend on the skill and skills of the novice master, as well as on the size and shape of the room. For example, for small rooms it is not recommended to use a complex system of ceilings, as due to the double construction the height of the room will be "cut off" and it will look cumbersome. As for rectangular rooms, when choosing the placement of levels, you need to pay attention to the fact that the second tier should be smaller than the first.
Mounting
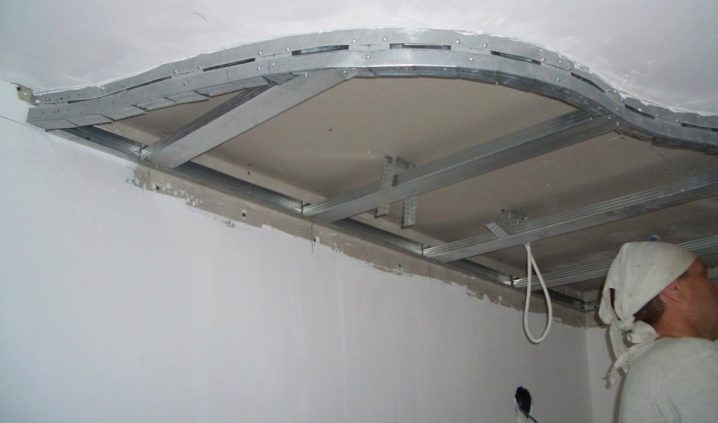
After all the preparatory work is completed, you can proceed to the direct installation of the two-level structure. In the event that the installation is done by hand, then it is important to make the correct measurements, having determined the zero point on the ceiling. To do this, you need a water level with which you can draw lines. If you plan to make a system consisting of several geometric shapes, then a grid of lines must be applied along the entire perimeter of the ceiling. In this case, the distance between perpendicular lines should not exceed 60 cm, for parallel lines it is 50 cm.


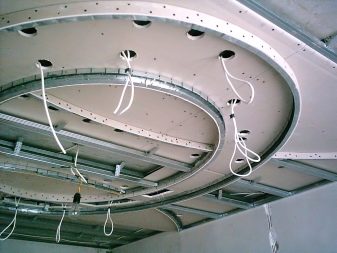
Plasterboard sheets are also accurately measured, their parameters must fully correspond to the dimensions of the frame. Thus, the drywall is fixed at the edges and in the middle with self-tapping screws, and the decorative figures are first made in the form of a cardboard template, after which they are transferred to the structure. Before sheathing the frame, it is necessary to lay all engineering communications, consisting of air conditioning, lighting and ventilation systems. They are attached directly to the slab to avoid damage when sheathing the frame. As for the wiring, it cannot be placed inside the profiles, the ends of the wiring are brought out, where the fixing of the lamps will take place.


Fixation of drywall sheets is carried out using special self-tapping screws. In the event that the composition needs to be sheathed with curved and curly details, they are first treated with a solution and given the desired shape using a spiked roller. He will make a lot of holes, thanks to which the drywall sheet will become pliable to processing and bend easily. First, the sheets of the first tier are fastened, then they proceed to the installation of the workpieces of the second level. If the ceiling area is large, then it is recommended to lay the drywall sheets in a checkerboard pattern, observing the distance between the plates of 40-50 cm, so the material will be securely fixed and will hold well.

In addition, you need to prepare holes for the installation of future lamps and fixtures. Since the wiring was laid earlier, it remains only to connect its ends to lighting devices.At the end of the installation, it is necessary to process the caps of the screws with a special solution, and also to putty the seams with a finishing mixture. After that, grouting, grinding and installation of lamps are done.

Useful Tips
A plasterboard ceiling, consisting of two levels and lighting, is considered a complex structure, therefore, in order to properly install it, you must first draw up sketches of the future composition, then assemble the system. Despite the fact that the installation process may seem difficult, it is quite possible to cope with it on your own.

For novice craftsmen, when installing two-tiered ceilings, it is recommended to use the following helpful tips:
- The second level of the suspension system plays a decorative role, therefore, the design of its design must be treated responsibly, picking up unusual ideas. The technology of installation of the structure will depend on the shapes and sizes of the second tier, since often the figures can have a cutout or go down to the first level.
- Installation should begin by measuring the perimeter of the ceiling and determining the height for each tier. For the calculations to be performed correctly, a laser or hydraulic level should be used. For each level of the system, a mark is placed, after which a chopping cord is attached, and a working plane is formed.
- The drawing of the future ceiling is drawn directly on the floor slabs, in order to fix the evenness of the lines, UD profiles are attached to the surface.
- To give the structure volume, you need to make guides from CD profiles. At the same time, while working with profiles, it is necessary to leave a small margin of length.


- The profiles are fixed with special metal screws. If necessary, they can be bent to either side of the structure. In the case when the profile is placed opposite the ceiling, then its direction is aligned as follows: cuts are made to the base every 5-10 cm, after which the segment is directed in the desired direction.
- Cutouts in the plasterboard ceiling must be made of rigid profiles that can withstand the load. They are attached to the ceiling using U-shaped brackets.
- All load-bearing profiles, unlike conventional wall structures, are mounted with a gap of 40 cm. To increase their strength, you can take a step of 30 cm. Such reinsurance will increase the strength characteristics of the frame and protect the structure from possible cracking under the influence of the weight of the second tier.
- In contrast to walls, the load-bearing profiles of the ceiling are fixed directly to the floor itself, therefore the fastenings are subject to enormous stress. To make the system durable, you should additionally attach metal brackets to the profiles, keeping a distance of at least 60 cm.
- It is advisable to combine the process of making the frame and sheathing it with sheets of drywall. Therefore, it is best to first sheathe the second tier, and only then start finishing the first main one. Thus, the work is done faster and more conveniently.
- The most difficult thing in the design of a two-level ceiling may seem to be the bending of drywall sheets. To do this, they are traditionally soaked, after which they are leveled with a special roller, but all this can be done in another way. If it is necessary to create figures of a small radius, then drywall will bend well and dry. In order not to break it, it is necessary to make even cuts in parallel, observing a step of 5 cm. The resulting workpiece will easily bend and putty.

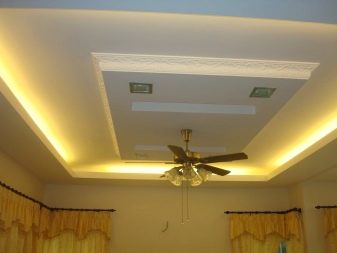
- In order for the ceiling of the original to complement the interior of the room, you should worry about its illumination. For two-level systems, LED strips are considered an ideal lighting option. They are best fixed around the perimeter of the lower tier, which forms a small niche. The result is a stunning light effect. In this case, the lower level should protrude beyond the frame perimeter by 50 or 70 mm.The edges of the drywall sheets are aligned along all borders, then guide profiles are placed and the LED strip is mounted.
- The design of a bunk ceiling must be selected strictly in accordance with the style of the room. It should be in harmony with the walls and flooring. Depending on the functional purpose of the room, you can install structures that visually divide the space into separate zones.


Beautiful examples in the interior
A two-level plasterboard ceiling is considered an ideal addition to the interior of any room. Such suspension systems look beautiful in kitchens, but since this type of room is often exposed to moisture and high temperatures, for decoration you need to choose the right material with special protection. A warm palette of colors is well suited for the kitchen, so two-tier compositions are best designed from several shades of color. Separate inserts from various textures and colors will also look unusual in designs. A classic option for the kitchen will be a snow-white ceiling with bright illumination, while lovers of Art Nouveau can choose models that combine not only drywall, but also colored canvas exhibitions, which will harmoniously complement the beauty of the flooring and furniture.


In addition, for the kitchen, you can choose plasterboard systems, assembled not only from rectangular tiers, but also decorated with interesting figures, lines and patterns. These can be geometric shapes, abstraction, or waves. To emphasize the beauty of a complex structure, the light sources must be installed not only along the perimeter of the lower tier, but also put them in decorative details. Thus, a small zoning can be performed in the kitchen. For example, the ceiling looks gorgeous in beige and white colors, while the color insert is a continuation of the furniture shade.

The living room plays a special role in every home. Since not only the whole family gathers in it, but also a meeting of guests takes place, its design should be special. A bunk ceiling will help to achieve a stunning effect in the interior of the living room. It will make the room luxurious and stylish, and unusual combinations of colors and shapes will give the surface a chic look. Two-level plasterboard ceilings look especially beautiful in living rooms, in the design of which there is an elegant matte or glossy film. Thanks to the unusual decor, even a small room can be turned into a trendy hall.

The color of the hanging composition must be chosen in accordance with the harmony of shades. Therefore, the tone of the background of the room is determined, and after that paints are added to the interior. Such ceilings can be decorated not only with geometric shapes, but also with Chinese symbols or unusual patterns. It all depends on the design style and personal preferences of home owners. Two levels look especially interesting in living rooms combined with a kitchen. For them, you can choose a classic design in white by placing the LED line on the surface in the form of original patterns.

The bedroom belongs to the recreation and sleeping area, therefore the installation of two-level ceilings in this room requires a special approach. An excellent solution for it will be a suspended structure of two tiers, where plasterboard parts will be made in light colors, and decorative canvases in dark shades. The lighting of such a composition can be made both from spotlights, and the system can be supplemented with small chandeliers that will help create an atmosphere of harmony and romance in the room. A complex structure in white looks interesting in the bedroom, the upper tier of which is located above the bed.

Despite the fact that the bathroom is prone to high humidity, it is still possible to install complex ceilings, consisting of two levels and lighting.To do this, you need to choose drywall, designed for wet rooms. It is advisable to use light shades in the design of such ceilings that would go well with the wall decoration. For the bathroom, it is not necessary to make complex compositions, you can get by with the second tier, laying it out in a figured form.

For information on how to make a two-level backlit plasterboard ceiling, see the next video.


The comment was sent successfully.