Varieties of ceiling tiles and methods of laying it

Ceiling tiles are a common material that allows you to quickly and professionally decorate your ceiling. It has several varieties, it can differ in both synthetic and natural composition.


To understand how to work with it, you need to know the features of the species: this will allow you to perform the finishing flawlessly, without resorting to the help of repair teams.


Features: pros and cons
Ceiling tiles are a modern finishing material that has its own characteristics, advantages and disadvantages. Outwardly, it represents fragments of an identical size, through which a ceiling covering is created.
This material has a lot of positive qualities, it:
- manufactured on modern equipment using the latest technologies, which allows the production of high-quality raw materials;
- differs in the variability of the composition, due to which there is a choice between synthetic or natural material;
- has a different shape and size, which is convenient for finishing non-standard rooms, contributes to quick work;
- it is an excellent sound insulation, reducing the level of sounds from neighboring apartments;


- regardless of the type of raw material, it insulates the surface of the ceiling, which is especially noticeable in the cold season;
- has the optimal size, due to which the ceiling is finished quickly and conveniently;
- available for sale, a wide range allows you to buy the desired option without problems;
- differs in color palette, allowing the buyer to purchase a finish to match the existing wall finish or in contrast to it, filling the space with light;


- has a wide range of patterns and ornaments, which makes it possible to choose in favor of a specific interior style, taking into account the footage of the room;
- depending on the type of material, it can be used for pasting the ceiling of different rooms;
- does not need scrupulous alignment of each tubercle or fossa of the ceiling surface, masks minor irregularities;
- is affordable, which is liked by the main circle of the buyer, keeping within the budget planned for the purchase, taking into account the cost of marriage.


Such material is a worthy alternative to plasterboard and stretch ceilings. Moreover, it is much easier to install, does not need to prepare a metal frame. You can paste over the ceiling with it during the day, not counting the preparation of the surface. Such a finish is durable: it can last for more than 10 years, while to renew the surface in many varieties, it is enough to use special paint and a classic foam roller, passing the ceiling sheet in 2 times.


Ceiling tiles in most cases are lightweight, so there is no need to apply glue to the entire back side, just a point application (5 - 9 points).
Therefore, the consumption of glue will be economical. It is not applied to the surface of the ceiling, even if it is cladding with relatively heavy varieties. However, in order for this material to stay on the ceiling for a long time and firmly, it is necessary to prepare the surface.


With a lot of positive characteristics, ceiling tiles have several disadvantages:
- this material requires accuracy in work, otherwise the risk of damage to the fragment is not excluded;
- in some varieties, it bends without returning to its original shape;
- the fragments are not always identical in length and clarity of the abutting edges, the tile requires calibration;
- if the glue hits the surface, installation defects are not excluded (not every composition can be removed without damaging the tile);
- synthetic material is fragile: it must be cut carefully so as not to break off corners or edges;
- when joining porous tiles, shrinkage is possible, the material reacts to the components of the glue.


Some varieties, due to expensive raw materials, are not affordable for an ordinary buyer. Despite its simplicity in work, this cladding requires accuracy. It must be carried out with clean hands, constantly washing off the remnants of glue from them. Therefore, his choice should not be an obstacle to quality work.
The disadvantage of some varieties is the presence of moisture in the structure. To prevent unsightly cracks from appearing during the pasting process, 2 - 3 days before installation, the tiles must be placed in a warm and dry room, removing the plastic wrap from the packaging.


Views
Ceiling tiles come in several varieties. It is classified according to the principle of manufacture and type of surface.
According to the manufacturing principle, it happens:
- stamped (pressed);
- injection (cast);
- extruded (extrusive).
Stamped tiles are made by pressing expanded polystyrene blocks, compressing the material to a thickness of 0.6 - 0.8 cm. This type is porous, somewhat loose fragments that are easily contaminated. It is quite fragile, does not have a protective film, and does not provide for wet cleaning. The advantage is the low cost.


The injection version is more thick, which is 8 - 14 mm, so its sound insulation properties are quite high. Due to a special production technology, it is stronger than pressed, has no relief differences and provides for a seamless installation technology, in which the complete cladding looks monolithic, without joints. It can be painted, while the surface will look monolithic. This category is characterized by a clear and deep pattern. It is not afraid of moisture, durable, environmentally friendly and fireproof, costs 3-4 times more than a stamped analogue.
This variety is remarkable in that it perfectly imitates different types of surfaces, including ceramic, wood, marble, leather and fabric textures, matting, sometimes similar to stone and brick.


Extruded ceiling tiles are made from polystyrene strips obtained by pressing. It is divided into two categories: paintable and protective film. This is a premium type of tile, it costs more than the first two. Differs in hygiene, high density, resistance to dust accumulation, repels water. It can be wiped clean with a damp cloth. This material is resistant to deformation: when squeezed, it quickly returns to its original shape.


All sound-absorbing varieties look elegant and are suitable for luminaires of different designs (suspended and surface type). In this case, you can beat the place of fixing the chandelier by means of a decorative fragment for plaster stucco molding, choosing a blank in the same theme with the pattern of the tile itself. The ceiling looks especially beautiful together with the ceiling plinth or molding.

By the type of surface, the finishing material can be:
- laminated;
- mirrored;
- seamless.
The laminated type is distinguished by the presence of a special protective film called "lamination". It is she who protects the colored surface from fading and loss of brightness, although over time such material may turn yellow. Thanks to the film, dirt can be washed off from such tiles.


Seamless tiles have no clear boundaries. Often its side edges are curly, when combined, they are inserted one into the other, without a side edge.Thanks to this feature, the type of cladding is monolithic. Such tiles are thermally resistant, they can be painted and wiped with a damp cloth.

The mirror category for the ceiling is nothing more than a design variety. It is a plastic material with a mirror layer applied to the surface. Due to the mirror inserts, the tile visually plays up the lack of usable space, so it is often used in small rooms. It looks expensive and, especially, is one of the best materials highly appreciated by craftsmen.


Material
According to the material of manufacture, this tile is different:
- Woodenmade of oak, mahogany, birch, aspen, linden, has a smooth, structural and carved surface texture;
- Metalhaving a concave, convex, matte, mirror surface (one of the most durable and refractory categories, withstanding temperature extremes);
- Plastic and polystyrene, characterized by a smooth or embossed surface, resistant to any temperature, practical, against the general background resembling plaster stucco.


Each type has its own characteristics.
For example, wooden varieties do not have a lot of weight, so they do not create a load on the rough base of the ceiling. To resist moisture, they are covered with a layer of varnish. Metallic is convenient for a variety of designs and colors, is easy to paste, but can cause difficulties with cleaning, so you have to remove dirt by diluting a special concentrated agent. The classic polystyrene category (PVC) is the most demanding of all for careful handling.


Dimensions (edit)
The standard sizes of ceiling tiles depend on the material of manufacture.
Each category differs in its own standards, for example:
- wooden can be 30 x 30, 50 x 50, 70 x 30, 60 x 20, 60 x 60 cm;
- metal has dimensions of 60 x 30, 50 x 50, 70 x 30, 30 x 40, 40 x 40 cm;
- expanded polystyrene (solid and perforated) differs in parameters 50 x 50, 60 x 60, 40 x 40, 60 x 30, 70 x 30, 70 x 40 cm.
These are not all possible dimensions. It is worth considering that this material is often made to order. For example, strips of metal tiles can be up to 2 m long. The synthetic variety can be very small (less than 30 cm), or quite large (up to 1 m).

Colors
The days when exclusively white tiles were available for sale are a thing of the past. Today in hardware stores you can buy a wide range of colored materials. Among the classic shades, noteworthy are blue and white, light pink, delicate milky, cream, sand, coffee, gray and orange tones. No less interesting are mint, lilac, purple, brownish-pink paints. Among the assortment, you can find unusual varieties with a metallic sheen. This group includes golden, silver, copper, brownish, marsh shades.

Such a tile does not provide for painting, while porous white is quite well painted over with a dye with the addition of the usual color scheme. Any shade can be obtained by mixing two or three pigments if necessary. This allows you to adjust the color of the ceiling to the design idea of the interior of the room, if you want to replace white with color.
The category that can be colored is visually thicker than the colored variety.


The form
Initially, the classic shape of the ceiling tile was a square. This made it easier to start work by calculating the center of the ceiling, or doing it from the corner. Symmetry contributes to a harmonious aesthetic perception: the ceiling appears flat and does not warp the walls. Today, in addition to square tiles, the parameters of which are small, on sale you can find material of rectangular and non-standard shapes. In this case, the side faces can be linear or curly (for example, wavy, concave, convex).


Style and design
This finishing material is appropriate in different styles.You should not fit it into creative directions (for example, loft, grunge, bionics, brutalism, retro): this way it risks losing its attractiveness. Styles close to the classics are inherent in it, in which you can demonstrate the elegance and solemnity of the finishing material. This design is especially appropriate in the style of neoclassicism, classicism, and Italian style. The drawing should be symmetrical, geometry and other ornaments are welcome.


Colored tiles look good in modern interiors. In this case, the emphasis is on an unusual appearance or an imitated surface, far from the classical understanding of ceiling tiles. The design can be a 3D drawing, mirror inserts in a large matting, imitation of marble tiles with a relief. At the same time, the abundance of drawing may be superfluous: today the texture itself is important. Minimalism is excluded, but modern and high-tech are quite possible. Ceiling tiles will also successfully fit into rustic Provence, country and boho, English and Chinese styles, supported by an interesting lamp. In this case, the drawing of the fragments should be discreet.


How to choose?
When buying a ceiling tile, you need to take into account a number of nuances:
- buy material that can be washed (the same applies to glue);
- pay attention to the tiles that can be painted with water-based paint;
- choose a variety of medium thickness (through thin ones, base defects may be visible);
- if there is a lot of wood in the interior, do not choose a material with an identical color, this way you can create the feeling of being in a bath;
- if repairs are done often, it is worth making a choice in favor of the polystyrene variety;
- if the interior is designed in an ecological style, choose natural tiles;


- for a modern trend, a metal or plastic material with an unusual shape and seamless technology is needed;
- for the classics, pay attention to the expanded polystyrene tiles, it is ideal for this direction and does not look old-fashioned;
- select the material taking into account the details of the furniture: pay attention to the pattern on the tile (where straight lines and strict geometry are needed, butterflies and flowers with curly leaves are inappropriate);
- make a purchase in a trusted building materials store with a good reputation, this will eliminate the risk of buying a toxic fake.


Required tools and mixtures
The work does not require special tools. Everything can be found at hand.
Before the process itself, you need to prepare:
- special adhesive for ceiling tiles;
- ceiling tiles of the right size;
- items for marking (pencil, thread, tape, scissors);
- a construction knife and a large ruler for cutting material;
- gloves (for those who are more comfortable);
- rags for hands and removing excess glue;
- a soft sponge and water (to instantly remove the glue from the front surface).


Glue
In the modern construction market today there is a wide range of adhesive materials for ceiling tiles. Some people like to use mastic, others choose an acrylic sealant for sealing. Usually the manufacturer indicates the type of material for which it is intended. In fact, not every advertised material is worth buying: some types of glue are the cause of marriage. This is due to the fact that when in contact with certain compounds, the tile shrinks in the places where the glue is applied.
Even experienced craftsmen disagree, each choosing the type of raw material with which he is used to working. However, if for some the presence of joints is the norm, others do not tolerate the slightest gaps between the glued tiles. If this is allowed, over time, poorly fixed tiles can simply fall out of the common canvas. Let's consider several main types offered for work.

"Titanium"
This company offers two types of adhesives that can be used to install ceiling tiles.The first one is sold in small plastic bottles, it is transparent, has a slight specific odor. The masters claim that it is quite comfortable and does not become limp when water leaks from the neighbors above.
In operation, it forms viscous threads, which somewhat complicates the cladding.
The canned glue of the trademark resembles canned putty in consistency. It has a yellowish color, therefore it is not suitable for thin and white tiles (it stands out with dark spots). When working with porous material, it leads to shrinkage: the tiles at the joints shrink within a few minutes after applying the glue. It is unacceptable to use such a composition for synthetic materials: both the tile and the entire appearance will be damaged.


Liquid Nails
This glue is sold in tubes and bottles for a construction gun. Its consistency is thick, especially in vials. Externally, the material is a dark beige paste that instantly solidifies. You need to work with it optimally quickly: it is not always possible to correct a fragment glued to the ceiling.
For working with thin white tiles, it may not be suitable because of the color, but heavy and colored varieties of raw materials will stick tightly. The disadvantage of the material is the problem of installation: it will be difficult to remove such glue, if necessary, after drying. You need to be extremely careful in your work. It will not be possible to remove 100% liquid nails from the treated surface.


"Quart"
This brand produces canned glue for ceiling tiles with a creamy consistency. The mass is characterized by a snow-white shade. It is easy to use and allows the tile to be adjusted if it needs to be moved. At the same time, the glue does not eat up the material. It is convenient in that it can be used as a joint sealant if cracks appear during the work (it allows you to seal the joints imperceptibly). It is matte, invisible after painting.


Laying methods
Ceiling tiles can be laid:
- parallel;
- diagonally;
- staggered;
- around the perimeter.
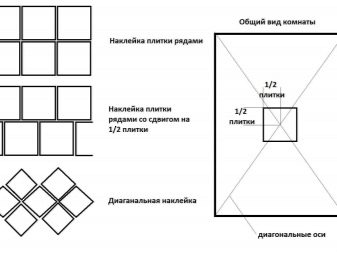
Each option has its own characteristics. The simplest of them is the parallel method, in which the installation starts from the location of the chandelier, taking as a basis 1 fragment, in which a hole is cut out to connect the wires to the chandelier. Before gluing the first fragment, markings are performed, for which a cross is formed from the centers of the walls by means of a thread fixed to an adhesive tape. This will allow you to maintain the correct direction when applying the first piece.

Further, everything is easy: subsequent blanks are glued to each face closely, avoiding the formation of gaps, for which calibration is performed before gluing.
Before applying the glue to the back side of the tile, a fitting is carried out, applying a fragment in the desired direction to the place of the future position. This will allow you to see how tightly the corner and side face will fit. Trying is necessary, since the tiles in most cases differ in size, even if they are made from the same batch. This may also be due to the dense packing of the material, in which the corners along the edges are especially pressed.


The staggered tile differs in that it is laid with a shift. In this case, the initial stage can begin not only from the center or location of the chandelier, but also from the corner, which is much easier. This method is relevant for a beginner.

Diagonal installation or gluing with a rhombus looks better than classical techniques, but this installation is much more complicated. It requires at least a little experience so that there are no joints in the work. In this case, the markup is performed from the corners of the room. Each corner of the fragment should point strictly to the center of the walls if the chandelier is centered. If it is displaced, the markup is corrected.


The perimeter method is performed along each wall, starting from the corner. In the center, the surface is finished with a different material: this way you can make the interior unique and demonstrate a subtle sense of taste.This technique looks beautiful, especially if it has support around the perimeter in the form of diode spotlights. However, this installation method requires taking into account the tile pattern: the ornament must repeat the elements of the existing style.

Tips & Tricks
To make the workflow easy, you should pay attention to several useful recommendations.
This will allow you to carry out the installation professionally:
- initially, it is necessary to calculate the amount of material, which will eliminate the risk of a shortage of raw materials (it is worth adding a few spare fragments in case of marriage);
- it is important to prepare the surface by removing the old whitewash, removing greasy and dirty spots, covering up cracks, removing large bumps;
- do not forget about the primer: it is needed for maximum adhesion of the tile to the ceiling surface;


- if gluing is carried out for the first time, buy material for painting, so that after drying the ceiling sheet, immediately paint the finish with a roller;
- do not use pins for fixing: to level the joints and tiles on the same level, roll the surface with a rubber roller;
- if initially there is dirt on the surface of the tile, and the amount of material is limited, try washing it off.
If it doesn't help, use this fragment in the corner or leave it for cropping;
- if you need to selectively paint a tile pattern, do it after the tile has been fully tiled and dried.


Manufacturers and reviews
Among the foreign and domestic companies offering ceiling tiles for sale, there are several brands that have a bright consumer appraisal. For example, the best and safest, according to experts who tested the material for compliance with safety standards, are the products of Decomaster, NMC sa, Kindecor. These materials are also liked by buyers who note that this tile is easy to use, looks stylish and beautiful. Other manufacturers, worthy of attention, buyers and experts include the goods of Armstrong, Martin-Plast, Ophelia (Russia), Decoplast. These extruded ceiling tiles allow you to easily finish the ceiling to match the desired style.


Successful examples and options
To understand how a different type of tile looks in the interior, you can take a closer look at the examples presented in the photo gallery:
- the tiles in the center of the room, edged with a baguette and spotlights, look stylish and expensive;

- a variety under a tree, coupled with a pendant chandelier, gives the interior a solemnity;


- laminated tiles with carved plinths look harmonious in a small room;

- the version with gilded decor fits well into the interior with the support of a gilded lamp;

- embossed material with a glossy texture and original ornament is successfully combined with an unusual chandelier;

- this technique allows you to create a visual effect of a multi-level ceiling, the tile goes well with a hanging chandelier;

- This example demonstrates the 3D capabilities of the material: with the simplicity of the pattern, the tiles increase the space.

For information on how to properly glue the ceiling tiles, see the next video.


The video is understandable, only it is not clear how long it is necessary to hold the tile until it grabs. Thanks!
The comment was sent successfully.