How to put the disc on the grinder correctly?

The disc of the "grinder" (angle grinder) is one of its main working parts. It is the disc that determines the use of the instrument. With it, this machine can be used to cut, grind or polish various materials. Discs, depending on the purpose, differ from each other: from abrasive chips - for metal, steel milling cutters and circular saws - for wood processing, with diamond dusting - for stone and tiles, all kinds of brushes, brushes and emery wheels - for polishing various surfaces.
The disc "grinder" is a consumable material; you will not be able to save on it in the process of work. The disc will gradually wear out (burn out) and must be replaced. When planning work, you need to be prepared for this and it is better to stock up on several removable disks in advance.


How to install correctly?
Installing a disk on an UMSH is not so difficult. You can change it simply by following the instructions, although there are some nuances here.
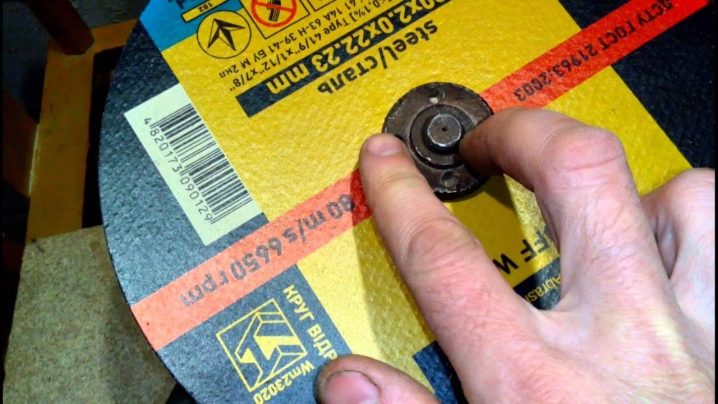
First of all, you need to install the disc in the correct direction. This is especially important if it is detachable. Usually the side of the disc with the label on which the marking is indicated and, accordingly, the scope of its application, is slightly different from the opposite side. It may not appear immediately, but with prolonged intensive work, the difference will not only be noticeable - it will be obvious.


On the side on which the label is glued, a wide pressure washer is placed, and the movable nut acts on it when tightening (installing the disc). The nut slides on the polished surface of the washer, without it it will become more difficult to tighten or unscrew, since the abrasive will firmly hold the nut and more effort will be required. This is especially important if a quick replacement of the disc is required or if it is damaged (jammed).
There is always a chance of a disc breaking, but when installed correctly, it breaks only under heavy loads, the structure of the discs takes into account the difference in loads on both sides.
With circular saws or other products that have teeth or a significant difference in two sides, there is usually no problem how to set. For example, a grinding disc cannot be fixed on the contrary: it will simply be impossible for them to work.
Discs for stone, including diamond ones, have a special rotation indicator in the form of an arrow: when installing them, you need to fasten them taking into account where the rod will rotate.

It is also important to consider the size of the disk when installing. In no case should you neglect safety and remove the protective cover - it is better to choose a disc of the appropriate diameter. Sometimes on a "grinder" of smaller dimensions they put a worn-out disc from a large unit. However, a worn disc, as a rule, cuts worse, the working surface is limited to about half the radius of the disc, the structure is slightly different. The disc burns faster and does less work. This operation can be justified if the diameter of the stem is the same. But you won't be able to change it back.

No debris should get under the disk when installing. Of course, the clamping nut may well squeeze small objects, something will press into the surface of the circle. But an imperceptible skew will cause a displacement of the plane of rotation and, as a result, a strong vibration of the entire mechanism, it can cause the destruction of the disc and, of course, one should not hope for an accurate cut in this case.

Before installing the disc, the "grinder" must be disconnected from the network - this is the main safety requirement, since a sudden turn on at this time is fraught with serious injuries.
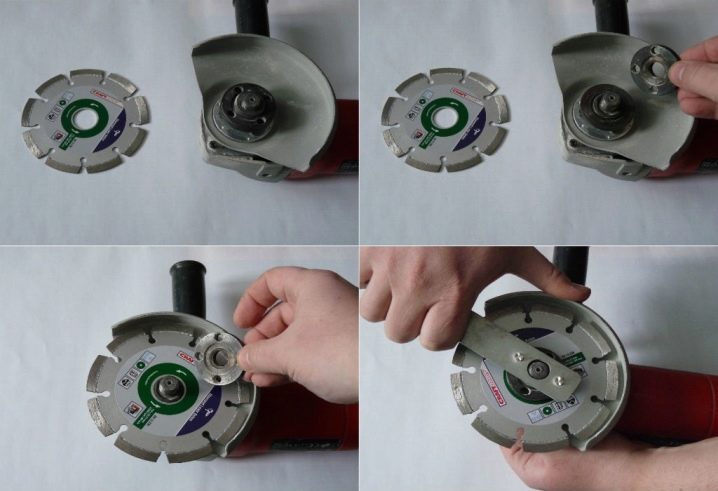
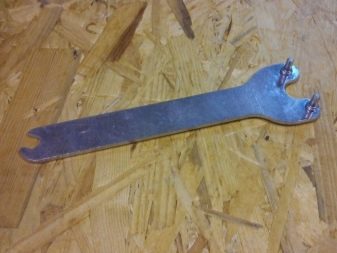
The clamping nut must be unscrewed with the wrench supplied with the tool. To prevent the stem from spinning, it must be locked by pressing a special button. It is necessary to unscrew the nut while holding the button down.

After twisting the nut, a disc is put on the released stem, with the front side out, and you need to make sure that it is installed exactly in the seat.
The kit for a new "grinder" always includes a certain amount of cardboard spacers - when installing the disc, they must be laid so that they are between the disc and the pressure elements. These gaskets will help unscrew a broken or jammed disc.
Further, the nut is manually tightened up to the stop and tightened with a special wrench. That's it, the grinder is ready to go.
How to remove it?
Discs, especially those designed for cutting, burn out quickly and must be replaced.
It will be useful to remind once again about the need to disconnect the "grinder" from the network. The work is to be done with fast rotating parts and it is better to protect yourself.
If you need to replace a worn out disk, you need to perform a number of simple operations.
- The disc is secured to the stem stem with a threaded nut. In the set of any angle grinder there is a special key, on the arms of which pins are fixed, which cling to the holes of the flange.
- The spindle is fixed with a special button, the cotter pin of which, when pressed, enters the hole of the gearbox, thus fixing it. Having pressed the button with your right hand, at the same time with your left hand you need to unscrew the fastening nut with a wrench. If the nut has moved from its place, unscrew it by hand. That's it, now the disc can be removed.

- There are times when the key, for some reason, was not at hand. What to do? The easiest way out is to stop working. But, as they say, this is not our method. It is also possible to unscrew the clamping nut of the "grinder" without a key. Often a pipe (gas) wrench is used for this. On such a key there is a device that spreads it. It is necessary to tighten the nut and, fixing the gearbox of the "grinder" with a button, move it from its place. Then it can be unscrewed by hand.


- The nut has holes for fixing it with pins on the key horns; you can unscrew it by tapping with a hammer on a chisel or a bar that is pressed into the hole.
- It is sometimes possible to push the nut off by simply tapping its edge with a hammer in the direction of twisting. However, in this case, damage to the flange may occur, especially the holes for the pins of the key; in the future, it may not be possible to apply the key to such a nut.
- A very good result is obtained when using a nail to make a key. It is better to choose a large nail, from 100 mm. Using a hammer and pliers, the nail is U-shaped. With a hacksaw or chisel, the point and head of the nail are cut off. With such an improvised key, you can try to knock off the nut. You can bend the ends of such a key, then it will turn into a kind of open-end key, but this will require a lot of labor. You can also insert a gate, for example, a hammer or other nail, into the arc formed by a bent nail.

How do I change a disk if it is jammed?
What to do if the circle on the grinder is stuck? This can happen, for example, when, as a result of work, pieces of the workpiece being cut sharply clamp the rotating disc. This often leads to its destruction.
It can be very difficult to unscrew the nut tightened as a result of rotation, if the circle is bitten.
- One of these methods would be to use two gas keys at once. In this case, the remains of the disc must be broken with pliers. With one key, you need to clamp the part of the stem located under the disc, and with the other, unscrew the flange.
- Sometimes, in order to gain access to the gas wrench to the rod of the "grinder", it is necessary to disassemble the gearbox.

- There are reviews of penetrating lubricant: a nut treated with such a composition should turn in a few minutes.
- There are also more exotic methods. For example, heating a jammed nut with a gas burner. The heated nut will be easier to turn as a result of expansion.
- Sometimes, in order to avoid undue impact on the parts of the "grinder", it is better to crumble the remains of the disc completely, remove the protective cover and cut out all the remnants of the circle between the pressure devices with a hacksaw.

- A simple device saves from the problem of a jammed nut - cardboard or tin washers. They are often sold with a grinder. But over time, they can be lost or become completely unusable. Making homemade washers is not at all difficult. However, it is best not to neglect them.
In an extreme case, the flange can be cut with a hacksaw for metal and then replaced with a new one.

Advice
If you had to use a gas wrench, you must remember about the very powerful shoulder of such a wrench and about the effort that is applied to the parts of the "grinder". If you do not act carefully, the spindle lock could be ripped off or the gearbox could be damaged.
All manipulations with the disc of the angle grinder must be carried out with the power supply completely disconnected (the plug must be removed from the socket). Any inadvertent pressing of the start button will cause the electric motor to turn on, and the rod rotation speed is very high. In this case, injuries cannot be avoided.

Working with a grinder involves a large amount of waste in the form of metal or wood shavings and dust. Before starting work, you must wear special protective glasses: they will protect your eyes from fragments of the cutting wheel itself in case of jamming and destruction.

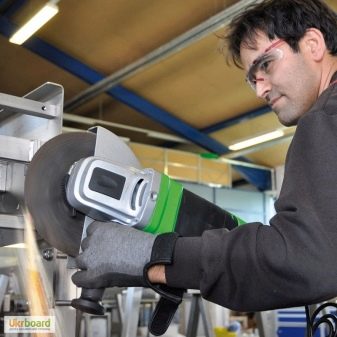
Glasses are needed not only as a safety element. If the eyes are protected, more attention can be paid directly to the work of the "grinder", to ensure the correct cut or the choice of the correct operating mode. This will allow the most efficient use of consumables (cutting wheels), minimizes the occurrence of abnormal situations with the disc biting or its destruction.
A protective mask that completely covers the face will perfectly replace the glasses - this is especially important for a visually impaired master who wears diopter glasses, which should not be worn with safety glasses.


The disc on the "grinder" can be installed both "away from you" and "towards you", depending on the direction of rotation and, accordingly, the flow of chips. In work, this does not make a fundamental difference. However, the "grinder" with a circle "on itself", when biting the disc, tends to jump out of the cut forward, and not on the one who uses it. This is especially important when working with powerful tools, but even a small angle grinder can pose a serious danger.
A specially mounted extension cord with a plug socket, preferably without grounding, will help to quickly stop the operation of a machine that has escaped from the hands.

The "Bulgarian" is a rough processing tool and it is not worth striving to obtain an ideal surface as a result of its work, the main thing is to make a rough cut, which later, if necessary, can be processed in other ways.
To work without clamps and jamming, it is better not to cut long metal workpieces to the end, leaving 1–2 mm of metal in the cut: it will be easy to break them off afterwards, this will practically not affect the quality of the workpiece.
It is better to place small workpieces in a vice or press them with a clamp to a workbench or other reliable horizontal surface. The quality of the cut and safety depend on the density of pressing.


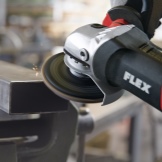
You can see how to put the disc on the grinder correctly in the next video.


The comment was sent successfully.