How to make a speed regulator for a grinder with your own hands?
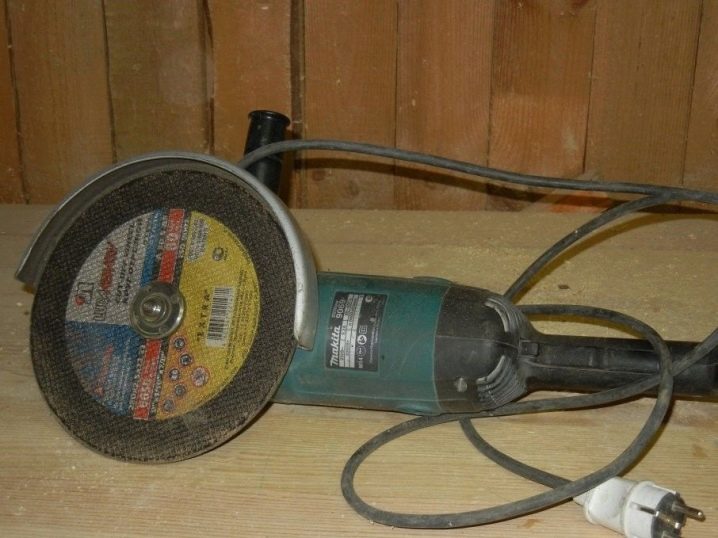
If there is an old grinder among your tools, do not rush to get rid of it. Using a simple wiring diagram, the tool can be improved by adding an option for adjusting the speed. Due to the usual control device, which you can create with your own hands within a few hours, the functions of the tool will significantly expand. By reducing the number of rotations per unit of time, the angle grinder can be used as a sharpening and grinding unit for different types of materials. There will be additional opportunities for using auxiliary equipment and attachments.
For what purpose is angle grinder low speed?
The integrated wheel speed control option enables the gentle handling of materials such as wood or plastic. At lower speeds, comfort and safety are increased. This option is most practical in the radio and electrical installation business, service stations and restoration studios.

In addition, among professionals who use power tools, there is a judgment that the more trivial the device is, the more reliable it is. And it is advisable to take the additional service "stuffing" beyond the borders of the grinder. With this approach, equipment maintenance is greatly simplified. In this regard, some firms deliberately produce remote individual electric regulators that are connected to the network cable of angle grinders.

Why does a grinder need a smooth start and a speed controller?
In modern angle grinders use 2 necessary options that increase the performance and safety of the equipment:
- speed regulator (frequency converter) - a device designed to convert the speed of the motor in different modes of operation;
- soft starter - a circuit that provides a leisurely increase in engine speed from zero to the limit value when the unit is connected.


They are used in electromechanical equipment, in the structure of which an alternating current electric motor with a collector is practiced. They help to reduce the wear of the mechanical part of the unit when it is turned on. Reduces the stress on the electrical components of the machine by bringing them into operation smoothly. As studies of the qualities of materials have revealed, a particularly strong development of contacting nodes is produced in the process of a sudden transition from a stationary state to rapid activity. For example, one start of an internal combustion engine in a car is equal to the wear of a piston and a group of sealing rings to 700 kilometers.

When power is applied, an abrupt transition is made from a stationary state to the rotation of a circle with a speed of 2.5-10 thousand revolutions in 60 seconds. Anyone who has used an angle grinder is well aware of the feeling that the tool "flies out of hand". It is at this moment that most of the accidents associated with the mechanical part of the unit happen.

The rotor and stator windings are equally stressed. An alternating current electric motor with a collector starts up in a short circuit mode, the EMF already pushes the shaft forward, but the inertia force still does not allow it to rotate. A jump in the starting electric current arises in the coils of the electric motor. Despite the fact that by design they are designed for such work, over time a moment comes (for example, with a voltage drop in the mains), when the winding insulator is not able to withstand and a short circuit occurs between the turns.


With the introduction into the electrical circuit of the instrumentation schemes for adapting a soft start and changing the frequency of rotation of the motor, all the above-described troubles spontaneously disappear. In addition, the issue of a sudden and significant decrease in voltage in the general power grid during the start-up of the tool is being resolved. Hence, it is clear that household electrical appliances will not be at risk of failure. And the automatic switches on the electric meter will not work and turn off the current in an apartment or house.

The soft start scheme is used in angle grinders of the middle and high price segment, the speed control unit is more and more in professional modifications of grinders. Speed control makes it possible to process soft materials with an angle grinder, carry out delicate sanding and polishing, since at high speeds the wood or paint will simply burn out. The auxiliary electrical circuit increases the cost of the toolkit, but extends the service life and the degree of safety in use.

How to assemble a regulator with your own hands?
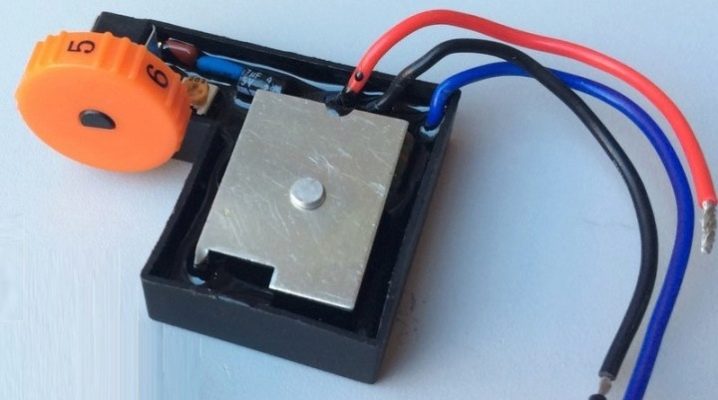
A simplified and rather reliable in operation frequency converter for angle grinders is constructed with your own hands from available electrical parts. Below is a diagram that shows all the required components for mounting on a printed circuit board of the device of interest to us.

So, we need:
- symmetrical triode thyristor (or triac, triac) DIAC (DB3);
- resistor (resistance) R1 (its parameters should be 4.7 kOhm);
- additional triac VT136 / 138 (TRIAC);
- capacitor C1 (400 V, 0.1 μF);
- additional resistance VR1 for 500 kOhm.


A similar scheme operates according to the following method.
- The charging time of the capacitor is modified by an auxiliary resistor (it is called the trimmer). When voltage is applied to the circuit, the triacs are in the closed position, and a zero voltage value is observed at the output.
- In the process of charging the capacitor, an increase in voltage is noted on it, which leads to the opening of the DB3 triac. As a result, the voltage falls on VT136 / 138. This thyristor element also opens up, and an electric current flows through it.
- After that, the symmetrical components are closed again and remain in a similar status until the capacitor is completely recharged in the opposite direction.
- Ultimately, at the conclusion, we acquire a deterministic signal of finite energy that is complex in its configuration. Its exact range is determined by the period of performance of the functions of the circuit capacitor - auxiliary resistance - resistance R1.

Triacs are usually located on a printed circuit board. It is easy to create it from PCB (multilayer extruded plastic is used, consisting of heat-insulating fiber and foil). Individual craftsmen cut the board with a cutter. It is practiced to place the circuit elements using the hinged mounting method. Triystres are mounted only on an aluminum or copper heat exchanger. It plays the role of a good heat sink.

The test of the assembled device is carried out using an ordinary 40-60 W incandescent lamp. Connect it to the circuit and start to regulate the glow power. If the brightness changes, then you have done everything correctly. Now you can start installing the regulator in the shell of the angle grinder.This is not very easy to do, since it is necessary to ensure that the accessory does not interfere with you when using the angle grinder.

You will need to calculate the installation location of the homemade control device yourself, in accordance with the design features of the grinder. The installation of the circuit is performed:
- in an additional box mounted on the unit body;
- into the handle of the holder;
- into a small empty niche (it is designed to cool and circulate air masses) in the rear area of the angle grinder.


The very connection of the circuit to the device is made by integrating it into the electric supply channel of the angle grinder. You probably won't have any difficulties with this.
Electronic device testing
Before connecting the unit to the grinder, check it. Take a plug-in electrical outlet. Insert 2 wires into it, one of which connect to the board, and the other to the network cable. Connect another wire to the network board. As you can see, the regulator is connected in series in the electrical circuit. Connect a light bulb to the electrical circuit and test the operation of the device.

Connecting the regulator to the angle grinder
The frequency converter is connected to the instrument in series. If there is free space in the handle of the angle grinder, then this device can be placed there. The surface-mounted circuitry is glued with epoxy, which will serve as an insulator and vibration protection. Move the variable resistance resistor with a plastic handle outside to adjust the speed.

Installation of the regulator in the cavity of the angle grinder housing
The electronic device, assembled separately from the angle grinder, is placed in a shell of dielectric material, since all components are energized. A portable electrical outlet with a cable is fixed to the body. The handle of the variable resistance resistor is brought out to the outside. The regulator is plugged into the mains, and the tool is plugged into a portable power outlet.

How to make a regulator out of a dimmer?
A very effective and easy solution to this issue will be the creation of an external frequency converter. In the role of a converter, you can use a dimmer - a device for regulating the level of illumination. When creating, you will need an electrical outlet and a plug. I must say that the implementation of such a device can be performed in different ways. Particularly simple are 2: with the use of the machine and without it.
- Screw 2 wires to the ends of the electrical outlet so that one is longer. Then connect the long end to one of the pins on the plug. The end of the 2nd wire is fixed on the contacts of the dimmer, and its other output is connected to the 2nd contact of the plug.
- When using the 2nd option, it is required to make a number of modifications to the circuit, and specifically to place an automatic machine on the cord between the plug and the dimmer. Basically, ordinary switches are provided in the dimmers, but we need an automatic one, which, if something goes wrong, will turn off our device from the mains.
So, the frequency converter of the angle grinder is ready, and for practicality it can be placed in a specialized case or fixed on a wood panel. It should only be taken into account that such a device is homemade, and when working with the power grid, one must be careful.

To learn how to make a speed controller for a grinder with your own hands, see the video below.


The comment was sent successfully.