How to check the grinder anchor and troubleshoot?
The grinder's anchor is a rotating element of the electric motor, which is the "core" of the entire structure of the device. The unit consists of a shaft - a metal axis of rotation, a wire winding, a collector - a set of contact plates representing the ends of the winding turns and a cooling screw. The armature interacts mechanically with the front and rear bearings, the grinder's gear unit and graphite brushes; electromagnetically with a stator - the outer part of the electric motor. Voltage is applied to the armature winding through the sliding contact of the brushes with the collector plates - lamellas.
The transfer of current is carried out in rotation mode, which creates conditions for friction and heating. These conditions carry the prerequisites for potential malfunctions.

Breakdown reasons
Anchor angle grinder - rotor, is a part that is exposed to the greatest loads: temperature, mechanical and electromagnetic. Violation of the operating rules prescribed by the manufacturer leads to an early failure of this unit. Some of the factors behind these violations are:
- going beyond the permissible time of continuous work;
- lack of protection against aggressive media - dust, sand, dirt, moisture;
- exceeding the load parameters;
- mechanical damage;
- work at the time of voltage drops.

These reasons can lead to the following armature malfunctions:
- melting of the insulation (insulating varnish) of contacts or windings as a result of overheating;
- mechanical damage: scratches, chips, cracks, from contact with foreign particles trapped in the compartment with moving parts;
- breakdown at weak points of the winding caused by overload;
- curvature or imbalance of the anchor shaft;
- short circuit or carbon deposits on the lamellas.


To eliminate the cause of the breakdown, it is necessary to study the device of the angle grinder armature and carry out the appropriate diagnostics.
Verification methods
Each rotor malfunction is identified by an appropriate test method.

Visual inspection
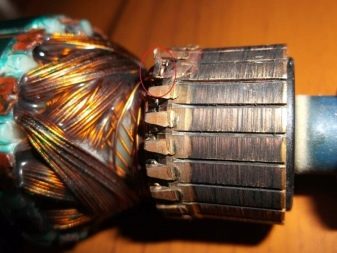
The test method with which to start diagnostics. Check the armature manifold for mechanical damage. Scratches, seizures and chips must be absent. Inspect the lamellas for burnout. If one of them is darker or swollen, there is a short circuit between the plate and the winding bus.


12 volt bulb
Connect two wires to the contacts of the light bulb. Make a break in one of them. Connect the wires to the power source, put the edges of the "broken" wire on the lamellas so that they do not touch each other. Rotate the anchor. If there are no breakdowns in the winding, the light will be on continuously.

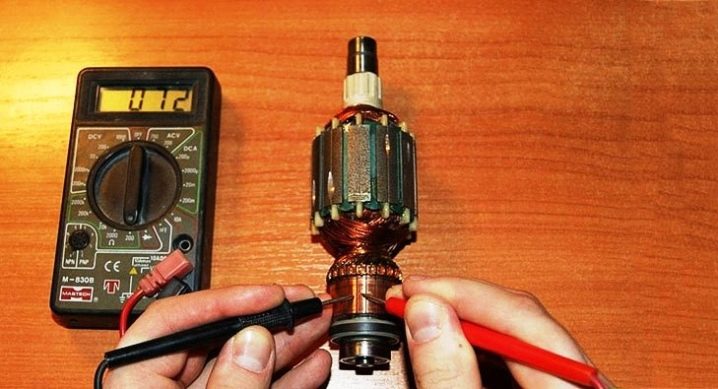
Multimeter
Put this device into resistance measurement mode. Put one of the probes (polarity does not matter) on one of the plates. Apply another dipstick to the rest of the lamellas in turn. A sound signal, depending on the multimeter model, will notify that there is a breakdown between the "winding traces".

Tester
Short-circuited turns indicator. Used for diagnostics of closed anchors. This type of rotors is characterized by the lack of access to the junction of the winding with the lamellas. The tester has two LEDs - red and green.By rotating the armature connected to the tester, it is possible to determine the presence of a breakdown in the winding by the illuminated red LED.

How do I fix the problem?
Visual inspection and testing will help determine the nature of the malfunction and understand if replacement or repair at home is possible. Malfunctions of the grinder rotor are divided into two types: amenable and non-repairable. The first type includes faults associated with a violation of the insulation of the winding, damage to the collector and the iron base. The second type of breakdowns are factors of deterioration of the balance of the armature as a whole and its shaft. In this case, it is almost impossible to restore the rotor.

Collector repair
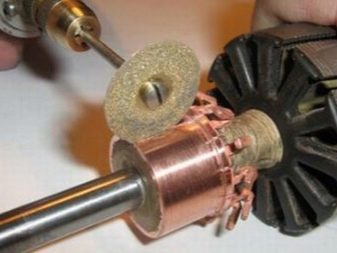
If structural damage is found to the collector lamellas, they must be pierced. This can be done on a lathe or with the help of improvised means. The groove must be carried out evenly. Otherwise, the balance will be disturbed, which will entail the destruction of the graphite brushes during operation and the failure of other grinder units.

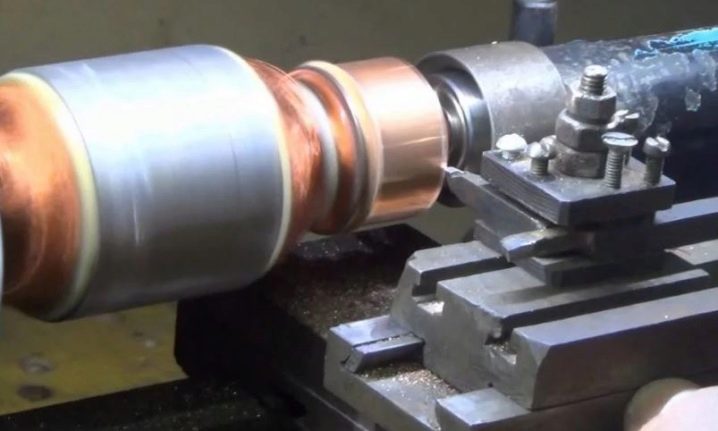
Machine groove
The grinder rotor is installed in the lathe. Since the collector consists of copper plates, and copper is a viscous metal, it is necessary to select the optimal rotational speed in the range from 600 to 1200. The cutter is set in half a division. At the moment the “knife” touches the collector, a longitudinal passage is made with the removal of a thin layer of metal. The best effect can be achieved with 2-3 passes. More of these can damage the structural integrity of the reservoir. Take breaks between the aisles to let the copper cool down. Otherwise, the varnish insulation between the lamellas may melt.

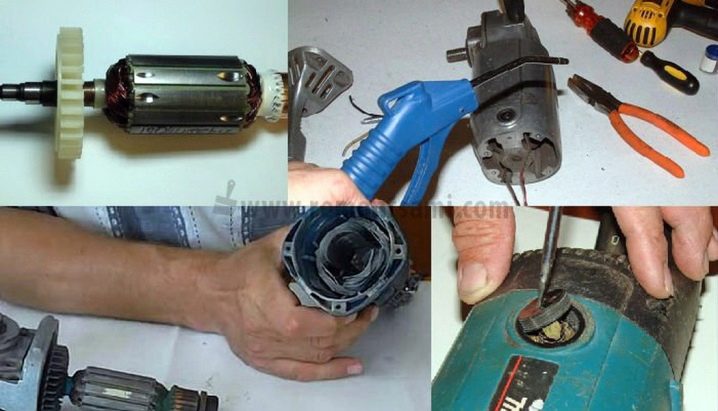
For grooving with the help of improvised tools, you will need a vice, a drill and several types of sandpaper. The grinder's anchor is removed from the body, while one part of it remains connected to the angle grinder gearbox. The gearbox housing is fixed in a vice, the other end of the rotor shaft is clamped in the drill chuck. The "lips" of the vise and the drill should be in line with the axis of the armature shaft.
Turn on the drill with the trigger button fixed in continuous operation mode. Grind the collector with sandpaper without pressing. Use a minimum of 3 types of grit size - from coarse to finer. Finishing should be zero grit sandpaper.
At the end of the groove, it is important to remove all chips and dust from the manifold, this will prevent a short circuit between the plates.
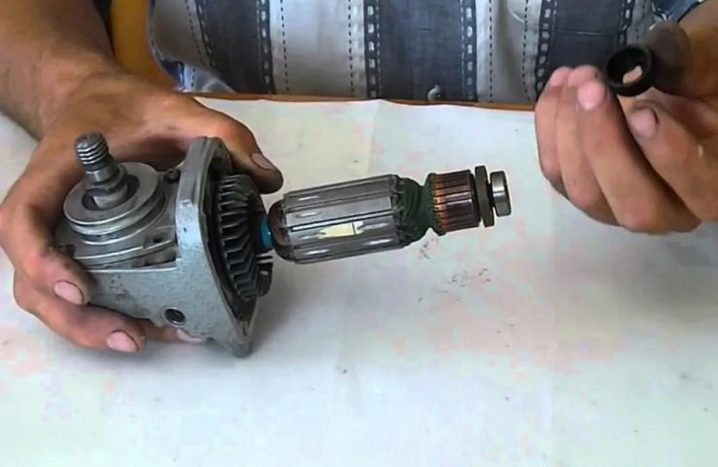
Removing the bearing
The edge, which is fixed in the drill chuck, is initially installed in the bearing. Remove it before grooving. In order to remove the bearing without a puller, you can use a vise, hammer and chisel. Fasten the shaft with the bearing in a vise so that only the bearing is squeezed. Install the sharp end of the chisel into the end of the shaft and knock the shaft out of the bearing with light hammer blows.
Winding repair
Rewinding a grinder's anchor is a job that requires the appropriate skills and special accuracy. To achieve the best end result, it is worth contacting the appropriate specialist.

How to rewind at home?
If the integrity of the rotor winding is violated, it must be carefully removed using pliers, a hacksaw for metal, a chisel, nippers - all the necessary tools. Avoid damaging the collector contacts, the iron base of the winding and the armature shaft. Before deleting, find out what the winding scheme is and fix this fact on paper. In the process, follow the drawn winding direction diagram.

The winding wire is laid in special grooves in the iron base. It is necessary to calculate how many conductors are in each groove and, based on this, calculate the number of turns. In the standard version, they should be 2000 - 2300. Cardboard plates are inserted into the grooves, insulating the winding from contact with the iron base.Then the wire is wound, the ends of which are soldered to the collector contacts upon completion.


It is important to select copper wire of the appropriate cross-section and length. The wire used for winding electric motors is coated with insulating varnish. It is very important not to damage this cover during the rewinding process. Otherwise, a second winding breakdown may occur.
Before impregnating a new winding, it is necessary to ring it with a multimeter or tester in order to exclude the presence of a breakdown. If there is none, the anchor is sent to the oven to warm up. The heated rotor winding is impregnated with epoxy resin. For better flow through the wire, the anchor is held at an angle.

Precautionary measures
Observance of precautionary measures guarantees the serviceability of all components of the grinder during an extended period of work:
- do not allow overheating of the electric motor, graphite brushes, do not exceed the permissible load on the grinder;
- use replaceable cutting wheels of the appropriate diameter;
- prevent dirt, sand, moisture and foreign objects from entering the corps of the angle grinder;
- monitor the condition of the lubricant in the gearbox and bearings - its lack or burnout will lead to an increase in the load on the electrical part of the tool;
- avoid working in an overloaded network, for example, when the welding machine is running.
Professional advice
Some professional advice will help prevent breakage of the grinder armature and extend the life of the power tool. Preventing dust and dirt from getting inside the case:
- use a construction vacuum cleaner to remove dust when sawing non-metallic materials;
- spill water over the cut area, reducing dust emission;
- close the air intake grilles with gauze or a piece of nylon tights, periodically change / clean this insulation;
- adjust the gearbox so that the direction of rotation of the wheel is directed "away from you" - dust and other sawing products will be directed away from the air intake grilles;
- do not put angle grinders on the ground, in sand, mud or on wet surfaces.

Tips for working with a grinder:
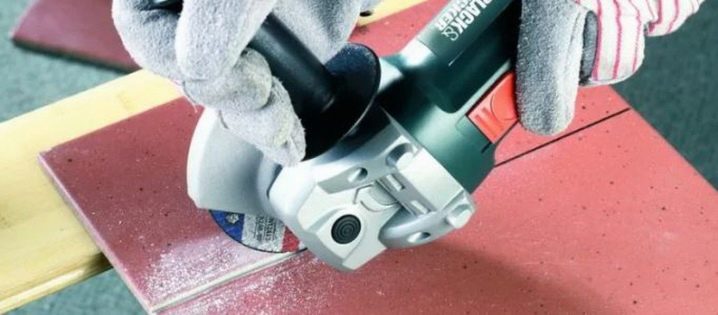
- immerse the cutting disc into the material slowly, without pressure;
- help sawing by moving the grinder forward and backward;
- compare the cutting volume and material properties with the technical characteristics and power of the grinder;
- if the speed can be adjusted, do not cut at low speed for too long.
For information on how to check the grinder's anchor, see the next video.


The comment was sent successfully.