How to install sliding interior doors?
You feel much more comfortable in an apartment or house if there are interior doors. With their help, you can divide the space and isolate different rooms. Recently, an increasing number of people are inclined to buy sliding doors, since their design has a lot of advantages, and installing it yourself will also save a decent amount.


What are they for?
Very often, during repair work in any living space, the owners decide which doors to install: swing or sliding. But, on reflection, many come to the conclusion that it is better to install sliding structures, since their the benefits are clear on closer inspection.
- The undoubted advantage of sliding doors is significant space savings absolutely any room. Due to the fact that the canvases of such doors slide parallel to the wall or hide in a special niche, they do not require space for opening and closing. In addition, some interior items can be installed close to these sliding structures; this will not work with swing doors.
- Unlike hinged structures, a sliding door of any modification unable to open up from a gust of draft: The web is held at both the top and bottom.
- This fastening in the sliding door does not make creaking sounds in contrast to the swing door, where the hanging of the leaf is impossible without the use of hinges that emit a creak.


- Due to the fact that manufacturers produce many modifications, you can, at your discretion, choose not only the size, but also the material for future design.
- The undoubted advantage of sliding structures is their security... Especially for families with small children. In swinging structures there is a gap between the door leaf and the jamb and often their fingers end up there out of curiosity or by accident. The sliding design eliminates this possibility.
- Thanks to various modifications of sliding doors you can beautifully combine adjacent rooms... The doors to the hall from the kitchen or dining room can be installed based on the overall interior design, choosing the option that is in harmony with all the rooms as much as possible.
- Lack of thresholds in sliding structures is an undoubted advantage for apartments or houses where people who move in wheelchairs live.


Views
Interior sliding doors can be classified according to several indicators: the type of movement of the structure, the number of door leaves, the material of manufacture, the location of the rollers.
Movement type
By the type of movement, the door leaf can move and hide when opened inside a special niche, or it can be open.
Hidden
Such a hidden mechanism is usually equipped at the stage of repair. The free space required for placing the door leaf together with the mechanism is equipped by thickening the wall. A pocket or pencil case for a door is made either from plasterboard or from a special metal cassette.
Thanks to this arrangement, the width of the wall, of course, will increase, but this configuration will allow you to install pieces of furniture near the door, hang a picture or place flowers in pots on special pedestals.


Open
Installation of a sliding door can be carried out in an open manner.The external sliding system involves the open movement of the door leaf.
For its device, it is not required to build a hidden pencil case and therefore you can install this structure at any time, regardless of the time of repair work. The door leaf moves parallel to the wall and therefore it is necessary to leave free space on the side where the door will be located in the open state.


Number of leaves
Depending on the number of door leaves, sliding structures are divided into options with one door and types consisting of two leaves. More complex options are less common: three- and four-leaf designs.
The single-leaf design is compact in size and is most often installed in rooms with a small area. When opened, the door leaf moves along either the right or left side of the wall.


Models with two doors are suitable for wider openings.
In addition, this design has several options for movement. Most often, when opening a passage, the sashes move apart in different directions. But there are other configurations, when one leaf remains motionless and rests against the doorway, while the other moves from one side of the opening to the other. There are models where a fixed sash rests against the opening, and the second moves with an approach to the wall. There are also options where both leaves can move from one side to the other, while resting against the doorway.


Material
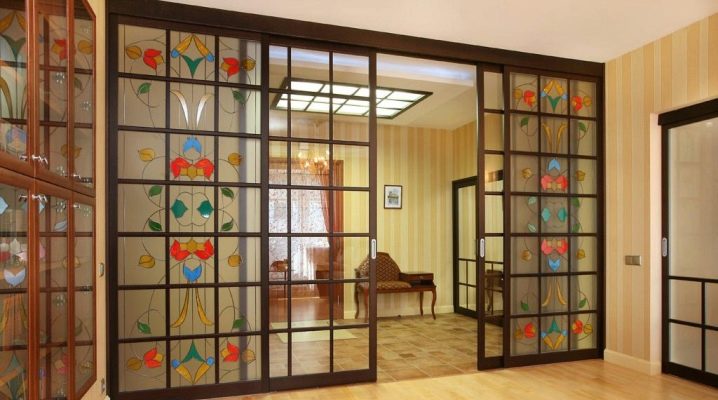
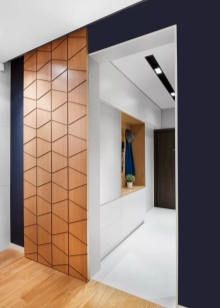
Depending on the materials used, door leaves are produced from glass, wood, chipboard. There are also combined options.
- Glass door panels visually increase the interior space of the room. As a rule, the blades are made of impact-resistant glass and therefore do not pose any danger. Glass doors go well with many styles used to decorate a room.
- Sliding structures can also be made of valuable wood species, chipboard, as well as wood faced with MDF.
- Combined door leaves contain both wood and glass.


Installation location of the guides
Sliding doors differ depending on where the runners are installed. They can be installed at the top or bottom, and there is also a combined installation method.
- Top location profiles is more popular. The hinged method is suitable for lightweight door leaves. Thanks to this method, the doors function for a rather long time and are not as susceptible to breakage as with the lower position of the guides.
- Bottom location used less often, as it is more prone to deformation. Profiles located on the floor need regular cleaning, and the door, which rests only on the lower profile, slides less smoothly.
- The most successful and reliable way is combined arrangement of guides... It is suitable for heavy doors. The presence of upper and lower rails is often used in wardrobes. Furniture sliding structures are a universal system and are installed not only in the cabinet frame, but between two walls, in a niche, with their help you can decorate any opening.


In order to open or close sliding doors, you need to apply some physical force, but there are models where mechanical action is not required.
These are automatic sliding structures that have a more complex structure compared to conventional models. The doors are set in motion by means of an electric drive according to a signal coming from sensors. Most often, automatic structures are installed at the entrance to rooms with high traffic. These can be office and shopping centers, government and educational institutions, as well as cafes and restaurants.


DIY installation tips
Installing sliding doors with your own hands is not such a difficult task. It is quite possible to independently install both an open and a closed system.
Any type of this structure consists of a door leaf (the number of leaves depends on the configuration), guides, stops, at least two rollers, an upper overhead panel (in some designs it is absent), platbands, fasteners (bolts, screws and other elements).
Before installation, it is necessary to prepare the tools, because without them installation will be impossible. First of all, they prepare a construction tape and a special level, you will also need a drill or a perforator (depending on the type of walls). It will not be superfluous: a screwdriver, a construction plumb line, a small hammer, a pencil (marker).


Each installation method has its own correct instructions. Depending on the location of the structure, they are distinguished: hidden installation, when the door, when opened, is retracted into a special case and external installation, when the movement of the leaf is not hidden either when opening or closing the door.
For the correct installation of the sliding structure, you must follow the instructions step by step.

Open sliding design
Before installation, first of all, it is necessary to dismantle the old door, the hinges on which it hung and the platbands. It is better to remove the door frame too, since it can interfere with the installation of a sliding structure.
Now you need to tidy up the doorway. We remove all irregularities: putty, plaster and level the edges. The lower part of the opening must be parallel to the floor, an error of no more than 5 mm is allowed. It is worth considering the thickness of the flooring. In its absence, it must be done taking into account the thickness of the coating.
With the help of a plumb line, the side surfaces are checked; they can have deviations within 3-5 mm. It is better if the walls have a perfectly flat surface, then the door leaf will fit well.


Now you can start installing the door frame. To align it, you will need special wedges that will be located between the box and the wall. By adjusting the location of the wedges and the degree of recession in the opening, you can achieve an even position of the door frame. You can check the correctness of the installation either with the help of a plumb bob, or use a building level. Having achieved an even placement, you can fix the structure with a screwdriver.
Before fixing the upper rails, it is necessary to make sure that the door leaf is suspended evenly. To do this, you need to attach the canvas to the wall next to the door frame and make a mark on the top. Then the canvas is inserted into the opening and a mark is also made.


If both marks coincide (draw a line), then the floor is level, and installation can begin.
From the resulting line, measure 5-7 cm in the direction of the ceiling and draw a line. With the help of it we mark the location of the timber. The length of the bar should be twice the width of the door leaf plus 10 cm.If a two-leaf system is attached, then the length of the timber and the profile should be 4 times more than the width of one door leaf and plus a few cm. This is necessary so that the door fully opens the door when opening opening.
The location of the bar depends on the number of flaps. If there is only one sash, then the fastening of the timber depends on the side of the door opening. Its middle can be located both above the right side and above the left. If the installation of two leaves is provided, then the length of the bar is divided into three parts, where the middle part should be located above the opening.

Pencil case
The width of the canister should be twice as large as the door leaf, it must be completely hidden in the canister when the doors are opened. The pencil case is installed either in the opening or next to the wall. From the outside, drywall is used to hide the structure, or the frame is decorated with wall panels.
The frame is made of solid wood, it is suitable for doors with a mass not exceeding 80 kg, as well as metal for canvases with a mass of more than 80 kg. The frame is purchased depending on the parameters of the door and the type of sliding system. In the opening, it is first carefully leveled, and then fixed on each side to the wall. The gaps between the pencil case and the wall are sealed with special foam.


When buying a pencil case, you need to find out from the seller what material the structure is intended for.
Then you can mount the sliding system. The fastening scheme for any installation method is almost identical. The upper rail is attached either to the timber or to the brackets. Rollers are attached to the upper part of the leaf, their number depends on the width and weight of the door. The roller blade is inserted into the profile and moves freely along its entire length. The presence of the bottom rail depends on the design.

Mounting features
After all the necessary measures have been taken, you can proceed with the installation of the sliding door.
To fix the upper rail, a bar with a section of 50x70 mm is most often used. A profile of identical length is attached to it using self-tapping screws. There must be at least three of them. Now you can install the timber according to the marks on the wall, having previously corrected its position using a level.
If you want to attach a timber to a concrete wall, you will need to install the dowels first. Marks for their placement are made using a drill, after having attached a bar to the wall for this process. Using the received marks, we drill holes with the corresponding diameter and insert dowels into them. Now you can attach the timber to the wall.


We start preparing the door leaf. To do this, we install a roller mechanism in the upper part. The fastening of the system begins with platforms, which are most often installed on the sides of the canvas immediately from the corner. We fasten the platforms to the canvas using self-tapping screws and insert plates with pins into them, on which there are special fixing covers on the side. Roller platforms must be screwed onto these pins.
Install the handles. In the finished canvas, as a rule, there are already holes. But if this is an ordinary canvas, then you will have to cut holes for this element using a chisel, having previously circled the contour of the cut-in handle.
The lower rail is installed if the system has mountings for the lower rollers. In order not to destroy the profile, you need to install a threshold, but you can install the guide flush with the floor.


If the installation of rollers is not provided in the lower part of the blade, then a special guide knife or flag roller can be attached to the floor. Thanks to him, the door moves according to a given trajectory. For the flag roller, a groove is cut out at the bottom of the door leaf that runs along the entire length of the door leaf.
To check the correctness of the installed upper profile, you need to drive the roller. If the roller slides well in the grooves, then the profile is installed evenly, and you can hang the door leaf and insert the travel stops. They are necessary so that the door does not roll out of the profile when opening. They are fixed with screws.
Now you can check the smoothness of the ride and start finishing work. A false panel is installed to hide the roller mechanism. The voids between the box and the opening are filled with foam and covered with platbands.


There is a complete set of the sliding system, which includes a cassette intended for installation inside the doorway and serving as the location of the door leaf.
Installing a cassette sliding door is similar to installing a structure moving along a wall, but there are details to look out for. The upper profile with a bar is not attached to the wall, but to the cassette or frame. And most importantly, the doorknob should freely go into the space of the pencil case.
Beautiful ideas in the interior
Interior sliding doors in the same room should be designed in the same style.
For the classic style, canvases are suitable that have either a dark saturated color or light shades. The stricter the interior, the darker the door leaves.
For country style, canvases in brownish or beige tones are suitable.
For high-tech style, you can choose glass sheets, which can be both transparent and frosted. Patterns can be applied to the glass as a decoration.


How to install a sliding door yourself, see below.


The comment was sent successfully.