The subtleties of building houses from a bar
Many people want to spend time at the dacha from spring to autumn, living in a comfortable beautiful house. Today everyone has such an opportunity thanks to the technology of building houses from a bar.
Peculiarities
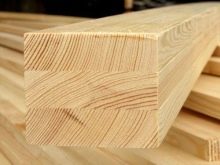
Timber houses are gaining popularity, so it is important to understand why this material is so good. First of all, it is distinguished by its availability and budget price. No special equipment is required to assemble this lightweight material, and you can handle it either alone or with several assistants.
The rectangular shape of the cross-section allows you to erect smooth, ready-to-finish walls.
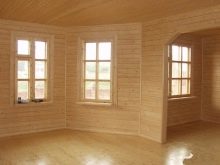
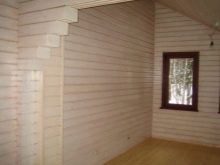
Many are attracted by the spectacular view of the log structure, which fits perfectly into the village landscape. From such houses and breathes warmth, comfort and tranquility. The timber allows you to decorate the room in any style, but in most cases the owners prefer to admire the natural beauty of wooden surfaces.
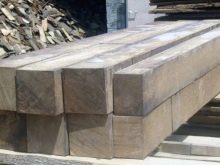
The choice is limited only by the material capabilities of the owner. Glued laminated timber consists of several boards connected to each other. Buildings made of solid timber are highly valued. The profiled material is obtained as a result of special technical processing, and the non-profiled version requires adjustment during construction work.
When choosing a timber, you should pay attention to the level of humidity, which determines the degree of shrinkage of the future structure. For example, a timber of natural moisture gives 3-5% shrinkage within three years. Dry timber, processed in a chamber furnace, gives minimal shrinkage - from the strength of 1-2%. But it also costs more than timber, which is dried before starting construction work.
The choice of wood is also important. Pine is strong, durable, relatively inexpensive, and therefore it is considered the undisputed leader in the construction of houses.
The spruce pattern is not interesting, the fir is not durable, the larch is very heavy, which complicates the processing of the material. The buildings made of oak and cedar are beautiful and durable, but the price “bites” too much.
The main disadvantage is the fire hazard of the material; therefore, the wood is carefully treated with refractory agents. The timber is susceptible to rotting, fungus forms on it, and natural wood is gnawed by mice and bugs sharpened. Regular treatment with a special antiseptic will help protect it.


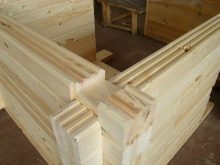
When building a country house, it is important to observe the maximum adhesion strength of each individual beam to the side surface.
This can be done in several ways.
- The working surface of the beam from above and below is equipped with grooves and protrusions using a machine cut, which allows the side parts of the two beams to join. Then comes the turn of steel rods or dowels with which the timber is pulled together - this allows the walls and ceilings to survive intact until the building is fully fixed.
- A special adhesive composition transforms the timber wall into a monolithic panel.
Despite the troublesome care, there are no fewer fans of wooden buildings.

Project
Often, owners resort to the services of construction companies to purchase a ready-made country house from a bar with a layout drawn up according to a standard project.
On the one hand, there is no individuality, on the other, this option has a number of advantages.
- A typical project is implemented in 1.5-2 weeks after signing all the necessary documents.
- The visibility of the presented projects attracts: each of them was ordered and the new customer has the opportunity to communicate with the owners of a similar structure.
- The cost of a typical project of a log cottage is much lower than an individual one. Additional savings are achieved thanks to unified design solutions that do not require the installation of ornate elements.
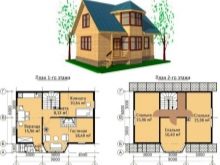
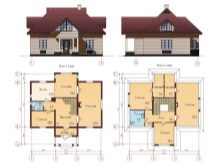
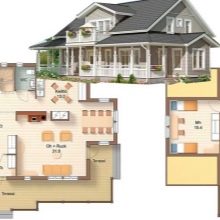
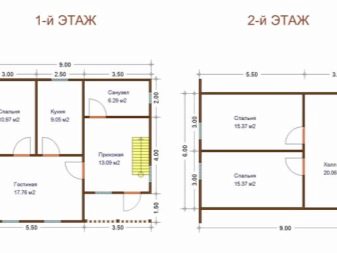
The project of the house can be drawn up by yourself, depicting all the constituent elements: an entrance hall, a kitchen, a storage room, a living room, a staircase to the second floor, a guest room. The list varies depending on the dimensions of the future structure. The plan is then passed on to the developers who finalize the idea. The best option is to draw up a drawing of your country residence yourself.
For this, 3D programs are used to view the house from all sides, and a number of documents are prepared:
- draw up a drawing of the foundation, which indicates its type, depth and materials used;
- a detailed diagram of the device of the floor base beams on which the floor is installed;
- they design all the floors of the house, indicating the location of window openings, partitions and walls, a fireplace and a stove, as well as connecting the house to various communications with an accurate determination of their sizes;
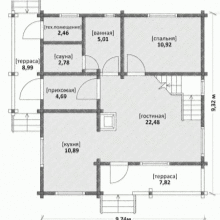
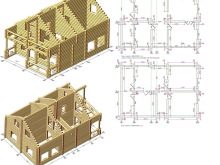
- the drawing of the walls indicates the constituent elements of the walls, as well as their dimensions, cutouts and holes;
- the specification of parts of a country house from a bar with an indication of the geometric size of each element is performed using a special program;
- the roof plan depicts a multi-layer structure with thermal insulation materials;
- the design drawing of the rafters provides for an indication of the materials from which they are made, as well as the sizes and elements of fasteners.
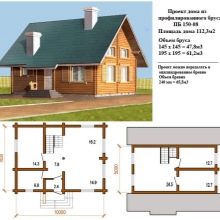
When drawing up a project, you should pay attention to the quality of the timber, since the pleasant "weather in the house" depends on it. For example, beams 18-27.5 cm thick are designed to create external and load-bearing walls. For an internal partition, a beam of 9-17 cm thick is suitable. In order to save money, you can make the inner walls frame and sheathe them with wooden panels to simulate a bar.

Required tools
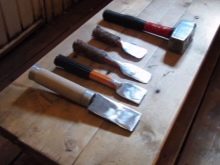
The tool must be stocked up in advance, ensuring the continuity of construction work. Care must be taken to ensure that tools and fasteners are in place. The best place for them is in special cabinets installed in one of the outbuildings. Before a tool can take up space in drawers and shelves, it must be sorted by type and size.
Large tools should be placed along the walls or hung on special hooks. In modern stores, a wide assortment is presented for any construction work. You shouldn't buy everything - it's better to make a list and start with the essentials.
- A shovel makes excavations in the upper layers of the soil and removes its excess.
- The soil is compacted with a rammer. You can buy it in the store or make it yourself. To do this, take a bar with a cross section of 15 cm and a length of at least 70 cm and cut off its ends. The trim angle must be straight. The part is cleaned with sandpaper, while at the same time rounding off the sharp edges.


- The screwdriver set includes a wedge-shaped one- or two-sided and a cross-shaped tool.
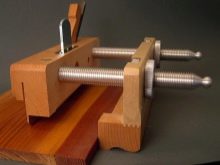
- Clamping of building parts is performed with steel or wooden vices.
- Pliers are assigned the role of a tool intended for installation, electrical installation, and also for locksmith work. For safety, the pliers are either immediately bought with plastic handles, or, if they are metal, they are wrapped with electrical tape.
- The chisel allows you to perform work on stone and metal. Hands are protected with a rubber pad on the tool.
- The punch allows you to punch holes in both sheet metal and concrete wall. Better to get a set of punches of different diameters.
- A zenzubel or pick is a type of planer designed to clean a surface.


- A falzgebel or a stepped-sole planer is used for reworking niches of any size.
- The grooves are sampled with a tongue-and-groove. The groove is equipped with a ruler that allows you to step back from the edges of the part and mark the groove on it.
- The primer consists of a hook-shaped cutter and a screw that attaches the cutter. Serves for cutting and deburring trapezoidal grooves.
- A staple with a semicircular working edge is intended for rounding off parts.
- Gorbach is a type of plane that combines two removable blocks measuring 25 cm in length and 6 cm in width. Suitable for cutting strongly and slightly concave elements.


- A polished steel shovel with a wood or plastic handle is called a trowel. It is used to apply and level the glue solution, and they also carry out plastering work.
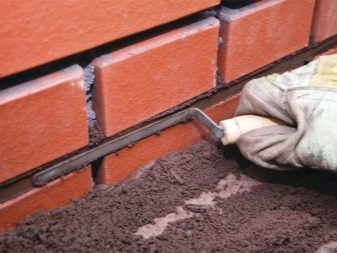
- The jointing helps to fill the joints with mortar, and also allows you to give a neat look to the laying of the foundation.
- With a hammer-pick, if necessary, split the brick into several parts.
- A stapler or construction stapler allows you to attach foil materials to wooden elements.
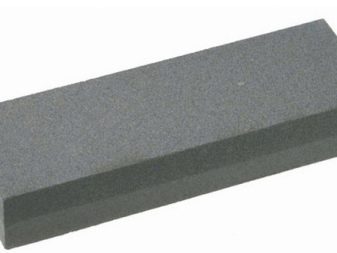
- A sharpening block with a fine and coarse-grained surface allows you to sharpen cutting tools in a timely manner.


It is also necessary to have a carpentry tool.
- A two-handed saw, which is a metal plate with teeth on the working edge, is used to cut thick logs. It is no coincidence that it is recognized as the most effective hand-held saw.
- Saw off and cut out all kinds of details with a hacksaw. Each type of this tool serves a specific purpose. For example, a hacksaw with a wide blade and sharpening of teeth at an angle of 45 degrees is used for cross-cutting. A narrow hacksaw is adopted when it becomes necessary to cut sheets of chipboard or thin boards.
- The plane cuts off unnecessary layers of wood and cleans its surface.


- Chamfers are made with a chisel, and also sharp edges of parts are grinded, giving them a rounded shape.
- The chisel is designed for hammering on a wooden surface.
- With an ax, wood is not only chopped, split and hewn. To build a house, you need at least three types of ax: straight - chop and chop wood, sharp-angled - chop off unnecessary knots, and obtuse-angle option is used for cutting wood.
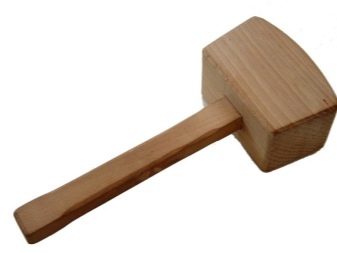
- A wooden mallet differs from a hammer in a lower impact force, which excludes damage to parts.
- A mechanical or hand drill with a set of drills is designed for making holes in wooden surfaces for screws and thorns.


In addition to hand tools, there must be power tools. They are more expensive, but significantly speed up the work process.
- An electric drill allows you to drill concrete, stone or brick surfaces. The small cylinder-shaped drill is designed for small holes, while the angled version cuts out hard-to-reach areas.
- Fastening of screws, screws, self-tapping screws, dowels and other fasteners is carried out with a screwdriver, while each element is fixed with its own screwdriver attachment.
- Sawing of large logs and boards, as well as logs and plates, is carried out with a circular electric saw.


It is worth stocking up on a measuring and marking tool.
- The plumb line is used to check the correctness of the vertical. This is an irreplaceable thing in the construction of any kind of buildings, as well as the installation of windows and doors. You can do it yourself using a strong cord and a small load.
- A measuring tape allows you to determine the linear size of wide surfaces.
- It is convenient to measure miniature items and parts with a folding rule.
- Using a wood or metal square will make sure that all parts of the structure are at a 90 degree angle to each other.
- The hydro level identifies the reciprocity of the arrangement of objects relative to the horizontal plane.


- The construction goniometer measures not only the angles of structures, but also the angles of the elements relative to the surface.
- The central hole, in the center of which the drill is installed, is marked with a center punch, which significantly increases the accuracy of the work.
- A caliper is considered a versatile tool. Its main measuring scale is called the barbell, and the auxiliary one is called the vernier. Its ease of use makes it the preferred choice for carpenters and joiners alike.
- It is convenient to use a metal cone to determine the density of the concrete solution. A plastic or wooden platform is installed on the prepared concrete, a cone is placed on top of it and pressed with your feet. Then they are filled with three layers of concrete mass 10 cm thick, take a steel bayonet and pierce each layer with it.


After that, it is necessary to cut off the excess concrete layer, gradually freeing up the concrete mass, and wait until it settles. At the final stage, the cone is placed next to the settled mass, a rail is placed over the cone, and then, using a ruler or tape measure, the distance from the rail to the concrete mass is determined - the greater the distance to the concrete, the thinner the mortar.
During construction work, an electric or manual concrete mixer will come in handy, as well as any other container, for example, an old trough or a cut iron barrel.
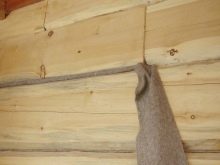
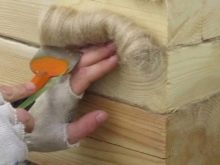
After construction, the log house needs to be bored, sealing all the gaps. Caulking the walls should be done with a rubber hammer, tape measure, and several caulking blades made of steel of different sizes.
A flat type-setting cauldron allows you to mount the insulation in a type-setting way, when one thread is twisted from all the material using a set of loops. Then the hinges are pushed into the slots between the laid beams.

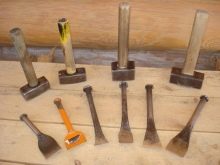
High-quality caulk meets the following requirements:
- the working part of the caulk must be made of high quality steel;
- it is convenient to hold a non-smooth rubber or rubber handle in your hand;
- the end of the handle is a knob with a cap;
- the optimum thickness of the caulking blade is 5 mm.
Caulking can be done by hand by cutting out of wood. It is desirable that it be hardwood, otherwise the caulking will become unusable after a couple of meters traveled. If the master hits the caulk with a wooden mallet or a rubber hammer, then it is permissible that the spatula be completely made of wood. But if he uses an iron hammer, then it is imperative to provide the caulk with a metal handle.
Construction technology
If a detailed project of a house was drawn up with an accurate calculation of all the necessary materials and a layout of rooms, then it's time to move on to construction work.
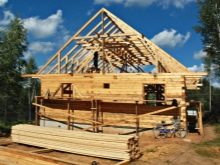
The beam weighs relatively little, the construction technology is simple, but it is important to carry it out correctly. The construction process is typical, as for most buildings, - it begins with laying the foundation and ends with the arrangement of the roof and wall decoration.
Below is a step-by-step instruction for the construction of log houses.
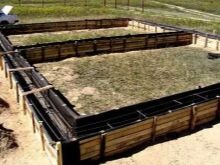
There are several types of foundations of the house, which can really be built even if there is no experience in such work.
Creation technology and features of a monolithic foundation.
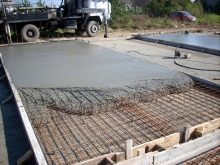
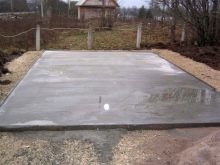
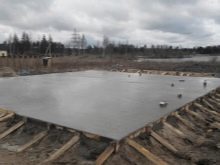
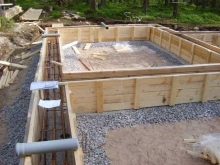
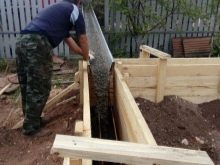
- For a monolithic foundation, a pit is dug, corresponding to the dimensions of the future building. A wooden formwork is installed and a concrete solution is prepared, achieving a homogeneous structure of the composition. Reinforcement is laid into the pit and concrete is poured, which dries up within 20 days.
- The monolithic foundation is strong and durable. Even if the demolition of the old house is planned, then this base can be used for a new building, having previously strengthened it.
The only drawback of the slab foundation is its high cost. It is equipped on clay, peat, swampy and sandy soils, subject to swelling and freezing. This is ideal for unevenly compressing soil.
- A monolithic foundation cannot be built if there is a large difference in height on the soil - this will help to avoid the risk of displacement of the slab and destruction of the house. If the site has a high level of groundwater, then it is worth choosing sulfate-resistant concrete for the base, resistant to aggressive substances.
- On a very loose soil, you first need to partially replace the soil with crushed stone or gravel, and then start building the foundation. The arrangement of a monolithic foundation on rocky ground is realistic, but this type of soil in itself is a stable foundation.
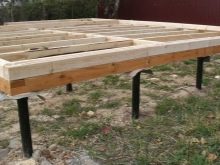
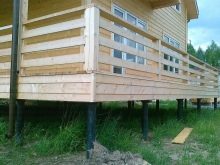
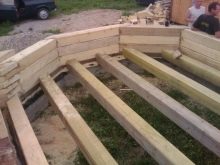
Next on the list is the pile foundation.
- Pits are dug around the perimeter of the future house at a distance of one and a half meters from each other. Gravel, crushed stone or sand is poured into the pits, and then wooden or metal piles are driven in (screw options are screwed in). They are buried in the ground no less than one and a half meters, waterproofed with roofing material or plastic wrap, and then poured with concrete.
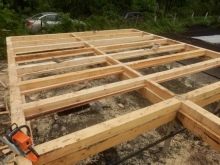
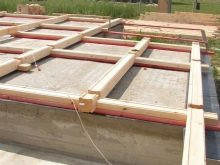
- The subfloor gains strength after about 30 days. After that, the lower strapping is made of wood or metal pipes, and only then the frame is built and the walls of the future dwelling are mounted.
- The pile foundation is universal - it is suitable for any soil. And yet, it is worth giving preference to a metal material, which does not care about high humidity or the proximity of groundwater.

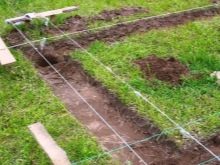
The most popular today is the strip foundation, which is a cross between a monolithic and a pile foundation.
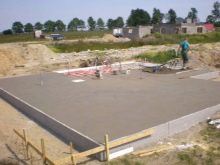
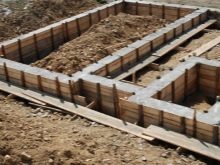
- To install it, mark the area around the perimeter of the house and indicate the location of the load-bearing walls. Dug trenches should be about 10 cm wider than walls and at least 600 cm deep. The trenches are covered with sand and crushed stone (the total layer thickness will be 20 cm), and then poured with a 5-cm layer of concrete.
- The formwork is made from a board 2.5 cm wide and installed in such a way that it protrudes about 400 cm above the ground.Then they begin to lay the reinforcing layer: metal rods are laid along and across, and the joints are fastened with strong wire. The rods, the diameter of which must be at least 1 cm, are laid in two layers.


- The ratio of sand and cement in the concrete mortar should be 1: 3. The prepared mortar is poured into the trenches. To avoid the appearance of bubbles, it is necessary to spray the uncured concrete with water. A few weeks later, the foundation will be solid and allow the next phase of construction work to proceed.
- A shallow strip foundation is built on rocky or crushed stone soils, as well as at a low groundwater level. The deepened foundation is built on sandy and clay soils - it is suitable for sandy loam and loam, as well as for stony soil.
- The construction of any kind of foundation is unacceptable with a high level of groundwater and a strong difference in the height of the site. It is inappropriate to build it in wetlands or in regions where the soil freezes over more than two meters.
When the foundation hardens, it is coated with molten bitumen and a layer of roofing material is laid, providing waterproofing. In this case, the roofing material should be 300 cm wider than the foundation itself.
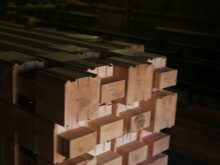
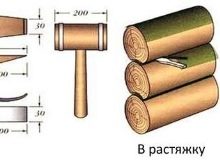
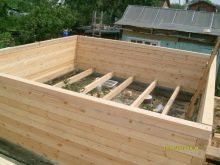
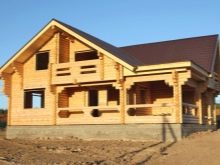
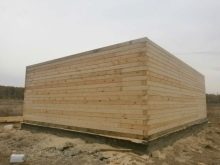
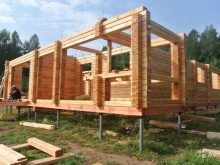
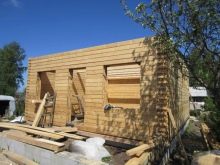
Then the first crown is erected. The wood is impregnated with antiseptic solutions, and the first row of the timber is laid by the method in half a tree - in this case, the upper part is sawn off from one of the timber, and the lower part from the other.
The design of the lower rim requires careful adjustment of the bar. Wood pins are harvested in advance in order to connect the lumber rows with pre-made holes. The walls are laid out strictly horizontally, connecting them with dowels. Insulation is laid between the rows, and the vertical of the walls is verified using a building level. Great strength is provided by the use of special spikes.
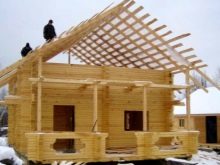
The roof of the house, as an important part of it, is designed in advance.
For example, a pitched roof is a single roof slab, which saves a lot of money and nerves. Such a roof has a slight slope with the complete absence of an attic wall. The arrangement of the attic space is impossible, and the house itself with such a roof often looks primitive, so many owners choose more complex options.
For example, a gable or gable roof is popular everywhere.
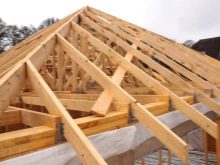
For ceilings and beams, you should choose a beam with a section of 15x20 cm and fix it in one meter increments - this will make the attic a living space. Then you can start arranging the frame of the future roof.
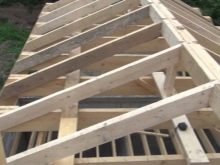
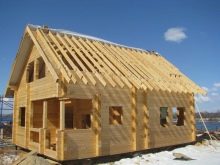
The rafters, which are the base of the roof at an angle of 35 degrees, are attached to the Mauerlat, a thick support bar located around the perimeter of the structure.
To increase the strength of the frame, you need to use a brace and a stand. After installation, the rafter frame is covered with a high-quality vapor barrier and proceeds to the installation of the lathing.
For the lathing, boards 150 mm wide and 15-20 mm thick are chosen. The distance between them depends on the roofing material. For shingles, the boards are nailed end-to-end, making a continuous crate.
If you plan to cover the roof with slate or corrugated board, then it is necessary to fix the boards with a step of 300 cm. The possibility of using any roofing material is an indisputable plus of a gable roof.

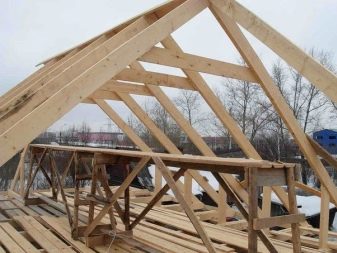
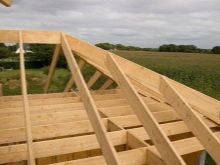
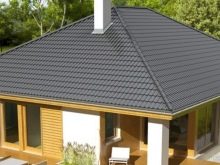
The four-pitched hip roof is strong, resistant to strong winds, beautiful, reliable and durable. It is not so easy to make it, and constructing such a roof is an expensive pleasure, so it has few fans.
To perform such a design, you need to follow some recommendations.
Along the perimeter of the bearing walls, a Mauerlat is laid and fixed on the waterproofing layer, on which the fastenings of the future parts of the roof are marked. It is important that the markings on both sides coincide, otherwise there is a risk of unevenly laying all parts of the structure, including floor beams, which are mounted either near the Mauerlat on the walls, or just below the walls on a fixed beam. After that, the Mauerlat is fastened with ties and the floors are closed with planks to ensure safe work.
On the puffs and floor beams, racks are installed, fastened from above with a ridge beam. The rafter central legs from the end hip sides of the roof are also attached to it. After that, the intermediate rafters are mounted from the frontal roof slope.

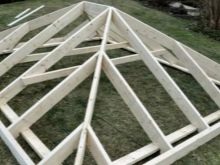
Then they begin to arrange the diagonal rafters connecting the corners of the building with the ridge. Work on the frame is completed with the installation of rafters or short rafters. If necessary, the roof structure can be reinforced with a strut, sprengel or by installing wind beams. The length of the rafters can be increased with the help of "filly" - pieces of boards that form a roof cut.
The installation of the roof is similar to the gable version, only a heat insulator is laid between the crate boards, on top of which a counter-lattice is placed. Depending on the roofing material, it is either immediately screwed to the counter-lattice, like a metal tile, or sheets of plywood or OSB are laid under it (under a soft roof).
After that, you can proceed to finishing work. It is important to consider the following: a house built from a kiln-dried timber allows you to immediately proceed to finishing. If the building is constructed from a different material, you will have to wait at least six months until it shrinks.
Modern stores offer a wide variety of interior and exterior finishing works, but it is better to describe the most popular options.
Brick cladding allows you to apply several variations in the position of this material, giving a unique style to the entire structure. The original solution for door and window openings, as well as for the design of cornices will be the use of rounded bricks.This material will not only improve the heat-saving properties, but also reduce the fire hazard of the house. The disadvantage of brick cladding is its high cost.
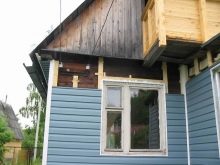
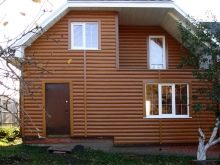
Siding is a one millimeter thick PVC finishing panel. Vinyl siding protects the home from negative environmental influences, is UV resistant and easy to maintain. Facade PVC panels imitate brick, marble or granite surfaces, resistant to chemicals and mechanical stress.

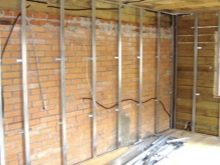
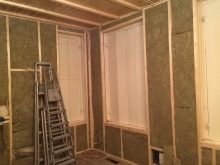
For interior wall decoration, it is permissible to use flexible and pliable drywall sheets. Before sheathing, the timber walls should be dug and treated with protective equipment, and then fixed on the base. However, experts recommend attaching sheets of gypsum board to a wooden crate, allowing you to lay a layer of insulation.

To do this, you should perform a number of sequential actions:
- the crate is mounted starting from the corners, attaching the slats at a distance of 40-50 cm on the walls and on the ceiling;
- lay any insulation;
- drywall sheets are attached with at least nine screws;
- plaster and grind the seams;
- proceed to the final finishing - painting or wallpapering.
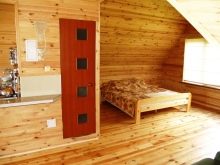
Clapboard decoration is an interesting option, just before use you need to treat it with protective fire-resistant agents. If the house is built of laminated veneer lumber, then its walls are beautiful in themselves - it is enough to grind and treat them with a primer. For a natural finish, you can use a false beam that imitates a wooden surface.
Below are several options for flooring.
- Varnishing protects the surface from damage and gives it an aesthetic appearance. Before applying the varnish, the floor is washed with soapy water, primed, and then a water-based varnish is applied.
- Laying of linoleum, laminate or carpet is permissible on the floor of a country house.
- Polymeric panels and sheets will reduce humidity, improve thermal insulation and shorten finishing time.


Tips & Tricks
The construction of a log house is not an easy task, there are many nuances here that you can understand using the advice of experts.
If it is necessary to make the cottage a place for summer and winter recreation, then it is better to choose a material whose thickness corresponds to the weather conditions of the region of residence. For warm southern winters, a thin timber is suitable, the thickness of which does not exceed 100 mm.
Cold winters of a temperate climate require a timber thickness of one centimeter. A 200 mm thick timber will protect against severe frosts. You should not save on heat-insulating materials - staying in the house will be comfortable at any time of the year.
If there is no experience in construction, then you can use ready-made factory-made kits for self-assembly. They contain everything you need for a construction site, including drawings and an assembly map for a log house. When ordering a kit, a drawing of the foundation is provided that is most suitable for the climatic conditions of the region.
When building a log house, it is important to observe the stages of work.
At the first stage, the foundation is poured and a log house is built, the rafters are erected and the roof is mounted. On the second, they install windows and doors, waiting for the house to shrink. The two stages can be combined by making cuts above door and window openings 4 cm in size - the house will shrink to about this height.
If you need to make a veranda, a shed or any other extension to the house, then you need to do it on a pile foundation, the structure of which does not need to be connected with the existing one.
To change the design of the house, it is necessary to certify the project and obtain permission.


Beautiful examples
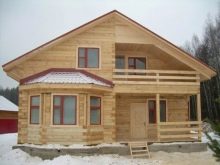
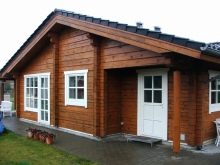
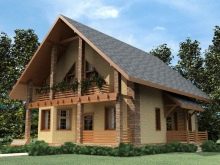
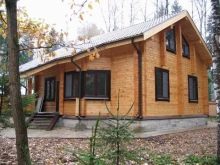
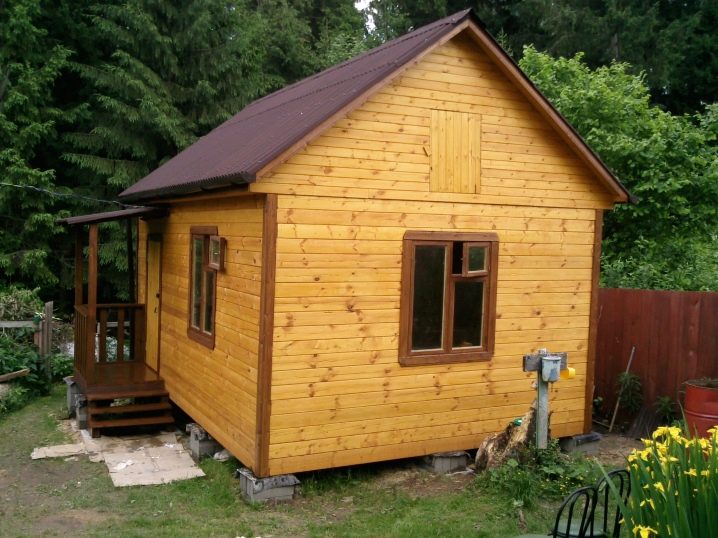
A small house with a gable roof is an excellent solution for summer residents who come to the site during the warm season. This option is the best solution for owners of small plots.
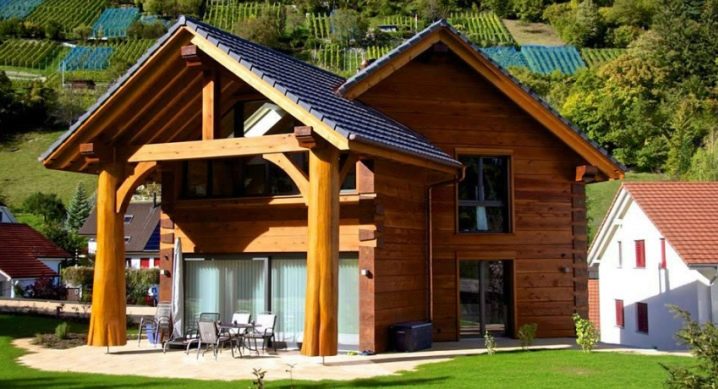
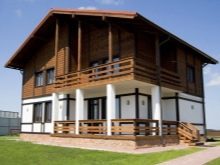
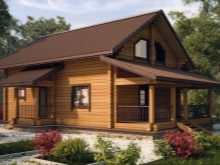
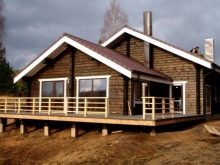
A spacious house with a roof made of metal tiles will accommodate both households and guests.In bad weather, you can hide behind wooden walls, and the wide terrace is conducive to sincere gatherings and friendly conversations.

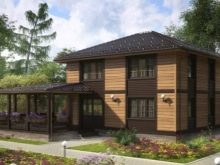
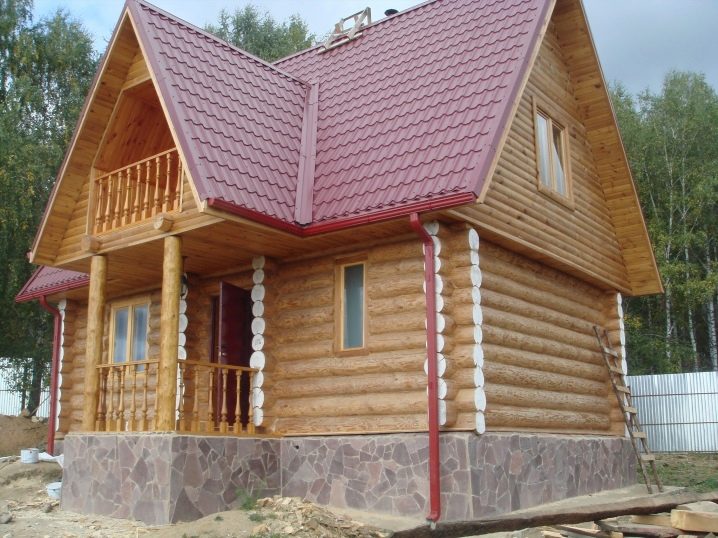
The compact two-story building looks cozy and fits organically into the village landscape. It is an excellent option for a small to medium-sized plot.
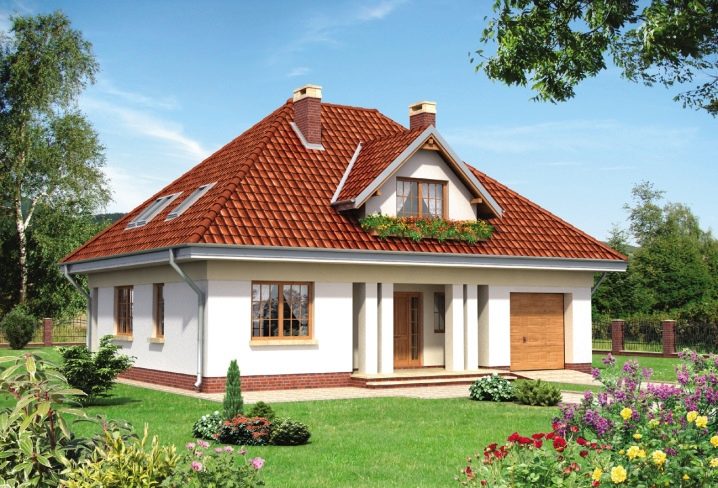
A spacious, light house with a hip roof resembles a clean Ukrainian hut. Living climbing plants that set off the attic became the "highlight" of the house.
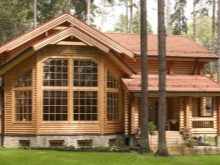
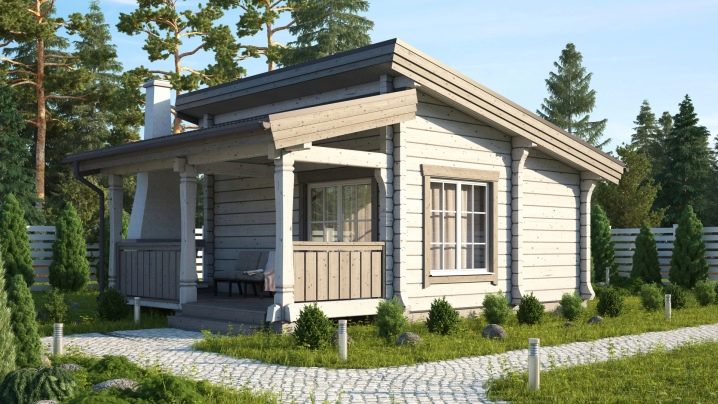
The log house with a pitched roof is a pleasant home with a wide terrace. Small size and discreet color are organically combined with the surrounding greenery. The budget version of the building is designed for a comfortable stay at a summer cottage.
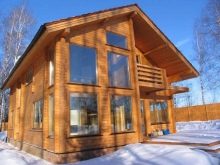
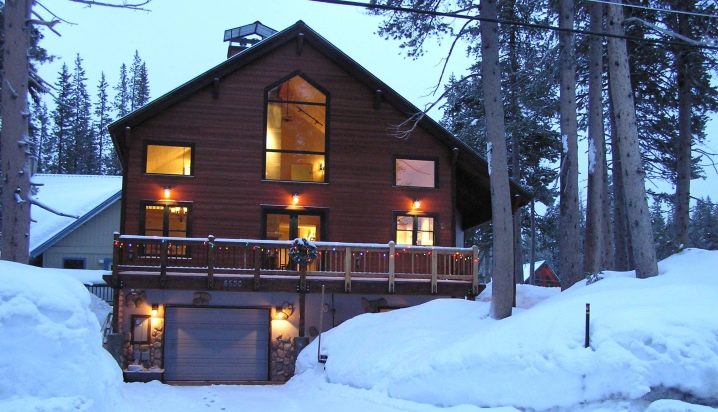
The snow-covered building with glowing windows reminds of the best kind fairy tales. Inside such a building it is warm and cozy, but outside the beautiful winter is raging, which is so pleasant to watch from the wide terrace.
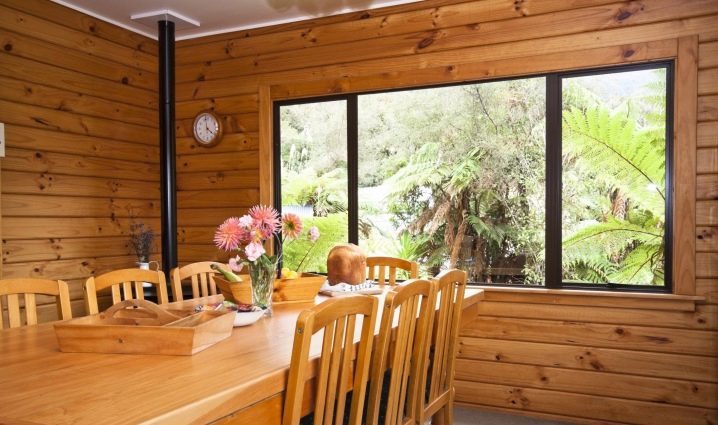
From the spacious, clapboard-clapboard kitchen, it blows home warmth. The unity of style is emphasized by pieces of furniture, dishes, and wooden window frames. This is a great place to gather for breakfast with the whole family and discuss plans for the day ahead.
Errors in building a house from a bar are shown in the following video.


The comment was sent successfully.