How to install a rivet without a rivet?

A novice master does not always have all the necessary tools. The riveter is also not purchased in the first place. But what to do if you urgently need to rivet the product, we will find out in the article.
Peculiarities
Riveting is one of the options for non-collapsible assembly of parts. The advantage of this way is cheapness. Consumable material - rivets - are relatively inexpensive. You can buy them at any store that sells fasteners.
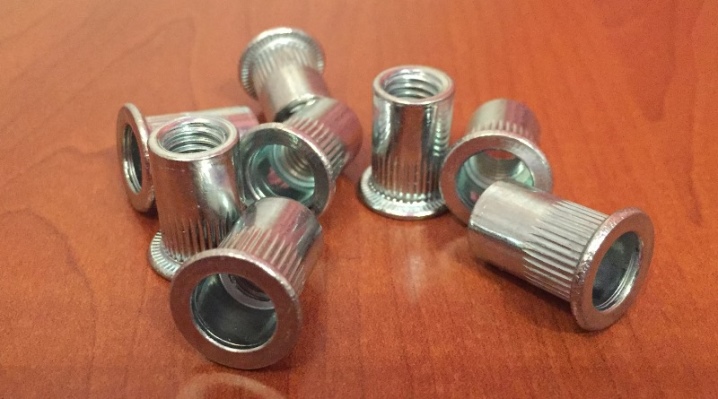
Modern materials are divided into two main types: threaded and exhaust. Both are essentially hollow tubes with a cap at one end. In the first case, a thread is cut inside the tube, and in the second, a rod with a thickening at the end is inserted into it.
The installation of a consumable is associated with its deformation. The only difference is in the way the rivet body is expanded.
Usually, to install a large number of standard rivets, a special tool is required - a riveter. It can be electric, pneumatic or manual. The use of this equipment allows to reduce the physical efforts associated with crushing a metal rivet. These tools are not cheap at all, this is what becomes the main reason for refusing to use rivets in everyday life or for small repairs. Indeed, the purchase of an expensive tool for the sake of one or two rivets is hardly justified.


Below we will consider how to install a rivet without special equipment.
What do you need?
So let's get started!
Given: parts that need to be connected, but at the same time cannot be welded, for example, so as not to spoil the painting.
Objective: Install no more than 4 rivets.

Task: rivet without a riveter, since it is not available, but it is quite expensive, and the purchase for the sake of 4 rivets is completely unjustified.
Given: threaded rivets and ... what is found in the garage, plus the notorious ingenuity, without which in this case there is no way at all.

Having rummaged in the deposits of any iron trash that have accumulated over the centuries, you need to find a long bolt that matches the diameter and thread pitch of the existing rivets, or, conversely, purchase rivets of the corresponding parameters, if such a bolt already exists.
Ideally, if the bolt is made of high-strength steel, but as a last resort, you can do with what you can find.

Next, you need to build the simplest riveter, with which you can roll the rivet. To do this, you should select:
- a steel sleeve, for example, made of a nut of slightly larger diameter than the already mentioned bolt;
- at least 2 washers with a hole diameter corresponding to the diameter of the bolt;
- small bearing (some craftsmen consider the bearing to be superfluous);
- a nut that matches the size of the thread to the already indicated bolt.

A homemade riveter is mounted as follows:
- screw the nut onto the bolt;
- install the washer;
- install the bearing;
- put the puck back on;
- put on a sleeve that can be covered with another washer.

After that, you can start riveting by screwing the threaded rivet onto the bolt.

To make a homemade rivet installation device, you will need the following materials and tools:
- steel pipe with a diameter of 5 cm;
- long bolt with a diameter of 8 mm;
- a nut for the previously indicated bolt;
- welding machine;
- grinder, drilling machine, drills.


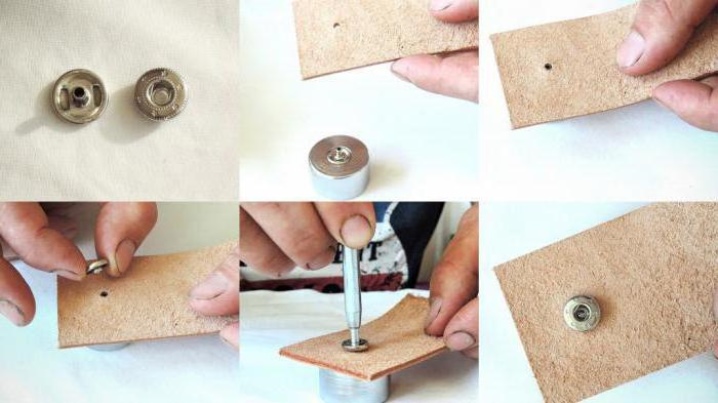
In addition to the need to install a threaded or blind rivet fastening metal or other parts and structural elements, there may be a need to install the rivet as an accessory on clothes or shoes. Tools for such an operation do not have to be made from scrap materials, they can come in handy:
- screwdrivers: Phillips and slotted;
- pliers;
- hammer;
- a bolt or piece of steel bar with a flat-grinded end;
- a piece of steel tube, similar in diameter to a rivet.
The various accessories used for clothing are made of relatively soft metal and have a small thickness; it does not require much effort to rivet it.

How to install a rivet?
Installing threaded rivets using the design described above will require two wrenches. One needs to hold the head of the bolt, and the other needs to turn the nut so that it pulls the bolt along with the rivet. The signal that the rivet is flared will be a change in the applied force. When the consumable collapses completely, it will become impossible to rotate the nut. After that, it remains to unscrew the bolt.

If the hardness of the steel is low, after several operations the bolt may break off, which is why it is not worth using a homemade riveter for a long time, and, most likely, it will not work.
Riveting a blind rivet is somewhat more difficult, the main problem in the absence of a factory riveter is to grip the rivet stem. But even this problem can be solved with some technical skills and tools.

Cut a piece 3 cm long from the prepared steel pipe. Next, drill a hole with a diameter of 9 mm in it, on the opposite side of the pipe - with a diameter of 3 mm. Process them with a 9 mm drill under the sweep, make a cut with a grinder from the edge of the pipe segment to a small hole. Process the edge with a grinder to obtain a conical expansion. On the outside of the pipe section in the area of the large hole, weld a nut, between the holes - a bolt for installing the handle from the drill, you can weld an improvised handle.
The end of the long bolt should be sawed down so that a plane is obtained in which a hole with a diameter of 4 mm is to be drilled. The bolt is screwed into a nut welded to the pipe section. A knob can be welded to the bolt head or a wrench can be used to turn it.


To bring a homemade rivet into working condition, a rivet must be installed in it. To do this, the end of its rod is pushed into the bolt hole, then the riveting sleeve must be placed so that its head rested against the sweep on the pipe segment, for this the rod must be bent - the alloy from which it is made makes it easy to do this. Well, then everything is the same as with the factory riveter: the rivet is inserted into the hole on the fastened parts by turning the bolt, with the help of the thread, the stem is pulled out and rolled.

As can be seen from the description, it is still impossible to do without some kind of set of tools and materials for making a homemade riveter.
The process of installing riveted accessories on clothes or shoes is technically simple - it is important to choose the appropriate tools:
- rivet with metal legs, can be installed using a slotted (flat) screwdriver;
- turnstile rivet-button installed with a tube and a hammer, and a Phillips screwdriver is needed to secure its bottom.
It is important to clearly determine the location of the fittings, since it is necessary to cut or punch a hole in the fabric for it.
Recommendations
- When making a homemade riveter, it is very important to maintain all lines and planes.... Skewing during the riveting process can cause a fragile connection or breakage of parts of the fixture.
- If in the garage or workshop there is still not enough stock of components and tools for constructing a homemade device, it is better not to waste time looking for them, but to postpone work until the purchase of a factory tool.
- It's better to do the same if you are not confident in your technical skills.
For information on how to install a rivet without a rivet, see the next video.


The comment was sent successfully.