What can be done from a washing machine engine?
Sometimes old household appliances are replaced with more advanced and economical ones. This also happens with washing machines. Today, fully automated models of these household devices are relevant, producing washing practically without human intervention. And old models can hardly be sold, so they are most often handed over for scrap.
The same fate awaits new units, which for some reason broke down, but it is impractical to repair them. But do not rush to get rid of washing machines with serviceable electric motors. Many homemade devices can be made from engines for home, summer cottages, garage and your own comfort.
What can you collect?
Much depends on the type and class of the electric motor, which will be the starting point for your ideas.
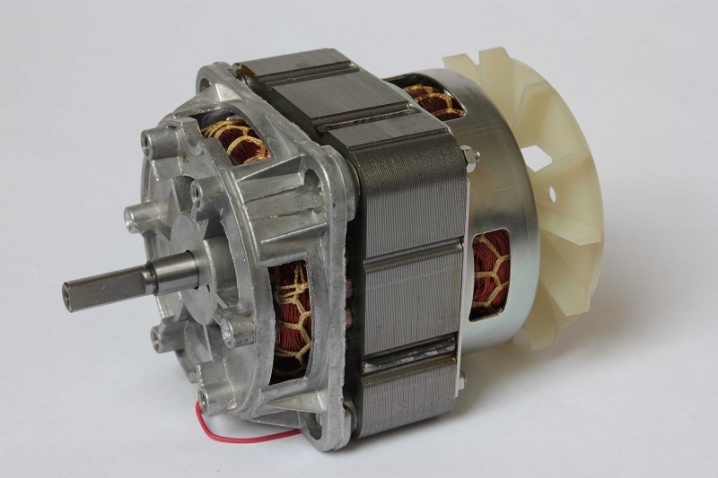
If this is a motor from an old model produced in the USSR, then for sure it asynchronous type, with two phases, albeit not very powerful, but reliable. Such a motor can be adapted for many homemade products that will be used in everyday life.
Another type of engines from the old "washers" - collector. These motors can be operated with both DC and AC current. Quite high-speed models that can accelerate to 15 thousand rpm. The revolutions can be regulated by additional devices.
The third type of motors is called direct brushless. This is a modern group of electric drives that do not have any standard in terms of their equipment. But their classes are standard.
There are also engines with either one or two speeds. These variants have strict speed characteristics: 350 and 2800 rpm.
Modern inverter motors are rarely found in scrap dumps, but they have rather promising plans for those who like to make something very useful for the family, and even with electronic control.
But here is an incomplete list of devices that you can easily build with your own hands based on a working electric motor from a washing machine:
- generator;
- sharpener (emery);
- milling machine;
- drilling machine;
- feed cutter;
- electric bike;
- concrete mixer;
- electric saw;
- hood;
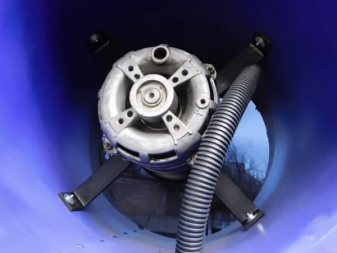
- compressor.
How to connect the motor?
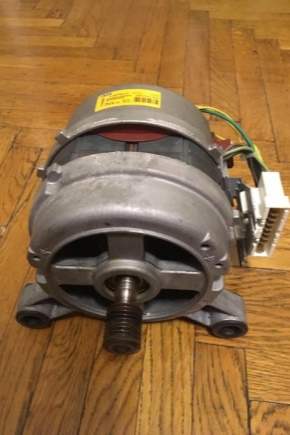
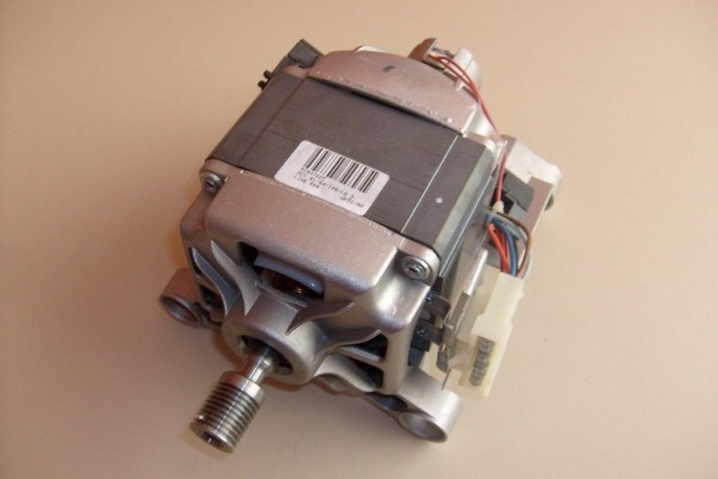
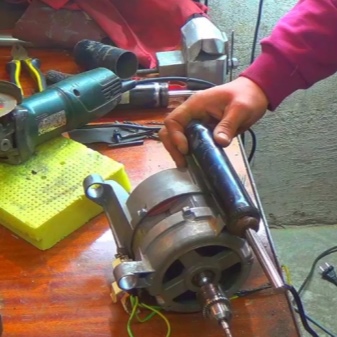
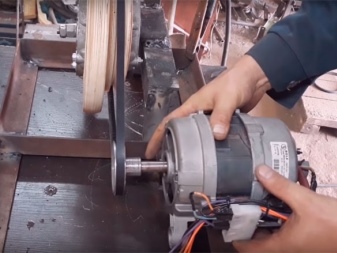
It is one thing to conceive the construction of a unit, useful for the economy, based on an electric motor from a "washing machine", and it is another thing to accomplish what was conceived. For example, you need to know how to connect the motor removed from the machine body to the electrical network. Let's figure it out.
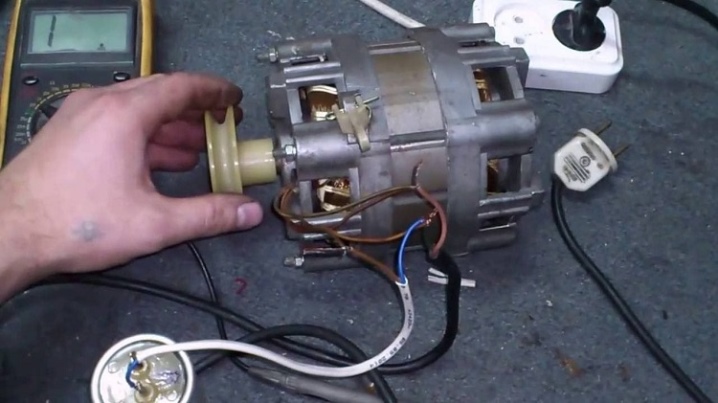
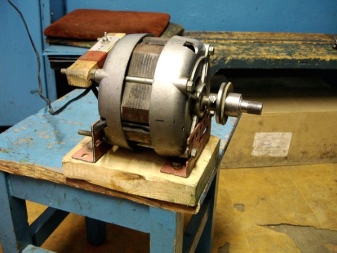
So, we will assume that we have removed the engine, installed it on a solid flat surface and fixed it, since we have to test its performance. This means that it will need to be twisted without load. In this case, it can reach a high speed - up to 2800 rpm and higher, which depends on the parameters of the motor. At this speed, if the body is not secured, anything can happen. For example, as a result of critical imbalance and high vibration of the engine, it can be significantly displaced and even fall.
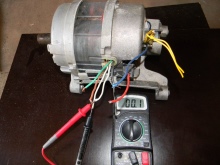
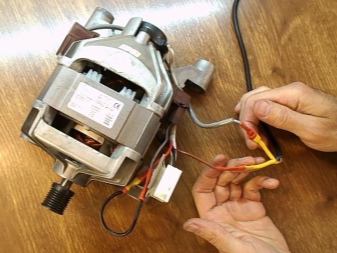
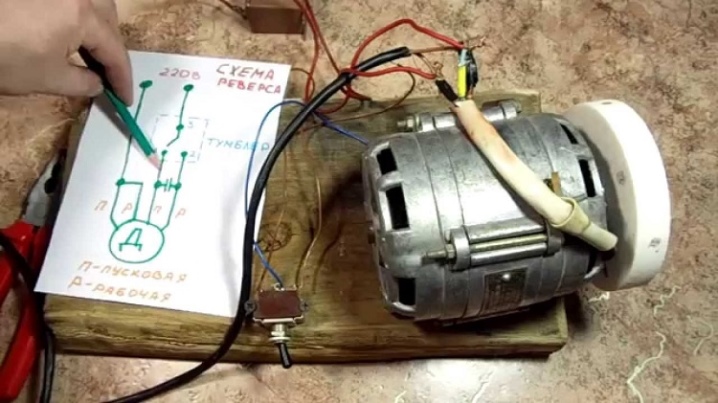
But let's get back to the fact that our motor is securely fixed. The second step is to connect its electrical outputs to a 220 V power grid. And since all household appliances are designed specifically for 220 V, there are no problems with voltage. NSthe problem lies in determining the purpose of the wires and connecting them correctly.
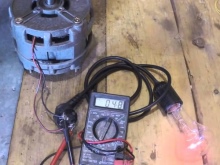
For this we need a tester (multimeter).
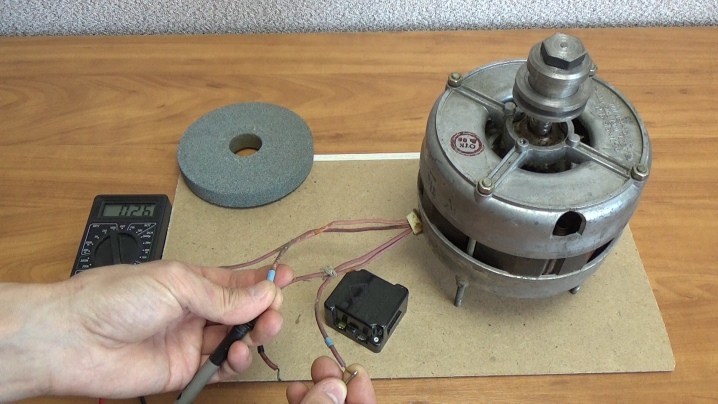
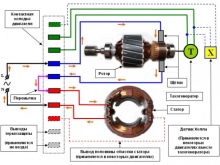
In the machine itself, the motor is connected via a terminal block. All wire connectors are brought to it. In the case of motors operating on 2 phases, pairs of wires are output to the terminal block:
- from the motor stator;
- from the collector;
- from the tachogenerator.
On engines of older generation machines, you need to determine the pairs of electrical leads of the stator and collector (this can be visually understood), and also measure their resistance with a tester. So it is possible to identify and somehow mark the working and exciting windings in each pair.
If visually - by color or direction - the conclusions of the stator and collector windings cannot be identified, then they need to ring.
In electric motors of modern models, the same tester still determines the conclusions from the tachogenerator. The latter will not participate in further actions, but they should be removed so as not to be confused with the outputs of other devices.
By measuring the resistance of the windings, their purpose is determined by the obtained values:
- if the resistance of the winding is close to 70 ohms, then these are the windings of the tachogenerator;
- with a resistance close to 12 ohms, it is safe to assume that the measured winding is working;
- the exciting winding is always lower than the working winding in terms of the resistance value (less than 12 ohms).
Next, we will deal with connecting wires to the home electrical network.
The operation is responsible - in case of an error, the windings may burn out.
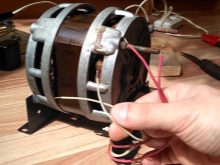
For electrical connections, we use the motor terminal block. We only need the stator and rotor wires:
- first we mount the leads on the block - each wire has its own socket;
- one of the terminals of the stator winding is connected to the wire going to the rotor brush, using for this an insulated jumper between the corresponding sockets of the block;
- the second terminal of the stator winding and the remaining rotor brush are guided using a 2-core cable with a plug into the electrical network (outlet) 220 V.
The collector motor should start spinning immediately when the cable from the motor is plugged into the outlet. For asynchronous - it is necessary to connect to the network through a capacitor.
And motors that previously worked in activator washing machines need a start relay to start.
Stages of making homemade products
Consider options for home-made devices based on motors from "washing machines".
Generator
Let's make a generator from an asynchronous motor. The following algorithm will help with this.
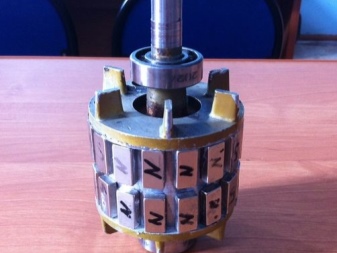
- Disassemble the electric motor and remove the rotor.
- On a lathe, remove the core layer protruding above the side cheeks along the entire circumference.
- Now you need to go 5 mm deep into the core layer to insert neodymium magnets, which will need to be purchased separately (32 magnets).
- Take measurements of the circumference and width of the core between the side rotor cheeks, and then cut out a template from tin according to these dimensions. It must exactly follow the surface of the core.
- Mark the places where the magnets are attached on the template. They are arranged in 2 rows, for one pole sector - 8 magnets, 4 magnets in a row.
- Next, a tin template is glued to the rotor with the markings outward.
- All magnets are carefully glued to the template with superglue.
- The gaps between the magnets are filled with cold welding.
- The surface of the core is sanded with sandpaper.
- The tester is looking for an output from the working winding (its resistance is higher than the exciting winding) - it will be needed. Remove the rest of the wires.
- The wires of the working winding must be directed through the rectifier to the controller, which must be connected to the battery. Before that, insert the rotor into the stator and assemble the electric motor (now it is a generator).
A homemade generator is ready to light up a couple of rooms in the house if there is an accident with the power grid, and it will also be able to ensure that your favorite series is watched on TV.
True, you will have to watch the series by candlelight - the power of the generator is not as great as we would like.

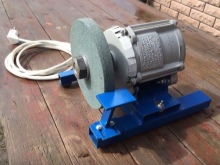
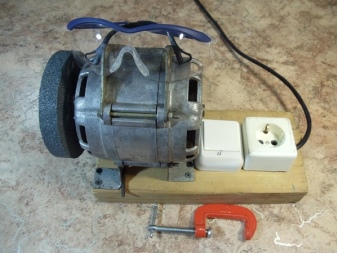
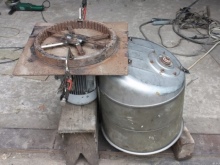
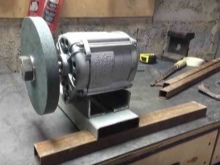
Sharpener
The most common homemade tool mounted from the SM engine is emery (grindstone). To do this, you need to fix the engine on a reliable support, and put an emery wheel on the shaft. The best option for fixing emery would be welding to the end of the pipe shaft with a cut internal thread, equal in length to the double thickness of the emery wheel... Wherein the alignment of this self-made clutch cannot be disturbed, otherwise, the runout of the circle will exceed the permissible limits, which will not sharpen, and the bearings will break.
Cut the threads against the rotation of the circle so that the bolt holding the circle on the shaft does not twist out during operation, but tightens. The circle is fastened with a bolt with a washer passing through the central hole and screwing into the internal thread of the coupling welded to the shaft.
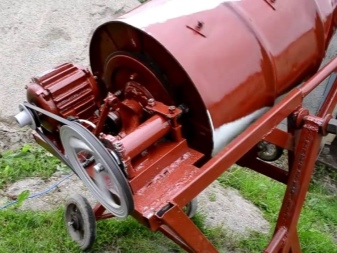
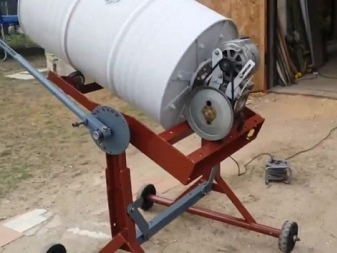
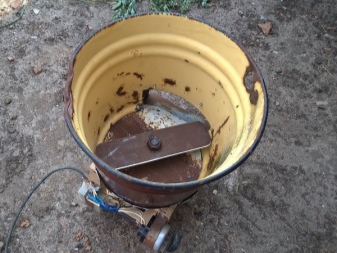
Homemade concrete mixer
For this homemade device, in addition to the engine, you will also need the tank of the unit itself, in which the washing took place. Only a round washing machine with an activator at the bottom of the tank is suitable... It will be necessary to remove the activator, and in its place weld the blades of the U-shaped configuration, made of sheet metal with a thickness of 4-5 mm. The blades are welded at right angles to the base. To install a concrete mixer you need to mount a movable frame from the corner, and hang the tank of the washing machine on it, which has become a convenient concrete mixer.
You just have to think about how to fix the tank in different positions.
Fraser
To make a router, you need to perform several operations.
- The engine is removed and cleaned of dirt and dust.
- From plywood, make a box-table from three sides according to the size of the engine. Its height should be equal to three engine lengths. The bottom of the box is mounted 5 cm from the floor surface. Holes are pre-cut in the cover to cool the engine.
- The whole structure is reinforced with corners on self-tapping screws.
- Install the collet on the motor shaft through the adapter. It is intended for attaching cutters.
- On the side of the rear wall, 2 racks are mounted from pipes, which will serve as a lift in order to be able to adjust the tool overhang. The engine is mounted on the racks, and the threaded rod, installed under the bottom of the engine and resting its lower end against the nut on the surface of the bottom of the box, will play the role of the lifting mechanism.
- The swivel wheel is rigidly attached to the hairpin.
- The design is completed by the installation of shock-absorbing springs necessary to facilitate the lifting of the engine and damp its vibrations.
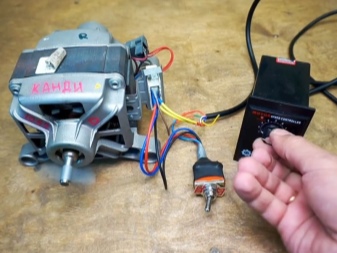
- It is necessary to include a speed controller in the engine circuit. Insulate all electrical contacts.
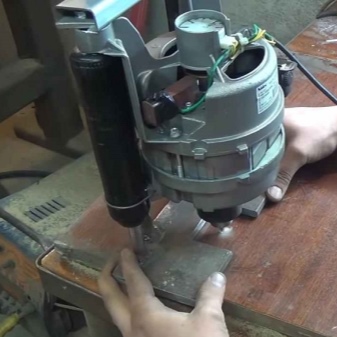
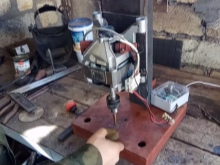
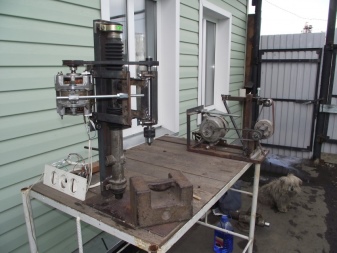
Drilling machine
For the drilling machine, you need to make heavy square base made of corners and thick sheet metal. Weld a channel of the required length vertically on one side of the base. Attach a small longitudinal feed used in a lathe to it. It will function as a vertical rack.
Attach the engine from the washing machine to the vertical rack - for this there is a circle-shaped platform on it. The engine is mounted on 2 bolts to the platform, but a plywood spacer should be installed between them for a tight connection. A cartridge is installed on the engine shaft through an adapter, wires are brought out to the mains, the speed controller is mounted in the circuit.

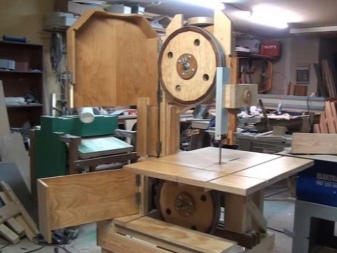
Band-saw
Since the band saw is a closed band with cutting teeth, it rotates between two pulleys that are driven by a motor. It is not difficult to build a small home sawmill if you use the motor shaft from the washing machine to rotate the pulleys. One of the pulleys can be mounted on the motor shaft, or a belt transmission of torque to one of the working pulleys can be used.
Hood
A vane device should be mounted on the motor shaft, a ventilation frame with fasteners for the motor should be built and the unit should be assembled, supplying it with an electric cable for connection to the electrical network. Next, prepare the place for installing the hood, for example, a through hole in the wall or roof of the room where you plan to equip the hood, re-equip the window frame. Insert the fan frame with the motor and the impeller into this hole, and then seal it around the perimeter and refine it.
It is better to take an exhaust motor with the possibility of reversing in order to operate the unit not only as an exhaust hood, but also as a supply fan.
Such an alteration is suitable for a garage, a greenhouse, a basement with food, a greenhouse, a kitchen.

Feed cutter
A feed cutting device can be made from an automatic machine using its motor and drum with its bearings and rotation mechanism. In advance in the drum, it is necessary to sharpen and bend the cutting holes like a conventional vegetable cutter.
- The frame is mounted by welding by the dimensions of the drum for mounting the equipment.
- A rotating mechanism with a drum is attached to the frame between the racks.
- The drum is connected to the motor through a gearbox.
- Next, you need to build and attach a feed cutter body with a loading chute to the frame. The body is installed on top of the drum in such a way that after loading the feed falls on the outer side of the rotating drum with knife holes, is cut and, being crushed, slipped into the drum space.
- As the device is filled with finished feed, you need to stop the feed cutter and empty it from the contents,

Other options
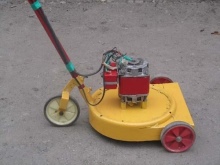
Of other homemade products, for which the craftsmen use engines from washing machines, the most interesting can be noted. For example, someone thought of adapting such a motor to their bike so as not to pedal. Another managed to build a grain grinder, and the third - a sharpener (or grinder). Even the turn came to such complex equipment as a lawn mower on wheels and a wind turbine.
And this is far from the limit for craftsmen.
Useful Tips
In order for the use of home-made equipment to be a joy and benefit, it is necessary to observe elementary rules of electrical and fire safety in the manufacture of all kinds of alterations and their operation.
In addition, you need to understand that many homemade tools do not require high engine speed. That's why it is necessary to install devices for adjusting and even limiting the speed.
You can find out how to make a router out of a washing machine motor with your own hands below.


The comment was sent successfully.