How to disassemble a Hotpoint-Ariston washing machine?
Like any complex technical device, Ariston brand washing machines also have the ability to break. Certain types of malfunctions can be eliminated exclusively with the help of an almost complete disassembly of the unit into its component parts. Since the main part of such malfunctions of the Hotpoint-Ariston washing machine can be fully corrected on its own, then an independent disassembly procedure should not be confusing. How to implement this, we will consider in this publication.

Preparation
First of all, it is necessary to disconnect the washing machine from all communications:
- disconnect from the mains;
- turn off the inlet hose;
- disconnect the drain hose from the sewage system (if it is permanently connected).
It is advisable to drain the remaining water from the tank in advance by means of a drain filter or a tube near it. Next, you should prepare free space for the location of the washing unit itself and the components and components that are removed from it.


We prepare the required tools. To disassemble the Ariston washing machine, we need:
- screwdrivers (Phillips, flat, hex) or a screwdriver with a set of bits of various types;
- open-end wrenches for 8 mm and 10 mm;
- knob with heads 7, 8, 12, 14 mm;
- pliers;
- nippers;
- hammer and block of wood;
- a bearing puller will not be superfluous (when the washing machine is dismantled for the sake of replacing them);
- hacksaw with a blade for metal.


Step-by-step instruction
Having completed the preparatory work, we proceed to the measures for disassembling the Hotpoint-Ariston washing machine.
Washing machine top cover
Without dismantling the top, it is not possible to remove the other walls of the unit. That's why unscrew the fastening screws from the back side, move the cover back and remove it from its place.
Above is a large block for equalizing the position of the washing machine (counterweight, balancer), which closes access to the tank, drum and certain sensors; nevertheless, it is quite possible to get to the noise suppression filter and control panel. Unscrew its bolts and move the balancer to the side.


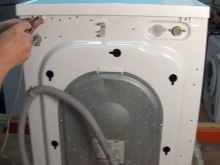
Back and front panels
From the side of the back wall, using a Phillips screwdriver, unscrew several self-tapping screws holding the back wall. Removing the back panel, many nodes and details become available to us: drum pulley, drive belt, motor, thermoelectric heater (TEN) and temperature sensor.
Carefully place the washing machine on its left side. If your modification has a bottom, then we remove it, if there is no bottom, then this makes the task easier. Through the bottom we can get to the drain pipe, filter, pump, electric motor and dampers.
Now we dismantle the front panel. We unscrew the 2 self-tapping screws located under the upper cover of the car body in the front right and front left corners. We turn out the self-tapping screws located under the tray of the washing unit, and after that we take the control panel and pull it up - the panel can be freely removed.


Moving elements
A pulley with a belt is fixed to the rear of the tank. Carefully remove the belt first from the motor pulley and then from the large pulley.
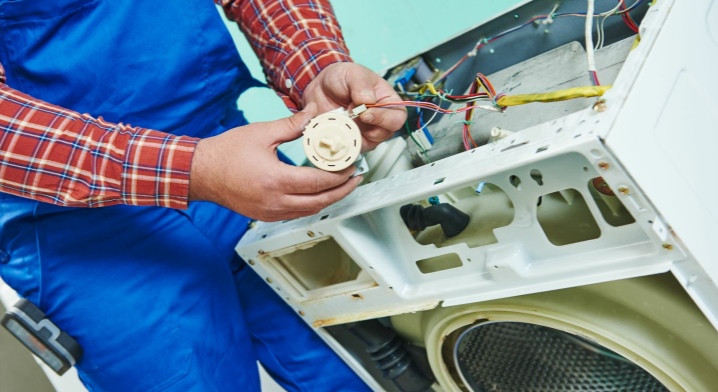
Now you can disconnect the thermoelectric heater wiring. If you need to remove the tank, in this case the heating element can not be reached. But if you want to diagnose a thermoelectric heater, then:
- disconnect its wiring;
- unscrew the central nut;
- push the bolt inward;
- hook the base of the heating element with a straight screwdriver, remove it from the tank.


We switch to the electric motor. Remove the chips of its wiring from the connectors. Remove the mounting bolts and remove the motor from the housing. It also does not have to be removed. However, the tank will be much easier to reach if the electric motor does not hang around the bottom.
Time to dismantle the drain pump.
If the motor could be reached through the hole in the back, then the pump cannot be removed in this way. You will need to put the washing machine on its left side.


Keep in mind that if you are uncomfortable removing the pump through the service window at the back, it is also possible to do this through the bottom:
- unscrew the screws holding the bottom cover, if it is present in your modification;
- unscrew the screws that are located in the area of the drain filter on the front panel;
- push the filter, it should pop out with the pump;
- use pliers to loosen the iron clamp on the drain pipe;
- disconnect the branch pipe from the pump;
- unscrew the bolts connecting the filter to the pump.
The pump is now in your hands. We proceed to further disassembly of the Hotpoint-Ariston washing unit.


Top details
From above it is necessary to remove the pipe that goes from the pressure sensor to the tank. Unclip the filler (inlet) valve pipe clamps. Remove the tubes from the seats of the detergent tray. Remove the pipe connecting the dispenser to the drum. Move the tray to the side.

Bottom
As mentioned above, by disassembling the bottom of the Hotpoint-Ariston washing machine, you can disconnect the drain pipe, pump and shock absorbers:
- lay the unit on its side;
- if there is a bottom, then dismantle it;
- using pliers, unclench the hose clamp and the branch pipe;
- pull them off, there may still be water inside;
- unscrew the pump bolts, disconnect the wires and remove the part;
- remove the mountings of the shock absorbers to the bottom and body of the tank.


How to disassemble the tank?
So, after all the work done, the tank is held only on suspension hooks. To remove the drum from the Ariston washing machine, lift it up from the hooks. Another difficulty. If you need to remove the drum from the tank, you will need to saw it, because the drum and tank of the Hotpoint-Ariston washing machine are not formally disassembled - so the manufacturer of these units conceived. Nevertheless, it is possible to disassemble them, and then assemble them with appropriate dexterity.
If the washing machine is made in Russia, then the tank is glued together approximately in the middle, if it is made in Italy, then the tank is much easier to cut. Everything is explained by the fact that in Italian samples the tanks are glued closer to the collar (O-ring) of the door, and it is quite easy to cut them. Hotpoint Ariston Aqualtis washing machines are equipped with just such.
Before proceeding with the sawing, you need to worry about the subsequent assembly of the tank. To do this, drill holes along the contour, into which you later screw in the bolts. Additionally prepare a sealant or glue.


Procedure.
- Take a hacksaw with a metal blade.
- Install the tank on the edge. Start sawing from the side that suits you.
- After cutting the tank along the contour, remove the top half.
- Flip the bottom over. Tap the stem lightly with a hammer to knock out the drum. The tank is disassembled.
If necessary, you can change the bearings. Then, to mount the parts of the tank back, install the drum in place. Apply sealant or glue to the edges of the halves. Now it remains to fasten the 2 halves by tightening the screws. The assembly of the machine is carried out in the reverse order.


The stages of disassembling the machine are clearly demonstrated below.


The comment was sent successfully.