Shtangenreismas: what is it, types and device

Among the high-precision measuring locksmith instruments, the so-called group of vernier tools stands out. Along with high measurement accuracy, they are also distinguished by their simple device and ease of use. Such tools include, for example, the well-known caliper, as well as a depth gauge and a height gauge. We will tell you more about what the last of the named tools is in this article.


What it is?
First of all it is worth giving general information about this locksmith tool.
- It also has another name - height-gauge.
- It looks like a vernier caliper, but is installed to determine dimensions on a horizontal plane in a vertical position.
- The principle of operation of the caliper is no different from the principle of operation of the caliper.
- Its purpose is to measure the height of parts, the depth of the holes and the relative position of the surfaces of various body parts. In addition, it is used for marking operations.
- Since the instrument is, in fact, a measuring device, it has a certain method of verification and measurement.
- Regulates the technical conditions of this instrument GOST 164-90, which is its main standard.


The accuracy of measurements and marking of the height gauge reaches 0.05 mm even for workers who do not have special skills to work with it.
Device
The construction of a conventional height gauge is quite simple. Its main parts are:
- massive base;
- a vertical bar on which a millimeter basic scale is applied (sometimes it is called a ruler, since in appearance it resembles this very instrument known from school years);
- main frame;
- vernier (additional micrometric scale on the main frame);
- measuring leg.


All other parts are auxiliary: fasteners, adjustments. It:
- screw and nut for moving the main frame;
- micrometric feed frame;
- frame fixing screws;
- holder for replaceable tips of the measuring leg;
- scriber.

The rod with the main measuring scale is pressed into the base of the tool strictly at right angles (perpendicular) to its reference plane. The rod has a moving frame with a vernier scale and a projection to the side. The protrusion is equipped with a holder with a screw, where a measuring or marking foot is attached, depending on the forthcoming operation: measurement or marking.
Vernier is an auxiliary scale that determines linear dimensions exactly to a fraction of a millimeter.

What is it needed for?
You can use this type of marking and measuring tools in locksmiths and turning workshops to determine the linear geometric dimensions of various parts, the depth of grooves and holes, as well as when marking workpieces and parts during assembly and repair work in the relevant industries (mechanical engineering, metalworking, automotive ). In addition, the height gauge is designed to accurately measure the height of parts placed on a marking area. At the same time, the metrological characteristics of the instrument are subject to periodic checks, the methodology of which is determined by the state standard.
They can take vertical, horizontal and even oblique measurements. True, for the latter, an additional node is needed.


Classification
Height gauges are classified according to various criteria. By design, the following types of device are distinguished:
- vernier (SR) - these are those that have already been described above, that is, they resemble a caliper;
- with a circular scale (ШРК) - devices having a circular reference scale;
- digital (ШРЦ) - having electronic readout indicators.


In addition, these tools are distinguished depending on the maximum measured length (height) of the parts. This parameter (in millimeters) is included in the model name of the tool.
There are hand-held devices marked SHR-250, which means that the maximum length or height of a part that can be measured with this tool should be no more than 250 mm.
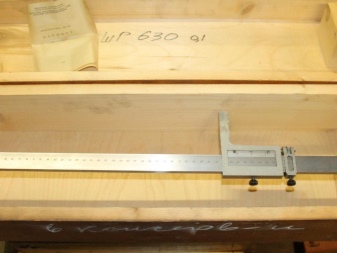
And also there are models of height gauges with markings ШР-400, ШР-630 and more. The maximum known model is SHR-2500.

All tools are classified according to the accuracy class. It is also included in the model markings. For example, marking ШР 250-0.05 will mean that this model of manual height gauge has a measurement accuracy of 0.05 mm, as indicated by the last figure (0.05). This parameter corresponds to the first class of instrument accuracy according to GOST 164-90. The interval of this class is 0.05-0.09 mm. Starting from 0.1 and higher - the second accuracy class.
For digital devices, there is a separation according to the so-called step of discreteness - from 0.03 to 0.09 mm (for example, ShRTs-600-0.03).

How to use?
To start using the tool, you first need to check whether it measures accurately and whether it has any malfunction. The technique must comply with the normative document MI 2190-92, intended specifically for height gauges.
Checking the zero reading at the workplace can be done in 3 ways:
- the device must be installed on a flat surface;
- the main frame goes down until the measuring foot touches the platform;
- the scales on the main ruler and the vernier are checked - they must coincide with their zero marks.

If everything is fine, you can confidently use such a tool.
The measurement algorithm consists of several steps.
- Place the workpiece to be measured on a flat, smooth surface.
- Combine the product and the height gauge.
- Move down the frame of the main scale until it touches the item to be measured.
- After that, by means of the micrometric pair mechanism, achieve full contact of the measuring leg with the product.
- The screws will fix the position of the frames of the device.
- Evaluate the result obtained: the number of full millimeters - according to the scale on the bar, the fraction of an incomplete millimeter - according to the auxiliary scale. On the auxiliary vernier scale, you need to find the division that coincided with the division of the scale on the rail, and then calculate how many strokes from the zero of the vernier scale to it - this will be the micrometric fraction of the measured height of the product.
If the operation consists in marking, then a marking leg is inserted into the tool, and then the desired size is set on the scales, which must be marked on the part. Marking is made with the tip of the leg by moving the tool relative to the part.


How to use the stengenreismas, see below.


The comment was sent successfully.