Supporting floor slabs on walls
Overlapping is a very important component of any capital construction. Their use is also closely related to leaning on the walls. Let's try to understand this topic in more detail.
Features and purpose
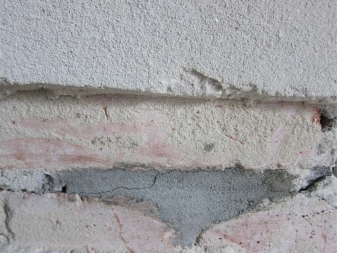
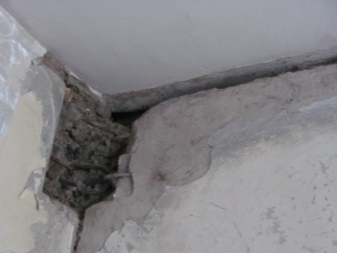
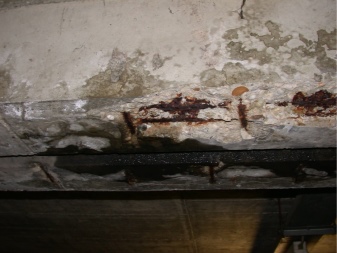
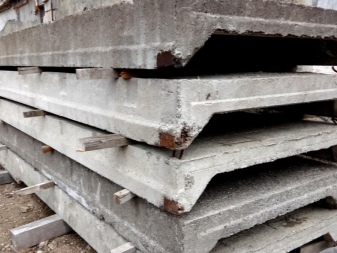
It is appropriate to start a conversation about the use of floor panels with the fact that when the installation technology is violated, problems arise very quickly in them. From time to time it is reported that overlaps are crumbling in different places. Immediately after that, it becomes impossible to use the buildings normally.
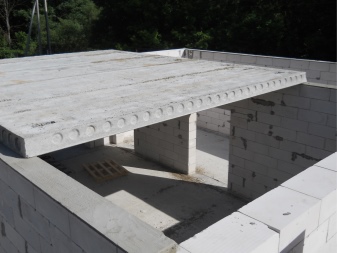
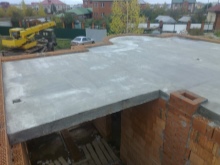
Floor slabs or panels can be supported either on a column or on an outer wall. In any case, they are located horizontally.
The purpose of using the slabs is to perceive the load exerted from above, with a partial transfer of it to the vertical supporting structures of the house. In most cases, these are typical products. The advantage of finished boards is:
- reliability;
- ease of use;
- no special requirements for use;
- retention of vapors, gases and water;
- zero fire hazard.
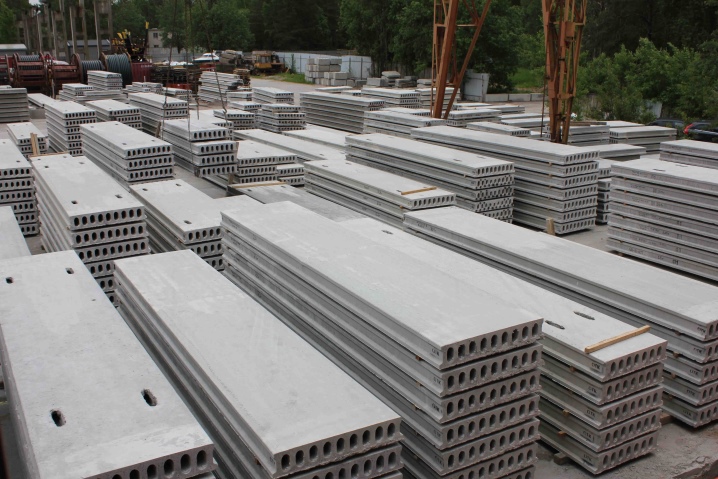
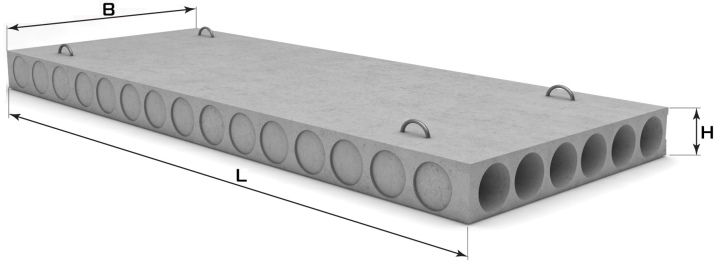
In most cases, the cover panels are made of reinforced concrete. It is a composite material made from purely natural ingredients. Modern products of this kind, according to GOST, must endure bad weather and severe frosts. An important feature of quality blocks is their high mechanical strength. As for the classification of the slabs, it mainly comes from the internal structure and installation methods.
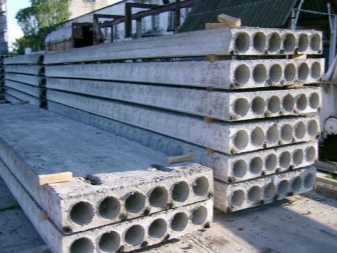
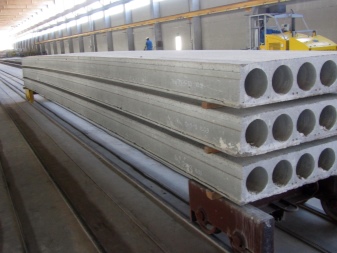
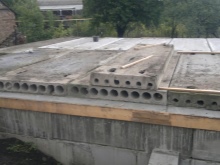
If the panel has longitudinal cavities, then it can be used in both residential and industrial construction. According to the diameter of the voids in diameter, the following types of products are distinguished:
- with cylindrical channels 159 mm;
- with circular chambers 140 mm (such slabs are made from heavy types of concrete);
- with voids 127 mm;
- with round cavities 114 mm.
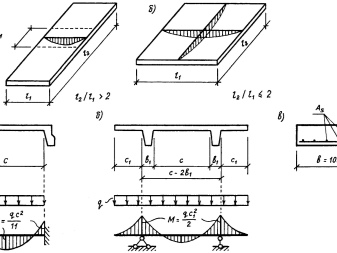
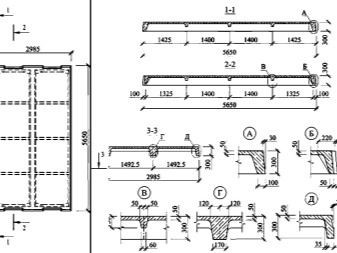
Design parameters
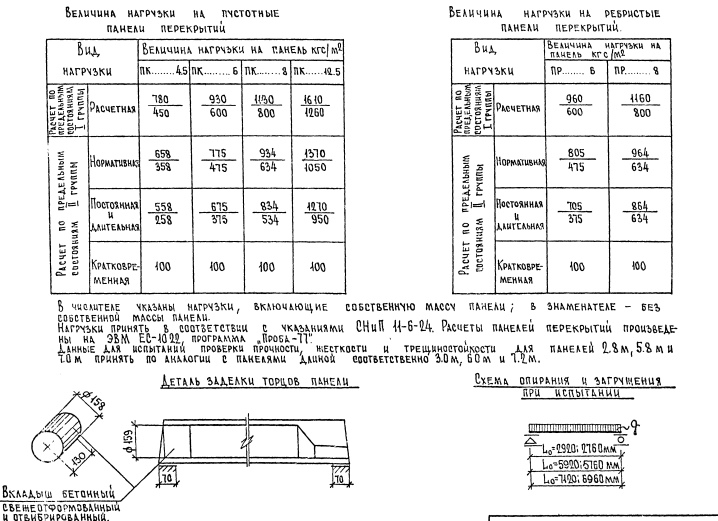
In order not to get into unpleasant situations, especially in news broadcasts, it is necessary to pay great attention to the calculation of the main parameters. The values of floor structures are selected for all structures separately. This takes into account the length of the spans between the walls. The spatial scheme of the building allows you to calculate the mass pressing on the supporting structures. Based on this mass, it is possible to determine the loads that fall on an individual slab.
Important: when calculating the total load, the severity of the screed and partitions, insulation materials, furniture and other equipment is taken into account. Suppose the slab weighs 2900 kg, and the bearing area is 9 square meters. meters. Accordingly, 1 sq. meter accounts for 322.2 kg of weight. Further, the calculated figure must be subtracted from the standard figure.
From the resulting difference, it is necessary to subtract the approximate load created by furniture, other structures and household appliances. After that, a solid margin of safety should remain. Usually, the real load per unit area is 2-3 times less than the value laid down in the project. This approach allows you to eliminate any surprises during operation.
The highest static load per point must be calculated with a safety factor of 30%.
The dynamic load is already calculated with a reserve factor of 50%. If you need to assess the suitability of old structures, you need to take into account:
- load capacity of the walls;
- the current state of the building blocks;
- safety of reinforcement.
Placing heavy furniture items, large cast-iron bathtubs in an old apartment, the load limit must be taken into account. The most accurate results can be obtained by involving specialists. A professionally executed calculation will avoid many unpleasant situations. As for the width and height of the floor slabs, here the more it is necessary to take into account the recommendations of professionals. In some cases, it is possible to solve on the spot the issues of strengthening the floor slabs, using their re-support on temporary supports.
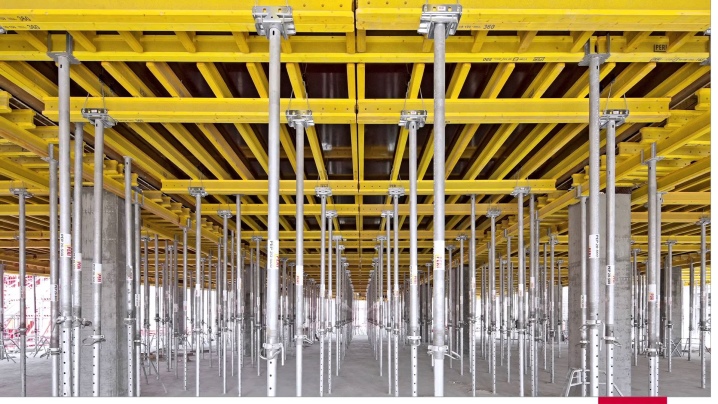
Slabs can be stripped in accordance with the established requirements only after concrete hardening up to 70% of the design value. In this case, put a single tier of racks. For your information: if you need 50% stripping, you need to put a couple of tiers of racks. Spans up to 8 meters long should be constructed with a temporary support in the center. If the span is longer, then more props are needed; but under slabs shorter than 3 meters, support is rarely needed.
Overlap and depth according to SNiP
The requirements of SNiP of Russia state that the overlap of the floor slab on the underlying wall is determined by:
- the purpose of using the building;
- the width of the walls;
- the thickness of the overlapping structures;
- their mass;
- seismic hazard level;
- the size of the covered spans.
A larger overlap in SNiP is simply not provided. Panels of types PC, PB in brick houses are laid on a pair of short sides. If the structure is up to 4 meters long, then the overlap should be 7 cm; with a greater length - it should be 9 cm.
The depth at which prefabricated structures are supported is as follows:
- when supported along the contour - 4 cm;
- when supported by a pair of long and one shortened side - 4 cm;
- when supported on two sides and a span of slabs up to 4.2 m, the depth should be 5 cm;
- when supported on 2 short and 1 long sides - 5 cm;
- when supported on 2 sides with a length of more than 4.2 m, the depth of support cannot be less than 7 cm.
SNiP 2.03.01–84 prescribes a number of requirements for anchoring reinforcement structures placed on supports. Of course, this moment also affects the final depth.
Important: the thickness of all parts of the floor located above the technical underground rooms and walkways (driveways) is calculated together with the insulating layer.
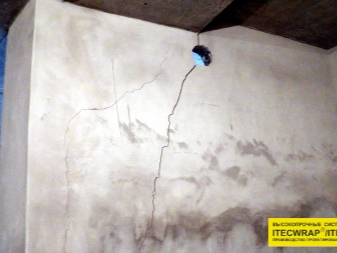
Separate requirements are imposed on the depth of embedded structures in the grooves. If the overlap is made with an incorrectly selected overlap, you can fear the appearance of cracks and even complete destruction of structures.
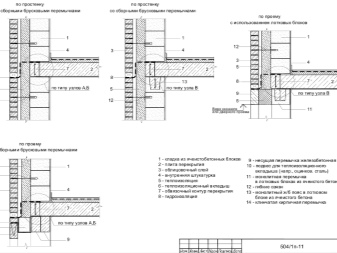
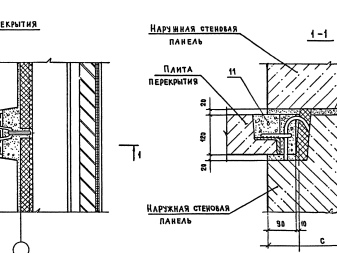
Supporting nodes
When preparing a bearing unit on aerated concrete blocks, it is imperative to take into account all the loads created by:
- blocks located above;
- reinforcing belts;
- other objects pressing on the jumper.
Some of the window lintels under the ceilings are simply poured into the U-block. In other cases, the concrete lintel is cast inside the wooden formwork.

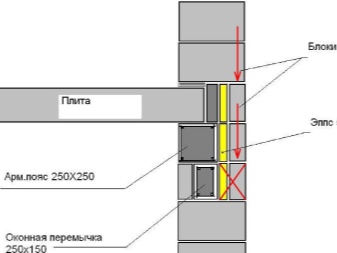
You can also use prefabricated aerated concrete lintels. The row of blocks that supports the lintel must be reinforced with a pair of rods with a diameter of 8 mm. The reinforcement strip should be 0.9 m on both sides or more.
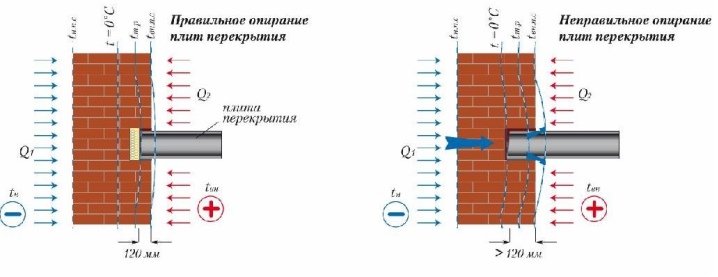
The row above the aerated concrete lintel, on which part of the floor rests, also needs to be strengthened. Otherwise, the high point load can severely damage. Attention: the lintels and the walls themselves must be of the same thickness. Aerated concrete floor slabs, as well as slabs on walls made of small aerated concrete blocks, must have a bearing depth of at least 12 cm.Where local loads are transferred to the masonry, it is required to spill a solution (no more than 15 cm).
It is strictly not allowed to embed beams and slabs of balconies into masonry with pinching... So that the eccentricity is not too great in order to avoid chips in the wall made of fine aerated concrete, the floor is supported by a row of bricks. They are laid “flat” on top of a mortar or a reinforced concrete belt. Slabs are attached to self-supporting walls made of aerated concrete with brackets.
Important: aerated concrete floors resting on basement elements must have a lining with waterproofing properties.
The ends of reinforced concrete floors are supposed to be covered with reliable insulation. When laying reinforced concrete cornice slabs on a brick wall, you can choose both flat and ribbed slabs. It is forbidden to use technological openings or shorten the panels. If some part of the slab is missing, it is necessary to compensate for this deficiency using a reinforced concrete mesh. When all the slabs are laid out, it is time for anchoring; all seams and loop holes are immediately closed.
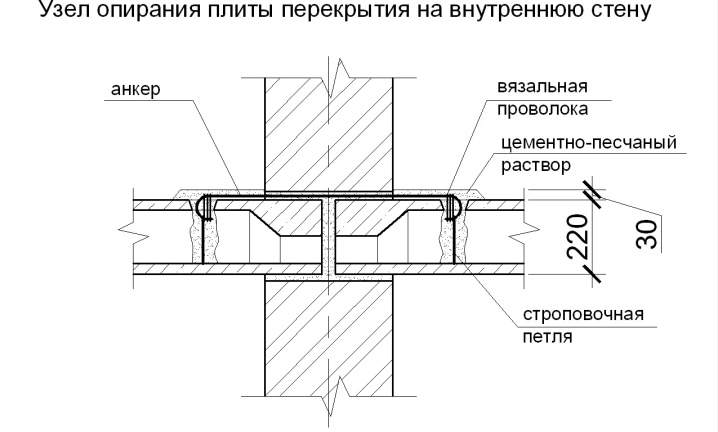
If the slabs are supported on a crossbar made of load-bearing reinforced concrete or on a wall made of dense concrete, the depth of the unit will be at least 6.5 cm.On a brick wall, this figure will be 8 cm. But on aerated concrete, polystyrene concrete or foam silicate - 1 cm or more.
All work must be done as quickly as possible. It is categorically excluded that construction debris gets into any holes and support points.
Minimum maximum limits
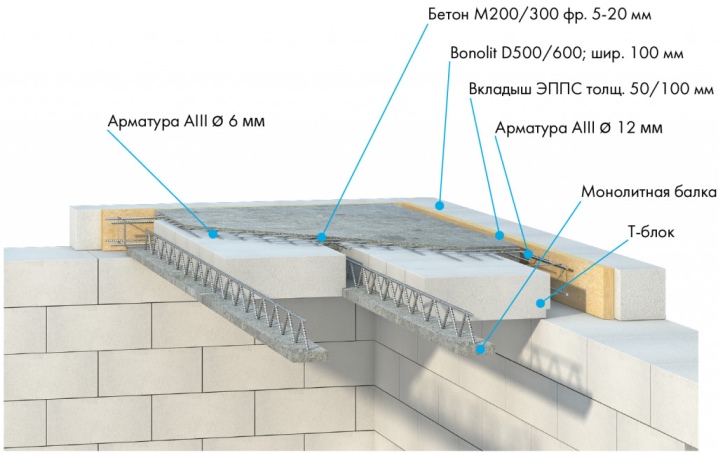
Modern technologies make it possible to implement almost any design solution. So, with the help of a monolithic slab, you can confidently close a span of 6x6 m. Additional support points are not needed in this case. A similar task is confidently solved:
- a plate resting on 4 sides (10 cm thick);
- bottom mesh 10 mm;
- top mesh 6 mm.
In most residential buildings built of bricks, the end part of the hollow core slab should extend onto the wall by 9 cm. The highest figure is 12 cm. The most accurate information can be obtained by special calculations. When laying a prefabricated slab with voids on a panel wall, the minimum limit is 5 cm and the maximum limit is 9 cm.
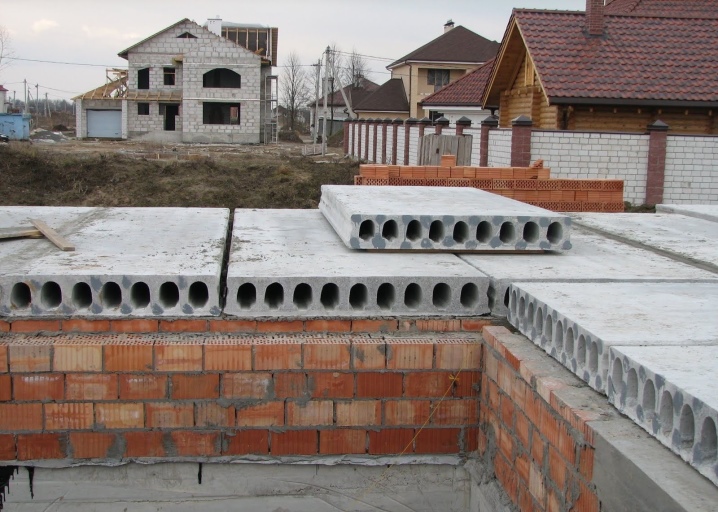
If the wall is made of aerated concrete or foam blocks, these indicators are 12 and 25 cm, respectively.
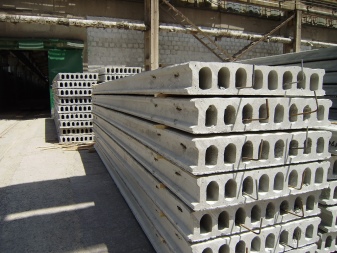
When using a ribbed slab, all the smallest and largest parameters are kept the same as for hollow core products. In both cases, they proceed from a single-span beam scheme. Special attention should be paid to the support parameters of the slabs for a wooden house. In this case, the walls must be at least 250 mm thick. The smallest support value is 1 cm; the largest, according to various sources, is 16, 22 or 25 cm.
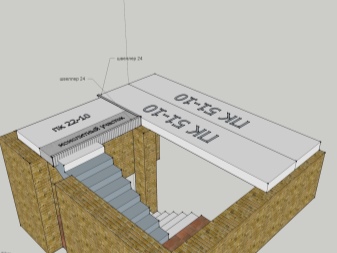
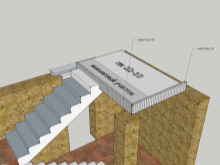
Ways to place on the walls
Undoubtedly, the classic technique is the support on 2 sides. In this case, bending occurs under the load mass, and the reinforcement picks up the resulting stress. The main condition for success is the compliance of the created load and the parameters of the slab. Sometimes they try to lean on 3 sides. This technique has an alternative name - support with a valve.
A similar approach is acceptable if it is impossible to put slabs in width, and it makes no sense to make a monolithic block. This solution is technically worse than 2-sided support. It is undesirable to install plates on the long side on the wall with a depth exceeding the thickness of the product itself. Otherwise, pinching will occur. They are especially dangerous for prefabricated structures.
It is categorically impossible:
- support the plate on two long sides;
- put an auxiliary support in the span;
- support the slab on two walls, taking out a part as a balcony or console.
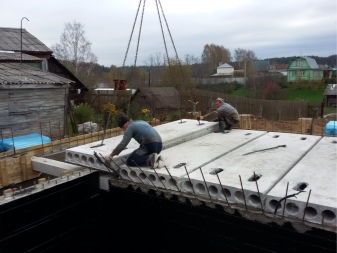
Arrangement of supporting floor slabs
To reduce freezing, it is required to close the holes inside the hollow core slabs. It is most correct and easiest to do this while the structures are still on the ground. Aerated concrete floor slabs are placed on reinforced concrete seismic belts. Mandatory requirements will be:
- symmetrical layout;
- deviation from ideal planes no more than 5 mm;
- a bundle of plates with a belt by means of welding, which ensures high strength;
- pouring anti-seismic lines exactly to the width of the walls.
You need to put heavy slabs with a crane until the solution has frozen. The solution should become thick, it is not necessary to dilute it with water.
Important: the surfaces of the load-bearing walls should be leveled as much as possible before the formation of the floor. If you have to support the slab on three sides at once, you must strictly follow the scheme proposed by the manufacturer. When there is no such scheme on the site, it is better to clarify everything additionally by submitting a request.
Formwork for reinforcing belts should be made of any materials with reduced hygroscopicity. In the absence of experience, it is advisable to order ready-made formwork. Given the likelihood of cold penetration through the reinforcing belt, it must be insulated. It is unacceptable to use brick layers or a grid instead of a full-fledged armopoyas (both together and separately). In some cases, concrete ring anchors are used.
For information on how to properly install floor slabs, see below.


The comment was sent successfully.