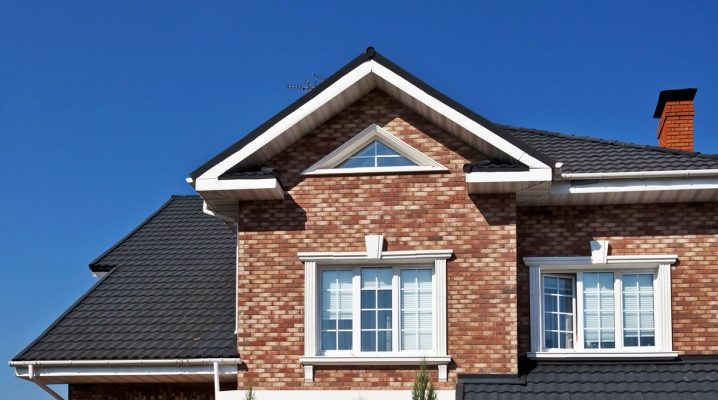
Clinker tiles for facades: material features and installation subtleties
Facade tiles have been known since the beginning of the 17th century. It appeared as an alternative to clinker facing bricks and to this day does not give up its positions, remaining one of the most demanded finishing materials.


Specifications
Facade clinker tiles are distinguished by high strength indicators and have a long service life. This is due to the peculiarities of the composition and manufacturing technology. Clinker is a mixture of shale clay, oxide solvents and special additives. Further, the raw material is given the desired shape (by extrusion or pressing), after which the future tiles are baked at a temperature of 1300-1400 ° C.
The result is a homogeneous, extremely durable and reliable material that looks like a stone. In addition, today clinker tiles that imitate brickwork are also produced.


Among the technical characteristics of clinker tiles for external cladding of the facade, several indicators are the most important.
- Mechanical strength. The material successfully resists all types of loads - bending, shock, abrasion and compression. The minimum strength indicators are M400 (that is, 400 kg of effort falls on 1 sq. Cm). The maximum strength value is equal to M800. For comparison: the average strength of brick for cladding is M250.
- Frost resistance. The tests carried out make it possible to assert that, without prejudice to its integrity, the material can withstand up to 150 freeze and thaw cycles. If you look at the old buildings lined with clinker, it becomes clear that in practice this figure is much higher. The increased indicators of frost resistance are due to the low moisture absorption of the material, which averages 2-4%.
- Density, vapor permeability and thermal conductivity. The product has a fairly high density. The average is 1.9-2 kg / sq. dm, which explains its considerable weight.
Clinker cannot boast of low thermal conductivity, on average, it is in the range of 0.95-1.2 W / (mK). This is why it is considered a protective and decorative coating, not an insulating coating.
Due to the peculiarities of production, the surface of the tile is covered with the smallest pores, through which moisture does not penetrate, but water vapor is removed. This allows us to assert that the material is vapor-permeable, "breathable".
The form of release of the material is tiles with a thickness of 15-25 mm. Dimension parameters are variable. There is a tile imitating brick and corresponding to its size (250x120 mm). The so-called old German tiles have dimensions of 240x71 mm, and the modern "American" counterpart - 295x57 mm. More details about the sizes of products and their labeling - in the following paragraphs of the article.


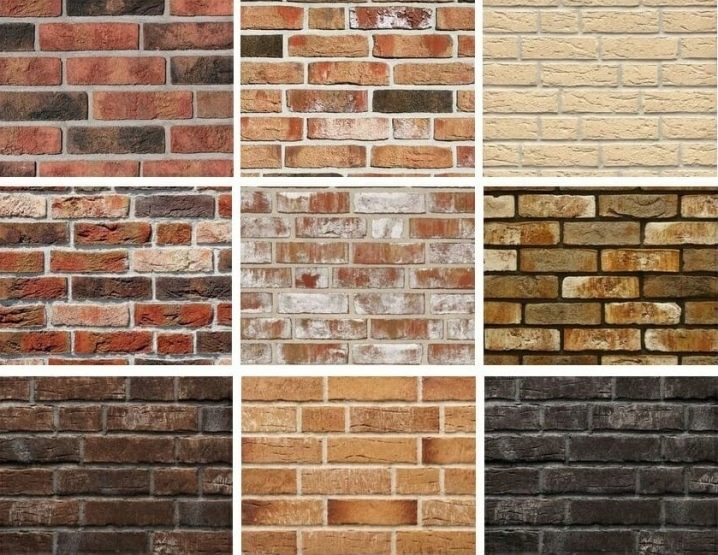
The bulk of the facade clinker is unglazed, its shade corresponds to the natural colors of clay (yellow-terracotta and brown colors), and there are also light beige, gray, graphite shades. If we are talking about glazed tiles, then the color can be any. However, it is more often used for interior decoration of premises.
The scope of application of the tile is considered to be facade cladding. In addition, it acts as the basis for a thermopile (insulated analogue).High adhesion allows the use of products on concrete, wood, stone, prefabricated panel wall surfaces. In this case, the durability of the facade is determined not only by the quality and strength of the tiles, but also by the quality of the adhesive composition and inter-joint grouting.
Facade organization technology can be dry or wet, ventilated or non-ventilated. More details about the features of each and the installation technology - in the corresponding section of the article.


Advantages and disadvantages
The material has the following obvious advantages:
- increased strength indicators, comparable to those of natural stone and porcelain stoneware;
- low weight, which allows you to refuse additional reinforcement of the foundation and facilitates the process of transportation and installation of tiles;
- low moisture absorption, ranging from 1-6%;
- frost resistance due to the presence of pores in the material through which moisture is removed outside and does not freeze at negative temperatures in the thickness of the tile;


- long period of operation, which averages 40-50 years;
- weather resistance, including squally wind, UV rays;
- resistance to temperature extremes, preservation of tile geometry;
- resistance to the influence of aggressive media, primarily acidic and alkaline, as well as the absence of efflorescence on the surface of the tile;
- hygiene, biostability - mold and fungi do not form on the surface;
- fire resistance - the material is non-combustible;
- environmental friendliness of the material;


- uniform pigmentation of the tiles, due to which, even if chips and cracks appear on the surface, they will remain unobtrusive, and the facade will not lose its presentability;
- high adhesion of the material due to the presence of grooves on the inner side of the tile, locking joints;
- unpretentiousness to the base material - tiles can be fixed on top of concrete, wooden, prefabricated panels, stone walls;
- variety of design options and colors (90 shades);
- ease of installation and ease of maintenance.


Like any finishing material, clinker tiles have disadvantages.
- Quite high cost of products. Although, if you compare its cost with the price of facing brick, clinker will be more affordable. User reviews suggest that the high price pays off by the long service life of the material and its reliability.
- Brittleness of uninstalled plates, which can cause material breakage during operation or installation.
- Installation of panels with insulation requires careful calculation of the dew point. The fact is that these panels have a thin polyurethane layer, therefore it is necessary to calculate the dew point, taking into account the use of other thermal insulation materials.


Views
Clinker tiles for the facade have different dimensions, and therefore the following types of material are distinguished:
- L-NF (295x71 mm) - the largest tile for decorating 1 sq. m requires an average of 40 pieces;
- WDF (215x65 mm), for 1 sq. m requires 59 tiles;
- WF (21x5 mm) - the smallest possible size, in 1 sq. m holds 73 tiles.
Large and medium tiles are 15 mm thick, small tiles are 17 mm thick.


The indicated dimensions and markings are relevant for models of domestic production.
European counterparts have slightly different dimensions. Their characteristic feature is a uniform length of 240 mm. Accordingly, when buying, attention is paid only to the width of the tiles.
It can be as follows:
- 2DF - tiles with a width of 113 mm, per 1 sq. m requires 32 pieces;
- DF - width 52 cm, consumption - 64 pcs / sq. m;
- RF are 65 mm wide, so 1 sq. m requires 54 tiles;
- NF with a width of 71 mm, consumption per sq. m - 48 tiles.
The thickness of imported products is 17 mm.
Finally, the American facade clinker is distinguished. Its length is 193 or 295 mm, the width can be 57, 71 or 92 mm. The thickness is the same for all tiles - 15 mm. For 1 sq. m, 33-74 tiles are consumed.

In addition to facade panels, basement and corner panels are also distinguished. The basement tile is thicker, which means it has more weight and strength characteristics. The second ones are designed for a beautiful and airtight design of corner joints, they are produced exclusively using extrusion technology.
Extruded corner tiles are based on mineral particles ground into flour (calcined white and red clay, mica, marble or granite chips) and polymer resins. Thanks to this, the tile becomes flexible, can be cut with a sharp assembly knife. At the same time, it is characterized by the same properties as the facade analogue, outwardly also does not differ from it.


In terms of design features, the following types of material are distinguished:
- smooth brick-like tiles are the most common and easy-to-clean option;
- material with a relief surface that can imitate not only brickwork, but also stone surfaces;
- tiles imitating aged bricks with characteristic chips and cracks.


Tiles are usually divided into thermal panels and those that are not supplemented with a layer of insulation. The insulated material allows you to protect the facade and increase its thermal efficiency, give it an attractive appearance. Structurally, it consists of clinker tiles and a layer of heat-insulating material.
As the latter, expanded polystyrene, polyurethane foam or mineral wool is used. The layer thickness is 30-100 mm.
Preference should be given to a material with a polyurethane foam insulating layer, since it has the lowest thermal conductivity and is characterized by resistance to the influence of environmental factors.

A thermal tile can consist of several layers:
- two-layer includes insulation and clinker;
- three-layer - "cake" of clinker, insulator and substrate made of moisture-resistant OSB - board, due to which it acquires greater rigidity and strength;
- The structure of a four-layer panel is similar to a three-layer panel, but it is additionally equipped with a refractory substrate.
Despite the high thermal insulation performance of thermal panels, it is not always rational to use them during installation. So, for facing prefabricated panel and frame houses, where there is already a layer of thermal insulation, it makes no sense to purchase thermal panels. They are not needed when organizing ventilated facades, as well as for covering garages, gazebos, fences.
Finally, today corrugated seamless tiles are produced, which are characterized by the absence of chamfers. This achieves the visual effect of a single monolithic façade structure without seams. The slabs still do not fit end-to-end, a small gap between the elements remains. It is required for thermal expansion of the material.


Selection Tips
- When choosing the thickness of the material, take into account the climatic conditions of use. The more severe they are, the thicker the tiles should be. Thick tiles are also selected for cladding buildings located near water bodies.
- Consider right away if you are ready to take the time to take care of the material. The easiest to use is a smooth brick-like stone. Dust and dirt accumulate in the grooves of relief analogs.
- Clinker is produced from natural ingredients, the reserves of which are limited. The production process is characterized by energy consumption, the appearance of defects at the slightest inaccuracies in technology. All this determines the high cost of the finished product, which on average starts from 4,000 rubles.


- Focus on this figure when buying, do not be tempted to buy cheaper material. Otherwise, there is a high probability of acquiring a fake of dubious quality.
- If possible, preference should be given to products of well-known European brands. As for Russian-made products, they cannot always boast of a quality that meets European standards.In addition, the designs of imported tiles are usually more interesting and the choice is more varied.
- Together with the tiles, it is rational to immediately purchase glue and grouting composition. These must be frost-resistant mixtures that can withstand at least 50 freezing cycles. The grout material is usually matched to the color of the tile. This is necessary so that possible deformations of the tiles due to temperature changes are invisible.


- The glue should be distinguished not only by frost resistance, but also be characterized by elasticity and high adhesion values.
- You can calculate the required amount of material by measuring the area of the facade and subtracting the area of door and window openings from the result. Next, you need to find out how many tiles of the selected size are required per 1 sq. m (do it yourself or find similar information on the packaging of the tiles). The resulting result remains to be multiplied by the number of square meters of the facade to be finished. As a result, you will receive a figure corresponding to the required number of panels. Don't forget to add another 7-10% to the stock.
- Experts recommend opening all packages with clinker and mixing the tiles before laying. This will avoid the effect of the striped finish of a private house, since the tiles of even the same batch may have slight differences in color. This recommendation turns into a mandatory rule if tiles of different batches are purchased. The only exception is the deliberate use of variegated products to achieve a particular aesthetic effect.


- A curtain facade involves the purchase of profiles and fasteners, make sure that they are made of anti-corrosion materials or have a similar coating.
- If you decide to purchase thermal panels, it is important to know that this material has low flexibility. This means that it can only be mounted on level surfaces. As already mentioned, the best insulation for this material is polyurethane foam.
- Plates with expanded polystyrene heat insulator will last less, due to their shrinkage. A material with mineral wool needs careful waterproofing, which increases the labor intensity and cost of installation. In order for the tiles to provide high-quality thermal insulation, the thickness of the insulation must be at least 60 mm.
- Going to the store, decide on the color and design of the tiles, this will greatly simplify and speed up the process.

Smooth, brick-like tiles of light beige shades can be called universal.
These can be found in the Perla liso collection of the German brand Feldhaus Klinker, for example. The tiles are medium in size. And the model of the 722 Paglio series from the German manufacturer Stroeher is almost the same in color and texture, but large-format.


Original samples for different types of stone are presented in the collections of the brands Feldhaus Klinker, Stroeher, Cerrad (Poland). High-quality tiles under the classic fired aged brick - in the Greetsiel Friesisch-bunt genarbt collection of German production Roben. The leading position in the production of thermal panels is occupied by the Termozit company.
Polish tiles are usually cheaper than German tiles.
- When choosing a material, remember that a single tile at a distance of 30-40 cm from the eyes looks different than a fully laid out facade from a distance of 3-4 m. But this is exactly how the view appears for casual passers-by or guests entering the house. Do not forget to not only carefully examine the tiles up close, but also evaluate their appearance on samples in the store (usually good sellers make a small calculation of several tiles), and also try to direct a flashlight beam at it. This will allow you to get a more accurate picture of the appearance of the tiles on the facade.
- When choosing 2 different shades for facade and basement tiles, pay attention to their compatibility. Products with overflow are not recommended.The grout should be of the same color, its task from an aesthetic point of view is to combine multi-colored slabs into a single whole. To highlight the brickwork, grouting one tone darker or lighter than the color of the tile allows.
- Pay attention to the composition - the basis of the product should be shale clay without dangerous additives. The quality and durability of the color of the tiles depends on the method of staining. The best option is dyeing during firing without the addition of artificial dyes.


Tile cutting rules
Those who decide to do the installation of clinker tiles with their own hands will sooner or later have to face the need to cut the tiles. Both standard tiles and elongated "American" tiles are cut. Since the material is fragile, failure to follow the cutting guidelines will cause the tiles to split. Eliminate such a nuisance will allow the use of special cutting tools.
The easiest way to cut tiles at right angles is to use a tile cutter with a diamond blade. This water-cooled device will allow you to quickly and quietly cut the material. In this case, the cut will be neat and smooth, without chipping. Using an automatic tile cutter is especially convenient when you need to cut a large number of tiles.


However, this unit has a rather high cost, so for home use it is quite possible to get by with a manual analogue, and sometimes a tile cutter-tongs. Using the latter, position the instrument so that the cutting line is in the middle of the support jaw of the forceps. When working, it is necessary to exclude sharp, jerky movements.
Finally, a straight cut can be done with a grinder. However, the result will be less accurate than using a tile cutter. In addition, the process is accompanied by strong noise and the formation of a large amount of dust.


A hacksaw with a diamond wire is used for curly cutting of the material.
However, its use may not be within the power of an inexperienced master. In this case, it is better to use wire cutters. The cut will be rough and jagged, so it will be sanded using fine sandpaper. If necessary, use a hole saw to cut ideal circles in the material.
It is important to carefully measure the tiles and mark the cut line beforehand. Otherwise, you may end up with inappropriate cut sizes. When cutting, the tiles must lie on a flat surface. Hold the material with one hand, ensuring its fixed position, with the other hand, guide the tool without pressing on it. Work should be carried out in goggles and a respirator.


Cladding stages
Depending on the material used, the initial condition of the work surfaces and the desired result, you can use wet or dry mounting. In the first case, the facing tiles are attached directly to the prepared wall. For this type of installation, a prerequisite is a flawlessly even and smooth wall; with a wet type of installation, the load on the base of the building increases.
The dry method involves the installation of a lathing on which the tile is fixed with self-tapping screws. However, it can also be glued onto a subsystem.


With the help of clinker tiles, ventilated and non-ventilated facades can be arranged. In the first case, an air gap remains between the cladding and the wall. Such a system does not increase the load on the walls, allows you to hide tangible defects in its surface and increase the thermal efficiency of the building. Heat-insulating materials are sometimes placed in the formed air gap.
Wet installation of the material is carried out in several stages.
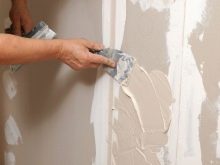
- Preparation of the base. The working base must be leveled (permissible height difference - no more than 2 mm per sq. M), if necessary - strengthened. After that, the base is putty and primed using deep penetration formulations (usually primers).Further, the surface dries in a natural way, it is unacceptable to fix the plates on a damp base, as well as to work in bad weather.


Smooth surfaces such as reinforced concrete walls need to be roughened to improve adhesion.
For this purpose, the surface is covered with notches, after which it is primed in 2-3 layers.
- Wall markings. Starting from the top of the window slopes, horizontal stripes should be drawn on the surface for further installation of the rows of slabs. At the same time, 5-8 mm recede from the upper slope, this is the distance for its decorative design.
- Glue preparation. It is important that the adhesive solution is suitable for outdoor installation, intended specifically for clinker tiles. When mixing the composition, you should strictly follow the instructions; it is more convenient to mix the composition at low speeds with a drill mixer.
- Glue application. Most of the adhesive is applied to the wall, slightly less to the back of the tile. For work, use a notched trowel. The thickness of the adhesive layer is 10-14 mm.


The glue dries quickly, so it is irrational to immediately apply it to the entire wall. Adequate application area is slightly larger than the applied tile, that is, after the tile is installed, a small amount of glue should remain on the wall around it.
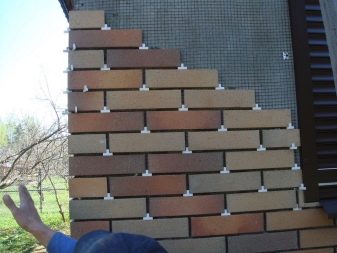
- Bonding tiles. Laying of clinker tiles starts from the corner of the building, from below. First of all, the corner tile is fixed, the first row starts from it. Each element with glue applied to the back is applied to the wall and pressed with a mallet for a few seconds. In this case, excess glue protruding into the inter-seam space is removed. The tile-to-tile gap is 10-14 mm, it is possible to maintain its uniformity by installing a rod with a circular cross-section and a diameter of 6-8 mm or mounting crosses between the plates.

The choice of the master - 2 types of styling. In the first case, the rows of tiles are laid over the entire surface of the facade. In the second, the tiles are mounted in small sections of 3-4 rows.
When using thermal panels, the installation technology looks different.
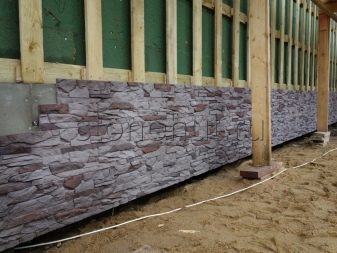
- Surface preparation is no different from that described above. If the surface of the walls is extremely difficult to level, you can build a metal or wooden frame to which the tiles will be attached.
- An aluminum profile is installed at the bottom of the wall (lathing), which will serve as a starting bar.
- A similar strip is fixed at the highest point of the wall that provides for the cladding.
- Installation also starts with corner panels, from left to right. The first panel is inserted into the profile, it is fastened using screws or self-tapping screws.
- The next panel is also inserted into the strip, the spikes of the elements are treated with a sealant or polyurethane foam.


Unlike conventional clinker tiles, thermal panels can be installed in only one way. You can start installing the next row only after the installation of the previous one is completely finished. Experts recommend additionally treating the joints with sealants to prevent the insulation from getting wet during operation.
The organization of a ventilated facade system begins with the preparation of the base, applying primers with an antiseptic effect on it. Then a waterproofing vapor-permeable membrane must be fixed on a dry wall surface. A frame made of metal profiles is mounted on top of it.
Insulation is placed in the space between the frame profiles. Usually it is basalt or mineral wool in layers 50-150 mm thick (the choice of thickness depends on climatic conditions).


On top of the insulating material, a windproof membrane is attached with an overlap, which must also be characterized by vapor permeability. Further, the insulation and the membrane are fixed to each other and to the facade using disc-type dowels.2-3 attachment points on a sheet of insulation will be enough, it is important to place one of them in the center.
After that, you can start laying the clinker. The distance between it and the insulation must be at least 25 mm.
There are 2 ways to attach the material here.
- Horizontal slats are attached to vertical guides, the width of which is 20-30 cm. The slat pitch is 40-50 cm. After that, plywood sheets or OSB sheets are attached to the slats throughout the entire area of the facade. Tiles are fixed on the resulting surface with a wet method. For better adhesion, plywood and OSB sheets are pre-primed.
- To perform installation using this technology, a special tile is used, which has grooves and ridges. It is necessary to select special profiles for the frame, also equipped with a locking mechanism.

These profiles are attached to the lathing, the step width corresponds to the width of the tiles used. After that, the tile is fixed - its lower ridge is aligned with the upper groove of the profile. The profile ridge, in turn, is inserted into the groove in the upper part of the clinker.
Tile laying, regardless of its type, is carried out in the warm season, in dry weather at a temperature of + 5- + 30 ° С.

Decoration of door and window openings
When finishing slopes, it is not necessary to achieve a perfectly flat surface, and the use of special corner elements eliminates the need to join tiles in the corners.
Notching will help improve the adhesion of the slopes. An obligatory stage of work is the application of a primer to the surface. For slopes, you can use reduced size tiles. But it is quite rare to find one, more often you have to cut standard material.


Laying should begin with fixing the corner element, from it a row of tiles is laid out over the entire surface of the slope. Tiles are trimmed if necessary. If the width of the slope exceeds the width of the tile, then the whole tile is laid on the edge of the slope, and the remaining space (closer to the wall) is made out in “pieces” of the required size.
When facing the upper plane of the slopes, use wooden supports to prevent the tiles from peeling off under their own weight. Place the supports and leave them until the glue is completely dry, then remove.
Dry laying is recommended before cutting and gluing the tiles. This will help you find the best styling option. Installation is also carried out while maintaining gaps of 10-14 mm. After the glue has dried, you can start grouting.


Seam processing
Grouting is the final stage of the cladding.
To do this, use one of three types of grouting compounds.
- Mix for semi-dry application. It is used in conjunction with a material imitating a rough stone or aged brick. It is a powder that is diluted with water to the consistency of loose earth. Next, this mixture is used to fill the seams with a spatula. This is a rather laborious process due to the peculiarities of the consistency.
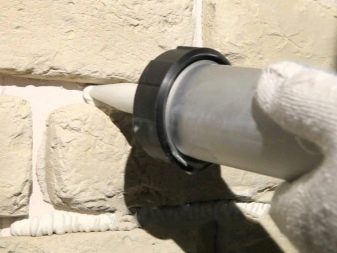
- Grout with plasticizers. It is also a dry mixture to which water is added. The result should be a sour cream-like consistency. The composition is applied using a special pistol, which is quite simple and convenient. After drying, its excess, protruding beyond the tile, is cut off with a knife. The only drawback of these mixtures is the high cost.

- The composition is applied to the entire surface of the wall. Only suitable for smooth brick-like clinker slabs. Its distinctive feature is the need to apply not only to the joint gaps, but also to the surface of the tiles. The protruding excess grout is also removed with a knife after drying.
If a white compound is used for jointing, do not grout with a metal trowel. When oxidized, it can leave dark spots on the grout surface. Choose a silicone or wooden spatula instead.


Beautiful examples
The use of tiles for brick or stone allows you to refine the appearance of any building and give it the sophistication and nobility of an English cottage of the 19th century.
Undoubtedly, cladding the entire facade with clinker material of different shades and sizes is the best solution if you dream of turning a country house into a Gothic-style castle.


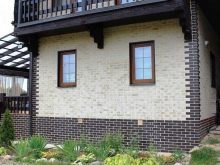
The clinker is in harmony with other finishing materials. Wood is one of the most popular tile companions. When using natural wood, it will be possible to create a completely eco-friendly home.
See how the combination of chopped stone clinker tiles and wood surfaces looks organic in this Alpine house project. Despite the rather powerful texture of the "stone", the structure does not look heavy.


The combination of stone and wood is also characteristic of the half-timbered style, a distinctive feature of which is the presence of unmasked wooden beams supporting structures in the facade decoration. The gaps between them are closed with clinker tiles.

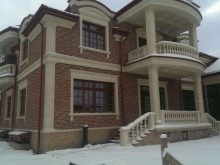
An American-style house (elongated buildings with longitudinal interfloor segments) is characterized by a combination of brick and plastered textures. The use of columns allows you to combine them.
The lower part of the building (together with the first floor) is finished with clinker for brickwork, which adds volume and expressiveness to the facade, the upper part is plastered (less often it is finished with wood).


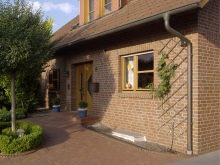
Regardless of the style, clinker tiles are well suited for plastered facades. Often they look flat and monotonous, but it is enough just to decorate the area of window openings, the basement and several zones in the corners of the building with brick tiles to make the house "come to life" and begin to stand out.
An example would be this Provence-style country house. The main part of the facade is covered with plaster, individual elements are highlighted by means of tiles for a brick. A large arched window and windows with frequent bindings, stucco elements and balconies with wrought iron parapets allowed to convey the grace and elegant simplicity of the style as accurately as possible.


The combination of clinker and stone looks amazing and noble. However, these surfaces are self-sufficient, so it's important to stick to the 70/30 rule. Brick clinker should be the base, background for stone elements. Moreover, this background (70% of the facade) should not be of different colors, too bright, textured, with overflows.


It is unfair to believe that clinker is suitable only for cladding the facades of buildings in the classical style. It looks no less impressive in modern exteriors. There is a combination of brick texture of tiles with concrete, plastered and wood surfaces. The columns and part of the facade, finished with dark brick imitation tiles, give the building an expressiveness.


The following video describes the properties of clinker tiles.


The comment was sent successfully.