How to lay tiles on drywall?
Overhaul is rarely complete without the use of drywall sheets. This material is quite practical and has a long service life. Sometimes difficulties arise when laying ceramic tiles on such a surface. If you understand all the nuances, then you can independently do this procedure in any room of your home.
Peculiarities
Plasterboard sheets made it possible not to use various mixtures for leveling the walls during repairs. Making a special frame and installing gypsum plasterboard is much easier than working through the walls for hours using gypsum plaster. Plasterboard can be covered with clinker, tile and ceramic tiles.
Laying tiles on drywall is a simple task. As a result of such work, a lot of construction dirt and dust does not appear.
Laying tiles on a plasterboard base is possible both in residential and commercial premises.

There are certain rules, thanks to which even a beginner can easily cope with the work.
The listed features must be taken into account, otherwise mistakes cannot be avoided:
- Laying tiles on drywall requires careful calculations. It is important to observe precise geometry during installation. Tiling will not tolerate hack-work and negligence.
- When choosing drywall, be sure to take into account the characteristics of the room in which you will be making repairs. For facing work in the bathroom or in the kitchen, be sure to choose a gypsum board with high moisture resistance. Otherwise, a brand new renovation will delight you for a very short time.
- Carefully consider the construction of a frame for drywall. All elements must be in the same plane. Each structural element requires a secure fit in order for the base to be rigid and stable.
- Remember that there should be small gaps between the gypsum board and the adjacent walls, floor or ceiling.
- There should be no more than 40 cm between the vertical beams of the frame. The greater distance will lead to the fact that the drywall will begin to sag during operation, and maybe even at the facing stage.


Adhesive selection
The quality of the work performed depends on the choice of glue.
The right frame, good drywall and expensive tiles without the right glue are wasted efforts. Pay your attention only to reliable manufacturers who have already earned the trust of consumers.


When buying, carefully study the composition of the mixture and the area of use. Good options:
- Cement-based mortar. It should be noted that such glue is not usually used for gypsum work. If your drywall sheets are covered with cardboard, then this solution is fine. Nowadays, this adhesive is rarely used.
A mixture of cement and sand fixes the tiles securely to the wall. The use of such a tool by beginners is not the best option. If you make a mistake, it will be very difficult to fix it.


- Elastic tile adhesive. One of the best adhesive options. It is produced in the form of a ready-made mixture or dry powder, which must be diluted according to the instructions. An excellent option for beginners, it is possible to correct the location of the tiles already on the surface of the gypsum board.


- Liquid nails of different types. One of the most modern formulations. Available in convenient plastic containers. For use, you will have to acquire a special pistol.
Some believe that such materials can be used to carry out the entire work from start to finish.
At the same time, experts urge the use of liquid nails for spot work, when some elements still lag behind the surface.


Surface preparation
A plasterboard box requires some preparatory work. You need to start this process immediately after laying the sheets on the walls. First of all, make the necessary holes for pipes, sockets and other communications. You will definitely need a primer and a roller with a brush to apply it. It is necessary to prime the drywall in 2 layers to improve the adhesion between the material and the mortar.


Before starting the preparation of the solution, be sure to determine the location of the first tile. To do this, use a level, pencil and one tile. Place the piece in the corner and draw a path. Focus on these contours and level when drawing lines throughout the wall. A horizontal profile can help you, use it as a guide.


Preparatory work is carried out as follows:
- Joint processing. The joints of the sheets must be embroidered. Use a construction knife. The tool should be held at a 45 degree angle to the center. Trim each side.
- Seams need to be putty. The first layer of the composition must completely close the voids. After that, glue the reinforced tape, this will help to avoid cracking in the future. The tape must be smudged into the surface you are leveling.
- Grinding. Sand uneven areas if necessary.
- Surface priming. For priming work, choose products with antiseptics in the composition. To improve the tightness and strength, it is necessary to treat the surface in 2 layers.
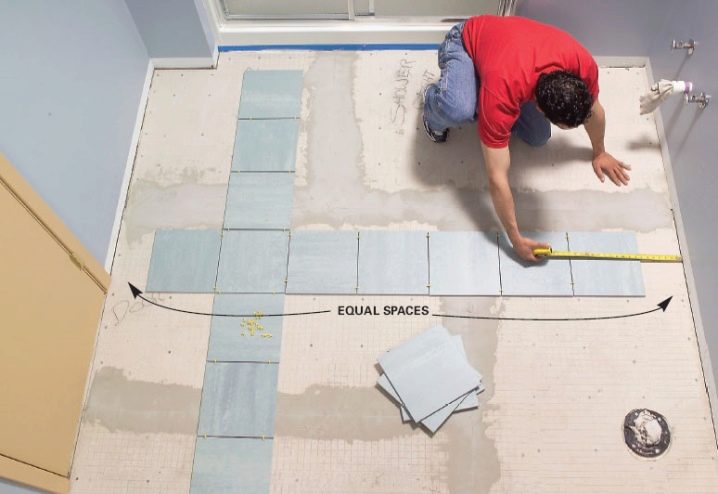
- Choosing a tile laying scheme. When choosing a scheme, the surface area of the wall is taken into account. Count the number of horizontal rows of tiles. Next, divide the length of the wall by the width of the tile, taking into account the width of the gaps.


If, as a result of dividing, you get a number more than 0.5 of the width of one tile, start laying from the edge that is better visible. This will allow you to position the trimmed tiles in an inconspicuous place. If the remainder of the division remains a number that is less than 0.5 of the tile width, start laying from the middle of the wall. This will make the trimmed tiles look symmetrical and beautiful.
- Preparation of the adhesive composition. At this stage, completely and completely follow the instructions of the selected material. Popular dry mixes must be diluted with water in the proportion indicated by the manufacturer. Pour the mixture into a container first, and then add the liquid.

For high-quality stirring of such a mixture, you can use a drill with an appropriate attachment. Do not mix a lot of solution at once. Experienced masters recommend diluting as much composition as necessary for laying tiles per 1 sq. m of drywall surface.


Tile preparation
After you have primed drywall, you can move on to preparing the tiles. Choose a well-lit place in the apartment, and lay out the elements on a clean floor in accordance with the chosen pattern. Use not only the basic tiles, but also elements for decoration (borders and the like). To account for the gaps, use the special crosses.


If you have a computer-designed and printed drawing, then the layout will not take much time. Even if you do not have such an assistant sheet, then this should not serve as a reason for refusing to lay out the picture. Remember, there is always the possibility that the batch will contain elements of different shades (darker or lighter than the specified one). Neglecting to prepare the tiles can cause these elements to appear prominently and ruin the experience.
In addition, sorting will help you find tiles that are not suitable for installation - broken, chipped, or with irregular decorative glaze. If the damage is not very serious, then these are the tiles that can be used for pruning.Perform this procedure immediately.

To cut the tiles, you only need a pencil and a special victorious cutter. Using a pencil, draw a clear line on the front side, repeat it with a chisel. It is important to cut not only the decorative glaze, but also to go deep into the base. To separate, hold the element on opposite sides and lightly hit the edge of any wooden surface (table, beam, etc.). The tile will crack evenly along the intended line.


Another option is to chop the tiles. Also draw a pencil line on the decorative side. Next, cut the surface with a chisel so that a continuous notch up to 2 mm deep is formed. From the back, hit the central part of the tile with a hammer. You don't have to put in a lot of effort in order not to spoil the element. Finally, take a piece of sandpaper and carefully sand the edge of the part.

After you have verified the neatness and identity of the tiles, check their evenness. To do this, attach two elements to each other, evaluate the quality of the corners and boundaries. Place the element on a flat floor and make sure it fits snugly across the entire surface.

How to lay it yourself?
Laying tiles on a plasterboard base begins from the 2nd row. To prevent the tiles from shifting, use a wooden strip or metal profile. It is quite possible to properly lay the tiles on the drywall wall with your own hands.
Prepare the following toolkit:
- Spatula (plain and serrated).
- A rag or sponge.
- A container for adhesive solution.
- Building level.
- SVP (tile leveling system) or plastic leveling crosses.
- Rubber spatula or float.

Simple and straightforward technology:
- Prepare the glue according to the manufacturer's recommendations.
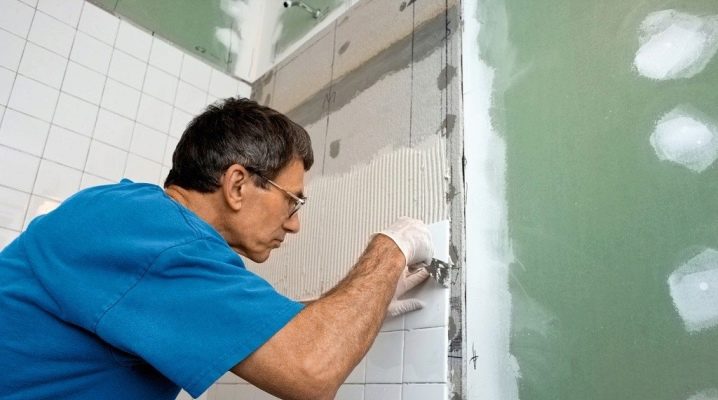
- Draw up the mortar with a spatula and spread over the area where you will lay the first tile. Smooth the surface with a notched trowel.
- The tiles should be slightly damp. After wetting, apply a thin layer of glue.
- The surface should be covered according to the markings applied in the early stages. Be sure to double-check the accuracy with a level.
- If you apply too much glue, it will come out after pressing. Remove this adhesive immediately with a spatula. After the first tile, the optimal thickness of the adhesive layer will become clear.


- You need to fix the second tile in the same way as the first.
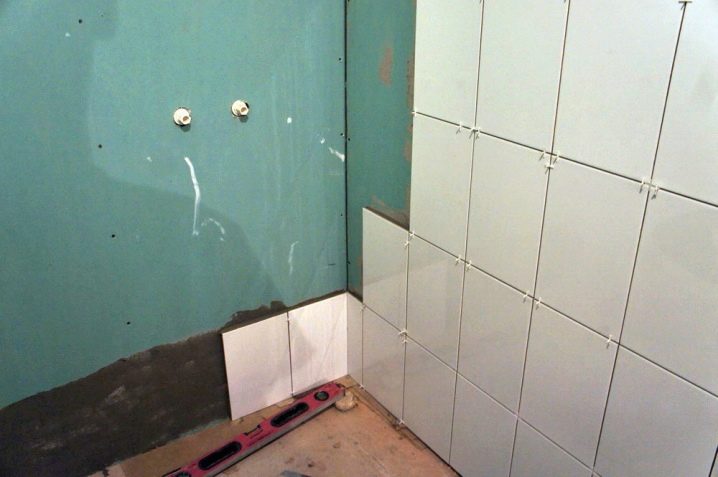
- Place the SVP or crosses between the two elements at once. They will help you create an even and neat joint.
- The tiles are laid on the plasterboard surface in rows. After finishing the first one, go straight to the second one.
- All further cladding is made according to the same type. Last but not least, you need to glue the tiles that have been cut. Also, the bottom row must be laid after you have done the necessary work with the floor.
- If you notice that glue appears on the decorative part of the tile, then immediately wipe it off with a cloth or sponge.


Leave the surface for several days until the glue is completely dry. Make sure that the tile holds well and move on to grouting.
This process goes like this:
- Remove the remaining adhesive solution and take out the SVP or crosses.
- Prepare a grout paste.
- For application, use a special float or rubber spatula.
- Fill the joints thoroughly with mastic. Remove excess mixture with a sponge or cloth.
This is where the facing work ends. Now your drywall is tiled and has an unbeatable look. If necessary, you can additionally use impregnation or sealant, but not earlier than after 2 days.

Useful Tips
Experts believe that not any drywall is suitable for such work. You should use a special moisture-resistant material - GVLV.If for some reason you do not have this opportunity, then under the gypsum board, place guide strips with a step of 40 cm, the sheets should be fixed on these strips using self-tapping screws or a construction stapler.
In some cases, the planks can be replaced with polypropylene plaster mesh. It helps to avoid curvature of the sheets during swelling. Such a mesh is glued using the usual PVA, and in addition it is fastened with staples.

Important subtleties when carrying out work:
- The primer should be applied at intervals of 45 minutes.
- Professionals recommend that you abandon the roller and brush, it is better to use a notched float to apply the primer. Apply the mixture to the surface of the sheet with the even side, and distribute the composition evenly with the scalloped side.
- The glue should be diluted with water until it becomes thick sour cream. It is this consistency that allows you to achieve the maximum properties of the adhesive composition.
- You need to press small tiles to the wall with your hands. If the elements are too large, then use a plastic or wood hammer with a special rubber pad.
- Install tiles gradually. Take an hour break every 5 rows. This simple trick will help relieve the tension that arises at the base of the wall.
- It is recommended to apply varnish after grouting. It will protect the surface from moisture and dirt.
- Periodically check the level of the cladding using a level or evenly batten. If waves suddenly form, then you will correct them in time.
- Decorative mosaics should be placed on the tile grout, not on the glue solution. Otherwise, you will have to clean the seams from glue residues.


Despite the fact that it is not difficult to put tiles on a drywall sheet, there are some tricks for cladding small rooms and rooms with high ceilings.
Such nuances will help to create high-quality wall cladding in a small room:
- Choose small tiles. You can even stop at a mosaic tile.
- Take a closer look at the elements of light colors, so the room will look larger and lighter.
- Give preference to tiles with a glossy decorative side.
- Choose the simplest horizontal layout.

Facing work in a large room will be simplified by following these recommendations:
- Lay the tiles vertically.
- Decor elements should be at eye level.
- Trim elements that will be located near the floor.

For information on how to properly lay tiles on drywall, see the video below.


The comment was sent successfully.