Knitted flowerpot: unusual ideas for decorating a pot
Refreshing an old clay pot with your favorite flower, placing many flowers on the window and creating an atmosphere of coziness - all this can be done by an ordinary do-it-yourself planter for flowers. In addition, this is a fairly budget option. The planter can be knitted from the remnants of the existing yarn, successfully combining colors with each other in one product, or by knitting several planters of different colors. You can make all the pots in the same style, observing the color and pattern, or you can experiment and knit different patterns or play with color.

Yarn selection
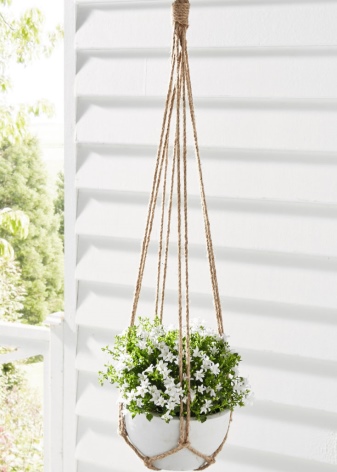
Almost any yarn is suitable for a pots, but it is important to take into account the parameters of a flower pot. If you intend to hang a flower, then the thread must be strong to withstand the weight of the pot with soil and plant. The larger the pot with a flower, the heavier it is, of course, so the yarn must be stronger.
For hanging options, cotton and acrylic are suitable, you can add nylon thread to the product for strength. You need to take thicker yarn.
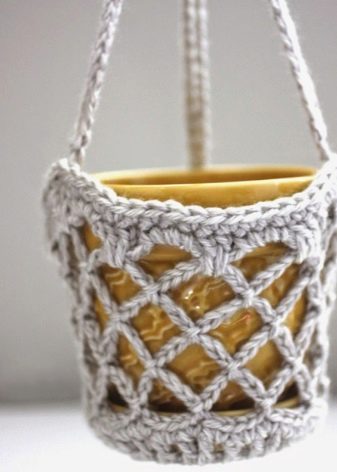
Twine products look good, resembling wicker baskets. If the pots are just a decoration for a pot standing on a windowsill, then in this case absolutely any yarn will do, since it will not carry any load.


Knitting methods
The choice of knitting method depends only on imagination and skill. There are no strict requirements for the manufacture of pots. It can be crocheted or knitted. You can knit in a circle at once or make a canvas, which then needs to be sewn.
Hanging models must necessarily have a bottom to hold the pot. For reliability, it can be strengthened: cut a circle out of plastic along the diameter of the bottom of the pot and put it on the very bottom of the planter. For flowers standing on a windowsill in pots with a pallet, it is more convenient to knit an option without a bottom.
The finished product will need to be washed and put on the pot. If cotton yarn was used, then you can also starch.

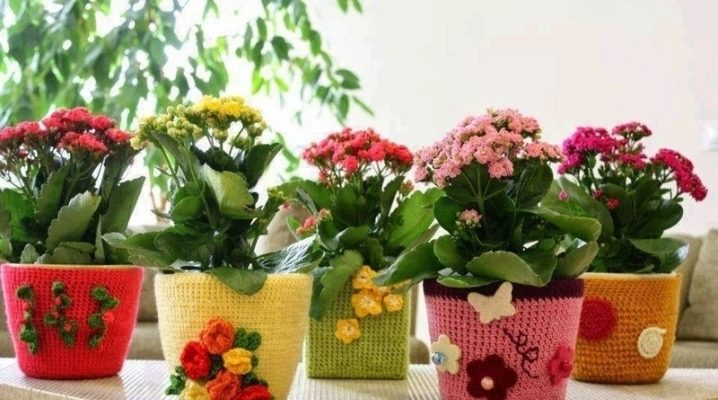
There are a variety of knitting patterns. Even a simple planter, knitted with a front stitch or single crochet stitches, looks great. It can be played up with color by picking up a multi-colored thread or alternating several shades. And the product, knitted with relief or openwork patterns, turns the pot into a work of art. This pots will emphasize the individual style of the house and create a unique window design.
Having thought over the color scheme and knitting method in advance, we proceed to create comfort.

Ideas and schemes
Simple planter
The easiest option is to tie the pot with single crochet columns, making additions to expand the pot in the right places. If the flower grows in a straight pot, which is a cylinder, then this is even easier. You just need to tie a chain of air loops with the length of the girth of the pot, close it and knit in a circle to the desired height.
If a suspended version is supposed, you also need to tie the bottom. To do this, first we knit a circle, and then move on to knitting the walls. And also you need to tie the ropes for hanging. When moving from the bottom to the walls, you need to knit the loop by inserting the hook only for one wall - front or back. This creates a "scar" that highlights the transition. At the top of the product, this "rib" creates a border as a decoration.


Openwork patterns
To add elegance to the planter, you can knit it with various openwork patterns.

Simple pattern
We knit the bottom with double crochets.
Tying the walls, we alternate the rows:
- double crochet;
- double crochet, air loop.
We tie the top of the pots with a beautiful border, and through the holes formed from the air loops we pass a satin ribbon and tie a bow. A cute planter is ready.

"Pineapples"
You can work a little and knit a more complex pattern called pineapples. You can also thread a ribbon through the holes and tie a bow. Previously, you can string beads on a thread and knit it into a pattern during the knitting process. You will get a beautiful and unusual pots.
Advice. If you knit the same patterns not from yarn, but from twine or jute, the effect of a wicker basket is created.


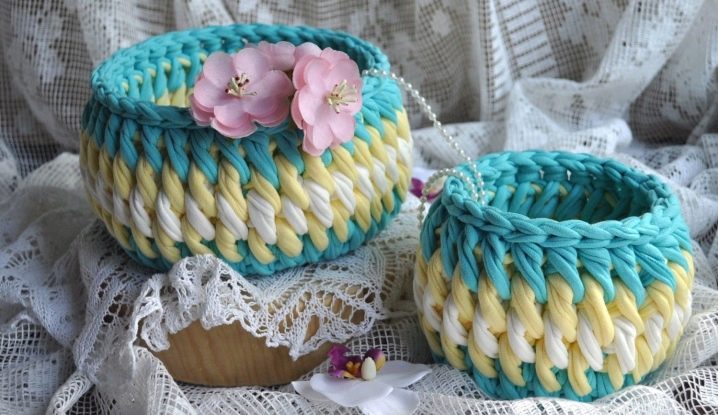
"Scales"
A crocheted flower pot will not only decorate the interior of your home, but it can also be an excellent handmade gift. You can buy a flower in an ordinary pot and tie a beautiful planter to it. Thus, adding personality and soulfulness to the gift. For pots with "scales" it is good to take multi-colored yarn, it looks beautiful in the pattern. The amount of yarn depends on the size of the pot. Such a pattern is crocheted.


Manufacturing process.
- To get started, you need to dial a chain of air loops. We make the number a multiple of 6 plus 1.
- We knit the first row like this: two double crochets from one loop, two air loops, skip two loops of the first row and knit two double crochets from one loop, and so on the whole row.
- Second row: we knit "scales". We tie the columns of the previous row two through two (we tie one V-shaped element, we skip one). We tie it with five double crochets. We knit one air loop between each group of five columns. In the last V-shaped element we knit a connecting post and move on to the next row.
- We knit the third row like the first.
- In the fourth row we knit "scales", as in the second. But so that they turn out in a checkerboard pattern, we begin to tie not from the first V-shaped element, but from the second, having reached it with connecting posts.
- Repeating rows 1-4, knit to the desired height of the pot.
The last row can be knitted simply with single crochets so that the edge is smoother.

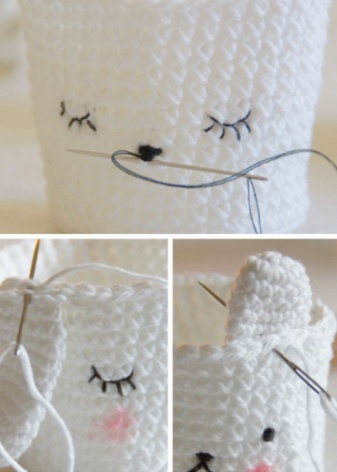
"Animals"
The pots in the form of a bunny or a cat will look original. You can tie both a pig and a monkey - it all depends on your imagination. These pots look good anywhere, but they are especially suitable for a child's room.
You can knit such a pots both crochet and knitting needles. Here it is not about the drawing, but about the knitted details. And, of course, we select the color: for the bunny - white, for the pig - pink, although you can fantasize.
We simply knit the main fabric with a satin stitch, and then we knit elements that create the desired image: ears, paws, tail.
We sew the elements to the "body", embroider the face: eyes, nose, mouth. The animal is ready.
Advice. If the main "body" is knitted not with satin stitch, but with elongated loops, then you can make a lamb.

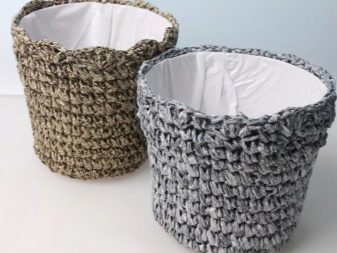
Knitted yarn planter
Recently, knitted yarn has become widespread.
Knitting small products from ordinary yarn, of course, is not very long, but the work takes time, especially when you need to knit more than one or two products.
Plus knitted yarn - in its thickness. It is very voluminous, thanks to which you can knit a small product out of it in just a matter of minutes.
Knitting openwork patterns on the scale of pots will not work especially, but you can play with color.
You need to use a thick hook or knitting needles. You can decorate all the flower pots in a day.
Planters on knitting needles
For convenience, you can knit on circular knitting needles. Or we use stocking needles to knit socks.
It will not work to wrap the canvas on the knitting needles around the pot. First you need to knit a test element and calculate the required number of loops.
After calculations, we collect the required number of loops and knit the fabric with the front satin stitch or create any pattern. In the right places, we add to the expansion of the pot, if it is not straight.
The cache-pot, knitted with the front satin stitch, can be decorated with embroidery, beads or sequins. And the braid pattern also looks beautiful.
But no matter what method, color and pattern you choose, a handmade pots will look great in the interior and add warmth and comfort to the house.

For information on how to make a knitted flower capsho, see the video below.


The comment was sent successfully.