How to install a cooker hood in the kitchen?
During cooking, it is required to ensure high-quality circulation of air masses in order to remove various odors from the kitchen, as well as reduce the temperature in this room. To ensure this effect, you cannot do only with a natural ventilation system. For this reason, a special device is placed above the stove that provides forced air ventilation - a kitchen hood. In this article, we'll show you how to properly install it and make it work efficiently.


Types of devices
Installation of different models of hoods may differ depending on the features of their design and their category.
If we take the air purification method as a criterion, then these devices can be as follows.
- Recirculating. Such models are equipped with special filters that use coal. When passing through it, the air is cleaned and flows back into the kitchen. The disadvantage of this option will be the need to constantly replace the carbon cartridges, because they cannot be washed. Typically, such a device has flat models of the devices in question.


- With a flow-through cleaning mechanism. These models perfectly clean the air masses from soot and oily vapors, which is very often observed in the kitchen. Usually these hoods are connected directly to the ventilation shaft. In order for such a hood to be as efficient as possible, its dimensions must be either the same as that of the stove or cooking surface, or larger. Such mechanisms are equipped with noisy, albeit powerful, fans.
Any hood will be equipped with a filter, but it can be charcoal, or it can consist of metal grates that are easy to clean. In flow-through models, such filters protect the ventilation shaft from the ingress of grease particles.


Hoods may differ from one another in the method of attachment.
- Corner. Such models will be relevant if the stove is in the corner of the kitchen. Corner models can have both a flow-through and a recirculation system. In accordance with this provision, it is necessary to provide unhindered access to communications during installation - ventilation shaft and electrical wiring.


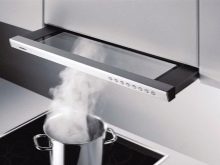
- Embedded. These models are very compact and almost invisible in the kitchen, as they are usually mounted in a niche specially designated for them. They require a direct connection to the ventilation system. This enables them to demonstrate the highest efficiency. Here metal grates are used as a filter, for which reason they should be regularly cleaned. They are dishwasher safe.
This option looks quite aesthetically pleasing and can fit into almost any design concept, be it a modern loft or a good old classic.

- Flat. They are installed when there is no access to the ventilation shaft for any reason. This device is completely self-sufficient, although it works from the mains. Usually equipped with a medium power fan. The cost of such a hood is low, but here you will often have to change the carbon filters.
- Island. These models take up a lot of space as they are attached to the ceiling directly above the slab. They are usually equipped with a powerful fan, which makes it possible to do an excellent job of cleaning. These hoods are often installed in the middle of the kitchen, right above the work area. Island solutions have a high price and nice design.

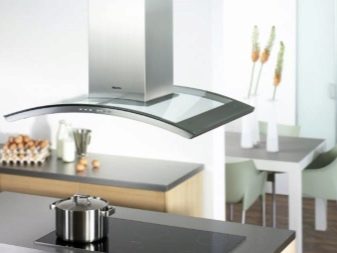
- Dome or fireplace. This type of exhaust system belongs to the group of high-power devices that have great functionality. Usually mounted on the wall above the slab, taking up a lot of space. Such models do not need to replace filters.

It should be noted that when choosing a particular model, great attention should be paid to its height. During installation, it should be positioned above the gas surface at a distance of 70-85 centimeters, and above the electric surface - from 60 to 85 centimeters.
The selection of this or that model will be carried out depending on the type of kitchen, the furniture located in it, the area of the room and the characteristics of the ventilation system.


Required power
When choosing this type of equipment, an important criterion that has a serious impact is the performance of air purification, which is measured in cubic meters. This value determines how much air masses the type of equipment under consideration can pass through itself in one hour of operation.
If we talk about domestic standards, the air in the kitchen must be completely renewed 12 times within an hour. And if you need to calculate the power, this can be done using a simple formula - the height of the ceilings will need to be multiplied by the area of the kitchen area and the resulting number will be multiplied by 12.
When carrying out calculations, it is necessary to make a small margin for the power drop due to the presence of various air duct bends, the length of the ventilation shaft and other characteristics. To do this, add 30% to the result that was obtained.


By the way, when purchasing a particular hood, the noise it makes should be taken into account. Manufacturers usually indicate its level in decibels. Do not purchase models that emit more than 50 decibels. Today there are almost silent models on the market with several fans with a special case that absorbs sound.
A large number of inexpensive built-in units are small in size, but this advantage can become a problem in terms of insufficient air pump power. This problem can be fixed with a little tweak that you can easily do with your own hands.
The bottom line is to mount an additional duct type fan in any part of the outgoing type duct. To implement this venture, you only need a couple of adapters. It is necessary to lay the power supply cable of the fan either in parallel with the duct or in it.


The installation can also be carried out with the aim of increasing the power, already taking into account the fact that the standard fan and the additional duct fan are working. If desired, it is possible to replace the built-in solution with an outdoor model with a capacity two to three times higher than the standard fan capacity. It is clear that no one will equip an inexpensive system with a too powerful fan.
It should be remembered that the switch used for the hoods that can operate in different modes may not be designed for connecting another fan, in addition to the standard one. Then it is better not to try to understand the essence of the device of such a switch, but simply to install an additional body-type toggle switch. To do this, you just need to drill another additional hole in any convenient part of the device and install the switch and connect it.


Requirements
If we talk about the design of the cabinet for a built-in hood, then it is quite simple. In such a cabinet, there are two walls on the sides with the total depth of the upper tier, which are fastened with a horizontal partition at the top and without a bottom. There should also be an internal shelf located between the walls. It is better not to order the additive of such a part during creation: four confirmants can be installed by yourself, but the hood will be delivered as tightly as possible.
With the size requirements, everything will be more complicated. So that after embedding it organically fits into the furniture structure, without creating any cracks and holes, the hood or its drawing with the main dimensions should already be with the owner before the creation of furniture. And the dimensions of the device should be selected taking into account the width of the cooking panel or stove, as well as the moment that the body will actually be two or three centimeters larger.

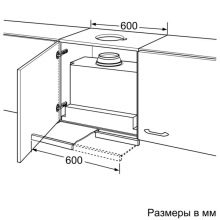

The lower part will be the widest, therefore it is from it that the main dimensions of the cabinet will be determined. Its size on the outside should be the same width as the hood itself. If we talk about a furniture case, then its depth can be 5-6 centimeters deeper. Then the hood can be moved to the front wall, and the open part can simply be closed with a small partition for fastening.
It should be remembered that the housing of the hidden part of the hood will have a gap of 1-1.5 centimeters from the cabinet wall. In no case should this condition be neglected, since this is one of the most important conditions for the installation of built-in electrical equipment.
With the height of the cabinet, everything is more or less clear, since usually the distance between the bottom of the upper tier and the tabletop is from half a meter to 65 centimeters. As mentioned above, the distance between the gas stove and the device should be from 70 to 85 centimeters, and the distance between the hood and the electric stove should be 60-85 centimeters. That is, the section where the hood is mounted will significantly drop out of the overall kitchen ensemble. In this case, the height of the cabinet can be 8-12 less than other cabinets.


Installation work
Installation of hoods in the kitchen is usually divided into several stages.
- First, you need to mount the hood to the desired location on the wall. This assumes that it will have to be hung over the stove, secured to the wall or ceiling.
- The device is connected to the mains.
- Air duct connection and its removal into the ventilation channel.


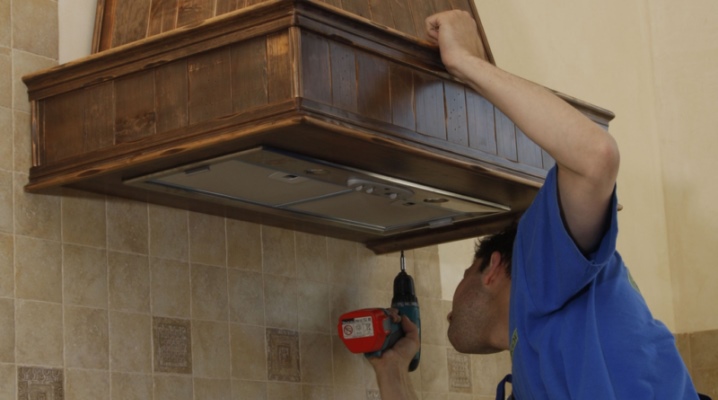
Let's start with a dome hood. Devices of this type are equipped with a flow-through filtration mechanism and require a direct connection to the ventilation shaft. For the fan to operate, a power outlet must be located nearby. Before assembling the device, you should completely assemble the kitchen set. In this case, it will not be superfluous to apply markings, taking into account the dimensions of the selected hood model. You need to fix it to the wall as firmly as possible. For this reason, holes are first punched under the exhaust mounts using a drill or a perforator if the wall is made of concrete or brick. It is necessary to mount the dowels into these holes and screw the special fasteners with the help of bolts, which are usually supplied in the kit.


If we are talking about a built-in hood, then it will be almost invisible in the kitchen set. Usually this type is installed either in a special panel that slides out, or in a special box that is hinged. If it is necessary to make installation in a cabinet, then it should be understood that it must be done strictly according to the dimensions of the device. You can find out its characteristics from the information that will be contained in the instructions for the technique.
Considering that this type of hood is built-in, its lower part should be flush with the cabinet. For this reason, the bottom rises to the height of the device, after which it is screwed to it. The mass of this design will be impressive, for which reason all components must be installed correctly. The bottom is best fixed with Euro bolts.


Note that the cabinet will cover the air duct. It is necessary to make a hole in it for the corrugated pipe. If the ventilation shaft is located in the wall behind the cabinet, which is often the case in private houses, then the back wall should also be cut out. If we are talking about an apartment, then the channel will be located at the ceiling, for which reason the upper part should be cut out.The cabinet is placed on the floor or on its side and the hood body is attached to it. Now everything is put in place and bolted firmly. But bolts alone will not be enough due to the fact that the mass of the structure will be too large. For reinforcement to the wall, you must first attach a special metal profile designed specifically for wall cabinets, and a structure is already attached to it from the side.
Now it is necessary to attach a pipe made of corrugation to the ventilation mechanism and the hood. The hood is connected to the mains and its functionality is checked. Now you just need to fix the front of the cabinet, after which the work will be finished.


If it is necessary to install a flat recirculation-type hood, then it should be said that this is a suspended type structure that hangs over the stove or hob. A recirculation cleaning system is installed here and there is no air duct, which is why the whole structure is flat.
To make the installation of this model easier, follow these rules.
- There are special holes on the body of the device to fix it to the wall. Under them, using a perforator, holes are punched in the wall, where so-called dowel nails are inserted.
- The awnings are attached to them, which are usually supplied with the device in the kit. The hood is attached to them.
- Now you just need to connect to the network and you can use the device.
In general, as you can see, the installation scheme for various models of hoods will be approximately the same. Even if you have a homemade hood, it will be installed using the same procedure.


Electrical connection
Due to the accumulation of steam and fat deposits inside such equipment, it is possible to get an electric shock if the connection was not made correctly. To connect an exhaust device in the kitchen and supply electricity to it, there must be three cables - phase, zero and ground. Landing standards should be yellow, separated by a green stripe. And before starting the installation work, you should make sure that there is grounding at all.
Of course, if the kitchen already has a grounding cable and European standard sockets are installed, then this greatly simplifies the connection: it is enough to connect the wire to the grounding contact, which is usually designated in the form of strips of various lengths or the letter abbreviation GND. If the device does not provide grounding, and there are such models on the market, then it is better to do it yourself, simply by connecting the cable to the metal case.
If grounding is not provided in the sockets, then you must do it yourself. But if you do not know how you can do it yourself, then it is better to resort to the services of an appropriate specialist. And you should not try to connect a neutral wire to pipes or a battery. It must be fixed exclusively on a dead neutral.
Do not forget that the hood must be plugged into a separate outlet, which is mounted at the level of the hood of the entire mechanism or slightly higher.


During the construction of any premises that will be used for human habitation, a ventilation system is also made. When you or the specialist you call connects the cooker hood, its operation is disrupted. To minimize these violations, it is necessary to install an additional box equipped with a special valve. Its principle of operation is extremely simple: when the hood is turned off, the valve is closed with a lid, and the air comes out on its own. When cooking is in progress and the hood is activated, the valve closes the natural ventilation hole by the forced air force from the fan. Such a mechanism has advantages - there is no reverse thrust.
Now let's go directly to the description of the process of connecting the hood to the electrical network.
When the structure has been completely installed, it is necessary to install the socket if it is not already in the right place. A separate line should be drawn from the transfer case. It would be nice if it is located on the wall located in the corridor. Then it will only be necessary to make a hole in the wall, carry out the conclusion of the wires and attach the outlet in a place convenient for you.
If the distribution box is located at a considerable distance or in an inconvenient place, then the work will be quite serious. First, you need to grind the walls, lay the wires, and then connect to the electrical panel. But everything will depend on each specific case.


Ventilation duct installation
There are two main categories of exhaust duct.
- Aluminum corrugated. They bend well, stretch and can be adjusted to one size or another. This version of the duct does not create noise and vibration, but from an aesthetic point of view, it cannot be called beautiful. Usually it hides in a closet, box, or inside a false ceiling.
- Air ducts made of polyvinyl chloride or plastic. Such material weighs a little and is considered to be quite durable. Due to the smooth surface, the air currents do not generate any noise while driving.


Before installing a duct in the kitchen, make sure that the only standard vent in the room is not obstructed by a pipe. If there is only one, then another exit from the shaft is often broken through and a check valve is mounted, which will shut off the flow when the device is activated. You can also use a special box with a clapper-type valve.
Now let's go directly to the installation of the duct. First, it is necessary to push the corrugation into the holes made, and in the upper wall of the cabinet it is necessary to give it the necessary, as a rule, square shape. Now you need to cut the corrugation with a small margin, and also make cuts at the corners to bend them outward.
It is necessary to hang a cabinet with a corrugation on the wall. Before doing this, do not forget to treat all airway joints with a silicone-based sealant. This is necessary so that the structure is sealed and there is no power loss. At the next stage, it is necessary to fix the homemade box on the cabinet, which will allow the corrugated material to be connected to the ventilation shaft. It will also not be superfluous to plant it on silicone.
If the gaps are too large, then it is better not to try to seal them with silicone. Then it is necessary to use polyurethane foam.


Now we fix the hood in the cabinet. It is better to screw it onto self-tapping screws or dowels. The second option will be relevant if the mount is intended for a wall.
We firmly attach the corrugation to the exhaust device and fix it using a clamp. It is not necessary to lubricate the connection with a sealant.
If the exhaust device is connected directly to the ventilation, then it is quite simple to carry out a direct connection of the air duct to the ventilation shaft. To carry out their convenient docking, you can use a special lattice in which there is a round hole.
If we are talking about the installation of PVC air ducts, then the installation will be the same: we just attach the pipes to the corners and carry them through to ventilation.
When installing ventilation, the number of pipe bends should be minimized as much as possible. This will preserve good air draft in the pipe. Each pipe turn reduces traction power by about ten percent.


Useful tips and common mistakes
Corrugation will be a more interesting and effective material for creating a ventilation duct for a variety of reasons. For example, it does its job better than plastic pipes. Its installation will cost significantly less than with other materials. Also, it has no loss of efficiency, which cannot be said about plastic duct pipes.During installation, it can be stretched quite strongly, which will significantly reduce the noise level during the operation of the system.
Another useful tip is that cleaning plastic pipes and corrugations should be done at least a couple of times a year in order to prevent them from clogging with any specific accumulations and waste.
You should also not hesitate to consult with an exhaust system specialist if you want to carry out your own installation. It will be good if you have an assistant who has already encountered some problems when creating a ventilation system - then you will have someone to discuss this or that problem with.


Hoods are usually equipped with special odor neutralizers, which can be:
- ultraviolet;
- based on chemistry;
- electroionization.
Chemical solutions require constant replacement, since their active element is covered with a fatty film. This option can also be hazardous to human health. Electroionization solutions work in the same way as a conventional air ionizer. This option has a disadvantage, since it will be located close to the person who is at the stove - this jeopardizes safety.
Ultraviolet solutions require periodic cleaning of the lamps from burning and grease. Lamps need to be changed every couple of years. But this option will be completely safe and harmless, since ultraviolet radiation is at a very low level here.
By the way, the use of such a solution can also solve the issue of lighting the stove or hob, since in addition to the mentioned radiation, llamas emit a barely noticeable bluish or white color.

It should also be remembered that each stage of the installation is important and its role can hardly be overestimated due to the fact that it is worth making the slightest mistake or deviation in the process of horizontal installation of the hood, and this in almost 100% of cases will lead in the future to problems that may seem at first imperceptible. For example, if you applied a small amount of sealant or left gaps that are not visible. This will definitely affect the operation of the entire mechanism.

The most common mistakes made by builders are as follows.
- In the ventilation shaft, a pipe is walled up, and an exhaust device is directly connected to it, where a check valve is installed. If the hood does not function, then ventilation of the room becomes impossible due to the fact that the valve simply closes the pipe when the fan is inactive.
- When installing, a pipe is often used with a diameter of 100 millimeters. This is not enough. Use a 125mm diameter pipe for ventilation. A pipe with a specified diameter removes contaminated air masses with a volume of up to 350 cubic meters in one hour.
In general, it is relatively easy to eliminate these two errors - it is enough to simply expand the entrance to the ventilation mine, as well as to install a special grating for the exhaust mechanism.

The process of installing the hood in the kitchen is fraught with certain difficulties, which cannot always be eliminated by a person who does not have certain knowledge. That is why it will not be superfluous to attract a specialist or at least consult with him when installing the hood in the kitchen yourself.
For information on how to install a hood in the kitchen, see the next video.


The comment was sent successfully.