Laying tiles in the bathroom: design ideas

In the arrangement of the bathroom, wall and floor cladding is of particular importance. Choosing a tile, you want it to be a decoration of the bathroom and carry a functional load. A glance at the design examples amazes with the possibilities of tile fragments.
Peculiarities
To an unenlightened layman, it seems that laying tiles in a bathroom is within the power of an exceptionally experienced master. His work, as a rule, does not have a difference in height, defects in the difference in seams in width, fixing the tiles upside down. However, it is not uncommon in the field of finishing to have cases when would-be craftsmen perform finishing at a low level. Since any defect on the surface is noticeable, you can do the styling yourself, because the owner of the house is always interested in a quality result. This does not require a global study of the composition of the adhesive and tiles.
It is enough to know the detailed instructions, the main points and tricks, through which the cladding looks perfect for the masters of their craft.


The geometry of the dies and the devices for maintaining the identity of the seams are of great importance. If you do not initially calibrate the fragments, it is difficult to expect an ideal result. The bathroom is a place with a high level of humidity. Here, the walls, ceiling and floor are exposed to steam as well as splashes and water. Tightness is important: the tile must be a reliable barrier that prevents moisture from entering the enclosing structures. Therefore, along with it, you need to choose a high-quality adhesive base with a high degree of adhesion. In this case, you will have to take care of the preliminary preparation of the base.
The perspective of the bathroom is not always straightforward. This complicates the styling, makes you buy more dies, think over their layout more carefully. Built-in lamps and drilling holes in the tiles for sockets can become a problem for the layman. In some cases, with inept handling of the tool, a defect is formed on the tile, which forces you to buy material with a margin. The same applies to ventilation openings in bathrooms or separate shower cubicles.


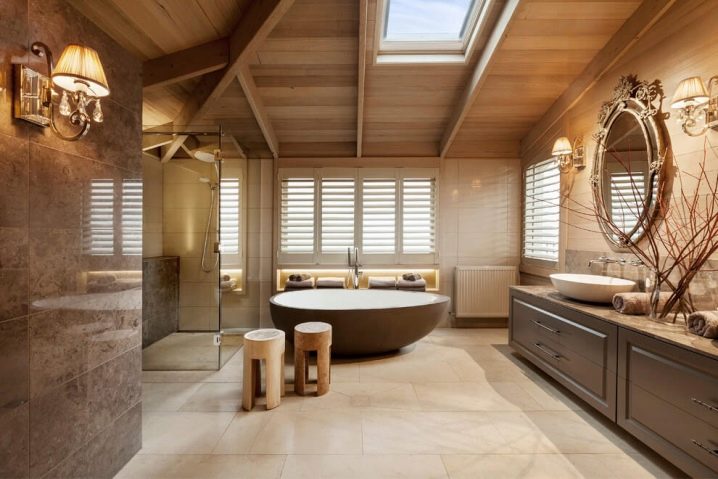
The location of the bathroom is of great importance. For example, if a part of the attic space is allocated for it, one has to take into account the weight capabilities of the bearing walls. If they allow, the cladding can be done on the walls and floor. If not, you will have to leave a small part of the floors under the tiles, sheathing other surfaces with lighter materials. Sometimes the tiles in such cases are used only for the bath and sink area.
At the same time, they think over a ventilation system so that the wet steam immediately leaves the room.

Nuances of choice
Bathroom tile material can be divided into three types such as:
- floor;
- wall;
- ceiling.
Each type has its own characteristics and performance characteristics. Do not replace wall and ceiling material with floor cladding. The size of the elements can be the same. However, tiles of different categories differ in thickness and weight. The weight of the adhesive and the floor tiles together will create a colossal load on the walls and ceilings. Wall mounted varieties are much lighter and thinner.

In addition, the texture is also different. Based on safety requirements, it is preferable to choose anti-slip options for the floor. These are more often slabs with a matte surface and abrasion protection, having some roughness. They are especially necessary in the case of facing the steps leading to the bath. Wall cladding can be matte or glossy, even or embossed.
Not every material is worth buying. It is not chosen only on the basis of external indicators. The size of the bathroom matters. This factor determines the area of the finish, the size of the dice, the size of the seams, their composition and location. Today it is not customary to make a version of a Rubik's cube out of a bathroom: the interior should not be completely decorated with tiles alone.


It is important that the cladding stands out and is functional at the same time.
For this reason, they initially examine the bathroom room, determine the place for pasting, outline the accent so that the coating looks expressive and modern. This is possible by combining cladding with other finishes. They try to use the tile in wetter places: bath, sink, shower area. Wall ceilings near the location of the furniture are sometimes sheathed or pasted over with other material. This allows you to maintain a balance in the background design of the bathroom and perform the reception of the zoning of the bathroom into separate functional zones.


When choosing serial tiles in the form of companions of different sizes, the situation is aggravated by the selection of the right amount of each size. This forces the pre-layout to be done. You can ask the seller to calculate the material. Usually, specialized stores have special calculator programs to solve such issues. Knowing the approximate coverage area, they will perform the layout, which will allow the buyer to determine the amount of facing material. If the styling is difficult, you can contact the designer.
He will draw a rough sketch, taking into account all sizes of the series and the way of masonry.

Style and design
The days when tiles were strictly functional elements of the bathroom are gone. Previously, the interior of the bathroom was not very beautiful. Today, in addition to protecting floors from water and destruction, tiles must be aesthetically pleasing. It is important that it indicates belonging to the chosen style. Modern design ideas are different.
If desired, with its help, you can hint at the sense of taste of the owners of the house, their well-being and status in society. To do this, use the color, texture and theme of the picture.
A fashionable technique for softening the variegation is to finish most of the floors with a monochromatic material. In this case, the raw materials can be very diverse. Tiles, glass, porcelain stoneware are in priority.


Ceramic tiles for walls and floors remain the traditional material. However, today its design is fundamentally different from the decor of the Soviet era. Modern trends are based on the imitation of different textures. Tiles with realistic designs imitating wood, natural or artificial stone, brick and even concrete, glass mosaics with varying degrees of transparency, including a mirror variety, are in fashion. If earlier they often relied on marble, today options with a design for a board, parquet, malachite, pebbles, cork, laminate and even textured plaster are popular.


The coating can have varying degrees of reflectivity. This allows you to choose between matte, glossy, pearlescent or mirror type of material. Due to this, you can beat the lack of usable space by visually increasing the height and width of the walls. Variants with a 3 D effect are popular. They allow you to change the perception of space, but are appropriate only if there is sufficient space in a particular room. They look stylish and unusual, harmonious as a small accent to highlight one area of the bathroom.
Usually these are small panels or wall cladding behind the bathroom, but as separate inserts against the general background, such dies are not suitable.


The mosaic is appropriate for accentuation of the shower stall, emphasizing the bath screen of the constructive protrusion. You cannot completely decorate the wall or floor with it. Today, brands offer the attention of buyers options on the grid. This eliminates the need for tedious alignment of joints between elements. However, it does not eliminate the need for pre-laying on the floor before cladding.
Today it is not customary to combine tiles with separate inserts in the form of a pattern, laid in a checkerboard pattern. When you need to make an interesting accent, they use the panel technique. This is a single image from several or many tiles, which can be of the same or different size. In addition, the direction of the tiles that create the pattern can be different. This design looks stylish, expensive, it is always appropriate when facing.


The choice of style
Today bathrooms can be designed in any design direction. Its choice depends on the general concept of the style of the whole house or apartment, the footage is of great importance: for a design in the spirit of palace solemnity, a limited room with a barely squeezed in bathroom and sink is not suitable.
Tiles for classic design trends (classics, neoclassicism, classicism) should be light. This is a predominantly smooth surface, dies in warm tones of the color palette. The basis of the finish is a coating without a pattern, sometimes with mother-of-pearl, the accent can have muted tones, gilding. For expressiveness of one area, you can use identical tiles for the floor and walls.
For example, a shower space with glass curtains will look beautiful, the ceiling, walls and floor of which will be made of tiles of the same design.


For boho, country styles, you can take a closer look at patchwork tiles. The convenience of such a material is the possibility of gluing in a chaotic manner. In this case, the direction of the pattern, consisting of modules of different colors, can be different. Such dies add a certain flavor and originality to the stylistics. They are extraordinary, however, it is precisely due to the variegation that their number should be dosed.


Fashionable and creative trends are interiors in the style of industrial facilities. These include grunge and loft. In such bathrooms, special attention is paid to the realism of the texture and its shape. It is better to choose a rectangular tile for walls with a matte surface and a realistic brick shade. It is good if you can find wall coverings for concrete in stores. In these areas, the focus is not on the drawing, but on the uniqueness of the texture and its reliability due to the color, shape and relief.


Floor tiles can be very diverse and also obey the chosen style.
If these are classic solutions, you can make a carpet imitation finish. The reception will allow you to make a beautiful and practical design of the bathroom by choosing a finish with stains like marble, stone or other material in darker colors for the area of greater traffic.
Occasionally a combination of mosaics, borders and large slabs can be seen in the design of the floor. An equally interesting design solution is laying tiles under parquet or planks. This gives a lot of opportunities for choosing an extraordinary styling using dies of different sizes and shapes. The options under the board are appropriate in the style of an Alpine chalet and Provence. Parquet looks good on the floor of a classic bathroom, although it can also fit organically into modern interiors.


Fashionable trends in the bathroom interior with tiles are as follows:
- classic;
- Art Deco;
- modern;
- loft;
- chalet;
- provence;
- baroque;
- rococo;
- brutalism;
- bionics.


The tiles are selected taking into account the temperament of all household members. Everyone should like it and be safe to use. Particular attention is paid to the protective layer that protects the material from abrasion. Usually, the design is thought out at the stage of bathroom renovation. If you want to lay out a drawing on the walls, floor and even the ceiling, think over its perception.
Often, a seemingly beautiful picture creates a negative effect. For example, it is undesirable to use a marine theme when the atmosphere of the seabed is created from all walls. On a subconscious level, this will bring a certain amount of discomfort. It will look better in the design of the seaside or shells against the background of the wall behind the bathroom. In this case, the rest of the space can be made of panels or siding for interior cladding.


It is undesirable to use the same texture for wall decoration along the entire perimeter. Even tile panels will look better than full wall cladding. Ideally, it is better to tiled only the walls and floors of the bathroom, shower and sink. Where furniture is planned to be installed, it is preferable to use wall panels. They are easy to maintain, easy to install and lightweight. This combination with tiles looks fresh, allows disguising communication systems and simple dismantling if necessary.
The tiles on their background will bring an unobtrusive organization into the space, defining the places for each functional zone.


Color solutions
The choice of color is an important factor in determining the mood of a room. It is undesirable to clad the floor and walls of the bathroom with material of the same texture and pattern. Even in the presence of companion elements, one can only indicate the unity of the material. But a full hit will create the effect of walls sliding to the floor. Shades can be related, while differing by a couple of tones. So you can create the effect of the versatility of the cladding.
Today, designers recommend using 2-3 tones of tiles for bathroom decoration. In this case, two contrasts are connected by a third, softening the transition between them. For example, a combination of wine color with steel and light gray contrasts looks beautiful. No less interesting is the design of the bathroom in light gray, beige and pearl colors. The priority is the natural colors of the palette. A stylish technique is the use of a dark wenge oak tone.


The combination of black and brown looks stylish in the cladding. Such tiles can be used to decorate the shower area. If you want more traditional options, a combination of neutral tones is appropriate for her. Tiles with marble imitation will also be a good design technique here. Blue and pink tones have today been replaced by combinations of beige with light gray or silver.
Mint tiles look beautiful, patchwork options in blue-orange colors. Stylists say that any tile color can contribute to the desired atmosphere with the right selection of other finishing elements and furnishings. At the same time, dark colors with sufficient backlighting are good for spacious rooms. Light colors are the way out for small bathrooms. If desired, you can decorate the bathroom with tiles in neutral tones, diversifying it to give an emotional coloring with color contrast. For example, tiles in white and silver tones are in harmony with olive, green and woody finishes.
If a strong paint is added to it, for example, blue, the interior of the bathroom becomes cold and restrained.


Required tools and tools
After choosing a tile, you need to decide on the inventory and auxiliary material for installation. For preliminary preparation, it is worth preparing the following:
- deep penetration primer;
- container for a set of primer;
- roller and flat brush for applying primer.
A primer solution is required. Previously, there were no such liquids, so the cladding peeled off over time from the surface of the bathroom walls. Today, brands have learned to make special compositions based on polymers that prepare the base, improve adhesion and make the overlap structure homogeneous.Such a drug is especially indispensable when the structure was erected in violation of technology, which is given by crumbling walls. Penetrating inside, the primer binds dust particles and microcracks. Due to the polymer base, it is elastic. Even if the house leads, the tiles will not chip off the substrate after the glue dries.


From quality materials, it is worth taking a closer look at the options based on acrylic and silicone varieties. It is better to take a liquid with quartz chips for surface treatment. If there is no such material in the store, you can buy a regular primer, then add sifted river sand to it. Thus, the surface will become rough after drying, which will provide the glue with a better basis for adhesion. The primer can be bought transparent or white. The second option will allow you to see which parts of the floor have already been processed. Visualization is important: if the primer is applied unevenly, the crystal lattice formed upon drying will be uneven. If the work area is large, it is better to buy a zinc dust primer in the form of a powder with a high reduction ability.
When the cladding does not occupy more than 1 wall, a 5 liter plastic container is enough.


For styling, you need the following tools:
- container for mixing glue;
- a drill with a mixing attachment for stirring;
- measure if the area of work is small;
- a trowel for a set of adhesive;
- notched trowel for spreading the glue;
- crosses and wedges for identical seams;
- building level;
- metallic profile;
- small sponge;
- container with clean water;
- smaller container for grouting;
- soft sponge;
- clean rags.


Depending on the installation method, a marker and a ruler may come in handy in addition to basic inventory. They are used to define the boundaries of the cladding. Often, the marking is carried out with a laser beam, which is convenient and allows you to make the lines better. To prepare the walls, it is worth purchasing an antifungal impregnation. With its help, it will be possible to process the floors before installation, protecting them from the formation of an environment for microorganisms.
When it comes to glue, there are no clear boundaries here. It is chosen based on the characteristics of the tile itself. For example, if a translucent mosaic with a glass base is used for lining the walls of a bathroom, take a white composition. It will reveal the true shade of the mosaic tiles. Liquid nails are more suitable for wall panels. It is impractical to use them for fixing ceramics.


They are not designed for adjustment, are more suitable for attaching moldings and are difficult to remove from the surface. They are often used for mounting ceiling tiles and moldings. However, a beginner is better off not messing with this lineup. It is problematic to remove it from the surface of tiles and skin of hands. Yes, and such material will not be cheap.
The traditional adhesive for ceramic and porcelain tiles is a cement-based adhesive. Today there is no need to independently mix cement with sand, choosing the right proportions. Thanks to the development of brands, it is possible to buy a balanced composition for breeding. It already contains the required components and performance amplifiers. Usually the composition is characterized by a fraction of medium size, its structure sometimes does not have much elasticity. Experienced craftsmen solve this problem by including PVA glue in the tile composition. The solution becomes viscous, its strength characteristics increase.


In addition to glue, in the work you will need a putty for the seams between the elements. In order not to doubt which grout is better to choose, you should give preference to the same brand, whose glue has already been purchased. The base color can be white. To give the seams the desired shade, it is enough to buy a regular color scheme. You can purchase a colored grout, however, its color does not always match the desired one.
Ideally, a finishing spray can be used.

Subtleties of work
It is not difficult to lay tiles in the bathroom with your own hands. However, it must be laid correctly, following each step of the standard technology sequentially. For this, a preliminary calculation is made by performing a schematic sketch of the layout. Having prepared the tiles and the necessary accessories, you can get to work.
It will consist of the following stages:
- preparation of the foundation;
- creating the necessary conditions;
- preliminary layout;
- laying on the base;
- grouting.
Each stage has its own nuances that affect the final result and the durability of the tile coating.
Therefore, it is worthwhile to familiarize yourself with each of them in more detail.

Preparatory work
They try to take out all objects from the bathroom that are not fixed to the wall or floor. In some cases, it is necessary to remove the plumbing so that it does not interfere with the high-quality facing of the planes. The switches are removed, and often the lamps themselves, be it built-in spotlights or wall sconces. Wiring is insulated to prevent electric shock if accidentally touched. After you have a drawing on your hands with the approximate location of the tiles, you need to prepare the base. It is necessary to start preparation precisely with this.
If old coating is present, remove it as much as possible. Paint, old wallpaper or other material is removed, because the walls need to be cleaned. They remove dirt and especially greasy stains, since the glue will not be able to stick to them for a long time. After removing the old coating, the surface will be dusty. So that it does not scatter around the room and does not interfere with further work, the overlap is wiped with a barely damp sponge. After removing the dust, the surface is dried.
After that, it needs to be primed with one layer of primer, then you can start correcting obvious defects.


It is necessary to cover potholes, chips and large cracks with a plaster mixture, otherwise the tile will not lie flat. After masking the defects, a primer is again applied to the surface. Its use will reduce the absorbency of the walls, ceiling or floor, which will slightly extend the life cycle of the adhesive solution and give additional minutes to adjust the tile before setting. In addition, the primer will strengthen all preparatory layers, giving them strength and reliability. Even porous walls will hold the tiles better.
For the floor, preparation can be more thorough than for the walls. If the wall ceilings are sometimes leveled with plasterboard, it is often necessary to make a screed for the floor. This process takes up to 28 days, as the base is often thick and must dry completely. Plus, you have to think over floor heating systems separately: few people like to walk on cold tiles. After preparation, you can start laying the tiles.


Tile layout
The layout is performed based on the selected pattern. The tiles are laid on the floor, they make up the intended pattern and follow it, laying out each element one after another. When the coating does not have a pattern, follow the direction, since the different shades of the finished cladding may depend on this.
The layout is necessary, including for calibration: when the glue is diluted, there will be no time to select the dies. Reception of a preliminary layout will allow you to control the execution of the drawing. He will show you how to best position the tiles for aesthetic appeal. An asymmetrical reception can visually distort the interior of the bathroom. Trying to save money on cutting can result in unsuccessful rendering. This also applies to the floor: an accent with an off-center relative to free space looks ugly.

Schemes
Tile laying is based on several types of schemes. In addition to the traditional version, some of the techniques are typical parquet laying patterns. A variety of methods allows you to choose the most interesting method to make your bathroom interior special.
There is a clear distinction between wall and floor tiles. For the walls, more traditional methods are used, they try to decorate the floor in an unusual way, although they often lay tiles using the traditional method. This is due to the type of plane: it is easier to glue tiles of different sizes and shapes on the floor according to a modular scheme. Laying of piece mosaics is carried out according to the pattern, regardless of the type of plane (bathroom screen, shower room decoration, wall, partition, floor).
All types of layouts can be divided into several layouts.
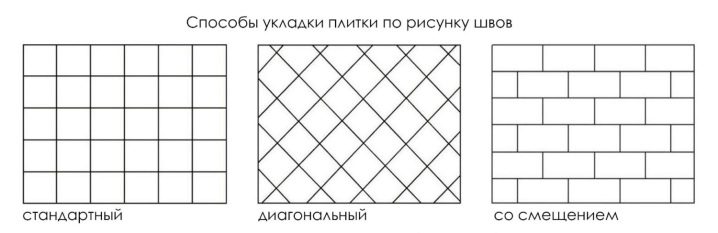
Traditional
Traditional - This is a typical technique for stacking dies in even rows, strictly on top of each other. The method is characterized by the presence of crosshairs of the same size. In this case, classic square tiles are used, as well as elements in the form of a rectangle. The main requirement is strict geometry.
So that the coating is not boring and monotonous, they try to decorate it with a pattern. To do this, choose a serial companion tile or dies of a related color, but a contrasting shade. A drawing is laid out from it against the background of the main coating. The technique is applicable for walls and floors.


Diagonal
The styling principle remains the same. However, square tiles are not laid parallel to the floor or one of the walls, in which case the traditional method is performed at an angle of 45 degrees. The order of work is as follows: in the case of the floor, they start from the center, which is found by crossing the threads from the corners.
When the first tile is fixed, you can lay it around with others and so on until the end. Along the edges, you will have to trim the tile. Such laying of tiles or porcelain stoneware is convenient in that it hides the unevenness of the base. This floor looks more interesting than the classic cladding.


Scattered
This method is an offset masonry technique. You can lay the tiles with an offset of half the length of the element, or you can set an arbitrary offset. The scheme is simple, the quality of the facing depends on the first shift and the observance of the identity of the seams. This installation method is better than others for wall decoration when using rectangular brick tiles.
It is not accepted to glue square dies on the wall using this method. They will look more harmonious if they are laid on the floor using slabs with a matte surface and a simple stone pattern. In this case, you can lay out the cladding diagonally or by combining straight and diagonal masonry. The method allows you to hide some errors in the preparation of the base and the location of the wiring. Such a design of the shower area will look beautiful if you put the tiles under the brick on the wall.

Herringbone
This method means a typical parquet laying, when one tile is laid at an angle of 45 degrees in relation to another, forming a kind of herringbone. It is used to decorate the floor. The work uses rectangular dies.
The method has two types: a standard method and a variant with an attachment., in which, in addition to the dies themselves, single fragments of a mosaic or a small tile are inserted. The method is used for tiling the bathroom floor. By using dies of related shades of brown, it is possible to create the appearance of wood parquet laying. This coating looks stylish and interesting. Installation is carried out by alternately turning the tiles to the right and left.


Modular
This layout is carried out for the floor. It is notable for the presence of tiles of different sizes and shapes. The drawing for her is designed in advance so that it has an approximate taxonomy or repetitions. A similar coating is laid out from square and rectangular tiles, often using piece mosaics.
Schemes can be very diverse, including with and without crosshairs, depending on the type of drawing. To make the coating look beautiful, you can use ready-made sets with selected shades, and scheme maps will help in design.The modular grid of small size will create an interesting design for a floor like stone or parquet.


Complex with a shift
In fact, this technique is based on any of the above. Outwardly, these are often small inserts that dilute the main elements. Shades can be related or contrasting. The decoration uses square-shaped tiles. For greater originality, styling is carried out using a diagonal technology. Sometimes it is diluted with separate inserts of a rectilinear direction with classic styling. This method is used more often for floor decoration.


For ceiling
Ceiling tiles are a separate type of tiles. For a bathroom from this line, modifications from plastic, metal and wood are used. Other options are destroyed by moisture.
The tiles are fixed in different ways. Some varieties are glued to the ceiling, for others they create a frame. This can be the classic method for glue, liquid nails according to the principle of the traditional method. In other cases, the tile is combined with moisture-resistant drywall and stretch film. It perfectly masks the unevenness of the ceiling, is easy to install and maintain. The cassette varieties are attached to the frame, which allows you to hide the pipes and simplify the installation of ventilation systems.

Technology
In the traditional method, the tiles are laid starting from the far corner. If this is laying on the wall at a certain height, a profile is mounted. This minimizes the possibility of blemishes.
The laying technology is as follows:
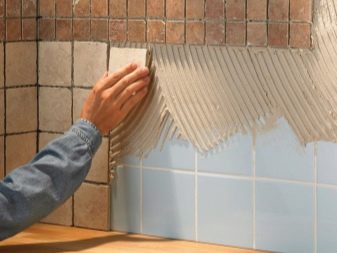
- glue is spread on the base on about a few small dies, then the excess is removed with a notched trowel;
- you should take the tile and apply glue to the back side, remove the excess with a notched trowel, but in a direction perpendicular to that on the wall;
- the tile must be applied to the base, lightly pressing with a sliding motion back and forth;
- you should take the second element and fix it next to it. In order to maintain accuracy in height, pegs are inserted down under the tile if necessary;


- a cross is inserted between the two tiles. Thus, the entire bottom row is performed, not forgetting to remove excess glue with a damp cloth;
- the second row is attached on top of the first. They try to remove the cement composition between the tiles, leaving voids for grouting. Plastic crosses are inserted into the crosshairs, moving the tiles tightly;
- if the laying does not provide for the formation of crosshairs, the crosses are inserted with an edge for the identity of the gaps;
- at the end of the work, they once again pass over the surface with a damp cloth, removing the glue;
- the lining is left to dry completely for about a day. Then, you can carry out finishing.

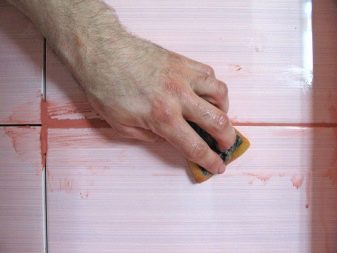
Grouting
After the tile is laid and dried, the crosses and wedges are taken out. In the case of wall installation, remove the metal profile. Dilute the trowel mixture to the consistency of thick sour cream. In order to avoid mistakes, it is important to take into account the proportions: the liquid composition can spoil the final result of the cladding.
The approximate proportions can be seen on the labeling indicated by the manufacturer of the mixture. It is necessary to rub the seams with a rubber spatula, tightly filling the voids with a mass, passing through them in different directions until they are completely filled. The composition dries usually within a day, at this time the surface should not be touched.
The excess is removed as it dries, wiping it off with a regular dry sponge.

You will learn more about bathroom tiles in the following video.
Tips & Tricks
Bonding tiles for walls and floors is difficult even with the same pressure of the elements to the base. The fact is that tile adhesive gives a certain thickness (0.7-1 cm). The tile is not pressed down to the very base, otherwise it will simply have nothing to hold on to. For the floor, it is easier to maintain one level of cladding. For a vertical plane, it will have to be constantly checked with a building level, pressing or, conversely, straightening the die forward.

At the same time, the glue will rush downward, so the distance from the wall on top of the tile element will be greater than below. The same applies to inclined planes, if the cladding is performed in an attic with roof-walls. This is perhaps the main difficulty in finishing, because the slope will be noticeable. It is also important that the first (bottom) row is flawless.
The following recommendations of specialists should be adhered to:
- if the glue is liquid, it will drain from the walls and form cracks, such a coating will not last long;
- it is better not to glue tiles on gypsum plaster, it also applies to drywall.
- if you need to install a bathtub, they are repelled by the type of work and ease of installation;
- the installation of a mixer or a mirror is carried out after the main installation. Holes are marked and drilled before laying;
- antifungal impregnation of the bases before installing the tiles is required;
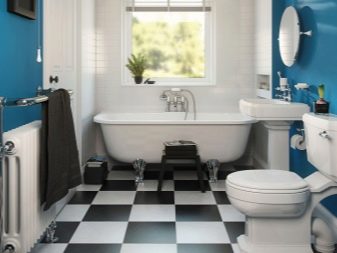
- with a minimum footage, for example, a bathroom area of 4 sq. m, choose small sizes of dies and light colors of the finish;
- decoration of planes with tiled decor in the form of a panel is possible in places not covered by furniture and plumbing fixtures.


Reviews
Using tiles for bathroom decoration allows you to bring to life different, even creative design ideas. This is evidenced by numerous reviews of tile buyers, whose choice is based on an approach to a particular style.
According to reviews, design with an unusual texture is distinguished. It is the tile for brick and wood that is today called the best for finishing wall and floor coverings. For the ceiling, buyers and craftsmen recommend purchasing drywall, lightweight panels and plastic-based ceiling tiles. The use of wall tiles for the ceiling is appropriate only for the design of the shower area. It is heavy, for the upper floor, the option of a stretch ceiling or the use of moisture-resistant drywall is better suited.
It is recommended to use a light-colored grout in order to exclude an abundance of lines and borders in the bathroom, upsetting the internal balance.


Successful examples and options
Examples of photo galleries will help you evaluate the possibilities of bathroom design through tiles.
- The use of two textures of a related color is a stylish solution for the background design.
- The use of mosaic tiles in the lining of the bath screen and the zoning of the toilet and shower areas is a modern design of the bathroom.


- Patchwork is perfect for decorating a shower wall.


- Ornamented wood-look boards create a special atmosphere in the bathroom.
- Imitation stone and different installation methods give the bathroom a special touch. Using the reception of stone tile panels looks stylish and unusual.


- A creative and stylish solution in the spirit of a loft with brick-like tiles and marble inserts for the shower area draws attention with its beauty and originality.
- The imitation of torn stone in the bathroom interior looks stylish.


The comment was sent successfully.