All about sharpening drills
Construction professionals constantly deal with different types of drills that become dull over time. Poor quality cutting elements become unusable after a few months. Expensive branded samples serve their owners for more than a dozen years. And it is their builders who do not want to lose, but send them to sharpen. In principle, this is the right decision, however, you have to pay a lot of money to restore the state of a blunt drill. And in order not to empty your wallet, you can use the recommendations for sharpening yourself.


Fundamental rules
Those who use the drill once a year do not notice that it loses its sharpness. But with this approach, at one point, it simply will not make a hole. And then you will have to make an independent decision - either purchase a new drill, or restore a blunt one.


The very process of sharpening on professional equipment does not require human effort, which cannot be said about restoring sharpness with your own hands. However, before proceeding with a detailed acquaintance with the rules of sharpening and the intricacies of the process, it is necessary to find out the signs that the drill will soon become unusable:
- the cutting element is very hot;
- small metal shavings fly out from under the edge;
- the noise from the working drill becomes much stronger.

Particular attention should be paid to the last feature. The friction between the blunt edge of twist drills and the surface to be drilled increases, resulting in unusually loud noise. In such a situation, it is necessary to immediately stop working, otherwise the cutting element will heat up, its structure will change, so that it will simply not be possible to restore the drill.

Further, it is proposed to get acquainted with some of the rules and instructions of experienced craftsmen who are engaged in regular sharpening of blunt centering tips.
And what is remarkable, from the information offered, it becomes clear that you can restore the drill with your own hands.

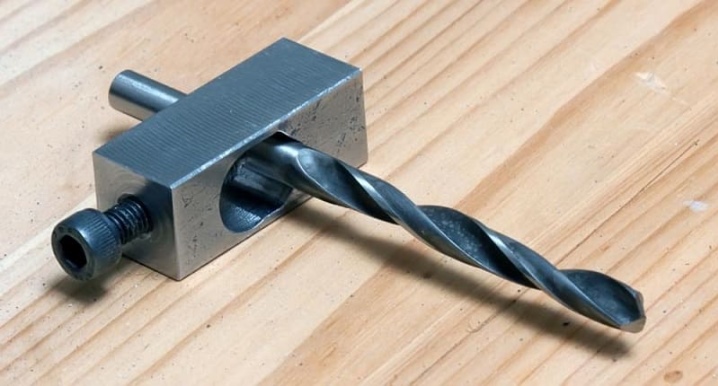
Drill sharpening process requires special equipment. In this case, we are talking about grinding machines and attachments for drills and hammer drills. A sharpening machine is a device equipped with a sharpening stone. Drill and hammer drill bits have unusual tip shapes. Often in private houses there is a miniature sharpening machine, since this device can be used to sharpen more than just drills.

The sharpening technology depends on the type of drill. Today, there are conical, screw, cylindrical, single-plane and double-plane cutting elements on sale. Each of the presented types of cutting elements requires a special approach to sharpening, but the common thing between them is that only the rear edges are sharpened.

It is very difficult to do it manually, but it is possible. Especially when it comes to small specimens. Small and thin drills are always sharpened by hand, thanks to which a person fills his hand in the sharpening skill and after a while can put in order the cutting elements of large sizes.

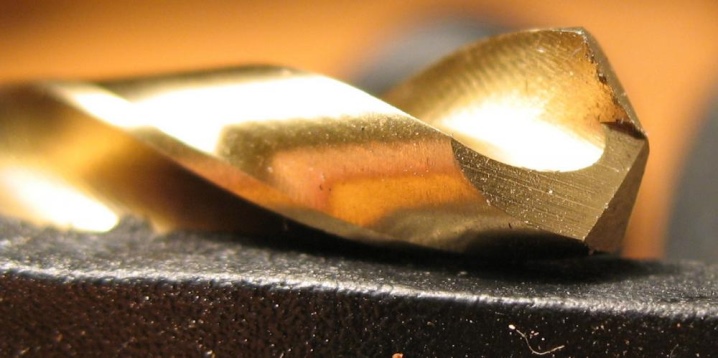
Single-plane drills differ from their counterparts by the presence of only one plane. The angle of inclination of the sharpness according to the standard ranges from 28-30 degrees. It is this part that lends itself to restoration. This beveled plane is brought up to an inactive grindstone.If the stone rotates, chances are high that the drill will get the wrong angle. Two-plane drills are sharpened in a similar way. The only difference in the sharpening process is the need to process two planes.

It is important to be very careful when restoring tapered drills. The tapered shape of the edge must not be disturbed. That is why the drill needs to be brought to a rotating grindstone, press on the cutting element and use oscillatory movements to sharpen the cone. The main thing is not to remove the drill from the stone and carry out the entire procedure with one touch.
An important rule of thumb when sharpening drills is to maintain the shape of the edge. It is no secret that this is not possible in every case. Especially when it comes to sharpening drills with a diameter of 10 mm or less. However, for this type of cutting element, it is preferable to maintain only the clearance angle.
As for drills with a diameter of more than 10 mm, grinding professionals advise to sharpen not only the edges of the planes, taking into account the angle holding, but also the front planes, which significantly improves the technical characteristics of the structure. This sharpening will be more effective in drilling work.

Due to the correct sharpening of the rake plane, the angle of the cutting part of the drill becomes larger, which significantly increases the endurance of the metal element. Besides, the transverse length of the edge becomes smaller, due to which the product does not cut the hole, but scrapes.

After the sharpening procedure, it is necessary to fine-tune it. In simple terms, remove the burrs caused by the mechanical action of the grindstone. For factory sharpening, this procedure is extremely important. Thus, it is possible to increase the level of wear resistance of the cutting element. At home, fine-tuning is not always possible, however, if there are the necessary devices, you cannot skip this procedure.

For home finishing, it is necessary to use a silicon carbide or elbor stone. They can be purchased in any construction market. Silicon carbide stone is green in color. Ideally, you should use a copy of grade 63C with a grit index of 6 and a hardness of M3-CM1. If the choice fell on a stone from Elbor, it is necessary to take a specimen with a grain index in the range of 6-8. It is important to pay attention that the presented stones for finishing should be made on a bakelite bond.

Special attention should be paid to step drills. They can be purchased on the market as single items or as a kit. The diameter of the produced step drills ranges from 4 to 21 mm. Step drills are of high quality and wear resistance, but even these cutting element patterns become dull. And, unfortunately, the restoration of the tip of the drill is possible only in some models.

If we are talking about a victorious drill, a diamond wheel should be used for sharpening.

Varieties
In the modern market, you can find twist drills, flat and center models:
- spiral elements, according to their name, differ in the spiral shape of the edges;
- flat products are intended for making deep holes of large diameters;
- center drills are used to center elements.


All the presented types of drills become dull over time. Reducing the sharpness of the cutting element interferes with construction work. This means that the product needs to be restored.

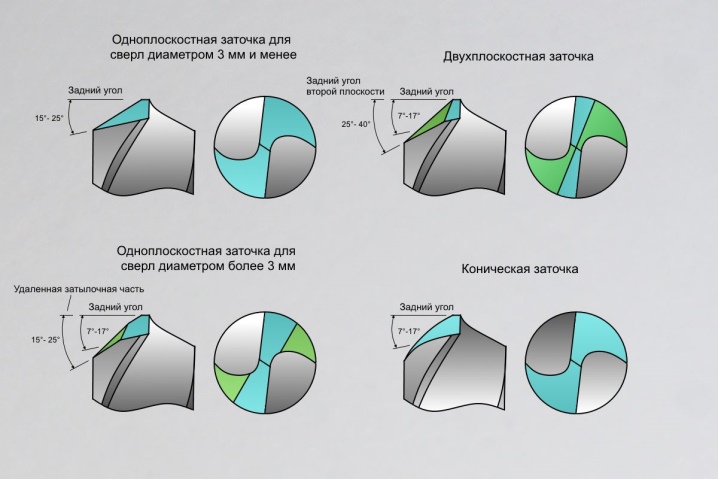
To date, 5 types of drill sharpening have been developed. Each individual method corresponds to the type of material of the cutting element and the specifics of its operation.
- "H" - this type of sharpening is universal. However, it is used for restoration of drills with a maximum diameter of 12 mm.
- "NP" - in this case, sharpening of short crossbars is performed.
- "NPL" - a type of sharpening involves lengthening the transverse edge and width of the tape.
- "DP" - in the professional field, this type of sharpening is called "double". In addition to the transverse edge, 4 more edges are formed in the form of broken lines.
- "DPL" - the description is similar to the 4th sharpening method, only the sharpening of the tape is added.
Sharpening angle
As mentioned earlier, before you start sharpening the drill, you need to calculate the correct angle for the restoration of the cutting element. For the convenience of finding the correct indicator, a special table has been developed, where in the 1st column the degree of inclination with a digital value is indicated, and in the 2nd - the material intended for drilling.

|
Processed material |
Sharpening angle |
|
Steel, cast iron, bronze |
115-120 |
|
Brass |
120-130 |
|
Copper |
120 |
|
Aluminum |
130 |
|
Ceramics, granite |
130 |
|
Wood |
130 |
|
Magic |
80 |
|
Silumin |
90-100 |
|
Plastic |
90-100 |
An incorrect turning angle will cause the drill and the power tool to heat up during operation. And the quality of the hole to be drilled decreases significantly.

Tool requirements
In industrial conditions, sharpening is carried out on specialized equipment in compliance with safety regulations. However, for domestic purposes, several other devices have been invented and developed:
- a mechanism equipped with a sharpening stone;
- machine connected to the mains;
- grinder and drill (however, they are used only in the absence of strict requirements for the sharpening angle);
- sharpening tips for drills.


Each individual device offers a high level of performance, angle accuracy and ease of use. They have a very convenient control system that even an amateur can handle. Another additional advantage of the presented options for home devices is their low cost and miniature size.

Ideally, you need to sharpen the drills with a grinder. However, in the absence of this equipment, you can only use the disc from it. The main thing is that the grain size of the emery wheel meets the requirements. The round emery should be fixed to a drill or sander. It is recommended to use a grinder only as a last resort.
It is important to note that there are multiple health risks associated with sharpening cutting elements. Therefore, before starting work, you should protect your eyes by wearing special glasses. A bowl of cool water should be placed next to the drill to be sharpened, in which the cutting element will be cooled.

How to sharpen different drills?
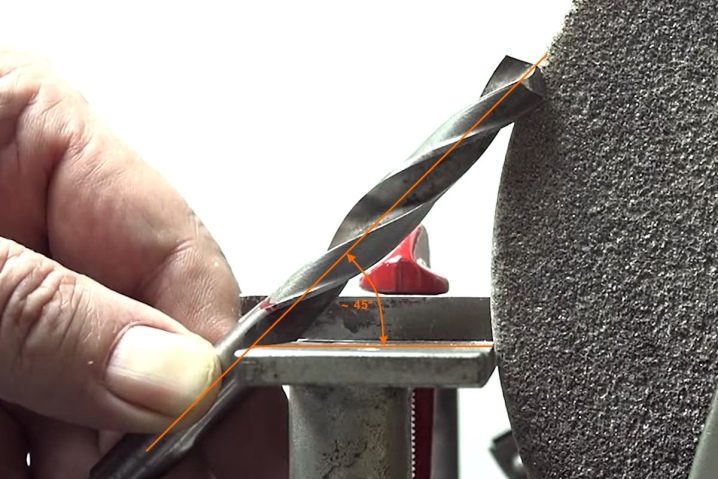
According to experts, one should start an independent practice of sharpening drills with cutting products with a diameter of more than 10 mm. The sharpening angle for such elements is 120 degrees. After the procedure, the front of the drill should be symmetrical. If an error occurs during sharpening, it can be corrected immediately.
At some distance from the cutting edge, there is a so-called flank surface. It should be within 1-1.5 mm of the cutting edge downward.

Further, it is proposed to familiarize yourself in more detail with the theoretical side of the do-it-yourself sharpening process. First of all, you need to do some preparation. On the surface of the grindstone, draw a line parallel to the rotation of the axis with a black felt-tip pen.
Next, you need to place the drill correctly. It must be kept clearly horizontally. In this case, the markings made with a felt-tip pen will be located slightly above the axis of rotation. Thus, the longitudinal part of the tool, located horizontally, will be turned to the left side by approximately 30 degrees, which will ensure that the required sharpening angle is obtained.

Now you can move from theory to practice. A drill with a blunt tip is taken. Next, you need to find the correct position of the tool. Initially, one side is sharpened, and then the other. In no case should you rush. The work must proceed with the utmost care.If suddenly the sharpened edge heats up and turns red, you need to dip the drill into a container of water. After cooling the cutting element, you can continue working.
Having finished sharpening the knocked-down drill, you need to check the result. For this, a drill is taken, a sharpened tool is inserted into the chuck. Then you can try to drill a steel surface that is 8 mm thick. If the holes can be drilled without difficulty, then the sharpening process was correct.


In fact, there are many ways to sharpen cutting elements. And each separate method assumes the processing of drills for different materials. For aluminum, copper and even stainless steel, twist drills are used, which are sharpened according to the universal and double "method". Sharpening a drill for spot welding is done with a grinder. Small drills with a diameter of less than 4 mm are sharpened exclusively by hand. By the way, if necessary, you can sharpen the old drill for the cutter yourself.
Unfortunately, not everyone succeeds in sharpening a dull drill the first time with their own hands... But with a little patience, you will be able to achieve a positive result.


On concrete
In concrete drills, only the rear surface is sharpened. For restoration, the two-plane or tapered method should be used.
First you need to familiarize yourself with the conical sharpening method. The cutting element is required to be inserted into the prism of the grinder, which moves around its axis. Next, configure the parameters. The axis of the taper should have an angle of 45 degrees to the axis of the drill. It remains only to activate the device and wait until the end of the work. The conical method is used to create a sharp increase in the clearance angle of the cutting element.

To automate the process, it is recommended to use the screw method. It is characterized by forward movements consistent with the rotation of the grinding wheel. Remarkably, this method allows you to simultaneously sharpen the front and rear corners of the cutting element.

By wood
First of all, you need to remember that this work process is very complex. The first time no one can sharpen a wood drill correctly. To start self-restoration of such a cutting element, you should practice on a worn instrument.
The main difficulty of the work is that even one wrong movement can lead to damage to the drill. That is why it is necessary to clearly follow the prescribed instructions:
- a container with water should be placed next to the workplace;
- it is important to get an angle of 45 degrees;
- drills must be held at the edge of the disc;
- for the sharpening process to go smoothly, you need to place the cutting element in the washer;
- the edges need to be slightly tucked a couple of millimeters and monitor their evenness;
- when the sharpening process approaches its logical conclusion, it is necessary to slow down the machine speed;
- at the end of the work, it is required to cool the cutting element and check its functionality.

For metal
The principle of sharpening a drill for metal is not particularly difficult, but still requires patience. With your left hand, you need to take the tool and hold it next to the working base. With your right hand, you need to grab the tail of the drill and start the rotation of the disc. The rear part of the edge is brought up to the rotating part. With light pressure, you need to turn the drill. At the same time, maintain the appropriate slope at all times. It is very important that the cutting edges have the same length and identical angles.
It remains only to check the sharpened drill.

An easy way to sharpen a drill is in the video below.


The comment was sent successfully.