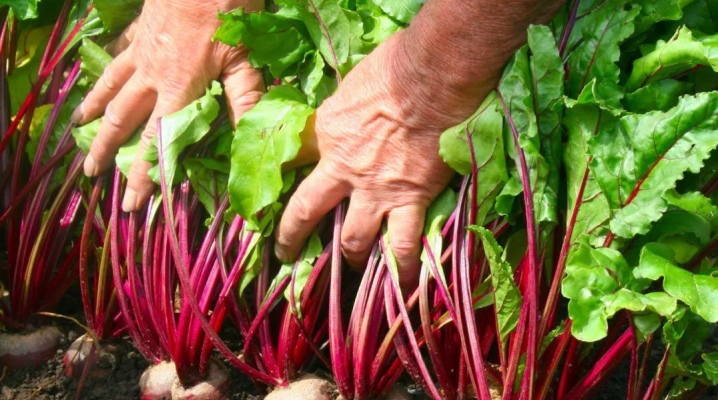
All about planting beets
Beetroot is easy to care for and ripens perfectly both in southern regions and in cold ones. All a gardener needs to get a good harvest is to properly prepare the seeds and provide the plant with normal conditions for development.
Timing
First of all, the gardener needs to understand what time is best for planting beets. When planning this procedure, attention should be paid to the following points.
-
Temperature. It is worth starting planting beets after the soil and air have warmed up enough. In warm regions, this is done in late March or early April. In Siberia, the Urals and other cold parts of the country, this is done in May. In such regions, it is better to plant beets in open ground, which are not afraid of frost. Late beets can be planted even in early June.
-
Weather. Before planting beets, it is important to make sure that no frost is expected in the near future. Otherwise, the plants may die.
-
Grade. According to the ripening period, all varieties can be divided into three categories. Early beets ripen in 100-110 days, medium beets in 115-130 days. The growing season of late beets takes almost 150 days. It is quite possible to plant different varieties of beets on one site. Thanks to this, part of the harvest can be eaten, and the rest can be sent for storage.
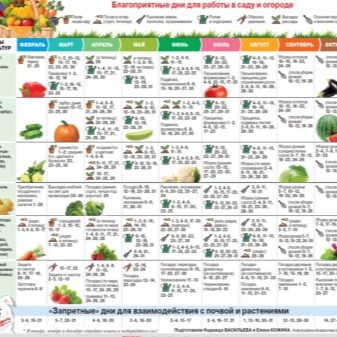
When choosing the right date for this procedure, many gardeners are also guided by the lunar calendar. It is believed that by planting vegetables on auspicious days, you can get the most healthy and resistant plants to various diseases.

Preparation
Having decided on the right time for planting plants, you need to prepare the site and planting material.
A place
First you need to decide on the most suitable place for planting seeds. Beets should be in a sunny area. In the shade, it will grow shallow. It is very important to avoid wetlands. Beet beds are usually narrow and not too long.
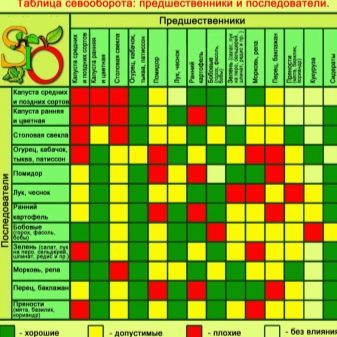
When planting root crops, one must not forget about crop rotation. Vegetables are recommended to be planted in an area where tomatoes, cucumbers, onions or legumes were previously grown. It is not recommended to plant vegetables in a garden where beets or carrots were previously grown. In such a place, they will lack nutrients.
You need to pick up in advance for root crops and good neighbors. It is best to plant beets next to onions, garlic, cabbage, or lettuce. It is quite possible to plant young dill between the rows. Poor neighbors for beets are potatoes, beans, and corn.
You should also not plant root crops next to tall trees or dense bushes. In this case, their crowns will shade vegetables. Therefore, beets will develop very slowly.

The soil
Soil quality also plays an important role. She must be fertile. Therefore, in the process of preparing the beds in autumn, manure or humus must be added to the soil. The soil on the site should also not be acidic. You can lower the acidity of the soil by adding chalk or ash to it. After that, the soil must be well loosened. This is done so that water does not stagnate on the site.

Seeds
Many gardeners plant beet seeds without any prior preparation. This does not particularly affect the harvest. But if gardeners want to speed up the sprouting process, they should process all the planting material. The seed preparation process consists of the following steps.
-
Calibration. The first step is to select healthy planting material. To do this, the seeds are simply poured onto a white sheet of paper and sorted by hand. All small and damaged grains must be destroyed immediately. For planting, use healthy seeds of the same size. In this case, seedlings on the site will appear at the same time. After that, the seeds must be placed in a container with salt water for several hours. After this time, all floating seeds must be thrown away. The rest of the grains must be rinsed under running water and dried.
-
Disinfection. This is another important procedure that is recommended for all gardeners. It helps protect beets from disease and pest attacks. To disinfect the seeds, they are placed in a container with a weak solution of potassium permanganate and left there for 12 hours.
-
Soak. In order for the seeds to germinate faster, they must be soaked. To do this, the planting material is wrapped in gauze and placed in a container with warm water for 6-9 hours. It is advisable to change the water every 3 hours. It should also be warm and clean.
-
Germination. Instead of soaking the seeds, they can be germinated. It is worth remembering that this process takes longer. To begin with, the planting material must be spread out on damp gauze and covered with a damp cloth or sawdust on top. Further, the seeds prepared in this way can be put into a bag or bowl, which is then covered with glass. The container is left in a warm place for several days. The seeds need to be checked and moistened daily. When the planting material has germinated, the gardener can start planting the seeds.
-
Vernalization. When planning to plant beets in insufficiently heated soil, the seeds should be pre-hardened. To do this, after soaking, they are placed in a refrigerator. They are left there for several hours. This method of seed preparation makes the beets more resistant to cold.
-
Treatment with stimulants. This method also helps speed up the seed germination process. The method is ideal for landing in regions with short summers. As a rule, beet seeds are soaked in containers with Epin solution or similar stimulants. Leave the grains there for half an hour. After soaking, they are taken out of the container with a stimulant and dried for 24 hours.


Proper preparation of planting material allows you to get a good harvest in any conditions. Therefore, these procedures should not be ignored.
Landing technology and scheme
The very process of planting seeds in the soil consists of the following steps.
-
In the spring, the soil must be loosened again. If it is very poor, it should be additionally fertilized. After that, the ground must be leveled with a rake. In the end, the soil should be light and loose.
-
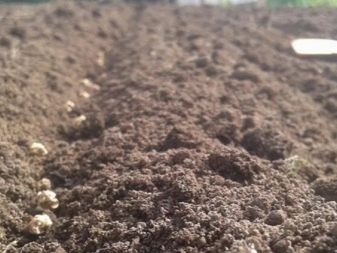
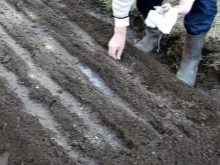
Next, on the site, you need to make grooves of a suitable size. The distance between them should be within three centimeters. The gap between individual rows is within 25-35 centimeters.
-
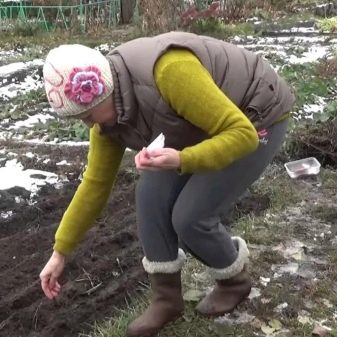
After that, you need to sow the seeds. The depth of their embedding should not be too great. Otherwise, the sprouts will not appear on the garden very quickly.
-
Further, the grooves need to be sprinkled with soil. The earth must be well tamped.
-
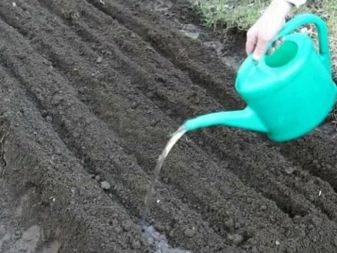
After planting the seeds, the beds must be watered abundantly. It is very important that the water is well absorbed. It is worth watering the beds from a watering can, trying not to erode the soil. Water for irrigation should be used warm and well-settled.
-
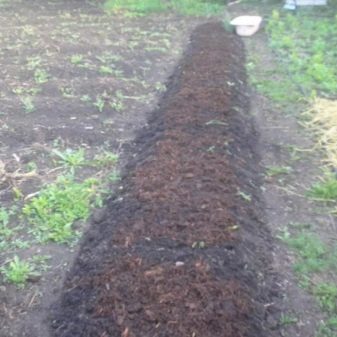
After this, it is recommended to additionally mulch the plants. For this purpose, it is best to use clean sawdust, humus or peat. The mulch layer should not be too thick.
If a cold snap is planned in the near future, it is recommended to cover the beds with agrofibre. This will help protect young plants. In this case, it is very important to remove the shelter immediately after the first shoots appear on the garden. This is to prevent the plants from starting to rot.
Some gardeners prefer to organize warm beds in their area. You can equip them in two ways.
- You can dig several wide trenches in the garden bed. A small amount of organic raw materials is placed in each of them.
- Special boxes are installed on the beds. They are filled with plant residues and loose soil.
For the arrangement of warm beds, it is very important to use healthy plant waste that has not been damaged by pests or diseases. It is possible to plant beets in such a bed only two years after its arrangement.
Separately, it is worth talking about the pre-winter sowing of root crops. This beet growing method has its advantages. First of all, it is worth noting that such plants are more resistant to cold weather, lack of moisture, as well as pest attacks and diseases. In addition, the fruits of beets planted before winter ripen much faster. Therefore, in the summer they can be used to prepare salads, soups and other dishes.

For planting beets before winter, it is worth using cold-resistant varieties. They are not prone to shooting and are not afraid of frost. Pre-winter planting of beets has its own characteristics. Novice gardeners should consider the following points.
-
Beets should not be planted too early. This will lead to the fact that the seeds will germinate at the wrong time, and the first shoots will die after the onset of frost. The optimal sowing time is the end of October.
-
In the fall, dry seeds are planted in the soil. At the same time, the soil on the site must also be dry. Sowing seeds is best done in cloudy weather.
-
After planting the beets, the beds must be covered with a layer of mulch or humus. You can also use sawdust or dry foliage instead. In the spring, the shelter will need to be removed.

The beets grown in this way are as tasty and large as summer beets.
What can you put in the hole?
To speed up the growth of beets, it is worth adding fertilizers with a high nitrogen content to the soil during planting. Usually at this time the beets are fed with urea. Other products can be used instead.
-
Manure. Pure humus is usually diluted 1 to 5 in warm water. Bird droppings can also be used instead. But a solution with such a product should be less concentrated. Dry pellets can also be used instead of regular chicken. You need to use them, following the instructions on the package.
-
Siderata. Some gardeners plant them on their site after harvest. In this case, they manage to grow before the onset of spring. During the spring preparation of the site, the greens are mowed and buried in the ground.
-
Ash. This is another product that is very often used for spring beet feeding. Clean ash obtained after burning healthy plant residues should be added to the grooves. It can be either dry foliage or branches.
-
Onion peel. Dry onion husks are also excellent for feeding. You can collect the right amount of product in a couple of weeks. In the evening before planting, the husk must be poured with hot water. Further, the container with the future fertilizer must be sent to infuse. The next day, top dressing can be placed in the wells.
If desired, these products can be replaced with purchased products. It can be both conventional mineral fertilizers and complex formulations.


The comment was sent successfully.