We make beautiful crafts from pencil shavings

Applications and crafts from pencil shavings can be done with children 3-4 years old. The material is environmentally friendly, affordable and easy to work with. You can do a lot of interesting things from shavings, everything is limited only by imagination. Work allows creativity and imagination to develop.


How to make original applications?
Crafts from pencil shavings can be made with the whole family. This is a fairly simple and fun activity, as a result of which you get great decorative elements for a child's room.... Children are happy to learn interesting techniques. You should definitely teach your kid to use pencils not only for drawing.
Making an applique on paper is the easiest option. This beauty can be done with children of any age. The following materials are required:
- pencils that you can grind off;
- simple pencil for contours;
- sharpener;
- PVA glue and a brush to it;
- cardboard or paper for the base;


The picture can be absolutely any. The mosaic looks interesting, different animals and cartoon characters. You can even just decorate children's drawings.
Progress
- First you need to choose a suitable application theme.... Flowers, fish, animals are often painted.
- A contour is drawn on a sheet with a simple pencil... You can even take pictures from coloring pages for children. There, the drawings have large elements.
- Spread out pencil shavings by colors for ease of use.
- Apply glue to the right place in the picture.
- Lay out the shavingslightly pressing against the paper. Excess glue should be removed with a dry cloth.
- The finished application should be placed in a file and placed under a press until completely dry.... This will ensure better adhesion of the elements. The masterpiece can be enjoyed much longer.
The first applications should be as simple as possible... After mastering all the tricks of the technique, it makes sense to try yourself in more complex work. It is worth noting that the shavings are perfectly combined with drawings or elements made of colored paper, plasticine. In other words, you can come up with many combinations to achieve the most beautiful result.


Ideas for applications
- Simple crafts. This includes a variety of themed postcards. You can glue the tree over with shavings. Rhinestones, beads and even nail polish are suitable as additions.


- Bouquet... Chip flowers look very attractive. The cores are made in a variety of ways. You can cut them out of colored paper or sculpt them out of plasticine. It is much easier to simply paint the base with felt-tip pens or paints, or simply fill in with finer or colored shavings.


- Dress or costume for a princess. The girl should just be drawn. Only clothes are laid out with shavings. It could be a ball gown, a fancy dress, or something else. Everything is limited only by fantasy. This is a good solution for an applique with a girl.


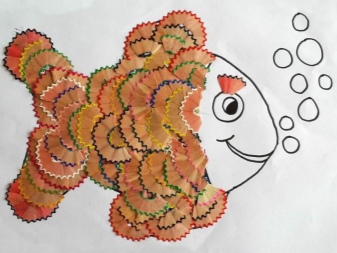
- Fishes... Scales are laid out from the shavings. It is worth starting from the tail, moving towards the head. Each layer is laid out with an overlap on the previous one. You can create a real masterpiece if you work out the background. Usually the seabed is painted with paints or felt-tip pens. Some elements can also be decorated with shavings.

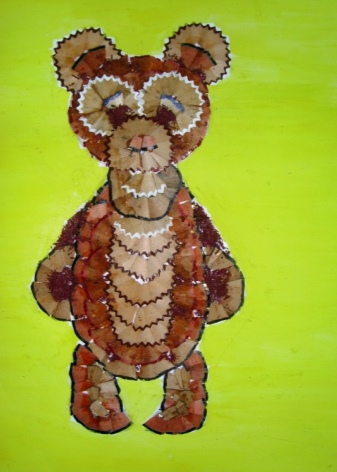
- Insects and animals... It is quite easy to lay out butterfly wings or hedgehog needles, chanterelle skin.Such a picture will look especially attractive if you paint over the shavings in the desired shade.


Overview of voluminous crafts
Multi-colored shavings allow you to make not only an applique, but also a voluminous figure. The material is suitable for making souvenirs. This is a good solution for a gift to a relative on behalf of a child.
The base itself is usually made from papier-mâché. The dried figurine should be covered with glue and overlaid with colored pencil shavings. The decorative material should be applied from bottom to top. Only the head, if we are talking about animals, is pasted over in the reverse order. All parts, such as the beak or the scallop, are processed separately.
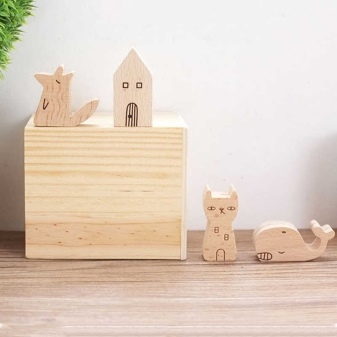
The blank can be made not only from papier-mâché. You can use wooden or plastic figurines. True, in the second case, you should choose the right adhesive.

A bright souvenir will be good as a gift or decoration for a child's room.
Interesting crafts can be done with older children, for example, with schoolchildren. The shavings are good for imitating animal hair, so they are made more often. The work will take some time, but the result will be mesmerizing.

Let's try to do chanterelle.
The following materials are required:
- newspaper;
- metal bendable wire;
- wallpaper glue;
- pencil shavings;
- hot glue gun and sticks to it.

Before starting work, a frame should be made. The wire is bent first in the form of chanterelle legs. The resulting frame is wrapped in newspaper, which is fixed with simple tape or thread. You should also twist the torso and attach the hind and front legs to it. The next step will be the preparation of the tail and head frame - they are wrapped in newspaper and attached to the rest of the structure.
After the formation of the fox, it is necessary to detail the head, make ears and nose, eyes. Gradually, the workpiece will take on the desired appearance. The entire frame should be pasted over with white napkins with wallpaper glue, and left to dry.
Wood shavings should also be prepared in advance. Not ordinary spirals are used, but wool imitation. The fibers should be slightly separated. The length should be approximately the same for the overall look of the fox to be neat.
The chips are fastened with hot glue.


Step-by-step instruction
- The tip of the tail is covered with shavings. Each next row should cover the previous one.
- Then you should decorate the hind legs.... You also need to start from the bottom.
- Now is the time to switch to the fox's body... In this case, it is necessary to move towards the head. All rows also slightly cover the previous ones.
- The front legs are glued in the same way as the hind legs. For them, you can pick up chips with a shorter length than the main one.
- Moving on to the neck and head. Ears with tassels and a muzzle are gradually laid out. The work ends at the tip of the nose.
- Last but not least, the eyes and nose should be attached to the fox.... Blanks are cut from leather, paper or birch bark. Beads will also work.


Material preparation tips
Using pencil shavings is straightforward. Some have it at home in large quantities. However, in some cases, shavings are harvested on purpose, based on the characteristics of the craft. This option is the best, you can make really beautiful products.
Chips making recommendations:
- An open-design sharpener should be used.... This will keep the spirals smooth and long. If you use a tool with a container, the chips will break, and unevenly.
- Spirals can be long or short, curly or straight... You can also use small pieces that look more like sawdust.
- When using a rotary sharpener, place a plate to collect material. So the shavings will be laid out evenly and neatly, will remain intact.
- Wood shavings can be pre-painted... For this, the material is soaked in the ink solution.The chips must be thoroughly dried before use.
Watch a master class on making an applique from pencil shavings.


The comment was sent successfully.