Rule for plaster: choosing a tool for finishing work

The rule is an ideal flat strip, with which the surface is leveled when decorating walls with plaster. Also, the tool is needed to control the evenness (quality) of the work performed.

Varieties
The rule for finishing work with plaster is a flat lath made of wood up to 2 m long. The main disadvantage of such a tool is the tendency to deformation under the negative effects of moisture. This problem can be eliminated using, for example, a special impregnation for wood - drying oil.
The rule of the modern type is already a 3-meter profile with a width of up to 12 cm, made of aluminum. This light metal rule will not undergo deformation, therefore, such a tool is very durable.


For example, the h-shaped rule can be equipped with a hydraulic level built into it, this greatly simplifies the do-it-yourself workflow. Such a tool can also be used for other works in which there is a need to apply a long level.

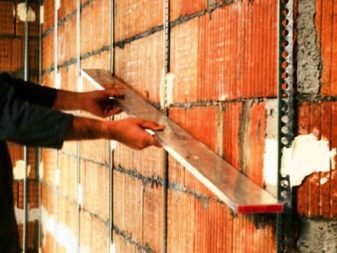
To check the wall for evenness, a rule is applied to it, according to the gap formed between them, the plane is examined and the presence of curvature is judged. A size of 1.5 cm is considered a tolerance.
This type of check should be carried out over the entire plane. The building level is also used to check the correct slope of the walls.
Smoothing plaster rule
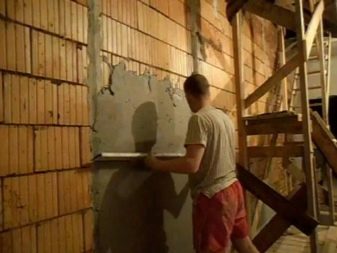
The plaster is adjusted by cutting off excess residues using the rule. At the same time, the rule should slide along specially fixed rails, the name of which is beacons. Such beacons are set in advance by level. These slats should be in a perfectly flat plane. The existence of lighthouses and their competent installation will allow for perfect plastering. The most popular method of surface finishing is usually plastering.

Lighthouses
Such orientation slats are not fixed too tightly in the corners and next to door and window slopes. The gap between them will depend on the size of the width of the wall, the distance should not be less than the length of the rule itself for adjusting the plaster layer.

Such beacons differ in design and material of manufacture:
- Wooden lighthouses. Wood has one significant drawback - the inconstancy of geometric shapes. Wood deforms too quickly, therefore it is too rarely used for "wet" work.

- Metal beacons. An ordinary tin profile acts as a steel beacon. Such a tool will not swell when exposed to water. Nevertheless, it also has disadvantages - a thin, easily bendable profile at a cost more expensive than ordinary wooden slats.

The alignment of the plaster layer with the rule of approximate auxiliary beacons is usually performed using a profile. There are different types of landmarks:
- Brick or ceramic tiles... Small pieces of brick, stone, chips of ceramic tiles can be a reference point. They are fixed to the wall in given planes. Of course, this is not a very convenient solution, but you can still use tiles or bricks when the installation of solid slats is impossible.

- Building mixture. Fragments of the solution are installed throughout the working area, fixation is carried out at a distance convenient for work. This complicated workflow can affect the quality of the plastering. Accordingly, it can be used only in rooms that do not differ in high requirements - a garage or an outbuilding.

Sometimes nails with a taut rope are also used. This option is not a professional decision. Plastering using a rule using guides is considered the simplest.
Fixing beacons
The entire room should be surveyed before fixing the landmark. It is necessary to identify whether the walls are deformed, whether there is a slope, how accurate the corners of the room are. Plastering the corners of the room is considered the most important stage. Geometric distortion is very noticeable in the corners; every corner of the room should remain perfectly straight. First, the walls need to be surveyed with a plumb line, so you can find a point that becomes a future landmark.
Next, you need to screw the screws into the walls, thanks to which it will be possible to install the beacons as evenly as possible. Screw in the screws first in the upper corners. Using a vertical level or a plumb line, do the same for the lower corners of the room.

Beacons are oriented to the heads of the screws already installed at the level of the screws:
- The metal profile is applied to the screws themselves.
- Wooden orientation beacons are placed close so that their plane fully corresponds to the area of the screw head.

Reiki must be fixed with a solution, this should be done along the entire line of the established level with a kind of "blunders". For such an operation, it is better to use a notched trowel. Metal profile rails made of tin material are very flexible, therefore, when carrying out such an operation for the first time, it is better to lean the rail on 6 screws. Additional screws for stability can be screwed in at a distance of 50 cm.

After the mortar has hardened, the existing void must be filled under the guides. To achieve a rigid fixation, you need to "coat" the guides on the sides. After placing the two landmarks near the corners, you can begin securing the additional battens. The need for this may arise only due to the peculiarities of the length of the wall.

2 screws are screwed into the wall surface between the corner and the rail itself to fix the rope. In this case, the rope should be tightly pressed against the rail. After the performed operation, you can proceed to the installation of guides in any quantity without the use of a level and painstaking work. For fixing, you can use a mixture instead of a solution, which will be needed when plastering a room. You can apply a gypsum-containing mixture, this will speed up the work process, since gypsum is a quickly hardening material.

In this case, the thread can be pulled above the rack level. This option is timely when using rigid beacons, they do not bend at the moment of pressing. Accordingly, it is better to apply the plastering rule, which is applied to the lighthouse and is pressed with pressure along its entire length. In this case, you should pull the rope at a certain distance from the wooden slats, such a gap should be equal to the width of the rule itself.

Laser fixation
The use of a construction laser will help to significantly facilitate the workflow: for a start, they put a risk on the rule (drawing a line with an ordinary pencil is considered sufficient, it will perfectly "stick" to aluminum). The laser should be installed in such a way that it retreated from the reference point by the distance of the width of the previously outlined fragment.
Thus, when pressing in the guide, you need to try to align the line outlined on the fragment and the plane of the construction laser. Solving the issue in this way, you do not need to pull on extra ropes and screw in screws.

Plastering
Plastering under the rule will consist of several layers - spray, soil and cover. Spray - application of the first layer with a solution with a consistency resembling sour cream in order to get better adhesion to the plane of the walls.
When the first layer is almost completely dry, the main primer layer is applied. It is necessary to throw the solution onto the surface with a spatula or trowel. At the same time, you need to throw in the solution so that you get a coating with excess. It is better to throw the mortar in spans - in fragments on the walls between the landmarks. As a rule, you need to start plastering the walls between the lighthouses from the floor, starting from the very bottom.

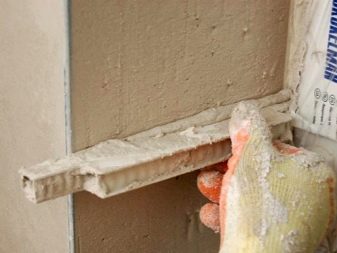
After the span is completely covered, the alignment begins. To do this, the rule is applied horizontally to the wall, for an emphasis on the edges there are beacons that limit the working area. In this case, the effort is directed from the bottom up.
If there are notches or dents on the plastered surface after smoothing, you need to throw in a little more mortar to go through the rule again. After that, a perfect smooth surface is obtained.

It is necessary to take into account the existing features in working with such an auxiliary tool:
- The butt-end of the rule for trimming the excess removes the remaining plaster, cleaning the surface. The tool should not be pressed with the wide side, so as not to bend the rule, the deformed structure can make the surface of the walls uneven. The resulting plane will resemble too noticeable vertical panels that will be visible under the wallpaper layer.
- When eliminating the surplus, you can work as a dry rule. At the end of the entire process, it will be more correct to wet the tool in order to obtain the greatest smoothness.
- The aluminum rule is very flexible, which is why it is so easy to deform or bend. When working with such an aluminum rule, it is not necessary to allow the solution to solidify on the very surface of the instrument. The rule should be flushed periodically.

The dried mixture must be cleaned; hard tools are used for cleaning, leaving many scratches on the aluminum surface. And a scratched surface starts to get dirty much faster. The last layer - the coating is applied to an almost dry primed surface.

Removing beacons
Most builders do not usually remove landmarks at all. All this does not in any way affect the issue of technical feasibility. Homemade orientation slats are not removed for several reasons:
- Plastering on the lighthouses is quick enough. In an effort to finish faster, workers simply ignore the need to remove the beacons.
- Removing the lighthouses is not difficult at all; it will be more difficult to replenish the remaining furrows. Not every lover will be able to level the walls and leave no traces.

Non-galvanized and cheap beacons must be removed. Over time, the lighthouses selected for work begin to rust inside the walls, and this leads to the appearance of brown spots on the surface.
It is necessary to remove the beacons when the plaster layer is almost completely dry. To remove the beacons, you need to find their upper part, pry off the profile with any convenient tool, use pliers to break out the profile, while tilting it down. The work should be carried out in separate fragments of 25 cm. It is better not to break the entire profile as a whole, so as not to get more destruction.

Lighthouses made of wood must be removed immediately and without fail. And here it's all about the difference in building materials. Plaster with wood react to existing environmental conditions in different ways, respectively, and they also "breathe" in different ways. The wooden beacon is mobile, so over time it will come off, and a crack will appear at the contact area. All this will affect the thermal characteristics of the entire structure and the aesthetics of its appearance.

For information on how to install beacons and use the plaster rule, see the next video.


The comment was sent successfully.