DIY porcelain stoneware laying

Porcelain stoneware is a material that has gained popularity all over the world. Initially it was used only for floor and wall cladding in public buildings and production halls. But with the development of technologies for its production and the emergence of ceramic granite tiles of various textures and colors, they began to be used for finishing residential buildings and apartments.

Types of tiles
The difference in production technology, as well as the use of special additives made it possible to create variety of porcelain stoneware, which is represented by the following types:
- Technical - the most budgetary and widespread tile option, has a high strength and strong surface. It is actively used for finishing flooring in industrial, public and sometimes residential premises.
- Matt is made without firing, which allows you to preserve a non-shiny noble surface. Looks very elegant and laconic, resistant to abrasion and moisture.
- Polished gets a spectacular appearance thanks to the removal of the top layer and subsequent sanding. It has a strong glossy shine and a very slippery surface that is resistant to dirt. Due to the risk of injury, it is almost never used as a floor covering. Such porcelain stoneware can often be seen on the walls of shopping centers, hotels and apartments.


- Lappated It is produced by treating the surface with abrasive compounds, as a result of which the surface acquires an inhomogeneous texture with matte and polished areas. It has increased strength, practically does not slip, so it can be used for any purpose.
- Satin obtained by treating the tiles before firing with special mineral salts. Has a pronounced noble shine, while absolutely non-slip.
- Glazed - porcelain stoneware with a pattern, which is applied before firing with a special glaze. This highly decorative coating is used both in public and residential premises for finishing floors, ceilings, stairs.
- Structural - relief tiles that can imitate various natural materials: stone, granite, wood, bamboo and mosaics. It is widely used in the interiors of apartments and cottages, executed in modern styles (hi-tech, minimalism, loft). Especially popular are stone and wood tiles.


Due to its strength, laconic appearance and resistance to pollution, porcelain stoneware is widely used in the decoration of industrial, residential and public premises. They are lined with walls, floors, stairs, pools and even the ceiling.
Due to the fact that the material is able to withstand up to 50 freeze / thaw cycles (by the way, no building material has such characteristics anymore) it can be safely used in the decoration of open terraces and unheated rooms in winter.
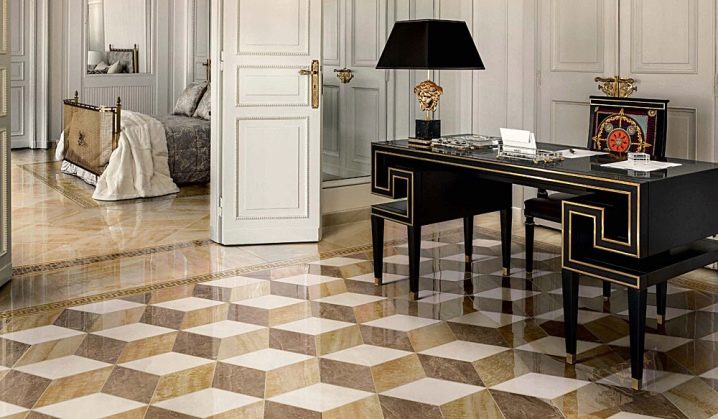
Due to the variety of sizes, textures and colors, porcelain stoneware can be laid in any arbitrary shape. You can lay out the tiles end-to-end, diagonally, herringbone, in the form of a mosaic, combining products of various sizes and patterns.You can also dilute large tiles of porcelain stoneware with special decorative inserts, which will give a more attractive appearance to both the floor and walls in the room.


In order to harmoniously lay the tiles, it is necessary to take into account several subtleties:
- It should be borne in mind that large and long porcelain stoneware visually reduces the room, while small, on the contrary, increases it. This is due to the peculiarities of perception, and this point must be taken into account when repairing.
- To visually expand the room, the tiles are laid in a pattern across, and to increase the length of the room - along.
- To combine two different zones in the apartment, a through drawing is used.
- Light tones of the tiles visually enlarge the room, while dark ones, on the contrary, reduce it.
- When laying diagonally, the edges of the tiles must be parallel to the diagonals of the room.
- In order to highlight a particular area, a combination of light and dark shades of tiles is sometimes used.
By following these guidelines, it is easy to create an original floor or wall design using porcelain stoneware without spoiling the aesthetics of the room.

Materials and tools
In order to proceed with the installation of porcelain stoneware tiles, you should prepare the necessary consumables and special devices.
You will need the following tools:
- metal ruler or construction tape;
- level (better laser);
- marker;
- rubber, plain and notched spatulas;
- construction mixer;
- container for mixing dry mixtures;
- tile cutter (you can use a grinder with a special circle for tiles).


Since porcelain stoneware is an expensive material that is durable, you should not save on tools. If you plan to lay tiles with your own hands, but there is no quality tool, then it is better to rent it instead of buying inexpensive equipment that can fail at any time.

For work, you will need the following materials:
- porcelain stoneware;
- water;
- crosses for laying tiles or clamps;
- adhesive for ceramic tiles;
- primer;
- water;
- silicone sealant;
- grout for joints of a suitable color;
- aluminum profile, angular.
The quality of the coating also depends on the correct choice of materials, as well as tools. Therefore, you should not purchase glue or grout that is not intended for working with this tile, otherwise you will not be able to achieve a high-quality result.


Preparation
Before proceeding with the installation of porcelain stoneware tiles, you should carefully prepare the surface on which the material will be laid. The state of the surface will determine how much work will need to be done.
It is not recommended to use plywood, polystyrene foam and drywall as a base for tiles, since these materials do not have sufficient strength and can easily deform under the weight of the topcoat.

Preparing the floor for laying porcelain stoneware implies the following:
- If the floor is rough, then you need to make a screed. To begin with, a waterproofing substrate is arranged, which will not allow moisture to get into the concrete and protect it from the formation of mold and mildew, and the room from dampness. For the screed, you can use both self-made sand concrete and industrial self-leveling mixtures. Before pouring, markings are applied to the floors and beacons are installed. You can start laying porcelain stoneware only after 28 days, this is how much concrete needs to completely solidify.
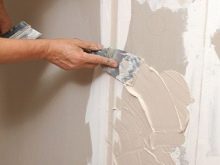
- If the floor does not need a screed, then its surface is carefully checked for cracks, roughness and unevenness. If they are found, it is imperative to carry out repairs, since the porcelain stoneware laid on an uneven floor can deform, crack and "move away" from the glue. For these purposes, putty, epoxy glue and specialized mixtures are used.
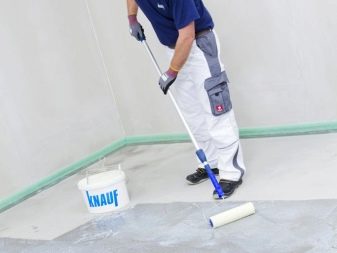
- After that, the surface is carefully primed.You can use universal primers or special ones designed to prepare the floor for porcelain stoneware.
- If it is planned to install heated floors made of porcelain stoneware, then the communications necessary for the "warm floor" system are laid.

The preparatory stage, carried out in accordance with all the rules, will allow further laying of porcelain stoneware without unforeseen difficulties.
You can also install porcelain stoneware on a wooden floor, provided that it is made of hardwood and is in perfect condition. In case of irregularities, it can be processed with a loop machine. Then it is treated with bitumen mastic in two layers. Waterproofing is placed on top and a reinforcing screed is applied. You can use penoplex as insulation.

To stick porcelain stoneware on the walls, the following set of works is carried out:
- Dismantle the old wall covering. If the tiles were glued, carefully remove the old glue from the surface. If the walls of a private house are whitewashed or covered with paint, it should also be removed.
- Surface repair with putty or special mixtures. It is necessary to smooth out all irregularities, cover up cracks and pits. With a strong curvature of the walls, drywall can be used.
- The surface of the walls is carefully primed. This is necessary to increase the adhesion of the glue to the wall and reduce the consumption of materials, as the surface becomes denser and more filled.
After the primed wall is dry (the time is indicated on the packaging of the primer and depends on its type), you can start laying porcelain stoneware.


If you plan to finish with tiles on the stairs, then you need to do:
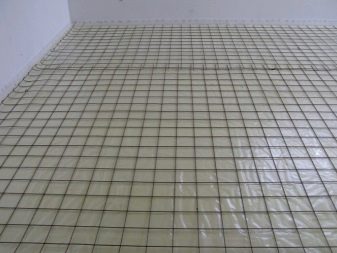
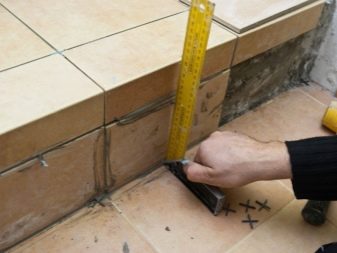
- The slope of each step is 2-30 mm. For this, a metal mesh is placed on each step, which is fixed with wire or dowels. Beacons are formed from concrete or tile adhesive. At this stage, a building level is required to form the desired slope.
- The screed of steps is carried out in the direction from the entrance.
- After the screed has dried, the steps are primed.
After the soil has dried, you can start decorating the stairs with porcelain stoneware tiles.

How to calculate the expense?
Porcelain stoneware is an expensive material, so it is important to decide on the number of tiles that you need for installation.
The calculation method depends on the chosen method of installing the tiles, however, it has general stages:
- Measurement of parameters of floors, steps or walls. Next, the area of the working surface is calculated. When calculating for walls from the resulting area, it is necessary to subtract the dimensions of doorways and windows.
- Then the area of each piece of porcelain stoneware is calculated. For a 30x30 tile, the area of an element will be 0.09 m2, and for a 15x50 tile - 0.075 m2.
- Next, we calculate the number of tiles:
- when laying in the traditional way, the area of the room is divided by the area of one element. 5-6 tiles are added to the resulting value in case of chips or cracks;
- when laying diagonally, the number of elements is calculated in the same way as with the traditional method, but the resulting value is multiplied by 13-15%. The result will be the required number of tiles with a small margin;
- when laying out patterns, the required number of tiles is determined in the traditional way (with a small margin) and is adjusted in accordance with the layout of porcelain stoneware. If one type of tile is used, then there is no need to buy too many additional elements, as trims can be used.

It is also necessary to calculate the amount of glue that will allow you to make high-quality masonry.
The amount of glue required for installing porcelain stoneware depends on:
- the size of the elements;
- evenness of the surface (the smoother, the less glue is required);
- the thickness of the adhesive mass.
Usually, the manufacturer places recommendations for calculating the required amount of glue on the packaging, therefore it is this information that should be guided by.
This indicator may differ for different brands.


Do not lay porcelain stoneware on concrete or glue intended for other coatings.
The fact is that this tile has a zero water absorption coefficient, which means that an ideal solution that ensures reliable adhesion of elements to the floor surface will be an adhesive containing the maximum amount of polymers.

Installation technology
The device of porcelain stoneware surfaces requires adherence to a special technology and the availability of special tools, as well as certain skills. However, if you have experience in carrying out construction work, you can cope with laying the tiles yourself.
Before installation, the porcelain stoneware is sawn as necessary, based on the pattern and installation method. In this case, you can use a grinder. However, it loses in many respects to the tile cutter. Firstly, the cuts are slightly chipped, especially when cutting thin and large-format material, which means that they require subsequent grinding.
Secondly, working with a grinder is dusty, and there is also a danger of fire. Therefore, it is better to give preference to a professional tool.
If it is necessary to make holes in the tile, then a drill with a stone cutter is used.

During production, a special protective composition of paraffin or wax is applied to porcelain stoneware tiles, which prevents the formation of scratches and chips during transportation. This layer must be removed immediately before installing and cutting the tiles.

On the floor
To lay porcelain stoneware as a floor covering, carry out the following work:
- Mark the middle of the room. When laying at an angle of 45 degrees, you can designate marks along the diagonal of the room and navigate in their work.
- The layout starts from the middle, gradually moving towards the edges of the room. This allows you to use trimmed elements around the edges of the room, near the walls, while creating a uniform canvas in the center.
- The well-mixed mortar is applied to the floor with a straight trowel and then leveled with a notched trowel, making sure that the thickness of the adhesive is uniform.

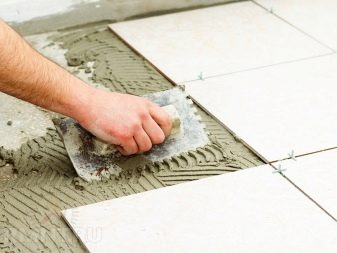
- The glue is applied to the porcelain stoneware slab and placed on the floor. To do this, the element is abutted with an edge to an already lying one and gently lowered down. It is important to ensure that the gap (unless a seamless installation is used) is not filled with adhesive. For these purposes, clamps or cross-fasteners are used, which provide the same width of the gap between the elements.
- The position of the floor tiles during installation is constantly checked using a building level. This allows you to create the coating correctly, which means that it does not deform or crack under load during operation.
- When tiles move from one room to another, the joint is made at the border of two rooms.
- Dry the glue after installation. This will take a day. The final composition of the glue hardens after 3 days.


You can lay out porcelain stoneware tiles in various ways., including "herringbone", deck method, offset, as well as an individual sketch. However, these technologies require certain skills in working with tiles and cannot always be performed with high quality on their own.
After the floor tiles have been installed and the glue has dried, grouting is carried out (except for the use of the seamless installation method).

We should also mention the SVP method - a tile leveling system. This system can be used to facilitate work.
It provides the following benefits:
- automatic alignment of two elements relative to each other;
- the tile "does not lead" when the glue shrinks after drying;
- the seams between the elements are more uniform than when using crosses;
- the speed and quality of laying increases.


Wedges and clamps are required to complete this method. The latter are installed along the edges of the tiles, and with the help of a wedge, the level of the tiles is adjusted relative to each other.After the glue dries, the wedges are removed, and the clamps are knocked off with a rubber mallet. At the same time, the lower part of the clamps remains hidden inside under the porcelain stoneware slab and does not in any way affect further operation.


On the wall
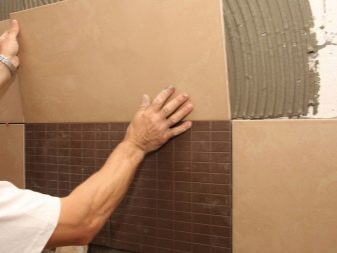
The technology for laying porcelain stoneware on the walls of a room is similar to installing a floor covering from this material. With one difference: the installation starts from the wall opposite the entrance and leads to the door. For the decoration of windows and doorways, trimmed elements of porcelain stoneware tiles are used.
Wall decor with porcelain stoneware can also be performed in various versions, you can combine elements of large, medium and small sizes, creating a unique design.
It will be easier to lay the tiles on the wall yourself, since physical contact with them before drying can easily be reduced to zero, which cannot be said about the flooring.

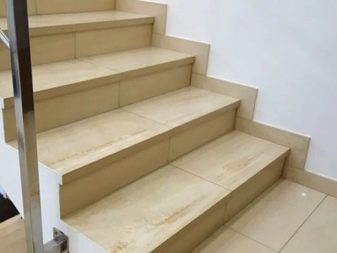
Staircase cladding
Do-it-yourself porcelain stoneware laying on the stairs is carried out in the following sequence:
- After measuring the steps and drawing up a tile layout, they begin to mark and cut porcelain stoneware.
- Apply glue for porcelain stoneware to a previously prepared (even) surface using a notched trowel.
- They apply glue to the porcelain stoneware itself and start making the steps of a concrete staircase. Crosses must be installed between the elements, and the correct installation is constantly checked with a level.
- After the glue has dried, the joints between the tiles are filled with grout.
By following these step-by-step instructions, you can easily transform the entrance to a private house or an indoor staircase.

Which grout to choose?
The quality of grout is also an important parameter, which will determine the service life and appearance of the floor or wall covering made of porcelain stoneware. In addition, the grout reliably protects the joints between tiles from debris, moisture and dust.
There are 2 types of grout for porcelain stoneware:
- cement-based;
- based on epoxy resins.

Cement grout is often supplemented with special latex-based additives that increase its strength. It is used for covering small joints in rooms with normal humidity levels.
Poorly withstands exposure to chemical and aggressive substances, can crumble and requires periodic renewal.
It does not have antibacterial properties, therefore, to protect against mold and mildew, it is necessary to carry out additional processing of the seams with special protective compounds.
Epoxy grout is more resistant to aggressive and mechanical stress than cement grout. Has a wide variety of colors and shades. It is not afraid of moisture and is resistant to the formation of mold and mildew. However, it is much more expensive than cement grout, but justifies its cost with a long service life and excellent appearance.

When choosing it, they are guided by the following rules:
- Room type and load. If the tiles are laid in damp rooms, then it is better to use the epoxy option. In other cases, cement grout can be dispensed with.
- Colour. The rich choice of colors allows not only to choose the color of the grout, but also to focus on the seams, using a contrasting shade to the porcelain stoneware.
It is better to trust time-tested manufacturers who have been on the building materials market for several years. Grouting brands Atlas, Isomat, Ceresit, Mapei are popular.

How to rub seams?
There are several ways to grout porcelain stoneware tiles.
To apply grout, perform the following steps:
- knead the solution and distribute with a rubber spatula into the seams, filling them;
- the excess is removed with pieces of clean cloth or napkin;
- using a special tool (or a piece of cable), seams are formed;
- the tile is wiped with a damp sponge;
- after drying, stains on the tiles and excess grout can be easily removed with water.


Epoxy grout is applied as follows:
- after mixing the solution, they immediately start filling the seams, since this composition dries very quickly;
- the excess is removed with a grater dipped in a washing solution, and then with a sponge and water;
- seams are formed with the help of a cable;
- when drying, stains can be removed from the tile only with the help of a special tool.
For epoxy grout, you do not need to use additional impregnations, since it has increased strength and is resistant to the influence of moisture and microorganisms.

How long does it dry?
In order for the grout to show all its properties, you must follow the recommendations:
- carry out light wet cleaning 24-48 hours after the end of the work;
- do not use tiles and do not apply maximum stress during the entire period of final hardening. For cement grouts it is 9-14 days, for epoxy grouts - 15-20 days.
Drying time depends on the brand and type of grout and the room temperature. In any case, you can safely walk on porcelain stoneware only after the grout has completely dried and hardened.

Beautiful examples in the interior
- Porcelain stoneware is used not only in private houses and cottages, but also in apartments. It looks laconic and practical in the hallway.
- In the toilet and bathroom, porcelain stoneware tiles are used not only for floor decoration, but also for walls.
- In the living room, its use is also appropriate.
- Modern technologies have made from porcelain stoneware, which was previously used only in the decoration of industrial premises, a wonderful highly decorative material that can decorate any room in an apartment or cottage. It does not require special care, is environmentally friendly and can last for decades if properly installed.


For information on how to properly lay kermogranite, see the video below.


The comment was sent successfully.