Silicone molds for stone: properties and subtleties of manufacturing
Silicone mold - a device used for casting products. Plaster rosettes, moldings, decorative interior inserts and materials imitating the texture of a wild stone can act as the final product out of the mold.
Appointment
The main purpose of a silicone mold is casting products, the surface of which repeats or imitates the plane of materials of natural origin. Wherein the mold can be used to prepare the base of products that are used to make new molds.
It is required for the preparation of semi-finished products. After removing them from it, they need specific revision: grinding, restoration of chips, cracks, shells and painting, if necessary.

Peculiarities
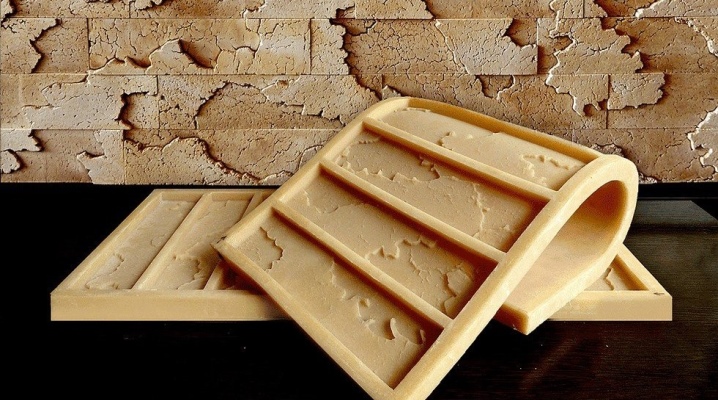
Silicone molds are the most common molds for casting blanks. Silicone has a wide range of characteristics for efficient manufacturing.
This material is soft, resilient and pliable. The smooth silicone surface does not stick to the product material. The workpiece, placed in the mold, is easy to remove without damage, which is an important factor in the manufacture of decor.

Casting products in silicone molds is carried out using a liquid solution. Its base consists of two components: gypsum (alabaster) and water. To improve the quality and appearance characteristics, the mixture is supplemented with various additives.

Their presence affects the parameters of the product's resistance to destructive loads and environmental influences.
Silicone molds are reusable - this helps to increase the efficiency of product manufacturing and reduce the cost of purchasing the materials needed to make the molds.

The silicone material is not affected by negative environmental factors. It does not rot, crack, or collapse under load. Certain types of this material are resistant to high temperatures, which makes it possible to increase the production output of molded products by placing them in a special dryer.

Manufacturing
Materials (edit)
In order to make a silicone mold with your own hands, you need to prepare the following set of materials:
- drywall sheet at least 50x50 cm in size;
- pieces of GKL sheet 10x40 cm;
- trimming the metal profile used for the installation of gypsum plasterboards;
- self-tapping screws with a wide thread pitch;
- masking tape;
- several tubes of suitable silicone;
- other related materials.


Assembling the base
A piece of drywall sheet serves as a basis. It must be placed on a flat table or workbench, the plane of which must be flat. This is necessary to exclude base deflections and cracking.
On the surface of the plasterboard base, you need to draw the inner contour of the future shape with a pencil (marker) and a ruler. Ee perimeter can be rectangular or square. It is important to take into account the angle between the sides of the figure in the drawing - it should be as close as possible to 90 degrees. This approach will make it possible to produce a high-quality mold with smooth walls.

Plasterboard pieces of 10x40 cm should be installed along the perimeter of a square or rectangle drawn on the surface of the base. If necessary, you can remove excess protruding parts of the line segments to get the correct shape.These segments will serve as the sides for the template.

The sides must be secured with pieces of metal profile. For this, the profile from the outside is applied to the abutment area of the bead, after which it is screwed to the base with self-tapping screws. The board is attached to it with screws screwed in from the inside of the template.

This action is performed in relation to all four sides.
To exclude the leakage of silicone in the gaps between the abutments of the sides and the base, gluing is performed on the inside with masking tape. It is advisable to achieve the absence of adhesive tape folds, as they can affect the appearance of the future form.

To prevent the silicone from sticking to the plasterboard base, you can put plastic wrap on the bottom of the template. Its size must match the area of the bottom of the template, otherwise the silicone will partially fall on the base and stick to it, making it difficult to remove the mold.

Fill
The next step is pouring in the silicone. To do this, it is necessary to prepare the surface of the natural stone, which will be imitated by the shape.
It must be free of dust and dirt. There should be no protruding parts on the surface, as well as moving elements that could come off during the pouring process.
The outlines of the stone must correspond to the parameters of the future artificial material, otherwise the workpiece that will be extracted from their shape will become unsuitable for further use during construction and finishing work.

The height of the stone specimen should not exceed the height of the sides of the template - the difference between these values should be at least 5 cm. This will allow to form the bottom of the future silicone mold, the thickness of which will be sufficient to hold the gypsum material.

The prepared stone is placed on the bottom of the template in the center.
It is important to maintain an equal distance from the sides to all the edges of the stone, then the shape will turn out to be symmetrical and even.
Silicone is applied to the sample as follows: using a small spatula, a palette knife or a plastic plasticine spatula, the silicone is applied to the surface of the stone. At the same time, attention is paid not to the thickness of the layer of the filling material, but to the degree of its penetration into the pores and natural depressions of the stone sample. Silicone is literally rubbed into the texture of the stone.

Thus, the entire surface of the stone is covered, which is laid in the center of the plasterboard template. After applying the primary coat, a second coat is applied. It is required to accurately fill larger irregularities in the sample surface.
After that the rest of the template space is filled with silicone... In the process, it is better to use a special silicone tube gun. The use of such a tool will speed up the process and improve the quality of silicone distribution. The upper part of the silicone mass is leveled with a spatula or plastic spatula.
Then you need to leave the mold to dry for the period indicated in the instructions on the silicone packaging.

To ensure reliable extraction, this period can be doubled, since the instructions are provided for thin layers of silicone application.
You can check the degree of drying of the material in the inner part of the mass using a long needle or knitting needle. To do this, you need to pierce the form with it before it buries itself into the surface of the base. After removing the needle or wire, check for signs of damp silicone. If they are not there, then this means that the form can be extracted from the template.

The extraction is done as follows: self-tapping screws holding parts of the supporting metal profile are unscrewed. The sides of the template are detached from the base and the silicone mold. The form itself, lying on the film bed, turns over. The film is neatly removed.
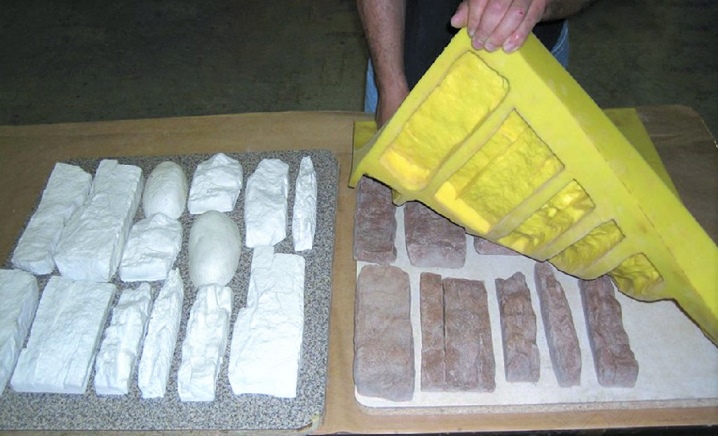
Then the most important manipulation is performed, on which the final quality of the silicone mold will depend - a sample stone is removed. For this, the silicone is gradually detached from the stone surface along the perimeter of the mold. The most difficult step is to separate the bottom of the sample from the bottom of the "bowl" of the mold.

After removing the workpiece from the silicone frame, the mold is cleaned of stone residues and other foreign inclusions. Air pockets formed during pouring can be filled with silicone so that they are not visible.
After several days of additional drying, the silicone mold for making the stone can be used in work.
For information on how to make a mold for casting a brick with your own hands, see the video below.


The comment was sent successfully.