How to sheathe the ceiling with OSB plates?
Excellent processing, environmental friendliness, the ability to cut with various tools - from a hand saw to a circular saw, high installation speed (screws can be screwed in even without preliminary drilling). All these are significant advantages of using oriented strand board in finishing works. But there are not only pros and cons, classes and characteristics that must be considered when choosing a field of application. The answer to the question of how and what is the best to sheathe the ceiling also includes preliminary preparation and final finishing.


Sheathing features
Construction specialists are sure that the idea of sheathing the ceiling with OSB plates is an excellent option for those who cannot afford stretch or plasterboard coatings. Despite some limitations, there is strong advice to use OSB coating only in residential premises and on lightly loaded ceilings. But the scope of application of chipboard boards is wide, they perform two important functions - decorative and protective. It all depends on whether the slabs will play the role of the main ceiling covering, or serve as a rough basis for further design. Possible applications:
- in the bath you can use OSB-4: it is not a cheap pleasure, but it has the moisture resistance necessary for the room;
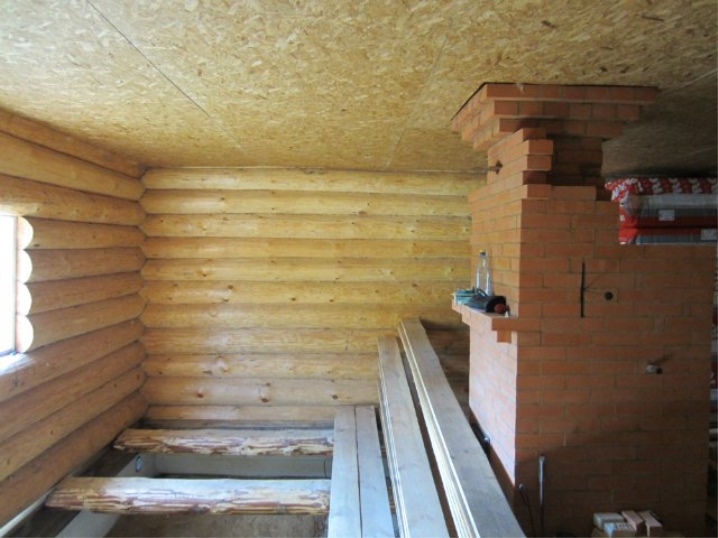
- in a wooden house OSB-2 and OSB-3 will be good durable, retaining texture and decorative enough;
- in the garage - OSP-3, with its increased resistance to mechanical stress and atmospheric conditions;
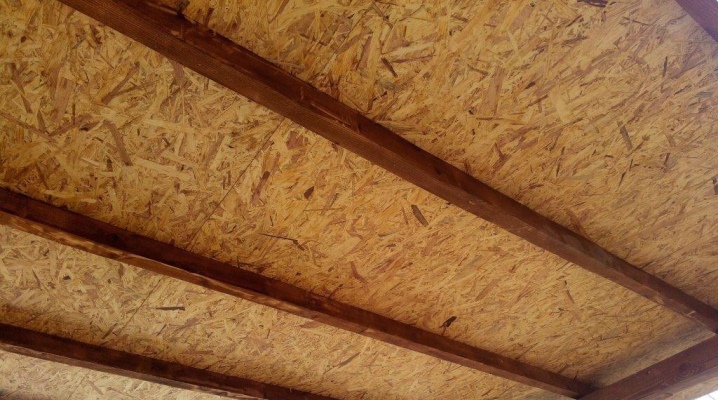
- on the ceiling in a private house or for the attic it is recommended to use OSB-2 and OSB-3 boardsthat increase the duration of operation and useful properties of the material;

- in the gazebo at the summer cottage, it is enough to use OSB-1, since this is a non-residential premises, often intended for decorative design.

The peculiarities of the cladding are determined not only and not so much by the number of layers of chip material in the board. These building materials are rarely in demand as the main decoration. They are more often used as a base for fine finishing.
Preliminary preparation and final decor are of great importance - coating with varnish or paint, decorative plaster, ceiling wallpaper, etc. As for the plating process itself, even an amateur who strictly adheres to the process technology, safety rules and the rules of finishing in different rooms designed for specific purposes can cope with them.

Material selection
OSB boards are a general collective term for demanded building materials with different thicknesses (from 8 to 26 mm). It is due to the number of layers with wood chips. The class of the material depends not only on the thickness of the sheet, but also on the resistance to moisture and mechanical stress.

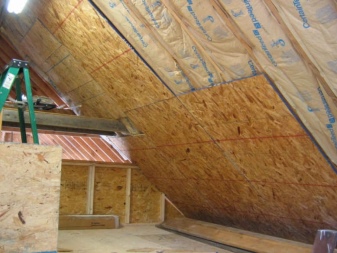
For attic ceilings, it is better not to chase thickness. Strength and elasticity allow the slab to bend at the desired angle so that heat and sound insulation will not suffer from this. Homogeneous structure, resistance to aggressive compounds, insects, fungi and mold guarantee long-term operation. Although the thickness of the product also matters.
- Some types of products can withstand a load of several hundred kilograms, and this allows them to be used for the assembly of critical structures.
- Resistance to insects, decay, fungi and mold is provided by a special impregnation, this point must also be taken into account.
- There are two types of mounting - frame and frameless. The last option is available only to professionals. Usually they make a crate from a wooden bar.
- If the work is carried out without an assistant, the sheet is cut into several fragments, the thick sheet is cut tightly.
- The thickness of the sheet is also important when buying fasteners, determining the length of the screws.
- Finally, the difficult choice between 4 types of OSB depends on how the sheet will be finished with varnish or wallpaper. They don't make the tiles much heavier. But ceramic tiles or wall panels will make the ceiling heavier, which can affect the reliability of the structure.


All the nuances can be consulted with specialists, a sales consultant or on the builders forum. It is imperative to decide on the presence of impregnation when buying. If it is not there, then at the preliminary stage you will have to do it yourself.

Preparation
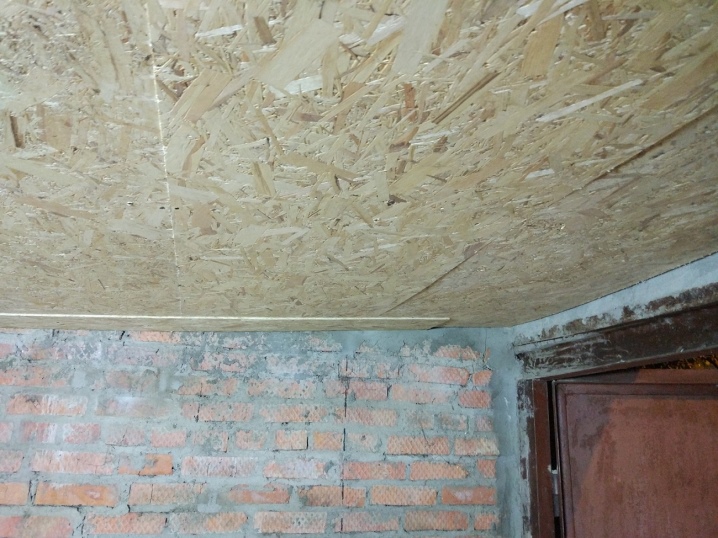
It is carried out in several stages. Includes optimization of the existing material and the structure of the frame (lathing). The stove, if necessary, is covered with an antiseptic, anti-fungal compounds and fire retardants. In some sources, you can find tips to sand and degrease the surface of the boards with additional moisture resistant protection. The ceiling is cleaned of dirt, then markings are made to place the lathing timber. The presence of communications and beams on the ceiling complicates the task: in the first case, the construction of separate structures is required, in the second, the frame is equipped at a single level. Then you need to cut the sheets according to the previously drawn up scheme for placing the frame racks. If the ceiling is located directly under the attic, you need to provide for steam and waterproofing, think over the insulation options well. The preliminary stage also includes:
- preparation of tools - a screwdriver, etc.;
- purchase of fasteners - self-tapping screws;
- purchase of improvised structures - stepladders or construction goats;
- impregnation of the frame beams with special compounds and their thorough drying after this process.


At the preliminary stage, the sequence of actions does not really matter. If there are two people working, they can work in parallel on different items on the list. However, already on the arrangement of the lathing, compliance with the algorithm becomes a prerequisite for the quality and strength of the ceiling sheathing.

Step-by-step instruction
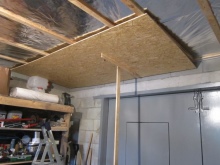
It must be compiled in order to correctly make a reliable and durable ceiling from OSB-plates. For one person, the work will seem inconvenient and difficult, so it is better to work with an assistant. But it is quite possible to do the work with your own hands, using cutting the sheet into segments. It is almost impossible to install a solid chipboard with a length of 2.5 m alone.
When installing OSB panels, you need to make a markup. The frequency of placement of jumpers is determined by the need to strengthen the structure, as well as the number of cut fragments. Their number is dictated by the complexity of the ceiling configuration.

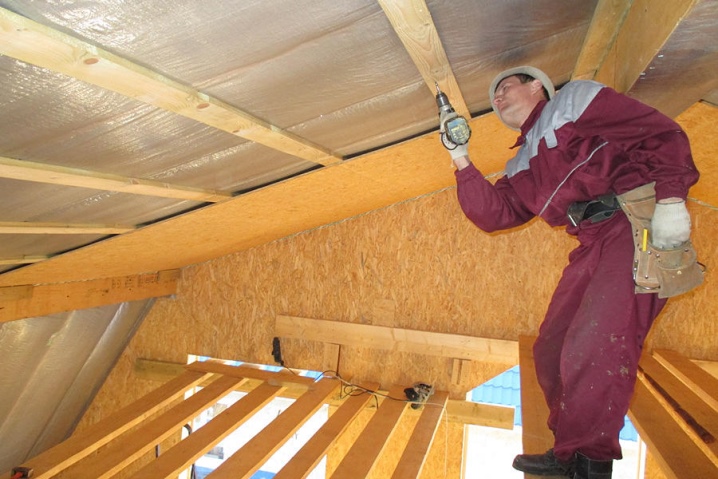
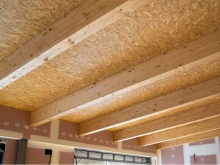
Assembling the frame
They begin to mount the crate from one of the walls. Then the cord is pulled, and the coordinates of the second similar part are set. Then the transverse posts are attached with metal anchors. The distance between them is determined by the thickness (and hence the weight of the OSB boards, as well as the finishing, if any). At this stage, all the necessary communications are laid, the future location of lighting devices is outlined.

Fastening plates
One of the advantages of particle boards is the ability to fix them to walls or ceilings without pre-drilling holes for self-tapping screws.However, experts are sure that an amateur can also hem the parts correctly, preventing distortions from occurring only if the holes are marked and drilled on the marks so that the self-tapping screws are inserted freely. Starting off the wall isn't the only technique. You can do it from the center, but this will require additional marking and pulling the installation cords, which will create unnecessary complications.

Each sheet or piece of cutting must be placed in a strictly defined place, with a gap from the wall of at least a centimeter. Correct filing is carried out by drowning the head of the self-tapping screw into the wooden surface. Installation will be of high quality only if the edge of each sheet or its cut fragment is securely fixed on the crate.

Finishing
Fine finishing, more precisely the variability of ways to give the ceiling from OSB-plates, functionality and decorativeness is one of the reasons for the demand for this building material. At the disposal of the builder or repairman - several excellent options to improve the surface of the slabs.
- Cover with varnish. But first, putty the irregularities, sand and saturate with a primer, and then cover with several layers of varnish. Such decoration allows you to preserve the spectacular natural texture of the tree, and additional external finishing is not required.
- Pasting wallpaper on the ceiling is a good way to close all joints, irregularities, fasteners. The use of fiberglass or multi-layer wallpaper eliminates possible complications. For roll wallpaper, you need to treat the base with putty, and cover the joints with a reinforcing mesh.
- For whitewashing or painting, you must first cover the ceiling with a primer (after degreasing the surface). The ceiling painted with acrylic paint is covered with pigment varnish.

There are other, but more expensive options for finishing slabs for a rough version of the ceiling. It is covered with a stretch ceiling, suspended structures, plasterboard sheets, ceiling tiles, decorative plaster, laminate or PVC.
If you sheathe the ceiling with laminated OSB sheets, you can do without decoration. When choosing a material, you need to remember that its thickness for subsequent finishing with decorative elements should not be less than 12-18 mm. There is no point in resorting to thicker plates - they weigh more and will complicate DIY installation.
For more information on how to sheathe the ceiling with OSB plates, see the next video.


The comment was sent successfully.