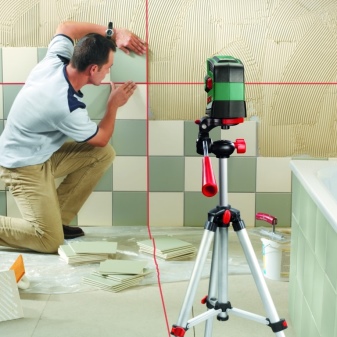
How to use the level correctly?

A level is a device used to make geodetic measurements. It is used in the construction of buildings, roads, technical structures and other facilities. Its main purpose is to measure the height difference between the areas / levels of the construction object. For example, it is used to measure the difference between the heights of the sides of foundations, reinforcing belts of buildings and other structural elements, the arrangement of which requires increased accuracy... Before use, preparation of the device is required - bringing its individual working units into working position.


Setting up the tripod
To get the best results when taking measurements with a level, it is necessary to learn how to use this device. Working with it begins with setting up a tripod. The main criteria that determine the norms for the working position of the tripod are:
- vertical level;
- horizontal level;
- stability.

The presence of a vertical level in the position of the tripod on the ground allows to reduce the error of the final measurement result. This error can be expressed as a violation of the horizontal level. Thus, the vertical level of the tripod affects the display of the horizontal level in the eyepiece of the level.
The horizontal level of the tripod is determined by the inclination of the upper landing pad. The presence of a deviation of its surface from the horizon line at an angle exceeding the permissible value may lead to a change in the vertical level displayed in the eyepiece of the device.

The stability of the tripod position is of paramount importance. Depending on the condition of the surface on which the tripod is located, measures must be taken to ensure its stability. As part of these measures, the soil or other surface is checked for looseness, holes, cracks or other imperfections. The stability of each tripod leg should be checked so that none of them fall into the ground, slide to the side, or otherwise change their position.
When determining the degree of stability, it is important to take into account additional loads: during the measurements, the level will rotate on the landing site. The efforts applied to rotate it should not move the tripod from its position.

Knowing how the tripod works will help you to set up the tripod correctly. It consists of the following elements:
- landing site;
- adjusting screws;
- support legs (3 pcs.);
- clamps;
- support tips.
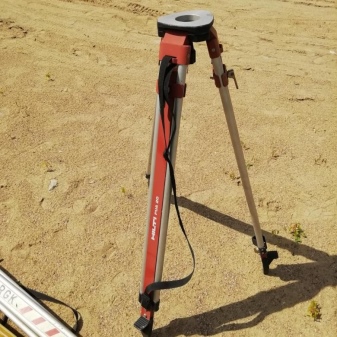

The landing pad is the plane at the top of the tripod. It is equipped with grooves with threaded connections, various clamps and adjustment screws. A rotary mechanism operates under it, which allows you to rotate the level without shifting the level of its position. This platform connects the tripod legs together.


The adjusting screws work in conjunction with the platform and other parts of the tripod. With their help, you can change the position of the landing plane in space. They allow you to achieve the correct level of its location - its parallelism to the horizon. Some of the adjustment screws are used to secure the position. They are used after completing the pad adjustment. Their presence allows you to limit its spontaneous movement and exclude deviation from the horizon.

The support legs of the tripod are the main structural elements of the tripod. They are fixed in one area - under the landing area, and diverge to the side with beams. Their outreach to the sides is limited by the fastening mechanism and straps connecting their middle parts. Each of the legs is telescopic. The extension and fixation of the position of the knees of the supports is carried out thanks to the clamps.


Clamps are simple mechanisms located at the articulation points of the knees of the legs. They work on a lever principle, which allows you to loosen or fix the clamp in one motion. This solution is optimal for this tripod assembly, as the screw clamps, which were used in earlier modifications, required more time and effort to use.
The telescopic legs and lever clamps on them allow to increase the efficiency of tripod installation, even on rough terrain. If necessary, one or more supports can be extended only partly, and the remaining ones can be extended to their full length.


Tripod support tips are pointed metal ends with a small “hilt” that prevents the tip from penetrating deep into the soil. The presence of these end caps increases the static structure. On a smooth surface, the pointed ends prevent the support feet from sliding, which prevents the level from shifting.
On soft and free-flowing surfaces, the tips sink into the soil, but the limiter prevents this sinking by controlling its depth. This avoids accidental subsidence of one or more supports at the same time. Often the tips are equipped with "paws", which serve to press on them with the sole of the foot. Thus, the tips are pressed into the soil by the operator of the device to the desired depth.


Level setting
The level is an optical device. For its correct operation, its position in space is important. To adjust it, special mechanisms are provided. In construction, the most commonly used levels are with built-in bubble levels, the adjustment with orientation to which allows you to achieve the correct location.
For the most effective adjustment, the level is equipped with three screws that change the position of the device along three axes: X, Y and Z. By turning these screws one by one, the correct position can be achieved. When carrying out adjustment manipulations, it is important to pay attention to the position of air bubbles in flasks with liquid. For best results, they should be positioned between the boundary lines.
A circular bubble level is located at the top of the instrument. Two circles are marked on its flask: a large and a small one. After leveling the level, the bubble should be located strictly in the center of the small circle. This procedure is the most difficult step in setting up the level. To facilitate its implementation, you need to set the tripod to the maximum "level", since the margin of free adjustment of the device using three screws is limited. The next step in setting up the level is to adjust its optical lens.


Focusing
Conducting focus manipulations provided by the presence of several adjusting elements on the device:
- eyepiece rings;
- focusing screw;
- guide screw.
The eyepiece ring is used to focus the eye on the reticle. The reticle is the markings that the eye sees through the eyepiece of the level. It consists of a vertical line and several horizontal ones. Measurements are taken along the longest horizontal line. Its intersection with the vertical bar is the starting point for measurements, which makes it possible to avoid setting the horizon when carrying out calculations of average significance.


The focusing screw is a focus regulator, with the help of it the focus is adjusted on the object of measurement itself. Any level is used in conjunction with a measuring rod, which makes it this object. After a clear display of the reticle appears in the eyepiece tube, turn the focusing screw until the staff image behind the reticle becomes clear. When you rotate the focus adjuster, the lens moves inside the eyepiece tube, which helps to zoom in or out of the image. Focus correction must be performed before each data acquisition.


The aiming screw rotates the level around its axis, allowing the lens to be moved to the desired position. In this position, the vertical scribe line should be centered on the measuring rod.
To improve the accuracy of the results, you need to know how to correctly take the readings of the device, what they mean and how to correct the result based on them.

Measuring and holding values
Measuring through the level is done by selecting a reference point and then adjusting the position values of other points based on the origin data. Example: The measuring rod is positioned at the highest point of the plane to be measured. Then the level is aimed at the staff scale.
For the convenience of taking readings, the staff moves up or down so that the crosshairs of the lines in the lens stand at an integer number indicated on the staff scale. This value is fixed. After that, the staff is transferred to another measuring point. In the new position, you need to find the fixed value on the scale - it should also coincide with the crosshair of the lens. After combining these indicators, the bottom edge of the staff will become the point at which the mark will be set.

In most cases, such marks are put on benchmarks - special structures between which construction cords are pulled (used, for example, when pouring foundations or laying brick walls). Depending on the alignment indicators of the level crosshair and the staff scale value, it may be necessary to move the benchmark or shift it along the vertical axis. Ultimately, all key points are marked on the lower edge of the staff and coincide with the first reference point in terms of level indicators.

The level allows you to set measuring points on the same level over large areas, which is impossible to do with the use of any other measuring devices. The distance that can limit the action of the device is determined by its technical capabilities and the characteristics of the lens. Besides, incorrectly selected tripod height can disrupt the measurement process... If the permissible position height is exceeded and measurements are to be taken at a low point, the length of the measuring rod may not be sufficient. This will lead to the absence of a ruler in the lens of the level - it will be impossible to take measurements.
If you follow the basic rules of using the level, you can achieve positive results in taking measurements. This will affect the final quality of the work performed.

In doing so, it is necessary to avoid common mistakes that can reduce the efficiency of the device.
Possible mistakes
The most common mistake when using a level is incorrect installation. Neglect of even small deviations from the level can lead to significant errors in the further production of work. The greater the measurement distance, the greater the deviation from the exact value.
Another mistake is the wrong choice of numbers on the staff scale. Only whole numbers are selected, no fractions. This error complicates the subsequent comparison of the selected number with subsequent readings. Fractional values are more difficult to compare with each other.
The lack of constant additional adjustment can lead to a gradual increase in the error, which will be invisible at the initial stages. In the future, this will negatively affect the quality of the work carried out, which, as a result, may threaten the safety during the operation of the facility.

See the video below for tips on how to properly operate the level.


The comment was sent successfully.