Ceresit tile grout: types and features of application
Ceresit products are in great demand in different countries of the world, and Russia is no exception. First-class products can be easily found in any hardware or hardware store, and the name Ceresit is already a guarantee that any product created in the company's workshops is of high quality, reliable and durable.


The brand gained fame and popularity thanks to a responsible approach to its work. It is not surprising that quality products have covered a large volume of the building materials market. Among other things, there is a Ceresit tile grout, the types and features of its application indicate that there is no better product for hiding tile joints.


Advantages and disadvantages
The fact that absolutely all products of TM Ceresit have excellent characteristics will be told by any professional builder and every layman who has dealt with repairs at least once in his life. The grout for tiles of this brand also has positive reviews.
The list of positive qualities includes:
- Wide range of. The company made it possible for each client to choose exactly the type of grout that is necessary for a specific case. On the counters, there are grouting for ceramic tiles, artificial stone, mosaics and other decorative lining coatings.
- Species variety of grout. It is necessary to choose Ceresit cladding not only based on the material of its production, but also taking into account the peculiarities of the application. For example, Ceresit produces a moisture-resistant grout for rooms with high levels of humidity (swimming pools, industrial premises, and so on). Also in the assortment of the company there are grouts created specifically for use in conditions of low or, conversely, high temperatures.
- Rich colors. It does not matter what kind of tile the surface was laid out with: plain, multi-colored, with or without a pattern. For each type of decorative coating, you can choose the ideal grout in color, the palette allows you to do this without much difficulty.


- Excellent wear resistance.
- Immunity to fungal infections.
- Excellent water repellency.
- The grout dries quickly, and after hardening it is easy to clean, dirt and all kinds of dirt do not stick to the glossy surface.
- For a long time it retains its original color and does not lend itself to deformation.
- It can be used for both outdoor and indoor work.


Ceresit grout has a large list of advantages, but this product also has disadvantages:
- After complete drying, the color of the cladding may change, and it does not always correspond to the color indicated on the package. For this reason, experts advise buying grout in a store, where you can always test any sample you like.
- Some types of grout are sold in paper bags. This is not always good, especially if the conditions for storage and transportation of the bulk product specified by the manufacturer have not been observed. Some buyers note that after opening, stones were found in the bags with lining, which indicates that the grout was in a waterlogged room and, having collected moisture, turned to stone.


Varieties
The modern building materials market knows the following types of grout from the Ceresit brand:
- CE 33 Super. Designed for the design of tile openings no more than 5 mm wide. Can be applied to external walls.Ideal for finishing toilet and kitchen, it is resistant to low temperatures, has excellent antibacterial and antifungal properties.
- CE 35 Super. It is used for sealing joints between tiles, with a thickness of 4 mm to 15 mm. It is water-repellent and does not react to sunlight and precipitation. Can be used in swimming pools. This type of grout must be chosen if you have to work with surface cladding with decorative stone, marble and other similar materials.


- CE 43 Super Strong. Material for tile joints (4-20 mm) of increased strength. It can be used in all weather conditions, since the grout is water-resistant and hydrophobic, it is resistant to temperature changes and exposure to sunlight. Suitable for all lining materials, with the exception of marble and glazed tiles.
- CE 40 Aquastatic. Designed for the restoration of joints between tiles up to 10 mm thick. It is immune to temperature fluctuations, easily tolerates both high and low temperatures. Due to these technical characteristics, it can be used in rooms with warm floors or outdoors. Easy to clean due to dirt and water repellency.


- CS 25. Silicone-based product for sealing joints between tiles with a width of 5 to 30 mm. Ideal for use in the bathroom and kitchen area. Has excellent anti-fungal properties.
- CE 79 UltraPox. Epoxy grout can be used to close joints of any width. Characterized by increased abrasion resistance, it is used for cladding internal and external surfaces. Withstands exposure to chemicals found in cleaning products.


Application
Each package of Ceresit grout contains a detailed description of what the product is made of, how to use it, so it is not difficult to work with such material.
As a rule, the instruction dictates the following steps for use:
- Grouting can only be carried out after the tile adhesive has hardened. If laying was carried out on a cement-sand mixture, then this time should be at least one week.
- There should be no glue, dust or grease residues on the edges of the tiles. For better grip, you can walk over them with a damp cloth.
- If an old lining is filled in, all the contents of the joints must be removed. The grooves should be equal in depth and width.
- Beforehand, you can test whether the grout pigments will color the tile surface (this sometimes happens).


The mixture is prepared as follows:
- In order for the dry mixture to mix well, pour water at room temperature into it. The amount of liquid is taken strictly according to the instructions, otherwise the technical characteristics of the grout will deteriorate. The end result should not be a liquid consistency, but a solution, like thick sour cream, without lumps.
- If a small amount of the mixture is needed, it can be made manually, but if large volumes are required, it is more convenient to stir all the original components with a drill with a nozzle or a construction mixer.
- After that, you need to wait 5 minutes, let the mixture "rest" and stir it again. The manufacturer gives 60 minutes of time to use the resulting composition, after which the grout will begin to harden and become lumps.


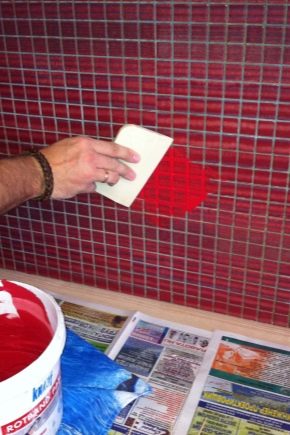
Grouting
A rubber trowel is best for working with joint mortar. With such a convenient device, grout is applied to the tile in a crosswise motion. If a surplus develops, it should be collected and reused elsewhere. For the mixture to set well, you need to leave it "alone" for 10 minutes. Next, wipe the surface of the tile with a damp sponge. Do not wet the rags too much, otherwise the seams may turn out to be heterogeneous. For example, a white mixture will turn gray in places, and a dark brown one, on the contrary, will brighten.After the mixture has completely hardened (about one day), wipe the tiles again with a rag. The optimum temperature at which it is recommended to perform troweling is from +5 to + 30C, with the exception of silicone grout, it can be applied at a temperature of +40.


Working with silicone grout includes the following steps:
- All surfaces adjacent to the seam must be covered with masking tape.
- Insert a polymer rope into the grooves of the seams.
- The cone on a can with elastic lining must be cut in such a way that its diameter coincides with the width of the seam.
- Then you need to evenly fill all the seams.
- After 10-15 minutes, you need to moisten the sealant with soap and water and smooth it with a wet spatula, removing all excess. After these manipulations, you can remove the masking tape.
- The thickness of the grout should be half the width of the tile groove.
- To remove fresh silicone grout, you need to use alcohol or acetone, and if it has hardened, only a mechanical method will help.


Epoxy lining
Epoxy grout consists of two components in one package. To prepare the mixture, you need to pour the hardener into the epoxy resin and mix everything thoroughly with a mixer. The mixture can be used for 90 minutes. When filling the seams, there should be no gaps, the grooves must be completely filled with the prepared mixture. A special epoxy trowel is suitable for these purposes. With this tool, you can also remove unnecessary blotches. You can also use an assembly gun. In this case, the mixture is applied in the same way as the silicone grout.


Applying a hydrophobic antifungal grout
A special compound for facing joints is applied as follows:
- At the first stage of work, the seams are cleaned of all contaminants; in difficult cases, the use of a fungicidal preparation is allowed.
- The grout mixture should be evenly distributed in the grooves.
- The adjacent surfaces are pre-covered with masking tape.
- The impregnated canister must be shaken well and filled into the joints with a special brush.
- After that, it is necessary to pause for 5 to 15 minutes and remove all excess impregnation with a damp sponge.
- To remove fresh dirt, it is enough to wipe them with plain water; only a solvent can remove dried ones.


How to apply grout, see the next video.


The comment was sent successfully.