How to make the tiles washed down at 45 degrees?
Modern design projects require a variety of skills from the craftsmen, including the processing of tiles. To work with tiles, very often you have to make them washed down at 45 degrees. Thanks to this technique, it is possible to revet various protrusions and niches, corners between the wall and the floor with such material. Also, an angle trim is needed when you want to create unusual masonry. Let's take a closer look at how this is done correctly, as well as with the help of which tools all the work is performed.


When is tile cutting needed?
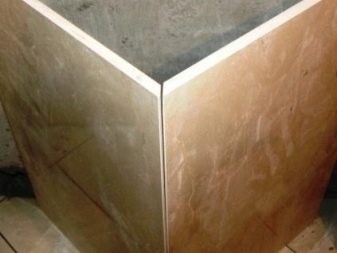
This method of processing tiles has to be resorted to in various cases when it is necessary to create a beautiful right angle. For example, when it is planned to lay tiles both on the wall and on the floor, when it is necessary to revet an existing ventilation duct or recess for pipes on the ceiling. In modern apartments, you can find various design features, which means that the variations in the use of tiles are significantly expanding.
Using this sharpening method, the inter-tile seam looks neater, and the edges of the tiles at the junction are more hermetically closed with grout, which reliably protects them from moisture or accidental impacts.
Cutting tiles at a 45 degree angle is done in case you want to put the finish in an unusual way, for example, diagonally. For this, you can use both square and rectangular tiles. The latter will allow you to create unusual ornaments (and even the effect of a "parquet herringbone").

Grinder for gash
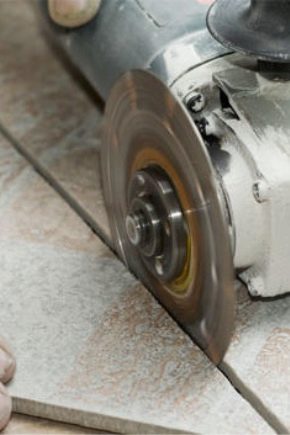
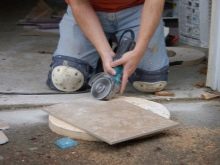
An ordinary grinder is in the arsenal not only of professional finishers, but also of amateurs. It must be equipped with a diamond disc. Place the tile face down under the rib. The speed of the tool should be regulated, then it will be easier to achieve the desired angle. At the same time, first you need to set a minimum indicator so as not to melt the edges. When the desired corner has been ground, go over it with the diamond disc again to grind it. You can use a file or sandpaper for grinding.
There are also special attachments for grinding. They are easy to replace - the base with Velcro is installed on the thread of the grinder. They are not as durable as diamond turtles, but they are also cheaper. For those who are not involved in repairs on an industrial scale, this may be quite enough.
Many people prefer to use a mask or respirator when working with a grinder. This tool generates too much dust, which is not recommended to breathe.


How to use a grinder?
Let's take a closer look at how to use a grinder when working with tiles:
- The tile should fit vertically in a vice. Put on the diamond blade, and then select the operating mode 1000-2000 rpm.
- Remove the corner with the notched portion of the disc.
- The tool should be positioned at an angle of 45 degrees (relative to the frontal plane of the tile).
- Remove the excess with smooth touches so that each time it leaves the surface in the thinnest layer, not reaching the edge of the outer side of the corner.
- The edge (approx. 2 mm) must remain intact. You can mark this distance with a pencil.
At the second stage, a support plate is installed on the grinder. The sandpaper circle is placed in the center of the support plate. Now you can finish the edge, and then create the sharpest corner possible.


Electric tile cutter for sawing
As the name suggests, the tile cutter is a more highly specialized tool, which means that you can do better cutting of tiles with it. Of course, not everyone will buy it for one-time use. If we are talking about a high-quality model with additional functions, then this tool will be quite expensive. In addition, you can achieve really good results with experience, so you have to spend some time acquiring the necessary skills.
If we are talking about professional finishers, then they should have an electric tile cutter in their arsenal. Cutting tiles with it takes less time, and such a machine leaves less dust.
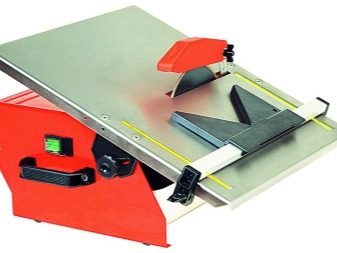

The tile cutter works in two modes:
- for a straight drink;
- for washed down at the desired angle.
It can be used to cut strips thinner than 5 mm, even from hard tiles. To avoid melting, water flows to the cutting site. It also removes dust and debris immediately.

Using a tile cutter
To learn how to work correctly with this tool, you need to follow a certain order of actions:
- Masking tape is glued to the tile in place of the saw cut.
- Mark the desired trim width on the tile using a pencil and ruler.
- Place it on the instrument platform.
- Press down on the tile and gently slide it over the disc. First you need to cut off the excess, and then grind the corner.
- Be careful not to touch the glaze or the edges will look uneven. If, nevertheless, the surface decorative layer of the tile was touched, then with sufficient skills it can be sanded with emery.


How to achieve a perfectly right angle at the junction?
If you want to create a smooth joint, you will have to work as carefully as possible:
- To begin with, the first tile is attached using a building level. Its edge should slightly extend beyond the plane of the corner of the base.
- After that, the second side of the corner is aligned. Each tile adhesive has its own hardening time, so much you are given to trim the resulting corner.
- Following the same principle, subsequent tiles are glued. The main thing is that the vertical of the walls is initially maintained, otherwise it will be almost impossible to hide the defect from unsuccessful joints.
Keep in mind that at the joints after the cut, the tile becomes more fragile. For this reason, this installation is usually not used on surfaces subject to high impact loads. It is especially rarely used when facing steps. So, when decorating street stairs, builders most often use metal corners, and sometimes they overlap tiles so that the upper module protrudes slightly above the side one.


Another way to create a bevelled edge:
If you want to trim a piece of pottery with your own hands in a simpler way, then there is another option. To do this, use a glass cutter to draw a line on the decorative side of the tile. After that, turn it over with the wrong side towards you, and then make a V-cut with a grinder for the entire width of the tile. Now you can break off the excess, and also make the finishing with sandpaper.
It is recommended to use # 40 or # 60 sanding paper for a rougher trim, or # 80 for finishing the edges.


Tips from experts
For working with porcelain stoneware, it is preferable to use a professional electric tile cutter, as it is adapted to work with harder materials. And this material itself is more expensive, so I want to minimize its losses during processing.
When cutting down, the angle can be made not 45 degrees, but sharper. This will make gluing the tiles at right angles a little easier.
When working with bevels in corners, a good grout is very important., since you can even hook on the tile with a gash with a belt from your clothes. This can lead to chipping off of its fragment. If a chip does occur, but at the moment you are not going to replace this tile, grouting will help to hide the defect.They are available in different colors, so choosing the right option for the color of the ceramics is not difficult. There is also another option: use any existing grout and tint it on top with paint of the desired shade.

When, after laying the tiles, small imperfections are visible at the seams, for example, from unsuccessful grinding of the glaze, then you can use masking compounds that hide the imperfections. These corrective agents are easy to use - there is usually a small brush in the cap. The main thing is to carefully study the instructions. Note that we are talking about very minor flaws, and not about chipped pieces of ceramics. The correcting agent will become an indispensable assistant if you need to "discolor" a small crack on a tile, and on any ceramic product.
The use of technology washed down tiles at 45 degrees allows you to make a good repair - this option looks more expensive and generally more advantageous than plastic corners at the joints.


With enough experience with finishing materials, you can do everything yourself. If you do not have the necessary qualifications, and finances allow you to hire experienced workers, then it is better to trust the professionals - then there will be no doubt about the quality of the work.
See below how to make tiles at an angle of 45 degrees.


If washed down at 45 degrees is so in demand, then why does the manufacturer not do it at the factory? Maybe, nevertheless, not to invent, but to put plastic or metal corners, since the choice is huge?
The comment was sent successfully.