Laying tiles: the subtleties of the process

Tiles are the most practical option for decorating floors in "wet" areas: bathroom, toilet, corridor and other places with high levels of humidity. If the coating is made of high-quality ceramics, it is easily cleaned of dirt and lasts a long time without losing its original appearance. Many people strive to do the facing work with their own hands: it will be much cheaper than inviting a master. If a person plans to do this for the first time, he needs to familiarize himself in more detail with such an issue as laying tiles. Knowledge of the intricacies of the process is very important in order to approach the issue competently and make the right choice of tiles, correctly calculating the amount of materials.

Peculiarities
Tile as a finishing material has its own characteristics and advantages, which you should familiarize yourself with before buying in order to be sure of the right choice of a decent and durable option for floor or wall cladding.

First of all, it is a high-strength material that, when tested for tensile strength, gives a compression rate of up to 300 MPa. The tile can withstand heavy loads, is not subject to deformation and does not bend under the weight of the human body or heavy objects. It is not susceptible to fires, and if it heats up, then the release of harmful substances does not occur, because it is based on natural components. It was the fire resistance of ceramics that became the reason for beautifully and tastefully revealing stoves, fireplaces and places near electric and gas stoves with it.
Also, ceramics have excellent heat-conducting characteristics and quickly become warm: this property is no less important when facing a stove or an operating fireplace.


If you lay such material on the floor, it should be borne in mind that without additional heating the floor will always be cold, so you should either walk on it in shoes, or provide additional heating, for example, bring the "warm floors" system. The tile is resistant to fading, its color characteristics do not change over time, unlike other coatings. It does not conduct current and is not an electrostatic accumulator. It does not accumulate harmful microorganisms. It is the best material for finishing swimming pools, saunas, operating rooms in hospitals.


Unlike laminate and parquet, ceramics have an enviable resistance to chemicals, except for the hydrogen-fluoride compound. The resistance of tiles to household chemicals is divided into five levels: AA, A, B, C, D. For example, the double letter A means that the material is not affected by most of the chemical compounds, single A means high resistance to them, and so on.
The wear resistance of the tiles is the leading factor: it is he who determines the service life of any coating. According to the European standardization system, there are five levels that determine the class of wear resistance. It is measured in groups - from the first to the fifth, and should always be indicated on the package.


Testing ceramic tiles for wear resistance is carried out in a very interesting way: the material is placed in a device that looks like a millstone, and coarse-grained chips are poured onto its surface.Water is supplied, the millstones begin to rotate, thereby abrading the tiles, creating an imitation of the natural conditions of its use. Depending on how many rotations of the millstones the material will withstand without the formation of visual defects on it, one or another class of resistance to wear is assigned to it. Based on this indicator, in the future, the tiles are sorted according to the type of their use in rooms with different requirements for finishing.


In addition to resistance to wear, there are a number of parameters that must also be taken into account when choosing tiles for different rooms. For example, the ability of a ceramic coating to absorb moisture (or moisture absorption). You can measure the level of moisture absorption as a percentage of the mass of the material.
According to international standardization, on the packaging of the goods there is an indication of a certain letter in combination with the designation of the method of forming ceramic tiles.


Its resistance to cold (or frost resistance) directly depends on the ability of a material to absorb moisture. If the tile is weakly porous, it will almost not allow moisture to pass through, therefore, it has high frost resistance. The first and second groups are frost-resistant, while the third is not. The third group is intended for use in warm rooms only.


The specificity of the production of tile materials is such that the concepts of caliber and tone should also be taken into account so that there are no misunderstandings. Hue means the same thing as "color", but unlike other types of materials, where the color is usually monochrome and has no discrepancies, it is not easy to achieve the same color in the production of ceramics. There is always a slight difference in shade, therefore, during the sorting process, the tiles are distributed by shade, which is marked with the corresponding letter: A, B, and so on.


Caliber is the size of the ceramic tile, indicated in millimeters. As in the case of tone, the size cannot be completely accurate - there are usually minor deviations, so there is a concept of nominal size and actual size. For example, the nominal batch size is 20x20 mm, and the actual size is designated by the English letter W and is indicated by three digits without a comma: W 198x198 (19.8 mm), and in general - caliber 01.

In addition, there is such an indicator as slip and cracking resistance. If a small "cobweb" is visually found on the surface of the tile, this is a marriage. Based on the number of rejects in a particular batch, such an indicator is formed as the type of tile: the first (marked in red), the second (blue) and the third (green). The safety of the coating depends on how great its slip resistance is. The higher the coefficient of friction, the safer the surface. Most often, it is measured using the German method - based on the angle of inclination of the floor, at which the object begins to slide on the ceramic surface.


Of course, it would be incorrect to talk about which tile is “ideal” or “universal”. Speaking about the features of ceramics, the first thing to do is to pay attention to its functionality, technical differences in the use of different types of ceramics, as well as whether it is suitable for the room in which the facing work is supposed to be carried out.

Views
Many people ask how ceramic tiles and tiles differ from each other. Buyers who first come across these two names often think at first that they are two different materials, but this is not the case. There is no difference between ceramic and tile.
Tile is one of the names of tiles made from ceramics, a type of wall cladding.


Tile, cotto, clinker - all these definitions are clarifying for one large segment of ceramic tiles, which may differ from one another based on the manufacturing technology, the quality of the materials used, the strength indicators and the purposes of use.Translated from Greek, keramos means "burnt clay". All types of such tiles, without exception, are made precisely from clay with the addition of some impurities, for example, quartz chips or feldspar. Also water and sand are added to the material.


The types of tiles can differ from each other based on the materials used, the specific firing and the level of porosity. It is made from various types of clay (red or white), its base can be dense or porous, and the front side is glazed or unglazed.


Single-fired ceramic tile material can have low porosity and is most often used to create durable floor coverings. Installation is allowed both indoors and outdoors. The tile is resistant to cold and high traffic conditions. Highly porous types of coatings using a single firing imply the use of technological compositions, due to which the shrinkage during firing becomes less.
High porosity tiles are designed only for wall cladding, because they are not a material of increased strength.


The most common type of such coatings is porcelain stoneware. Its better known name is porcelain stoneware, it is also called gres tiles or color mass. It is characterized by an almost glassy face and high density, which eliminates the need for artisans to glaze. Dirt is removed from it very easily, and the resistance to mechanics of porcelain stoneware is excellent, therefore this type of tile is most often used as high-strength flooring.
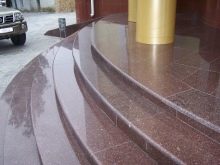
Conventional floor tiles and clinker varieties cannot match porcelain stoneware in terms of durability, hardness and other characteristics. Porcelain stoneware can be polished and matte. Its matte version is the most durable, but the polished one looks more beautiful and attractive. Matt porcelain stoneware is ideal for laying tiles outdoors, in difficult operating conditions. It can often be found on steps, which, being faced in this way, will last a very long time, without losing either their practical properties or appearance.


If we compare porcelain stoneware with ordinary granite of natural origin, natural stone can begin to deteriorate due to temperature differences or harsh weather and climate conditions. Despite the fact that natural granite is considered quite durable, porcelain stoneware is much better than it in all respects. The ceramic granite tile looks uniform, its surface is even, it doesn't care about any chemicals and reagents, with the exception of hydrofluoric acid. In an ecological sense, porcelain stoneware tiles are as safe as natural stone.


Glazed types of tiles are not only ordinary tiles with a shiny glossy surface.
If the glaze layer is thick enough, it can also be used as flooring in areas with high traffic levels.


The double firing technology, which is applied to all types of ceramics, is significantly more expensive in terms of cost than a single firing of the material. The surface, which has gone through two firing, has a pleasant smoothness and shine. This tile is universal: it can be used for both walls and floors. If firing is performed once, the gas passing through the surface "remains" on the face in the form of cosmetic irregularities. When using double firing, this does not happen. Of course, this type of tile is more expensive, but aesthetically it looks more attractive, although much depends on the place and on the laying technique itself, because if desired, some of the irregularities can be visually hidden.


Clinker types of tiles are made from different types of clay, to which dyes based on oxides, fluxes and chamotte are added. Chamotte is nothing more than clay, which is fired until the final loss of plastic properties. Depending on the manufacturing technology, the front part of the clinker can be either glazed or without the use of glaze. Most often, one-shot firing is used in production, as a result of which a low-porosity material is obtained that is resistant to chemicals and harsh weather conditions. When laying clinker tiles, a wide joint should always be left, because shrinkage occurs as a result of firing and the clinker edge always has irregularities that have to be compensated in this way.

Ceramic tiles of the cotto type are used for the purpose of covering floors. It is unglazed and, when laid, forms a relief surface that prevents slipping. This front side is called rusticated. In the production of cotto, extruded mixes are used, consisting of several types of clay. At the same time, careful sorting and mixing is not carried out. This technique for creating tile materials has been known since antiquity and is still relevant when carrying out facing work.


For those who care about high aesthetics and impeccable quality of laying tile materials, you can offer such an option as seamless tiles. Does this happen in reality? In fact, it has seams, but during the manufacturing process the material undergoes rectification: its edges are carefully cut using a special machine. As already mentioned, during firing (both on one and on both sides), deformation of the tiles occurs, due to which technical overlaps may occur during operation due to the mismatch in size and shape.
In the case when the material undergoes a correction in the form of rectification, there will be no deviations and all parameters will perfectly match.


Rectified tiles will provide excellent aesthetic effect in the form of a smooth monolithic surface. It often seems that there are really no seams or joints. Such a picture looks advantageous in a large space, therefore "seamless" tiles are produced in large sizes - 60x60 centimeters and more. It can be laid both on the floor and on the walls.


The prospect of acquiring such material looks very tempting. However, before buying, it is important to consider some of its features. The first is the cost, which is generally very high compared to conventional ceramic tile options. Rectification is a very laborious process, and only he alone gives a price premium of at least 20-30 percent. Of course, it will be cheaper than using natural stone, for example, marble or granite, but compared to reliable porcelain stoneware, the "seamless" option is much more expensive.


Rectified tiles have specific installation subtleties. If ordinary ceramics are more "unpretentious" to the flaws of the walls and floors, their possible irregularities and roughness, in this case the surface preparation should be carried out especially carefully: it is best if it is perfectly flat or as close as possible to these parameters. In addition, experience is required to work with this type of material, so it is best to trust the professionals, because, unfortunately, a beginner will not be able to cope with such delicate work.


The very concept of "seamlessness" should not be taken literally. Even if the seams are not visually visible, they, of course, are still there. A small gap of one and a half to two millimeters is always left between the tiles. The effect of a monolithic canvas is created by the maximum and finest fit.
If no seams are left at all, minimal unevenness will immediately ruin the whole picture.


Ceramic tiles are by far the most common material for cladding floors, walls, fireplaces and more.Its different types (usually with high wear resistance) are also used for facing street sidewalks. However, ceramics are not the only ones to create a reliable and durable coating in outdoor conditions. Probably, many have already heard about rubber tiles, which are widely used in flooring for country paths and playgrounds. In some cases, a rubber coating can be a good alternative to ceramic, especially if you do not need to create a "ceremonial look", but a simpler material is allowed.


Rubber tiles are made from a mixture of rubber, polyurethane and colored filler. Often, for its manufacture, recyclable materials are used in the form of crumb rubber, the basis for which are old car tires. This material, contrary to popular beliefs, is durable and highly resistant to wear. If you touch such a tile, it will be soft and slightly rough to the touch. In winter, a layer of ice crust will form on it, which is easily chipped off without harm to the coating. At high and low temperatures, rubber tiles remain the same bright in color without losing their original properties.

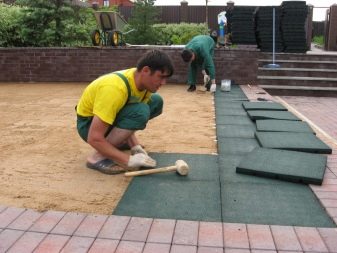
The material is also resistant to deformation, perfectly absorbs, and if any defect appears on it, the damaged segment can be easily replaced with a new one. Very valuable properties of rubber tiles - they never slip and dries very quickly after rain, repels dust and dirt.
The scope of this type of coverage is wide: from playgrounds and sports areas to the arrangement of garden paths in private areas, especially in places of high humidity: near fountains, wells, swimming pools.
The rubber cover is water permeable, which ensures that the front side is free from moisture.


The rubber tiles are laid on the surface, which must be very well prepared. Usually it is an even asphalt surface, a concrete screed, and if the surface is uneven, it can be corrected with the help of special leveling mixtures. Installation work should be carried out in dry and clear weather at temperatures of five degrees and above.


Calculation of materials
It will help to correctly calculate the number of tiles for any room that the master will determine in advance the answers to simple but important questions. First of all, you need to decide what color will be used, whether you need to adjust it according to the pattern, whether you need additions in the form of decorative elements. It is important to know that when measuring the facing surface, calculations should be made, taking into account those tiles that are to be cut. It will not be possible to do without this, because rooms without protrusions in the walls, tricky corners and places for the output of communications are rarely found.

There are several guidelines for calculating tiles. Regardless of the place in which it is planned to lay it, the length and height of each wall where the cladding will be carried out is measured first. The measurement of the length and width of the floor is also carried out, and the indicators of the door (or bath) are necessarily subtracted from the dimensions of the wall where the door (or bath) is located. Next, you should decide on the parameters of the tiled plates. They come in 30x30, 33x33 and 40x40 - these are the standard dimensions for the floor, and the facing usually has the parameters 20x30 and 25x33. Based on these indicators, it is necessary to make preliminary calculations in square meters.
For greater accuracy, all tiles are counted individually.


It is recommended to calculate the amount of materials without using popular online programs, but manually, because in the case of tiles, they often make big mistakes. For example, an online calculator cannot take into account the width of the inter-row seams, in addition, in any similar program there are always indications that it is better to recalculate all the indicators later on your own.


How thick should the glue be?
For beginners, this question may seem insignificant, but it is he who is one of the main tasks. The thickness of the adhesive directly depends on the type of material used.
Also, factors such as the size of the tiles and the level of surface preparation for cladding affect the thickness.


If the size of the tile and its weight are small, the minimum thickness of the adhesive should be two millimeters. For heavy types of installation material (such as porcelain stoneware), it is recommended to apply a layer of adhesive of at least 4 or 5 millimeters. When the surface has significant irregularities and depressions, the thickness of the glue can be greater: in this they are all marked one by one and the adhesive layer is adjusted depending on their depth and size, because it will be necessary to fill all the pits and depressions with an adhesive solution. However, it is not recommended to make the maximum layer more than ten millimeters when laying tiles on walls, and the thickness of the adhesive solution when working with ordinary floor tiles can be 15 mm.
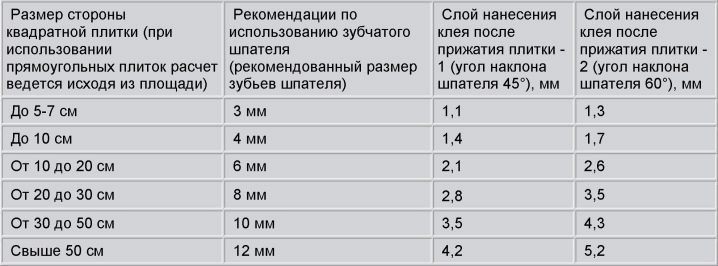
As for porcelain stoneware, since this material is distinguished by its high weight and strength, the thickness of the glue when laying it should be appropriate: from 20 to 22 mm, but not more. If you overdo it, it will lead to the fact that the adhesion between surfaces is significantly impaired.


When laying tiles on a wall, you should also pay attention to how the irregularities are located on it. It has already been said that ten millimeters is the optimal level of glue thickness, but if the wall is relatively flat, without large bumps and depressions, the initial layer can be applied less: three to four millimeters, and as the condition of the wall improves or deteriorates, increase or decrease it. This is how the correction of all irregularities is gradually carried out.


The technology for applying the adhesive composition is also different. Sometimes glue is applied to both walls (floor) and tiles. Some experts say that if the glue is of good quality, it is enough to apply it only to the floor or walls or to the material. In order to save glue, you can use its one-layer application, but beginners will feel more comfortable when the glue is applied to both surfaces: the tiles can be easily aligned and moved in the desired direction.


What to put on?
There are two ways to lay tiles on the floor. In the first case, a cement-based solution is used, and in the second, a specialized glue. When working with cement, the technology of laying tiles is carried out by so-called "sealing" it to the floor, and if glue is used, the material is carefully applied to the surface.
Laying on the wall is carried out on a prepared surface, which should be leveled and primed as much as possible.
It is better to lay the tiles on a putty surface, especially putty is relevant in the corners, because it can be used to smooth out their irregularities.


And finally, even walls are an important factor that determines the quality of work in this case. If the walls are very crooked and cannot be leveled with a primer or an additional adhesive layer, the use of plaster or drywall will help, after which you can safely work with any tile material.


Surface preparation
First of all, the wall must be “healthy and free of fungal infections. The uneven surface will need to be leveled, and if the plaster crumbles or peels off, it must be removed, followed by cleaning and leveling. Of course, you always want to hope that only a part of the plaster layer will have to be dismantled, but its “avalanche” peeling often happens - along the entire perimeter of the wall, for which the master should always be ready.


If the wall is brick, and the plaster layer "sits" tightly, the surface should be cleaned of old coatings: whitewashing, painting, wallpaper.At the slightest sign of a fungal infection, the wall must be "cured" before lining it: otherwise, sooner or later all efforts will go down the drain. We'll have to purchase special compositions that are guaranteed to cope with fungi. Before processing the wall with an antifungal solution, loose layers of plaster are removed, after which not only the affected areas of the surface are processed, but also all walls must be treated in order to avoid the reappearance of microflora. In advanced cases, processing can be carried out several times.


After carrying out antifungal measures, the walls must be treated using a deep penetration soil composition containing an antiseptic. In this case, double priming is desirable. The second layer is applied after the first one is completely absorbed into the wall and dries.
Aligning the walls also includes minor repairs in the form of eliminating minor flaws.
If there are cracks and cracks on the wall, their size will have to be increased to ten millimeters in width, and then filled with putty "all the way" and equalized, focusing on the general plane of the surface.


You can adjust walls in different ways., including plastering them completely, filling or using drywall or plywood. At the same time, a slight roughness of the walls is allowed and even desirable: the wall and the tile will adhere better to each other when using the adhesive composition. As already mentioned, small defects are putty, and if wall cladding with massive porcelain stoneware is planned, drywall or plywood will create an ideal base for it.


To prepare the floor surface with your own hands, the first requirements will be the same as when preparing the walls for cladding: cleanliness, treatment with antifungal agents (if necessary), leveling, elimination of defects. The most time consuming will be checking and preparing the concrete screed, if any. The screed must be tapped completely to identify unstable areas. Those fragments that, when tapped, emit a booming, "booming" sound, should be removed. It is impossible to leave the "loose" parts of the screed, everything must be cleaned up to the "healthy" layers of concrete. Of course, this kind of work is very tedious, but it must be completed if necessary. After removing the old screed or its sections, a new one is poured, aligned horizontally, and after it dries, tiling is already carried out.


If the screed is in good condition, if necessary, minor repairs are carried out in the form of sealing cracks and eliminating large bumps, which should be removed, focusing on the general level of the concrete base.
After the work is completed, you need to clean the room, dust the entire surface, and then prime, preferably twice in a row.


Newbies sometimes have a question about whether it is possible to lay new tiles on old tiles, using it as a base. Of course, there is such an opportunity, but only when the tiles are strong, solid, and the floor is flat and does not need to be leveled horizontally. The method of laying on old tiles is quite common for the simple reason that dismantling the old one is very tedious, and communications can be hurt. However, if the old tile is unstable and "dancing", new laying on it cannot be carried out. Unfortunately, there is no other way out but to completely remove the old coating.


If the old tile does not cause serious concern, before carrying out a new cladding, it is necessary to revise the floor by tapping each tile for its stability. Those areas that emit a muffled sound must be removed, the formed recesses must be cleaned to the concrete base, and then primed or treated with the same adhesive that is planned to be used for further work.The surface of old tiles is degreased to ensure maximum adhesion of the adhesive. For this purpose, you can use a common organic solvent.


Old tile joints are also tested for strength. In the process of checking, the most loose and cracked ones are removed, after which the deepest cleaning of the seams is carried out, followed by priming, preferably with a composition like "Betonokontakt": it is on this that the tile glue always fits perfectly.


If the base of the floor is made of wood, it is also possible to lay ceramic tiles on it, of course, if it is strong and in good condition. Testing of a wooden floor for tiling suitability is carried out by identifying "floating" and creaking fragments. Weak areas of the floor are removed, the logs under them are checked for wood decay.
If necessary, worn out areas must be replaced with subsequent treatment with an antiseptic solution.


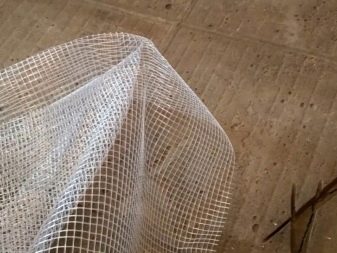
In the case when the floor is wooden and the paint is preserved on it, its remains must be removed with any abrasive substance. You can use chemical cleaning and heating with a building hair dryer. After that, you need to carry out a control check of the floor for strength. If the tiles are planned to be laid directly on old boards, you will need waterproofing, which is used as a latex impregnation for wood materials. The impregnation is applied with a wide brush, after which the floor is immediately covered with a masking net made of durable fiberglass.


When the impregnation dries, the mesh is fixed with dowels, an additional layer is created on the floor so that the tile adhesive firmly "grabs" with the wooden base. The composition of the layer usually includes silicate glue, coarse refined sand and water in a ratio of 2: 2: 1. When the mixture hardens after application, the tile base will acquire the required rough texture and strength required for high-quality cladding.

There are different ways to create a solid tile base on a wooden floor: it can simply be covered with wide sheets of OSB. This will make the job easier in terms of the fact that there will be no need to remove the old paint. A waterproofing impregnation layer is placed on the OSB sheets, or you can use an ordinary dense polyethylene film. GVL sheets are an alternative to OSB: they are made from gypsum and cellulose fibers and are capable of withstanding heavy loads. They are laid in the same way as any others, and their advantage is that no additional layers and treatments are needed, with the exception of priming.
The use of GVL sheets contributes to the fact that the fastest facing will be carried out with savings in both effort and time.


Markup
Before you start laying tiles on the wall, you need to mark up and prepare a place for the first row. A rail or corner made of plastic is attached at the bottom of the wall - this is the basis for resting the entire first row. Then you should draw a straight line vertically in order to control the correctness of the masonry. In order to clearly draw a line, you can use a laser level or a plumb line.
The floor surface should be marked out by drawing a line on the outlying edge of the first row. It is necessary to note the location of the tiles that differ from the rest in the event that there is a need to match the pattern. It is recommended to start the installation process from one of the farthest corners of the room.


It is important to carry out all calculations, taking into account not only the size of the material itself, but also the gaps and seams between the tiles.


Required tools
In order to lay tiles on a wall or floor, the master will need the following tools and tools at hand:
- laser or building level;
- a screwdriver or perforator with a nozzle in order to mix the mixture;
- tape measure and two spatulas (rubber and notched);
- wide brush;
- roller;
- nippers;
- tile cutting tool;
- marker or pencil for marking,
- two separate containers for adhesive mixture and primer.


How to cut tiles?
No matter how ideal the walls or floor are, paving work is never complete without trimming the material. You can cut the tiles with an ordinary glass cutter or with a special tool with a diamond cutting wheel. If the tiles are cut mechanically and manually, then the principle is the same as when cutting glass. Such a simple method is used in the case of light tiles: the cutting wheel of the tool is directed to the marking line on the front side of its fragment, and after the cut, the material is neatly broken along the drawn line.


Floor tiles are much heavier and larger, so a glass cutter will not work for them. For heavy types of ceramics, a tool called a machine tile cutter is used. It has a ruled platform and guides that make cutting much easier. The limiters must be moved so that the marking line coincides with the line located in the middle of the tile cutter.
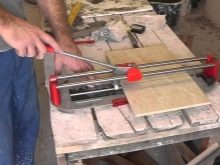


The upper part of the tile cutter is equipped with a carriage, which has two guides, and a wheel for cutting and a stop with folding petals located at a certain angle to each other. There is a lever next to it. The carriage must be taken to the far edge, put the wheel to the edge of the tile fragment, slightly press and slide it along the markings. Then position the carriage stop in the middle of the cut and split the tile with light pressure.


Installation technology
The installation technology has its own subtleties and nuances, depending on the place of installation and stages of work.
On the wall, laying is done without much difficulty. First, you need to apply the glue mixture to the wall surface with a wide spatula and remove the excess glue. On the inside of the tile, glue is applied with a thickness of about three millimeters, the edges are carefully oiled, and the excess is removed with a notched trowel. After that, you need to put the tiles on the wall and press down slightly.


Alignment is carried out by using a building or laser level, and crosses are placed between the tiles so that the row is even and neat and the tiles do not "float". There are usually five crosses in one intersection: one in the middle and one for each seam. It is impossible to keep them in the seams for a long time in order to avoid seizing with glue.
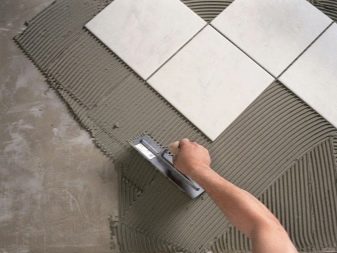
Laying on the floor is a more time consuming process. To lay the floor tiles yourself, a glue mixture is collected on the flat side of the trowel and applied at an acute angle first to the floor itself. The glue should penetrate deeply into all small cracks so that there are no gaps and voids left. Then the glue is leveled with a notched trowel so that the “grooves” are of the same height (adhesive layer - three millimeters).


If ceramics are laid on the floor, it is advisable to "start" with whole tiles, filling the gaps with scraps. Each tile is firmly pressed to the floor, well coated with glue, and the excess mixture must be removed from the seams with a rag. As well as when working with wall tiles, the dimensions of the seams and the neatness of the masonry are adjusted using crosses between the joints.
It is important to ensure that the butt line is straight.


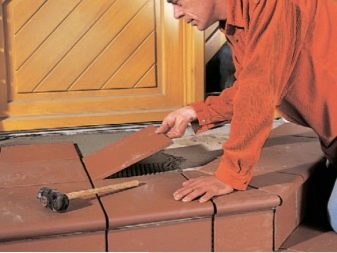
When facing a fireplace, decorative types of materials are usually used. (natural and artificial stone, resistant porcelain stoneware, terracotta tiles). It is impossible to tile the stove with tiles: it may not withstand heating, the adhesion to the glue will deteriorate and it will simply fall off. Surface preparation will be required: jointing, cleaning from dust and plaster layer. Then a primer is applied to improve the adhesion of the adhesive. If a brick surface is veneered or restored and it begins to crumble, a mesh of reinforcement is attached to it.


Only heat-resistant mixtures are used as glue, which can be prepared independently according to the instructions. Laying starts at the bottom.Using an even trowel, the glue is applied to the surface of the fireplace so that several fragments of the cladding can be placed at once. Then, on an even layer, you need to walk with a notched trowel, attach a tile, press down and lightly knock on it with a rubber hammer. The building level controls the evenness of the tiled row. To veneer corners and projections, special shaped parts are used.
Scraps are usually placed between the rows, and after lining the entire surface of the furnace is covered with a varnish that has high heat resistance. It will protect tiles from dirt, soot and moisture.


Masonry patterns apply to floor tiles.
There are several options:
- "Seam to seam" is ideal for beginners, it is clear and simple: the tiles are laid one after another, and the rows are straight and even. All masonry runs parallel to the walls;
- "Diagonally" - the masonry is not parallel and the corners of the tiles are directed to the wall surface, as if "looking" into it. The option is less economical, more laborious, but aesthetically beautiful and attractive;
- "Staggered" - tiles are placed one above the other, without coincidence at the seams, by analogy with brickwork.


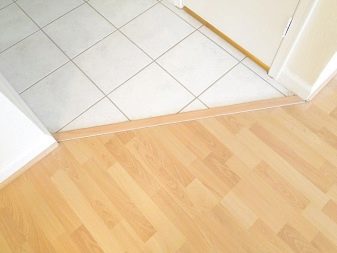
It so happens that it is required to join tiles with linoleum or parquet boards in an adjacent room without a sill. In order to accurately do the joining, it is important to take into account the different thicknesses of ceramic tiles, glue, different substrates and, for example, parquet boards. You need to calculate like this: first, the thickness of the glue and the tile itself is added. Then the addition of the thickness of the parquet board, glue and plywood (if any) is made separately, and the key number is the difference between these two numbers. It also determines the height difference at the junction.
If the difference in height "remembered" too late, the situation can always be corrected by purchasing a docking profile, which can be of different levels.

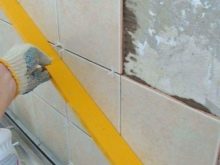
Grouting is carried out after the completion of the tile laying on the walls or floor. This process is called jointing and in order to carry out it correctly, you must wait until the glue is completely dry. For grouting, mixtures based on cement, epoxy, sealant or silicone are used. The selection of the mixture is carried out on the basis of the color scheme of the cladding. Cement-based grout will need to be diluted with water right before use, and silicone and epoxy mixtures are available ready-to-use.


Before grouting, the finished facing surface is thoroughly cleaned with a vacuum cleaner. If using a silicone or epoxy grout, cover the edges of the tiles with masking tape to prevent the mixture from getting on the glazed face. The mixture is applied to the seam with a rubber trowel and squeezed slightly into the depth. Then the putty knife is placed across and the excess is removed, which ensures that the seams are aligned. Masking tape is removed from the cladding after the grout mixture has completely dried.


How long does it dry?
When all the work on laying the tiles on the floor has already been completed, there is a great desire to start walking on the new surface as soon as possible. It should be noted right away that there are a lot of factors that affect the drying time. Also, the composition of the glue affects this process no less.


The manufacturers always indicate the drying time on the packaging of adhesives, but it should be borne in mind that this time is extremely conditional, because a lot also depends on environmental factors. As for the terms written on the packaging, after which you can begin to walk freely on the lined surface, it is important to understand that we are talking about some ideal parameters that are very rare in a real environment. For example, the temperature is from 20 to 24 degrees without weather changes with a stable air humidity of 40 percent.


If the owners of the new coating are lucky and the weather conditions are favorable, you can walk on the coating after 24 hours.In other cases, you have to wait until the moment when drying is complete.
The higher the room temperature, the faster the lining will dry. However, it is impossible to artificially heat the room using electric heaters, because this can fatally affect the physical characteristics of the tiles.
The whole process of drying it, no matter what, should take place in the natural environment, even if for some reason it is delayed.


Of course, if you carry out laying work in the summer, the tiles will dry much faster than in winter. It is important to remember that the work should be carried out at a temperature of 20 to 25 degrees. In the warm season, the cladding can completely dry out in a period of time from 24 to 36 hours, and in winter, the time increases by at least 12-16 hours.
Room humidity also plays a significant role. The higher the humidity, the slower the glue dries. If it is very high, then the drying time of the floor can take up to a week, which must be taken into account.


Whatever the accompanying conditions for drying, you need to learn how to determine whether the glue has dried or not. You can check this in two simple ways. The first is to lightly tap the tiles with a hammer on the corners. If it remains completely motionless and does not "walk", the glue is completely dry. The second way is to simply try to detach the tile from the base. It is advisable to test in corners, because in these places the unevenness is much easier to eliminate.
In any case, you need to wait until the glue is completely dry, so as not to damage or move the tile while walking, because it will be very annoying and troublesome to fix defects.


As already noted, in good conditions the glue mixture dries completely within 24 hours. However, depending on its type, this time may fluctuate. For example, an adhesive designed for lightweight tiles is versatile and dries in seven to fourteen hours. The glue designed for heavy porcelain stoneware and other floor cladding options dries from a day or more.
Adhesive mixtures with an increased level of frost resistance, designed for use in outdoor conditions, dry in 36 hours. Moisture-resistant compounds used for cladding walls and floors in baths, saunas and pools dry for a day, ideally, you should wait from two to three days, and white glue for glass tiles is designed to dry up to 36 hours.


Professional advice
Floor or wall tiles look great anywhere: in an apartment, in an office, in an administrative institution, especially given the variety of colors and design solutions. It would seem that choosing the right tile is very simple, but this is not entirely true. The main thing is not to get on a low-quality product, which can "show" itself not from the best side even when the installation is done.


You can make the right choice, taking into account the peculiarities of this coating, focusing on the appearance of the product. First of all, the tile material should be smooth to the touch, without paint sags.
It is important that there are no cracks and chips on the surfaces: unfortunately, if a lot of material is required, it is easy to miss a scrap in the total mass, so you should pay special attention to this.


In order to avoid difficulties with fixing and tightness of adhesion of tile parts to each other in the process of work, you can attach one part to another already upon purchase. This will help to make sure that there are no or presence of rough gaps, which once again shows the level of quality of the product. When buying, there is always the opportunity to test the tiles for sliding with water by wetting the front part. When it comes to choosing a floor tile, it should not be slippery in order to avoid injuries and falls: its surface usually has ribs and roughness or is sputtered with corundum chips.Slippery tiles are often highly glossy and work well for bathroom wall cladding, but not for flooring. For those who have no experience in choosing a material, it will not hurt to know about this, so as not to make mistakes in the future.


Of course, no matter what quality the tile is, you need to buy it with some margin, because fragility is inherent in it. Briefly, you can make calculations of the required amount of material by dividing the area of the floor or wall by the area of one of the coating samples. For an accidental marriage or "in reserve" usually added ten to fifteen percent.
If you plan to tile a wall, you can opt for a lighter and less thick tile, but in the case of a floor, you should always give preference to heavier and more durable models that will be resistant to accidental damage and can withstand different loads with dignity.


Before buying, you should be aware that according to the coefficient of hardness, all types of tiles are divided into several levels, each of which corresponds to a certain marking. For example, if you need a tile for your floor, you need to choose from levels three to five.
It is no secret that the best and most durable material is porcelain stoneware. It is more expensive in cost than others, but it is very easy to install and lasts much longer than cheaper tile options.


For small kitchens, small tiles, for example, 10x10 tiles, are suitable. If the room is large, you can lay a large one, so the room will visually look smaller.
Curly tiles mean that you will need to buy a special shape of it in order to beautifully lay out the corners, skirting boards and borders.


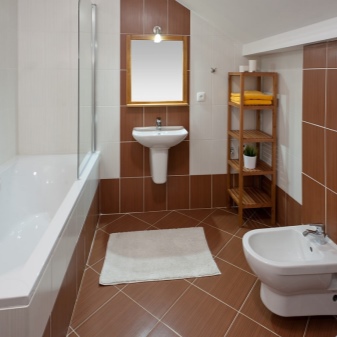
Beautiful examples in the interior
Thanks to a wide variety of ceramic tiles, you can create a unique and inimitable interior at home that will serve for a long time, pleasing the eye with its simplicity and beauty. Since different collections of tiles are now being produced, by combining different types of the same style, you can create an amazing picture, including with your own hands. If earlier ceramic products in the form of simple tiles were used only in bathrooms (toilet and bathroom), now this facing material is present everywhere, striking in its diversity and naturalness.


To give the interior style and modernity, it is allowed to use fragments during cladding that have not only different sizes, but also shapes. Large and small tile models, square and rectangular, can be successfully combined with each other, provided that their quality and design harmoniously complement each other. By the way, a combination of matte and glossy cladding will look very impressive anywhere.


Now a variety of tiles is being produced that successfully imitates wood, stone, brickwork. Such options will look ideal everywhere, especially in the corridor and in any places where there is high traffic and the tendency of the room to increased pollution. Tiles with such patterns are unpretentious, stains are not visible on it, and all dirt is very easily removed with a soft damp cloth.
Any tile with a "monolithic" name porcelain stoneware can be successfully used, including for cladding outdoor space. If at the same time ideal seamless patterns are used, the picture will look the most holistic and harmonious, especially if the facing of large surfaces is planned.


Since ancient times, mosaic-shaped tiles have been considered a wonderful decoration for bathrooms. Of course, its installation is associated with a certain difficulty and scrupulousness of the process, but the efforts are worth it: you can lay out a whole mosaic picture or panel, of course, if you have certain skills for this.
Recently, tiles of non-standard sizes and shapes have become popular for decorating bathrooms (and not only) - polygons, hexagons and octahedrons, as well as other geometric shapes that are the embodiment of the diversity of modern style solutions. Of course, such installation is difficult and requires the presence of professional craftsmen.


The patchwork technique has been known for a very long time, and in the case of ceramic tiles it is one of the newest, because earlier models with complex patterns were very rare. If you want to decorate a bathroom or even a country-style living room, you simply cannot find a better option.


As for the already mentioned imitations of tiles for stone, wood or brickwork, all this is called "loft", the roots of which are in the United States. If the preference is given to imitation of plaster or an untreated wall, this can be easily created using tiles. Looking at such a work of art, it is difficult to imagine how much work was invested in its creation, and only a close look and close examination catch the masonry and imitation.


The classic combination of black and white elements is always a win-win. In this case, a correct assessment of the area of the room and the height of the ceilings should be carried out so that the overall picture does not look disproportionate, and the room or bathroom does not seem smaller than it really is.
There are types of ceramic tiles that are self-cleaning due to the fact that they are based on a special chemical composition. Such options are ideal for kitchens with high traffic and constant cooking conditions - in catering establishments, canteens, cafes, restaurants.


Simple and concise types of ceramics can favorably set off the overall picture of the interior. Glossy tiles in the form of hexagons or rhombuses, shiny mosaic elements, simple models imitated in marble or granite - such solutions will organically fit into any interior style, they will not need to be changed if, for example, you plan to change furniture or curtains.


The elegant and bold Art Deco style is a complex combination of regularity with bold geometric shapes and intricate patterns that carry ethnic motives. If the Art Deco tile is large, it will be universal: it can be used to decorate both walls and floors, and if it is small, it can be used to highlight, for example, an area near the stove in the kitchen or to veneer a fireplace or stove.


Tiles in bright colors are not only bold, but also an effective solution, such an interior will always look rosy, warm and optimistic. Of course, not every owner will decide on such an experiment, but for creative people it is always an advantage, especially when it comes to decorating not only residential premises, but also various art spaces. In this case, the tile will quickly justify its costs: it will not fade like wallpaper, its color will always look bright and catchy. The only difficulty that you usually have to face is the selection of furniture, but if you want to bring the matter to the end, it is always possible to pick it up. One of the simplest solutions - a headset for colored or bright tiles is better to buy white, cream or any other tone close to pastel.


Laying tiles is always a difficult process, especially if a person has to do this work on his own for the first time in his life. Of course, looking at a lot of examples showing the most complex styling options, I want to quickly learn how to do something like this myself. If a novice master has to deal with the simplest styling option, the result will always delight him in the end.
At the present stage, even a simple rectangular bathroom tile can be made so beautiful and unusual that it will not take your eyes off it when all the work is finally completed.

For information on how to properly lay tiles on uneven walls, see the next video.


The comment was sent successfully.