We make clamps with our own hands

Making wedges with your own hands is much easier than it seems. The dimensions of carpentry clamps, their diagrams and drawings have long been known. You just need to know how the clamps are made for gluing furniture panels from a profile pipe and homemade clamps from a bar.

Manufacturing features
In technology, the so-called compression joints are quite widely used. This is a whole group of manual and stationary (stationary) positioning devices that tighten and press down products connected by spikes. Therefore, it is necessary for absolutely all amateur carpenters and joiners to know how to make carpentry clamps with their own hands. Such a task is not too difficult, it only requires attention and accuracy.
When working, they are guided by the size of the device. It should be relatively comfortable and not overload. Very heavy machines are impractical. But even an extremely weak vyma is unlikely to justify itself. The press needs to work as efficiently as possible.


Large workpieces rarely have to be processed. Therefore, in most cases, the devices are oriented towards the average size of the products. But protection is always provided against the ingress of glue where it should not be normally. The diameter of the clamp is calculated taking into account the technical needs.
Recommendation: if the device is made for a reputable workshop, it does not hurt to pay for the consultation of engineers.

Tools and materials
For work you will need:
-
shaped metal pipes;
-
special stops;
-
fasteners - not only self-tapping screws, but also screws and nuts;
-
Angle grinder;
-
welding inverters (an autogen can also be used, but it is worse suited);
-
gaskets between parts made of wood;
-
spanners;
-
other tools for handling fasteners;
-
hydraulic level;
-
construction squares.


How to make?
We will analyze the process of making a screw from various materials with our own hands.
Metallic
When using a professional pipe, you must first prepare the element. Its optimal length is 1.2 m. Structures can be assembled on bolts. But sometimes parts of the clamp will weld. Assembly on corners with a length of 2.5 m is also possible; in this case, channels are attached at equal distances (this is very important!).

The edge of one channel and a short corner are placed at a right mutual angle in the gap dividing the long fragments. The nuts are placed on gaskets with a thickness of 10 mm. Welding the inner joint of the smaller corner with the channel is not necessary. Otherwise, even in the simplest products, the seam will create assembly problems later.
The next step is to get the clamps. Take for them a steel bar with a cross section of 50 mm. The end must be drilled to obtain a hole 10 mm wide. A pair of ball bearings is mounted in this hole. Friction will be too great without them.

The next step in getting homemade clamps is to weld on the nut. Make sure that the screw is at right angles to the profile. Violation of this rule threatens to push through the pressed parts. This is followed by the preparation of the clamps. To get them, take a corner.
The clamps themselves will have to be firmly secured. For this purpose, it is necessary to drill holes with a cross section of 12 mm. Pins are inserted into them. Then, thanks to the pins, changing the position of the workpiece is not difficult. Stops are welded onto the lower segment, increasing the stability of the clamps from the profile pipe.

Recommendations:
-
monitor the parallel arrangement of all parts during assembly;
-
check the visual assessment at the building level;
-
minimize the size of welds;
-
make sure that the structures from the profile are not deformed during welding heat treatment.

Clamps-clamps for joinery panels can be made from a profile (from a pipe). For work you will need:
-
the actual pipes with a size of 4x2.5 cm;
-
steel plate with a section of 2x0.5 cm;
-
threaded stud of category M12 (and the same elongated nuts);
-
a set of bolts and nuts M10.
The number of clamps is determined by how large the shields are planned to be assembled. The number of holes is also determined taking into account your own needs. Next, you need to cut the housings for stops and for screw terminals. Workpieces with a length of 40 cm are cut from a threaded rod. A hole must be drilled in the body of each clamp, each stop; install two nuts, and the second of them is scalded.

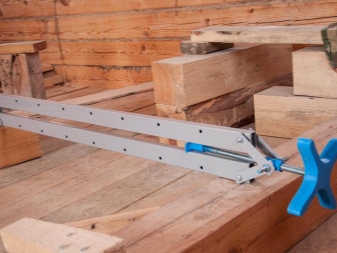
A very important point is the size of the clamp for gluing the furniture board. They are selected individually each time. In its simplest form, gluing structures are a metal frame, supplemented by pressing folding elements. Moving stops are placed on one side. As a result, it becomes possible to correct the bonding area.
Many professionals prefer to use multi-story assemblies. As a result, an optimal load on all parts of the structure is provided without reducing the free space. Single-sided and double-sided frames are often collected into powerful collections. The vertical positioning of such systems is typical for industrial equipment. It can handle very long, sometimes up to 6 m, workpieces.

Along with mechanical, pneumatic clamps are quite widespread. With the help of such equipment, you can make:
-
window frames;
- door frames;
- furniture facades;
- shields;
- timber with a cross section of up to 10 cm.
When creating a machine, you need to consider how to set up the vertical work area. It is best to install ball valves to control the clamp. The membrane must develop a force of at least 1 ton.

The use of all-welded frames is recommended. It is worth ordering components from leading suppliers; the same requirement applies, of course, to all springs in jacks with a jack.
Wooden
Carpentry clamps can be made from wood yourself, and it's not even too difficult. It is necessary to carefully prepare the drawings or be guided by projects made elsewhere. The main component of the clutch is the load-bearing beam. It doesn't matter whether the main part of the structure is made of solid wood or from a bar, in any case, the main support is made of the same profile pipe, angle or channel.

The latter option allows you to count on high quality construction. However, you will have to put up with the heaviness of such products.
A typical vyma assembly scheme looks like this.

To work, you will need the same components that are named above. Reinforced nuts and other fasteners are recommended.
Clamps can be applied to work with both hard and soft wood species. Such equipment is very light and therefore is highly mobile. Mechanical structures are made according to:
-
screw;
-
lever;
-
cam circuits.
In different cases, 2 or 4 bed stops are used. But all that has been said applies only to full-scale loans. By the way, disposable structures can be created from wood. In this case, a solid bar and especially reliable self-tapping screws will act as blanks. The prepared workpiece and wood parts are laid out on a flat area.

Two beams are placed on each side of the workpiece. Carefully check the parallelism of all parts to each other. After screwing in the screws, the clamps are wedged. After the shield is completely glued, the vayma is disassembled.For industrial use, such a design is of little use, but in the domestic sector and in small workshops, it is quite useful.
For more details on how to make your own clamps, see the next video.


The comment was sent successfully.