Selection and operation of two-handed saws

The two-handed saw is one of the most popular and oldest tools for sawing wood. Despite the active development of technology and the production of automatic gasoline counterparts, the standard saw never goes out of style. The configuration of the device is a flat, C-shaped metal plate, on one side of which cutting teeth are applied. At both ends of the plate there are holes for installing wooden holders - handles. The saw is designed for two people, but if necessary, it can be quickly converted into a one-handed tool. It is not difficult to work with a saw if you follow the basic rules and recommendations.

Varieties
In common parlance, the two-handed saw is called "Friendship-2", as it is designed for two people. Among all such hand tools, it has the largest dimensions. The modern construction industry produces several varieties of this tool, which differ in the size and shape of the sharpening of the cutting teeth. There are 4 main saw length standards:
- 1000 mm;
- 1250 mm;


- 1500 m;
- 1750 m.
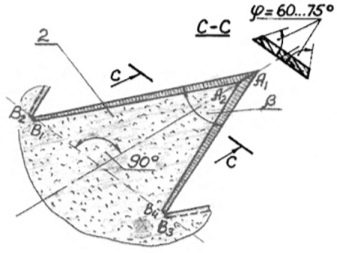
Today such saws are produced by many companies from different types of steel, but the sizes are standard for all. The length of the teeth, regardless of the dimensions of the blade, is 20 mm, but their shape is different. On short models up to one and a half meters, the cutting teeth have a classic triangular shape. Long versions (1500 and 1750 mm) are equipped with M-shaped teeth, between which there are 2-3 regular triangular teeth. Such a complex configuration of teeth on long saws is necessary so that during sawing, the sawdust does not linger in the slot, but comes out. Short versions of the tool do not need this, as they are only used for cutting small pieces of wood.


The sharpening angle of the working cutting teeth for all varieties of two-handed saws is initially the same - 70 degrees, but each master changes it at his discretion. For example, when working with soft wood in the summer, it is better to sharpen the teeth to 35 degrees. In winter, if dry logs or trees are sawing, the angle is brought to 50 degrees, when working with raw material - to 60. But these are conditional indicators, to a large extent it all depends on the specific type of tree species, working conditions and personal preferences of the master.
If it is decided to change the design of the saw and make it one-handed, then it is better not to change the sharpening angle, but to leave the factory standard.
Operating rules
The principle of working with a two-handed saw is based on the fact that each participant in turn pulls the tool towards himself. When the reverse is done, on the contrary, it slightly pushes the handle, helping the partner to pull its side. At first glance, the procedure is not difficult, but there should be a certain skill. Otherwise, such complications arise:
- saw sticking;
- bends of the canvas;
- breakage of lumber.


The actions of employees must be uniform and consistent. The cut must be carried out with the same force of pressure and pressure in the opposite direction. To make it more convenient, it is recommended to install the sawn element on special goats, at a distance of about half a meter above the ground. Moreover, one of the participants should rise slightly above the other, for example, stand on a pallet.Thus, due to the formed angle, a deeper cut can be made in one tool stroke. If all the work is done correctly and harmoniously, then a two-handed saw can not only cut logs across their axis, but also dissolve them onto longitudinal boards.

How to sharpen?
The process of sharpening a two-handed saw is the same as in the case of an ordinary hacksaw on a tree. Only with this tool, everything happens much easier due to the large cutting teeth, you just need to properly prepare. For self-sharpening you will need:
- rectangular file;
- template for precise setting of teeth;
- homemade wooden vise.


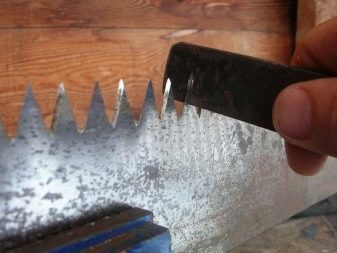
Since the blade of a two-handed saw is long, it will not be possible to clamp it in an ordinary metal vice. You will need to design this device yourself. To do this, you need to fix the saw blade along between the two boards, tie them tightly along the edges with a rope and install the resulting structure on the legs. Then you should make sure that there are no protruding elements among the teeth, they should all have the same height. If a tooth rises above the rest, it is necessary to shorten its top with a file. At the same time, it is important to maintain the length of the prong relative to the base, therefore, after grinding off the upper part, you need to make an appropriate cut into the depth of the blade.

When sharpening, it is recommended to attach the file to a wooden block so as not to injure your hands, and to carry out all work with construction gloves. When the height of all the teeth is adjusted, you can proceed to their distribution - bend the teeth in different directions one by one (one to the left, one to the right). This will increase the width of the future cut and facilitate the work.
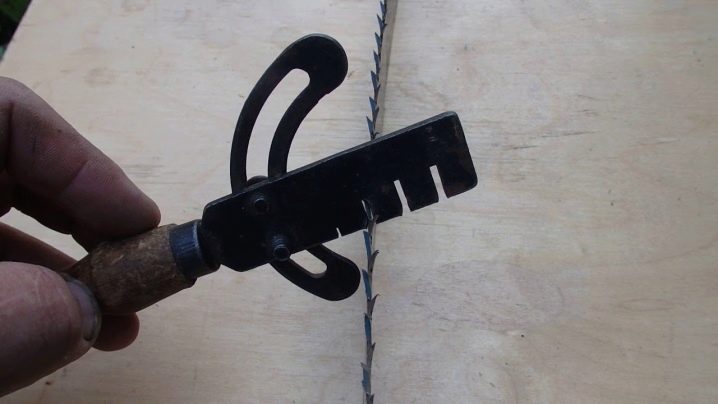
To spread the teeth to the sides should be at a distance of no more than 2-3 mm relative to the plane of the tool. In order not to be mistaken with the bending angle of each tooth, you can use a template, you can buy it or make it yourself.
The template is a wooden or metal strip curved at a certain angle. Its flat base is pressed against the saw blade, and the curved tip determines the angle of inclination of the teeth.
After wiring, proceed directly to sharpening the cutting elements. To do this, the file is brought to the edge of each tooth and, with the help of reciprocating movements, its edge is sharpened, like an ordinary kitchen knife. It is advisable to move the file away from you, so it will turn out to create a sharper angle. During sharpening, you need to firmly press the file surface against the edge of the tooth, you cannot perform this action with a swing. Failure to do so may result in the file slipping and causing serious injury to the hand.
After sharpening the edges on one side, it is necessary to move to the other side and process the second edge of each tooth in the same way. It is important to note that when buying a new tool, the width of the cutting edges on the teeth is different - one is narrower, the other is wider. The narrow edges only separate the fibers of the wood material, while the wide ones cut them, which ensures fast and accurate cutting along the intended line. It is advisable to maintain these proportions during sharpening, so as not to reduce the efficiency of the tool.


How to make a one-handed saw?
If it is not possible to work with the tool together, you can make a one-handed saw from a two-handed saw, slightly changing its design. The efficiency of the device will decrease, so it is unlikely that it will be possible to cut thick logs on your own, but it will be quite possible to cut small wooden elements. To re-equip the saw, it is necessary to pull out the short handles from the extreme holes, and in their place install long (up to half a meter) rounded sticks, like holders for a shovel.
Next, in the center between the new long handles, insert a rail of the appropriate size, providing a small spacer. It is better to screw the rail to the holders with self-tapping screws for wood, in extreme cases - to nail it down. Tie the upper ends of the handles firmly with a rope. In order to securely fix them and create sufficient tension, it is recommended to twist the rope in the form of a bundle.


It is convenient to stretch it by winding a small piece of a branch or other short stick around the center of the rope and, rolling it across the length of the hacksaw blade, pull the ends of the handles towards each other.
The rail inserted in the form of a spacer will not allow the blade to bend, and the holders will be rigidly fixed in one position, which will prevent the structure from breaking even with strong pressure or jamming of the saw in the wood.
You will learn more about how to sharpen hand saws in the following video.


The comment was sent successfully.