How to set up your camera?
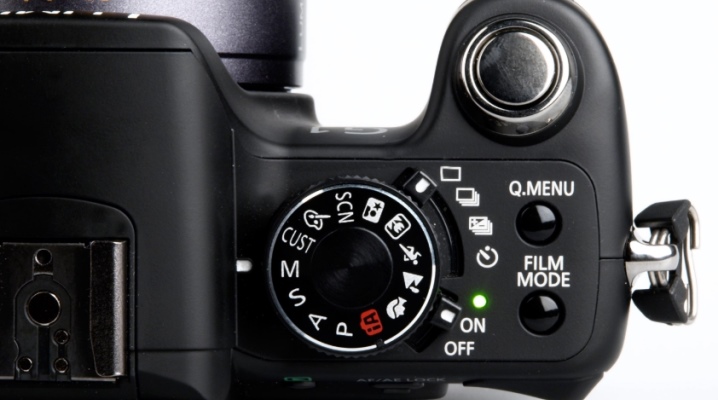
Today the camera is a common technique that is found in almost every home. Many people use both SLR or mirrorless and budget compact devices of different brands. Every device needs to be set up correctly. In this article, we'll figure out how to set up such a technique.
basic settings
Nowadays, the assortment of cameras of various classes is really huge. Buyers can choose from a great variety of high-quality, practical and multifunctional devices, which are convenient and simple to use. It is possible to get beautiful, clear and rich pictures with various effects with the correct settings for the technique.
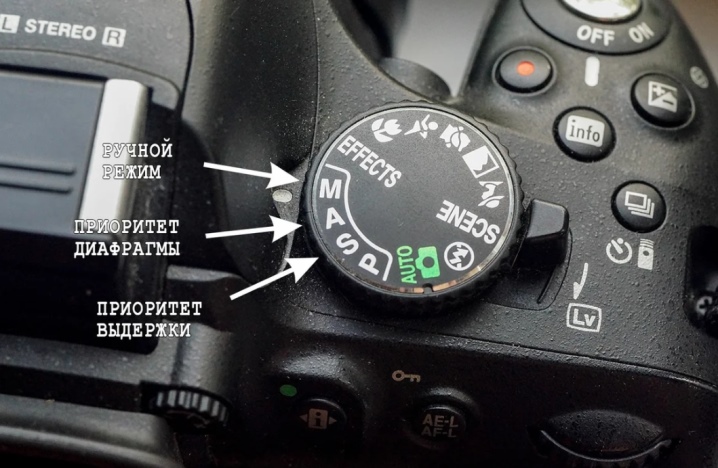
Setting up modern cameras on your own is not difficult. The main thing is to know which item is responsible for what and what is its importance. Let us consider in detail what settings of such technical devices can be attributed to the main ones and what roles they play in the operation of the devices.
Excerpt
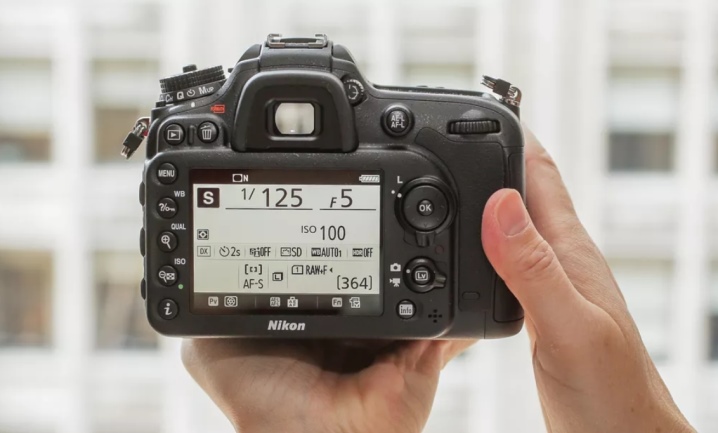
This parameter is usually measured in seconds. Exposure is the time at which the shutter of the device will open at the moment the shutter is released. The longer this part is left open, the more light will be able to hit the matrix. Based on the specific time of day, the presence of the sun and the quality of illumination, you should set the appropriate shutter speed. Many amateur photographers prefer to use only the automatic mode, in which the camera measures the amount of illumination on its own and selects the best value.
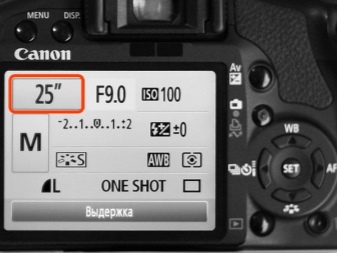
Exposure affects not only the lighting of the frame, but also the level of blurring of moving objects. The faster it moves, the shorter the shutter speed should be. But in certain situations, on the contrary, it is allowed to fix it a little longer in order to achieve a special "artistic" lubrication. A similar blur can be obtained if the photographer's hands are shaking, so it is important to set such values that could neutralize this problem.
The photographer should exercise extra exercise to keep shake to a minimum.
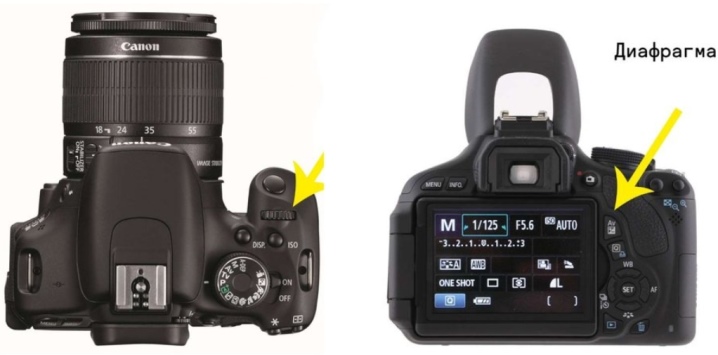
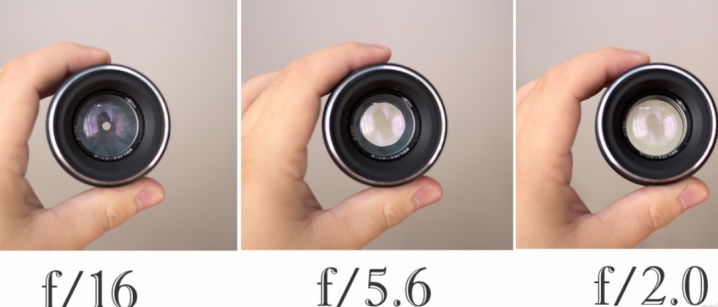
Diaphragm
This is another of the most important, basic options that must be set correctly when setting up equipment. It is designated like this: f22, f10, f5.6, F1.4 - means how much the lens aperture is opened when the shutter button is released. The lower the number you set, the larger the hole diameter will be. The more this hole is open, the more light will fall on the matrix. In automatic mode, the technician will choose the best value by himself using the set program.
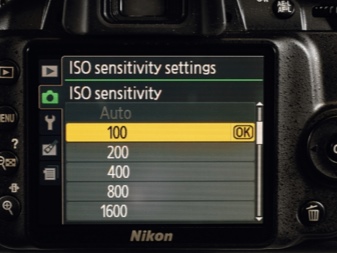
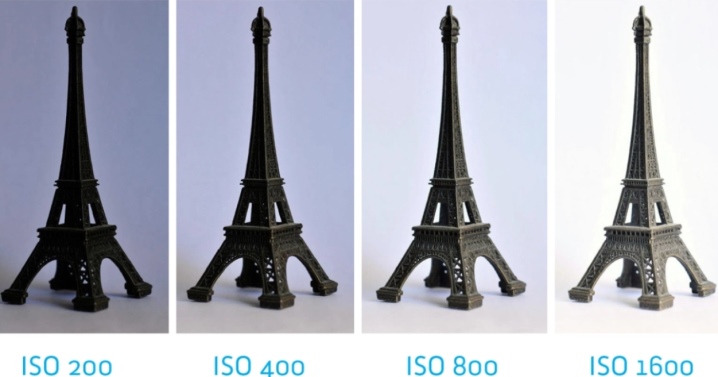
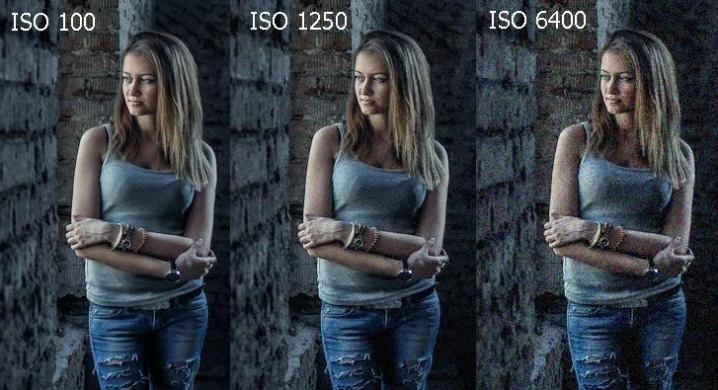
ISO sensitivity
It can be denoted like this: ISO 100, ISO 400, ISO 1200, and so on. If you have experience shooting on special films, then you should be aware of the fact that previously films were sold with different light sensitivity values. This indicated the different susceptibility of materials to the effects of light.
The same is true for modern digital cameras. In these devices, you can independently set the optimal light sensitivity of the matrix. In practice, this will mean that the frame will turn out to be lighter when adding ISO values (with the same shutter speed and aperture settings).

A distinctive feature of expensive modern models of cameras is that they can provide a very "serious" ISO configuration, flesh up to 12800. This is an impressive figure. At ISO, you will only be able to take shots in daylight, and at 1200, twilight will not interfere. Current budget SLR cameras have a maximum ISO range of 400 to 800. Above this, the characteristic color noise may appear. Compact "soap dishes" suffer the most from this drawback.
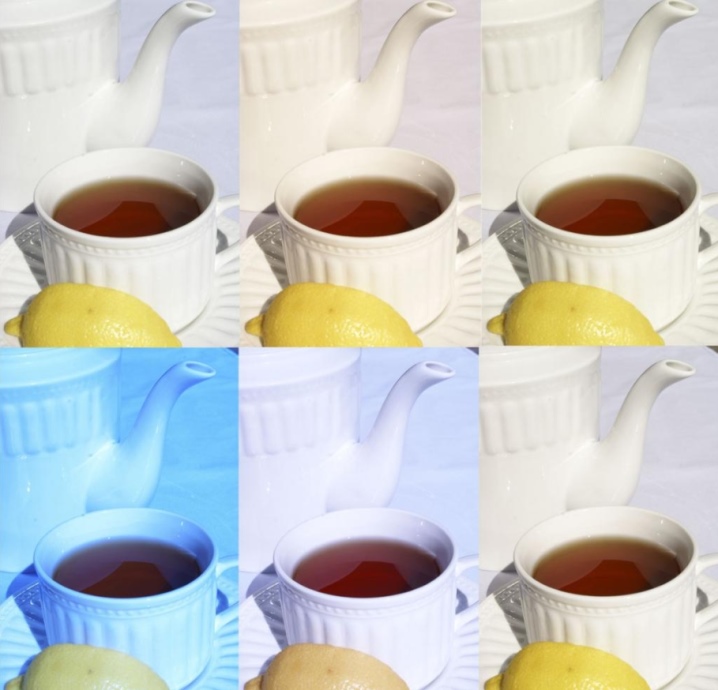
White balance
Surely everyone at least once in their life has seen footage in which too strong yellowness or blue is visible. Such problems appear due to incorrectly set white balance. Based on a certain light source (be it an incandescent lamp or daylight), the tint palette of the photo will also come out. Today, most cameras have convenient white balance settings - "cloudy", "sunny", "incandescent" and others.
Many users shoot beautiful shots with auto white balance. If certain shortcomings are identified, it is more convenient for people to make adjustments later in the programs that are suitable for this. What is the best way to do it - every photographer decides for himself.
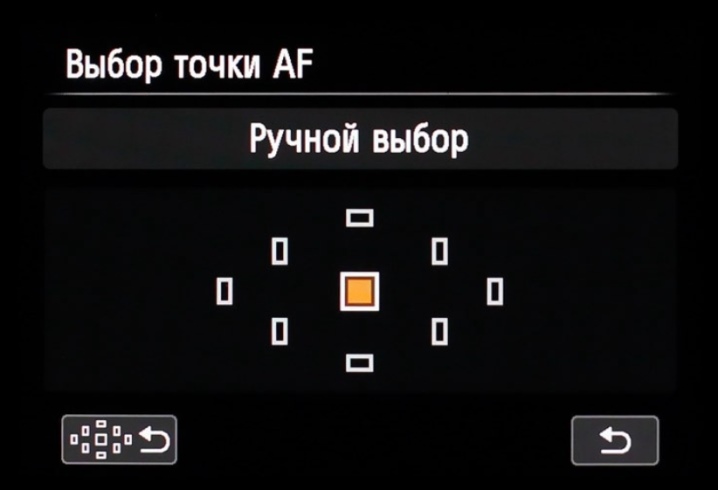
Focus point selection
Usually, all high-quality cameras have the ability to independently select the focus point. You can make it detect automatically.
The automatic mode can be useful in the situation when you are trying to capture high-quality and vivid images in conditions of limited time and a large number of objects. For example, it can be a noisy crowd of people - here automatic focus selection will be the perfect solution. The central point is considered the most accurate, which is why it is used most often. It is necessary to look at whether all points of your apparatus are "working" and whether they can be used.
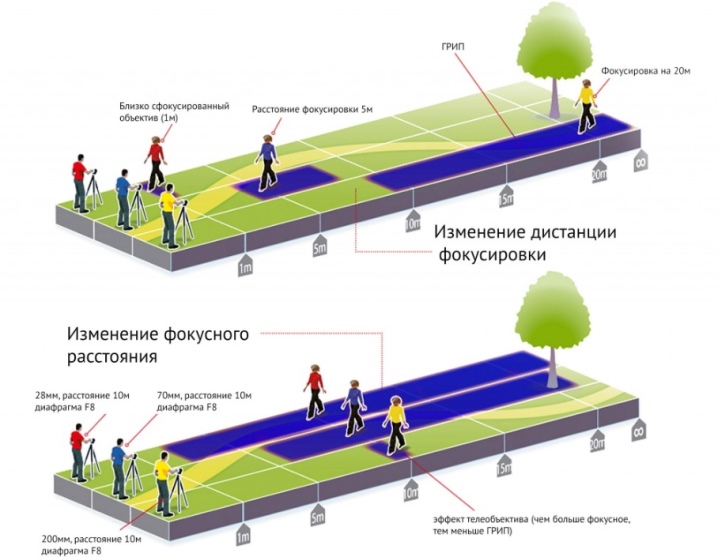
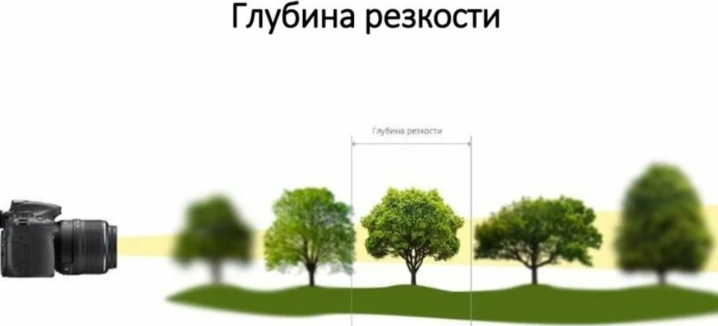
Depth of field DOF
The depth of field parameter is the range of distances in which all shooting targets will be sharp. This parameter will be different in different circumstances. Much depends on the focal length, aperture, distance from the object. There are special depth of field calculators in which you need to fill in your values, and then find out which setting will be optimal.
Step-by-step instruction
You can customize your existing camera for any type of shooting (for example, subject, portrait or studio). This is not difficult. The main thing is to "feel" the technique with which you are working, and to know exactly how to set certain settings on it.
Excerpt
Let's consider the basic rules for choosing a suitable excerpt.
- In order not to collide with blur due to hand shake, it is better to set the shutter speed no longer than 1 mm, where mm is the millimeters of your actual indentation.
- When shooting a person walking somewhere, the shutter speed should be set to less than 1/100.
- When you are shooting children indoors or outdoors, it is recommended to set the shutter speed no slower than 1/200.
- The "fastest" objects (for example, if you are shooting from a car or bus window) will need the shortest shutter speeds - 1/500 or less.
- If you plan to capture static subjects in the evening or at night, you should not set too high ISO settings. It is better to give preference to long exposures and use a tripod.
- When you want to shoot gracefully running water, you will need a shutter speed of no more than 2-3 seconds (if the photo is planned with blur). If the photo needs to be sharp, the following values 1 / 500-1 / 1000 will be relevant.
These are approximate values that are not axiomatic. Much depends on the capabilities of your photographic equipment.
Diaphragm
Let's consider what aperture values can be set under different shooting conditions.
- If you want to take a photo of a daytime landscape, then the aperture should be closed to f8-f3 so that the details are sharp. In the dark, a tripod comes in handy, and without it, you will need to open the aperture even further and raise the ISO.
- When you shoot a portrait (for example, in a photo studio), but want to achieve the effect of a "blurry" background, the aperture should be opened as much as possible. But we must remember that if the installed lens is not fast, then there will be too many f1.2-f1.8 indicators and only the human nose will be in focus.
- The depth of field also depends on the diaphragm. To make the main subject come out sharp, it is better to use f3-f7.
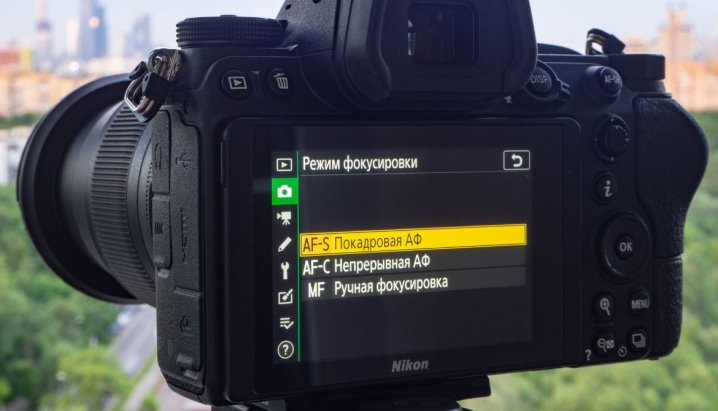
Focus and depth of field
The focusing of modern cameras has 2 modes.
- Manual. Provides rotation of the lens ring or change of certain parameters in the device in order to get good focus on a particular object.
- Auto. Responsible for automatic focusing according to the exposed points or a specific algorithm (for example, many models provide automatic face recognition with their further focusing).
There are many types of autofocus. For example, the device can keep focus on the subject until the shutter button on the body is released.
DOF will depend on the focus of the technique. Many aspiring photographers want to become masters of portrait photography, for which they try to use the technique of focusing on a selected subject. This is easy if you know how to set up a specific camera model so that when focusing, only the subject stands out, and the background remains blurred.
The corresponding functions can be controlled using a button on the body of the device, as well as by rotating the focus ring on the lens.
ISO matrix
Let's take a look at some of the current ISO settings.
- For shooting outdoors or indoors or in a studio with good light (for example, pulsed), it is advisable to set the minimum ISO values (1/100). If possible, you can set an even lower parameter.
- Cloudy weather or twilight will require setting a higher ISO - above 1/100, but too high values should not be set either.
White balance
In DSLRs, automatic white balance is most often used to photograph different objects - landscapes, animals or interiors. But technology cannot always adapt to the existing situation.
- Automatic adjustment most often brings the white balance in a lighter "direction", and can make the picture pale, so you should not constantly refer to such configurations.
- Most cameras have a white balance that matches “daylight” or “sunlight”. This mode is ideal for cloudy, gray days.
- There are specific white balance settings that can be set to make good shots in shadow or partial shade conditions.
- In “cold” environments, do not balance, which will make the picture even more blue and “frosty”. Such a shot is unlikely to turn out beautiful.
It is necessary to adjust the white balance based on the specific situation and environment. Experiment with the technique in different weather conditions. Check exactly how a particular mode affects the resulting frame.

Recommendations
If you are planning on setting up your camera yourself, there are some helpful tips to consider.
- If you want night photography to take place without using a flash, it is enough to set higher light sensitivity values.
- If you are shooting (photo, video) in winter and notice that the moving elements have become more blurry, the screen began to work with a delay, and the focusing is slowed down, this indicates that it is time to end the photo session - this happens not with incorrect settings, but with long stay of equipment in the cold.
- If you want to take an official family or group photo, it is recommended to use a tripod and a remote control of the equipment. Thus, the risk of hand shake is minimized. The same technique can be used during video filming.
- When setting the appropriate white balance in your camera, it is recommended that you use the maximum setting and manually set the desired values. Thus, it will be easier for you to control the given device option.
- Most camera models "tend" to focus well on those objects that are closest to the center of the frame. If the subject (or person) is far from this point, and there are additional objects between it and the camera, then it will be necessary to carefully monitor what exactly the technique is focusing on.
- Many users suffer from blurry photos. Often this problem occurs due to hand shake. In order not to face such a "disease", it is worth starting the stabilization system on the camera itself or on the lens (if your device has such configurations).
- If shooting using a tripod, it is permissible to turn off image stabilization.
- Some cameras have a special "snow" mode. It exists in order to successfully compensate for too many white colors in the frame.
- If you want to shoot a small subject as close as possible, the macro mode is the best solution. As a rule, it is found in most modern cameras.
- If you want to keep taking more and more new shots until the camera's memory card is full, then you should set the "continuous shooting" mode. In this case, the technician will continue to “click” the images until you lower the button on the case or “fill up” all the free space.
The following video shows you how to set up your camera perfectly.


The comment was sent successfully.