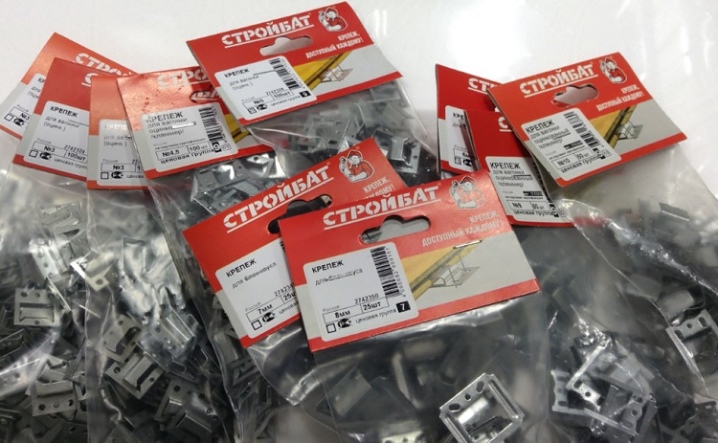
Features of kleimers
Each era brings new technical revolutions, new technical inventions. Once upon a time, a person connected the elements of his home with the help of natural materials at hand. First, nails, and then screws, self-tapping screws were considered the best and most advanced fasteners for various types of finishing materials. However, the very appearance of the buildings was not ideal, since the joints were visible - due to the appearance of rust from metal corrosion, because the material itself cracked during finishing. Then new connecting elements appeared - kleimers.

What it is?
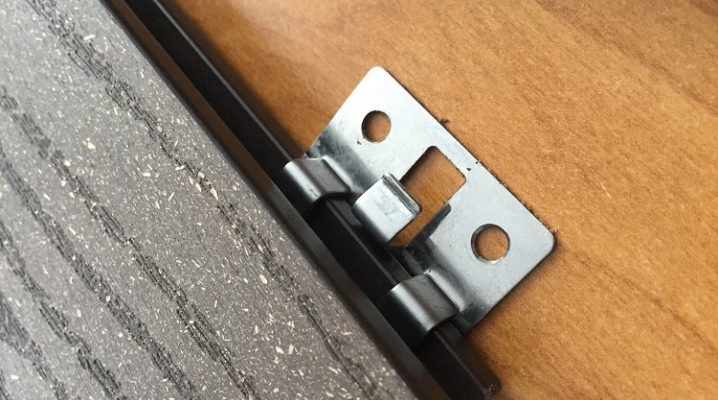
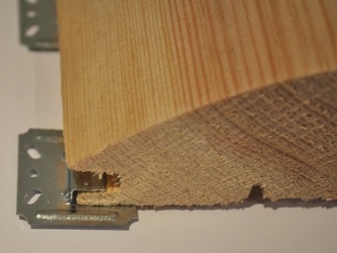
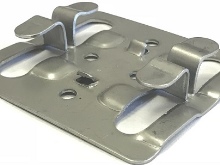
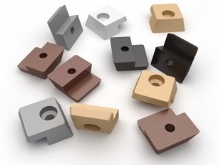
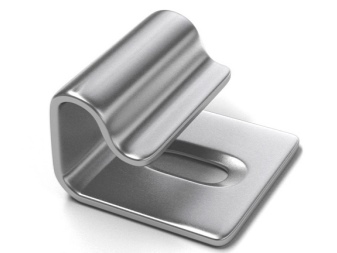
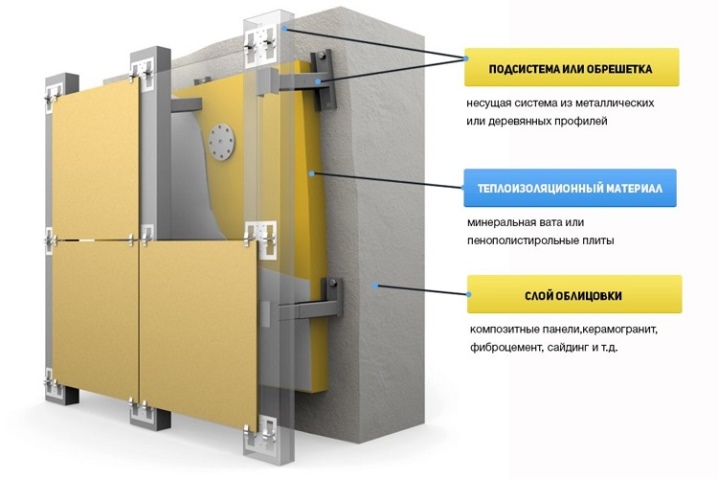
Kleimer is the same bracket with which various panels for finishing work are fastened with a secret connection. The result is a plane with no visible connection elements. Kleimer is used to connect laminate, decking, porcelain stoneware, timber, block house, wooden lining, PVC panels, wall and MDF panels.
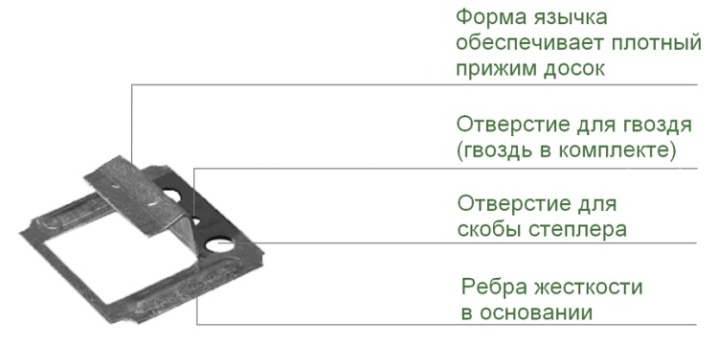
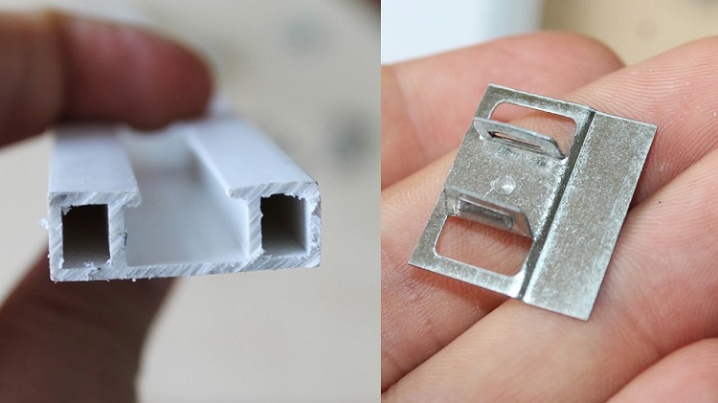
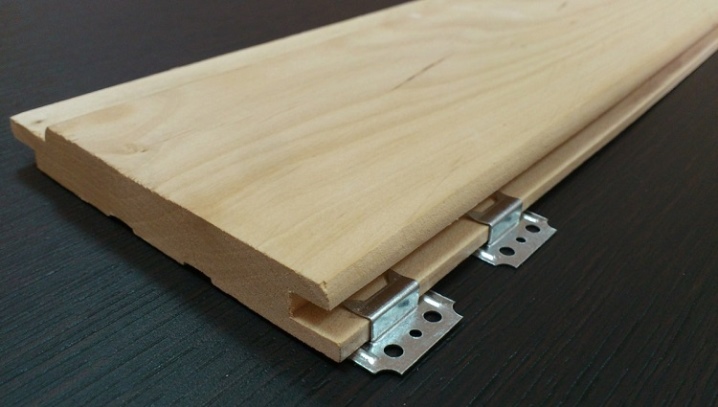
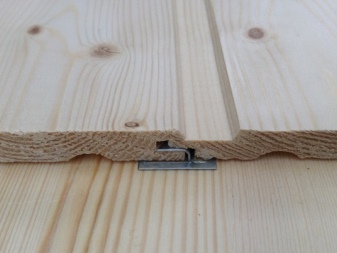
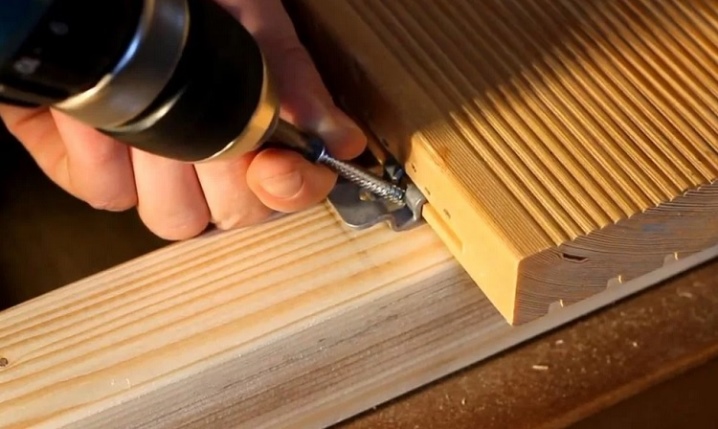
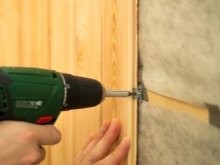
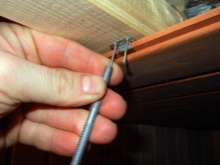
One side of it is inserted into the part of the panel where there is a groove, and the other side is attached with a self-tapping screw or nails to the crate or a specially prepared surface of the wall or ceiling. That's why this mounting bracket itself becomes invisible on the cladding surface and is located from the inside out.
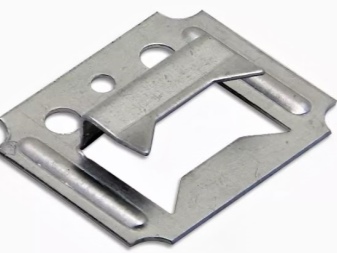
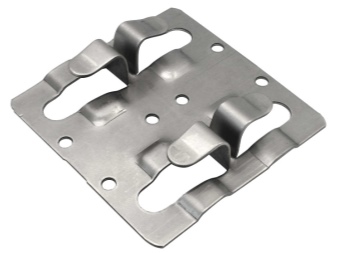
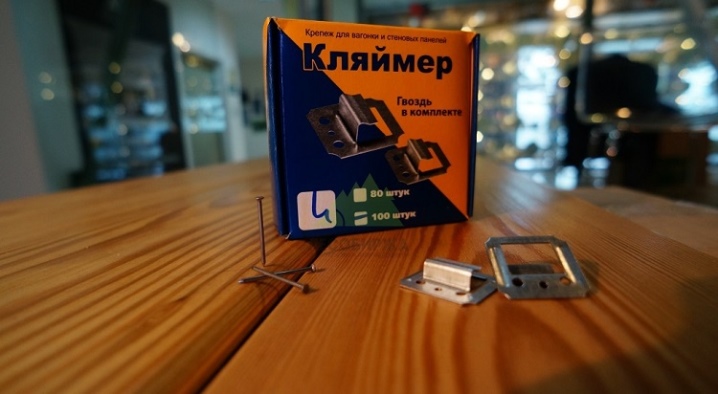
This connection is made of spring steel or galvanized iron and aluminum. Consists of a platform with holes for nails or self-tapping screws and a protruding part bent at a right angle. This protrusion is called a tongue, its distance from the base will depend on what kind of material the clamp is used to attach. Depending on the application, there are 6 types of markings, they are measured in millimeters and show the height of the mount from the platform.
The tongue itself is solid or bifurcated. This so-called tooth is inserted into the groove of the lamella and holds it to the surface.
What are they?
Types of this mounting bracket.
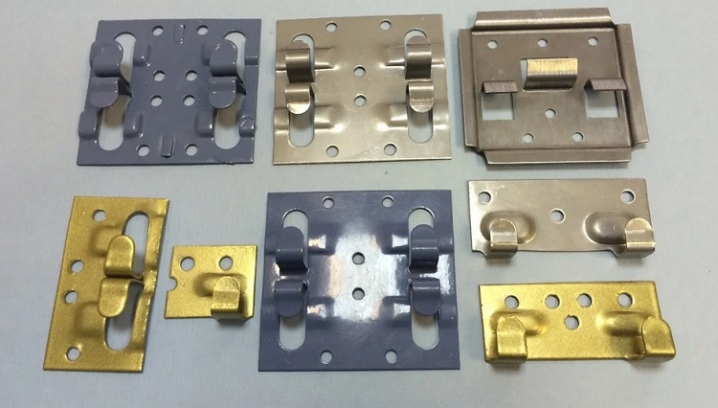
- Special. They are used with one specific type of finish. So, there are roof clamps or clamps for porcelain stoneware slabs. Reinforced steel mounting hardware can withstand loads of up to 25 kilograms. Glass holders are also special clays. The glass holder is a transparent plastic fastening system for attaching glass to the cabinet front.
They come in different shapes. But they all have a recess for glass and a hole for a self-tapping screw. They are attached from the inside of the facade without sampling.
- For working with plastic panels.
- For working with wood cladding: lining, block house.
By their appearance and design, clays are divided into 2 types.
- Privates. They help to connect two boards to each other. These cleats have four teeth.
- Starting. They connect elements from the side, top or bottom. They have 2 reeds. Sometimes, instead of starting ones, they use privates, sawn into two equal parts.
Dimensions (edit)
The size is determined by the height of the kleimer tongue, therefore, depending on the thickness of the finishing material, 6 types are distinguished.
- number 1: for fixing vinyl or plastic panels no more than 5mm thick.
- number 2: for fixing vinyl, plastic and MDF panels with a thickness of no more than 8 mm.
- number 3: for fixing the chipboard panel for wall and euro lining.
- number 4: for attaching a standard Euro lining.
- number 5: for fastening moisture-resistant wooden lining.
- number 6: for fixing the block house
Materials (edit)
Most often, galvanized steel and aluminum are used for the manufacture of these fasteners.They are not subject to corrosion for a long period of time, are strong enough and ductile. That's why galvanized fasteners can be used for outdoor use and in rooms with high humidity. For example, lining is used for wall cladding inside the bath. And if you fix it with clamps made of high-carbon galvanized steel, then this will not only create the aesthetic effect of a beautiful and even wall without visible nails, but also more expedient due to the resistance of galvanized to temperature extremes, high temperatures and high humidity.
If the outer wall of the house is sheathed with wooden clapboard, then you need to purchase hardware from stainless materials. This will create a neat appearance of the house, as the wood absorbs moisture well, which can lead to rapid corrosion of the fittings and the formation of corrosive streaks on the wall surface. For fastening plastic PVC panels, any options for hidden fasteners are suitable, since plastic does not need protection from moisture and does not rot. Therefore, any material for the manufacture of a kleimer is suitable: aluminum, and galvanized, and stainless steel. For fastening the plinth made of wood, you can also use the fastening on the cleats, and here they use fasteners made of polymer materials.
In the manufacture of PVC-profile windows and wall decoration with plastic panels, along with a variety of plastic fittings, plastic lathing, special plastic cleats are also used.
Selection rules
For each type of facing material, you can choose the required type of clamps. The size, as mentioned above, is determined by the height of the attachment protrusion. For plastic and MDF panels, for wall cladding, a mount with a height of 1-2 millimeters is used. For wood panels and ordinary euro lining, fasteners with a size of 3-4 millimeters are taken, and for heavier wooden panels, for example, from linden or aspen, fasteners with a height of more than 5 millimeters are selected. When the walls are sheathed with a block house to simulate a timber, then hidden fastenings with a tongue-to-platform distance of 6 millimeters will be required.
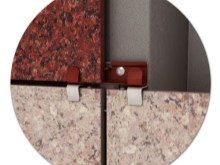
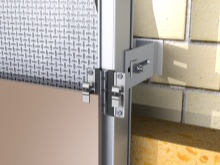
You can find out what size of the mounting clip is needed for the lining: you need to know or measure in millimeters the thickness of the rear groove at the panel. The required number of fasteners is selected according to its size. For wall cladding from the street side, a special technology is used - a ventilated facade cladding with porcelain stoneware. Previously, only 2 types of special fastening systems were used to install porcelain stoneware for a ventilated facade - an ordinary kleimer and a starting one. Moreover, they were of an open type, that is, the clamping system was visible in the vertical lines of porcelain stoneware.
Then the developed fixings for corner tiles were added to them. - end kleimer with 1 bracket, still the final kleimer, has in its design 2 brackets for vertical fastening and a kleimer, which is needed to correctly install the plate exactly in the center and to keep it level in the horizontal plane, regardless of the weight of the material and the strength of the wind. All of these are open-type fasteners.
More recently, hidden clamps have been used for porcelain stoneware on walls for a ventilated facade. They are made of stainless steel and inserted into the cut of porcelain stoneware. But the use of this type of fasteners is very laborious and costly, since it requires a high level of work from the master to cut a porcelain stoneware slab. The recesses must be even, neat and of the same thickness on all tiles, otherwise the clamps will not adhere equally along the entire vertical, and the porcelain stoneware cannot be installed evenly and neatly on the facade.
In addition to the curvature of the wall itself visually, this can lead to cracking of the facing plates and to their collapse.
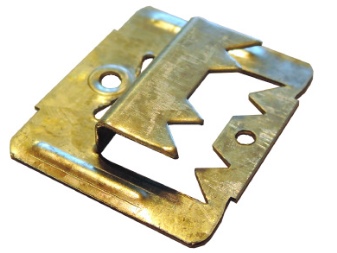
For a ventilated facade, an imitation of a kleimer with hidden fastening is also used. These staples for porcelain stoneware are not visible from a distance of 10 meters, which is suitable for finishing the upper floors of high-rise buildings and buildings located in the depth of the site. This type of fastener is called a serrated kleimer. It is designed for vertical fixing for porcelain stoneware. Two types are used here - ordinary anchor clamps and starting ones - single serif.
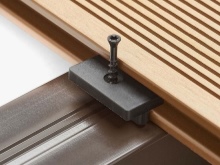
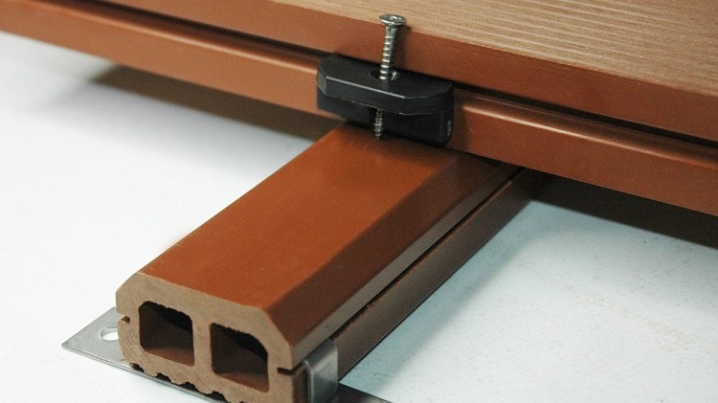
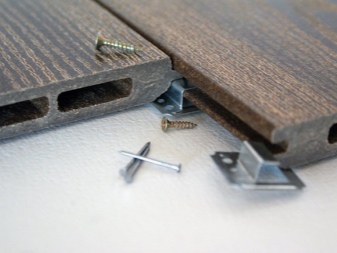
For a decking or otherwise for a larch deck board, a special type of hidden fastening in the form of a butterfly is used. The teeth on it are located on both sides and snap into place in the form of a clip on the lower protruding edge of the board. Such a connection allows you to create a surface with natural technical longitudinal holes, which does not allow the terrace board to close tightly, which means that moisture and snow cover do not linger on its surface, but flow through these grooves. Usually this specific type of fastening is sold together with the main material as a companion item and is not available for sale in a store.
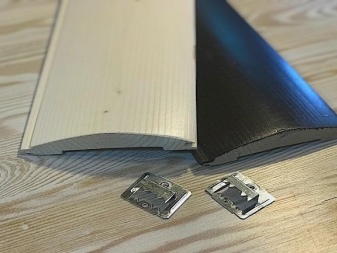
For the laminate, two types of galvanized fasteners are selected: with teeth on the tongue and with a flat ledge. The first board is fastened from the end to the lathing system with fasteners with teeth. Subsequent panels are fastened using a flat tongue connection, which allows the locking systems to snap onto the laminate itself and to connect the boards without seams. For PVC panels, clamps number 1 are most often used, where the height of the fastening tongue is 1-2 millimeters. They are screwed to a lathing made of wood or metal profiles or directly to a wall or ceiling.
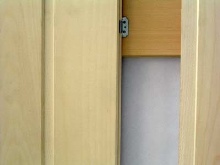
The lining is attached to the ceiling according to the same rules as to the walls. First, the lathing is made, and then the lining is nailed with the help of a cleaimer. And the choice of clamps will depend on the material used for finishing. The size of the fasteners from which it is made should be selected based on what you decorate the ceiling with - wooden clapboard, plastic panels, MDF panels or laminate. For glass in furniture facades, for mirrors, plastic clasps-glass holders are used. They are transparent and colored. They are fastened with self-tapping screws. With their help, you can attach a mirror both on the wall and on the cabinet door.
They are convenient to use in the bathroom, because the plastic mount is not afraid of humidity and temperature.
How to fix it?
The installation of the cladding begins with the fastening of the lathing on the desired surface. Even if the surface of the wall, ceiling or floor is fairly flat, the lathing allows you to create a level and verified plane, allows for ventilation, and also provides space in which a variety of cables and insulation can fit. The lathing can be made from wooden bars, or you can assemble a metal one, as for fixing drywall. For the installation of wooden lining, a wooden lathing is better, especially in a bathhouse and a sauna, since the wooden lathing "plays" with the wall and does not allow the wood material to crack during shrinkage and swelling, depending on humidity and atmospheric conditions.

You need to decide in advance on the direction of the wall cladding. There are 4 options with which you can fix the panels on the crate: horizontal, vertical, diagonal, combined. It should be noted that the direction of the strips of the lathing should be perpendicular to the direction of the lamellas of the used finishing material. For horizontal installation, the first plate must be fixed horizontally with self-tapping screws or nails at a distance of 1-2 mm from the floor or ceiling.
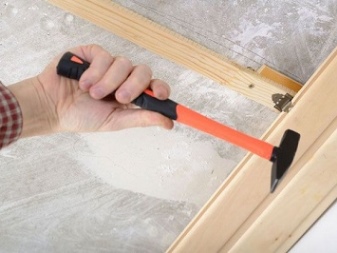
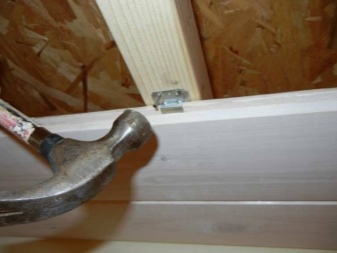
This attachment will later cover the ceiling or floor skirting board. In the groove of this board, we install the tongue of the kleimer, and fasten its base with self-tapping screws or nail it to the crate. All the following panels are inserted with grooves into the ridge of the previous one and securely fixed to the lathing bars.
For a more reliable connection, you can fix the sheathing by attaching the boards to each other more tightly, lightly driving them into the grooves using a mallet and a tamping board. The last plank, if necessary, cut to size to the required width. When laying the panels horizontally in a steam bath, they begin to be installed from the ceiling so that the lining spike is directed up the wall, and the groove down. This is necessary so that condensation does not accumulate in the lining, but flows freely down the wall.
With vertical installation, the starting board is nailed vertically from the beginning of the sheathing, placing it close to the crate and hammering a nail into the crest of the lining. The nail heads on the first board can be removed with a side cutter or covered with decorative strips. Clips must be installed in the groove of the first board and fixed with nails or self-tapping screws on the crate. Place the comb of the next board into the groove of the previous one.
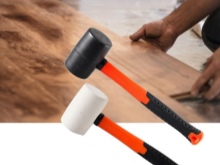
We use a rubber hammer to fit the lining panels more tightly into each other. And then, with the help of clamps, we install all the finishing materials. The last panel is also cut to size. With such an installation, the correct vertical of the installation must be checked using a plumb line every 7-10 panels. Vertical cladding is suitable for rooms with high humidity - saunas, baths, verandas, for upholstery from the street, as it does not allow moisture to accumulate in the grooves of the lining.
With diagonal and combined laying, sufficient skill and professionalism is required, therefore it is better to entrust such a cladding to a specialist with sufficient experience. This type of cladding is most often used for interior walls and ceilings.
In a combined arrangement, panels can be nailed in different directions and create a variety of fantasy patterns.
All types of cleats, what they are used for and how they are attached, see the video.


The comment was sent successfully.