How and with what can the chipboard be painted?
There is no need to rush to part with old things - this slogan has become the motto of the fighters against the era of consumption. Indeed, not everything new necessarily has an objective demand. And confirmation of this is the sites on which lovers of home alterations buy up Soviet furniture, as well as headsets of that time produced by the GDR, Czech and other similar ones. But restoration very often means repainting. Including repainting of chipboard. You should not be intimidated by this procedure, it can be impeccable if there is a desire to understand, learn and do everything according to a clear algorithm.
What is it for?
Painting and repainting furniture is an interesting and inspiring procedure. It is not for nothing that social media accounts dedicated to restoration work collect thousands of subscribers. People are interested in watching how craftsmen make modern Scandi-style furniture from an old grandmother's sideboard with their own hands. Or as a fashionable interior accent is obtained from an unassuming coffee table from chipboard.
The restoration of old furniture is both a saving and a great way to extend the life of a not very fashionable, but strong and reliable design, and a wonderful opportunity to turn outdated into actual. And if professional restorers have a lot of tools, methods, technologies, home craftsmen can limit themselves to the most affordable ones. Furniture repainting is the main one.
Here are 5 reasons to repaint your chipboard furniture.
- It will merge with the overall interior ensemble.
- It will look modern.
- The situation will change, and so will the mood of the household.
- Small flaws and deformations created by time will hide a layer of paint underneath.
- This is a great DIY repair experience that will hardly hurt anyone. And if in the future you want to save money on the services of masters, you can start studying right now. And repainting is perfect for beginners.


Beautiful, successful examples are inspiring. It remains only to learn a little theory - and this is also interesting.
Choice of paint
The paints traditionally used in restoration are acrylic, alkyd and even oil. Oil paint is a composition of vegetable and synthetic oils with pigments and other fillers. It will perfectly cover the base, forming a film surface. But it has a pungent smell - and this is a minus of oil paint.
Consider the characteristics of other formulations.
- Alkyd - can be called an analogue of oil enamel, only instead of oils, alkyd resins are used here. Such a composition dries quickly, it adheres better to the material.
- Acrylic paintsbelonging to the category of water-dispersive. Bright in color, with a high hiding power marker, quick-drying, non-toxic, odorless - perhaps the ideal composition for repainting chipboard. If a smooth furniture coating is to be painted, a moisture-resistant paint with increased adhesion rates is chosen. For example, you want to repaint an old sideboard white - it will be very convenient to work with acrylic paint.
- Water-based formulations, they also dry quickly and do not leave smudges. Silicone paints do an excellent job of painting over scratches, overlapping cracks that are not very deep, they are not afraid of moisture and do not cling to dust. Silicone paint can be used to transform furniture that will stand in the kitchen, in the bathroom, on the balcony.
- Chalk paints are a novelty in recent years. They have proven themselves well in painting varnished surfaces without such preliminary steps as sanding and priming. Chalk paint creates a pleasant tactile, velvety surface.


There are other options, but these are no longer paints, but varnishes and toning materials. Stains perfectly tint veneer plates, and varnishes decorate the surface, both painted and without this layer.
Paints are produced in the form of liquid and aerosol compositions.
If the surface is large, you need to take paint in a can, if it is small, an aerosol can will be enough (and it is more convenient to work with it).

What is required?
To remove the old layer from furniture, you need to take a spatula or a cycle, a medium-hard metal brush, sandpaper or a sander, and a rag. Paints and varnishes are perfectly removable with a construction hairdryer. The surface will be protected with masking tape. All fittings must be removed - or sent for restoration (cleaned to a shine, for example), or subsequently replaced with a new one, which happens more often.
You will also have to prepare the following:
- small trays for paint;
- brushes with natural bristles (if oil or alkyd paint is used), brushes with artificial fibers (if paint is acrylic or latex);
- paint rollers - it is more convenient to paint facades and countertops with them;
- paint sprayer is a great time saver.
Attention! Your own safety measures are also worth taking care of. You need to work in a room that is well ventilated. Protect the floor and walls with newspapers, polyethylene if possible. Put on the clothes that are no longer a pity to be hopelessly spoiled with paint.
However, you should not rely on synthetic work clothes: they will not be as comfortable in them as in a cotton T-shirt and trousers, for example.


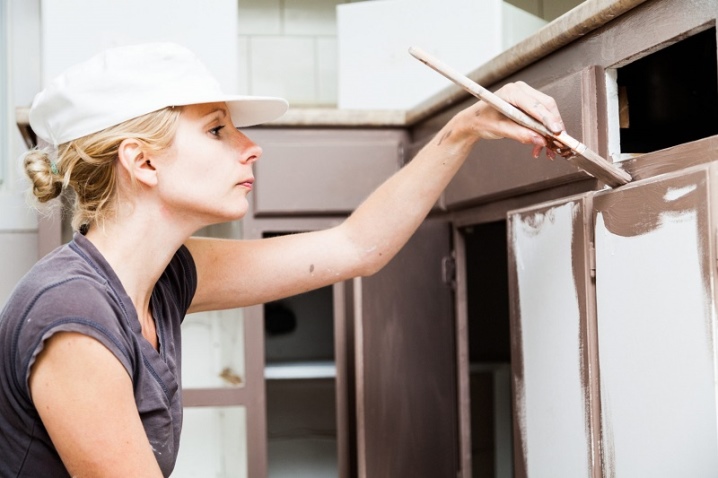
Painting technology
Painting of chipboard furniture itself will include 2 stages: preparatory and main. Additionally, furniture can be decorated, but this third step is optional.
Preparation
The adhesion of paint is primarily affected by how well the old coating is removed from the surface of the furniture. If, for example, dust, dirt, grease stains, moisture remain on the nightstand, this is a big gap in the work. Everything must be done thoroughly, only in this case it is possible to repaint the furniture correctly and efficiently in a humble home environment. The preparation includes a number of steps.

Sanding
This is the most affordable option for this treatment. If you have a sander, it will speed up the process. But people without experience can accidentally touch the veneer layer. The varnish is usually removed with a metal scraper, brush or coarse sandpaper. To achieve a smooth surface, the movements should be along the grain. If you have to work with sandpaper, it makes sense to use sanding pads equipped with clamps. They are replaced by a not very large block of wood or foam, and the sandpaper itself is already attached to the bars.
Grind the surface to an optimum dust-free appearance.

Removing varnish / paint by heat treatment
It is quite easy to remove varnish or paint with a construction hairdryer. Materials with the action of this device are softened, and then removed with an ordinary spatula. Cleaning takes place with an abrasive material. Only in this work with chipboard, care is required - otherwise the wood may darken. If the varnish, for example, is charred and does not come off in layers, you cannot do without special chemicals. They are available in powder or gel form, as well as in the most common liquid form.

Wood putty
Cracks, chips and visible pores on the furniture surface must be filled with a filling. All putty areas must be level with the main surface. It is not difficult to prepare a mixture for leveling with your own hands from PVA glue and those waste that remained from grinding.
Do not forget about degreasing the surface: this is done with a napkin dipped in white spirit or acetone, for example.

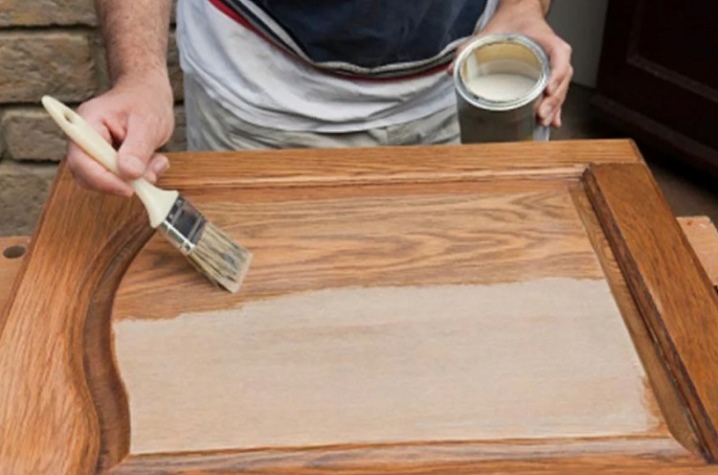
Primer
It also helps the paint to adhere to the surface of the countertop or the fronts of the kitchen unit (in the case of which). The primer will bond the fibers together and significantly reduce the absorbency of the material. It is desirable that the primer and paint are of the same type of bonding agent. True, there are also universal remedies. And in order not to be mistaken and to process the furniture correctly, you need to read the label: it will be clear whether the acrylic primer is suitable for oil paint.
If the material is already old and loose, it is primed with a deep penetration compound.
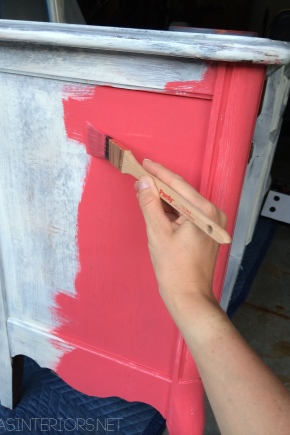
Dyeing
If all the previous steps have been done without any complaints, repainting the old (and sometimes not so) furniture in a different color will be the dessert of the whole renovation event. Because this is, indeed, the most interesting thing in this process. The result, do not forget this, will depend on the quality of the paint.
The staining algorithm consists of several steps.
- Preparation of the composition for work. The paint must be mixed well, achieving uniformity. If necessary, tinting is done again. And again the paint is stirred, after which it is poured into a tray or pallet.
- If a facade or countertop, for example, a desk, is to be painted, a roller is immersed in the pallet. The roller is impregnated with the compound from all sides. Then it is rolled along the wall of the tray or pallet. The surplus must be squeezed out.
- It's time for the first layer. It is advisable to start painting from the middle, gently, without haste, rubbing the coloring paste on the base. At the exit, a more or less uniform coating with a very small thickness should form. There should be no sags and smudges. Hard-to-reach and end zones are painted with a brush. Now there is nowhere to rush, you must definitely wait until the composition is dry.
- The second layer is applied in the same way as the first. Usually two layers are enough, but individual variations are possible.

A typical beginner's mistake is not to wait for the layers to dry. Oddly enough, but many do not even realize that all this painted man-made beauty is not limited to one layer. People see an imperfect surface after the first stain and become discouraged. But the point is, indeed, in the number of layers - therefore patience and endurance should be companions of the repainting process.
The furniture can be varnished to obtain a protective layer of the painted finish. It can be either colorless or tinted composition. It is applied to perfectly dry surfaces.
Working indoors with varnishes / paints, of course, is not always pleasant, but in an ordinary house, apartment, everything can be done with minimal discomfort. The main thing is to strengthen the ventilation mode and protect children, animals, and allergy sufferers from such disadvantages of repairing.
Where to work, everyone decides individually: in the kitchen or on the balcony - if you want, you can paint the furniture everywhere. If the painting touches something small, a shelf or a stool, this is not at all fundamental.

The main thing is to protect the floor and walls from possible splashes and traces of work.
Surface decoration
Sometimes you also have to decorate furniture made of chipboard. For example, hand-painted furniture is being transformed. Let those who think that he has had enough painting, and that he is not an artist, do not be in a hurry to be indignant. Today, fortunately, stencils are actively used, which make furniture unique, special, atypical.
Appliques and prints on furniture are an interesting solution. You can use the same stencil to make an inscription that is important for the owner or household members.
Interesting idea! If repainting touches a children's desk, there is always a problem of rapid deterioration of the updated look of furniture. Traces of plasticine, paint and others soon appear on the countertop. You can use a tricky decorating trick - to make a tabletop in the form of an artist's palette.That is, to create these stains of paint, fingerprints, splashes on purpose. Children will be involved in this process - they will only be happy. And then paint on top with one layer of white paint so that the table in the form of a palette is not very bright. And at the end - a protective varnish.
If we are talking about the same writing desk or, for example, a chest of drawers, you can "confuse" and over the interior decor. For example, upholstery inside drawers with fabric. The work is painstaking, but the result is delightful. The fabric is chosen at the discretion of the master - it is convenient to work with variegated natural fabrics. Then the table becomes not just retro furniture, but luxurious antiques.

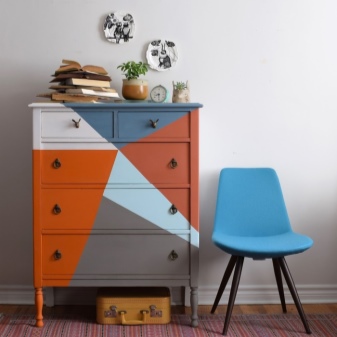
Beautiful examples
And now is the time for ideas that will inspire those who doubt to the last that they will master the repainting with their own hands. Everything in the photo has been repainted and transformed for modern interiors.
Here are 10 impressive examples of successful furniture repaints.
- The work is difficult, but accessible to many. A very bright chest of drawers that will decorate the hallway, children's room and living room in a consonant style.

- With a slight movement of the hand, the old sideboard turns into a fashionable object of the Scandinavian interior. And the inner walls can not even be painted, but pasted over with glossy wallpaper, for example.


- Paint the walls white, leave the facades the same or renew them with stain. What is not a solution for transforming a chest of drawers, the appearance of which is already depressing. Such a light update in a modern interior is almost always successful.


- Those who believe that large forms are definitely not for him may be inspired by an express rework of the Soviet nightstand. Quite another matter!


- The chest of drawers has not only changed, it has become fundamentally different. Guests and friends will congratulate the hosts on a new purchase, unaware of the miracles of transformation.


- The old sideboard becomes new thanks to the magic of white. A thing for all time.


- If you have an idea to throw away a trellis mirror, you should think carefully. After all, it can turn into an ultra-fashionable and at the same time very cozy thing.


- A real feast for the eyes - especially in the "white apartment". For scandi design, a win-win.


- The magic of color is back in action: there was an outdated design - it became a very fashionable wardrobe.


- So beautiful that this place in the house will definitely be a favorite photo zone.


Fruitful work and results that you want to boast of!
The process of painting a chipboard wall in the video below.


The comment was sent successfully.