How to make a do-it-yourself flower stand?

Fresh flowers decorate houses and yards, bring joy to hostesses. Flower stands will help you place the pots in the right place. Make a useful thing with your own hands and surprise guests with originality. Such a stand is more budgetary than a store stand, and the appearance can be anything.

Types of stands
You can make a stand for any colors yourself. Products differ in functionality and method of application. Before starting work, you should decide on the type of stand.
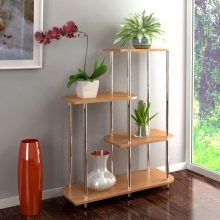
Floor standing
Designed for large flowerpots and pots. They are usually made of durable materials. Such structures can be used as an original screen for zoning a room.
The design can be multi-tiered or designed for one flower.


Wall mounted
The optimal solution to free up space. Small or medium-sized flower pots are usually placed on such a stand. Structures allow you to hide wall defects. For manufacturing, metal or wire is often used. Can be placed in a corner to use extra space.


Hinged
They are a variation of the previous version. The planter looks impressive and stylish. The main drawback is that it is difficult to move the stand from place to place; holes are made for mounting in the wall.
Most often, the design is used on a balcony or terrace.


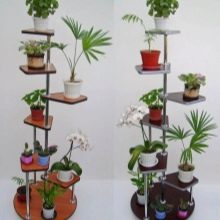
The structures are presented in the form of slides, whatnots and racks, they are stationary. Used for ampelous flowers with large, drooping leaves. They can be used in an apartment, but more often they serve as a garden decoration. With the help of such a stand, you can create additional shadow or compensate for the small area of the flower bed.


Non-standard designs
Such coasters are made by hand only. Outwardly, they may resemble some interior items, vehicles, shops and much more. Decorated with shiny paints of gold, copper, silver. Forged products or welding wire stands look very impressive and expensive.
Can be installed both indoors and in the garden. Usually the coasters are for small pots.


Outdoor stands must meet special requirements. The material must be durable, durable and wear-resistant. Usually, original forms or multi-tiered structures made of metal, wire, forging are used. Home coasters can be of any kind. Usually used when growing light-loving plants. These designs are designed for small to medium sized pots. Install home coasters on a windowsill, balcony, or hung on the wall. If the size of the room allows, then floor views can be used.


Tools and materials
The stand can be made of completely different materials. They use metal and wire, wood, glass, plaster, plastic bottles and more. Metal structures are durable and can withstand heavy loads. The stand requires special care or it may rust.
Wooden products are very popular. It is better to cover the stand with varnish. Frequent exposure to water when watering plants can lead to swelling and rotting.It is rather difficult to work with glass at home, therefore it is more often used as an additional material.
Glass shelves on a metal or wooden frame look great.


The combination of materials is used in order to combine practicality and beauty. The frame and shelves for large flowers are made from the most durable materials. Shelves for large pots can be made from the same. Places for small and light pots can be made from more refined glass or wire.
The required set of tools directly depends on the selected material. For metal or wire products, cold welding will be required. Use a screwdriver, drill and saw when working with plywood. If you use improvised materials (plastic bottles), then construction tools are not needed at all.
When making any stand, it is recommended to use a building level.

Manufacturing methods
You can make a functional and attractive stand for your favorite flowers with your own hands. With the help of a structure, you can decorate a window or wall. If the homemade stand will stand on the windowsill, then be sure to make preliminary measurements. Manufacturing options depend on the selected material. Some coasters will require materials at hand and a little time. The manufacture of complex structures will require special skills in working with tools.

Made of metal
A simple and convenient option looks like several parallelepipeds with 2 common faces. The work is time consuming and requires special skills. It is better if a man is engaged in manufacturing. Pre-sketch the drawing and mark all dimensions. For vertical supports, you need to make 4 equal segments, and for horizontal edges - 8. From the short parts you need to make squares or rhombuses by welding. It is important that they are the same, otherwise the stand will skew. It is necessary to connect geometric shapes with long racks. Then proceed as follows.
- Weld the metal cross bar between the uprights. It should be at the height of the next shelf.
- Make a rectangle out of metal. The dimensions are easy to calculate. The width should correspond to the distance between the vertical parts of the tall stand, and the length is calculated from the previous measurement.
- Cut 8 more small and 4 large pieces. Repeat the procedure. Connect 2 tiers to each other by welding.
- Depending on your needs, you can make as many blanks as you want.


From plastic pipes
The flower stand turns out to be quite attractive and easy to make. You can do the manufacturing with your children. The product is appropriate not only in the apartment, but also in the garden. It is necessary to take plastic pipes, lining trimmings, 2 pieces of a regular hose, self-tapping screws (6 pcs.) And a screwdriver. Act like this.
- It is necessary to make rings. Twist the pipe in a spiral so that 2 hoops are formed. To facilitate the task, you can use an empty barrel.
- Remove the spiral from the mold and cut. You should get 2 rings.
- Connect the edges with a hose.
- On one ring, make 3 marks at a 120 ° angle. Insert self-tapping screws into the holes.
- Make similar marks on the other ring.
- The legs are made from pipes. Cut it into 3 pieces, 40 cm long.
- Make 3 corks from the scraps and insert them into the legs.
- At the final stage, you need to collect all the parts. Fold the first ring under the legs and screw it with a screwdriver to each of them. On the back of the pipes, put on the second ring and screw it to the legs with self-tapping screws.


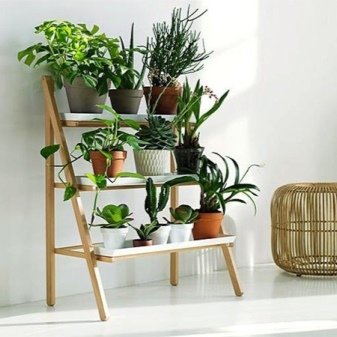
Plywood
The classic stand is well suited for apartments and houses. You need to take a chipboard or PVC shelf, plywood, thick rope, screws, plugs, paint and varnish for decoration, a screwdriver, drill, saw, hammer and screwdriver. For comfortable work, a level, tape measure, ruler and pencil are useful. Make the product like this.
- Prepare the material.Calculate the size based on the free space. The width should match the size of the pot. Additional bars in the middle will help make the distance between the shelves the same.
- Drill 2 holes in each shelf with a drill. They need to be placed in parallel. The size of the hole must be such that the thick rope can pass freely.
- Pass the rope through all the holes. Form a hanging loop at the top, and make a secure knot at the bottom.
- Install the stand. Drill a hole in the wall in the desired location, install the mount. Fix the stand firmly. The wall-mounted design is ideal for indoor flowers.


Wire
Even a woman can make a structure, the main thing is to have experience in handling cold welding. For work, use a welding wire with a diameter of 1 cm. Stock up on tools for cold forging and a hammer (800 g). Make the stand like this.
- Draw a sketch, divide it into simple parts. Calculate all sizes. Be sure to think about the diameter of the round blanks for the pots.
- The first step is to make a stand and stands. Duplicate the drawn details with wire and fix with cold welding.
- Make decorative items. These can be various curls, spirals, leaves and flowers. If desired, you can use pre-made metal shapes to create these parts. It is enough just to drive the wire with a hammer into the template and get the desired element.
- Attach all decorative parts to the main homemade structure using cold welding.


From driftwood
Lovers of natural materials can make a stand out of wood. You can use a felled trunk or branch, depending on the size you want. Act like this.
- Cut off excess knots from the driftwood to form a cylinder. It is convenient to perform the procedure with a grinder.
- Step back from the ends about ¼ part of the total diameter of the deck. Make deep cuts to the depth of the flower pot.
- Saw or gouge a piece of wood between the cuts. Place the pot. This floor stand looks great in the interior.


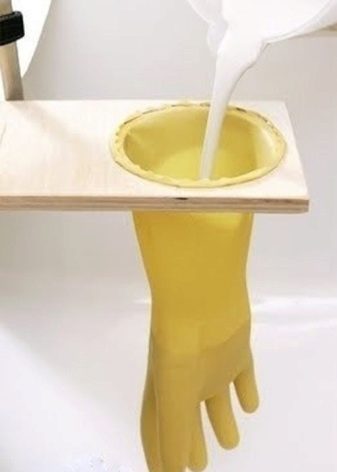
From plaster
It is easy to make a product from such a material, it does not take much time. Gypsum is durable and versatile. The main thing is to purchase or make a form for the stand. The product is best placed indoors and handled with care. A suitable flower pot can be used as a shape. Pour the plaster mixture into the container, and install another pot on top. Inside, you will get a hole into which you can insert a flower. Work with the solution like this.
- Pour water into a container and add gypsum in a ratio of 10: 6, respectively.
- Add 1 part slaked lime to all ingredients. The mixture will be more elastic in liquid state and more durable after drying. The component can be found at any hardware store.
- Pour the solution into the mold and wait for it to dry. The exact time is indicated in the instructions, on average it will take 24-48 hours.
- Color the stand. If you wish, you can make the plaster of Paris already colored. To do this, add gouache to the water while mixing.

From bottles
Such a stand can be placed even in the garden, it is not afraid of bad weather. A product from scrap materials can be made with children. Take scotch tape, PVA glue, a roll of toilet paper and a pack of tissue paper, 14 plastic milk bottles, a skein of medium-thick twisted lace. You also need to take thick cardboard, spray paint with gilding and beads or beads. Make the stand like this.
- Roll up 12 bottles in 6 pairs with duct tape.
- Use 3 pairs to make the bottom. Fold the bottles in the shape of a flower and secure with tape. Place 1 bottle in the middle so that the neck is 5 cm higher than all the bottles.
- Make another flower from 3 pairs of bottles, but without filling in the middle.
- Put the second flower on the bottom of the neck of the bottle so that the middle wide part protrudes into the role of the rod.
- Wrap the structure with toilet paper, pre-coating it with PVA.
- Lay several layers of napkins in the same way. After each layer, you need to wait for the glue to dry.
- Leave the construction for 24 hours.
- Make an ornament on the surface in the form of flowers or something similar.
- Make leaves from a sheet of cardboard, glue to the product.
- Decorate the flower stand to your liking. Finish with a layer of gold paint.


Design
The appearance of the flower stand is of great importance. Beautiful ideas help inspire before making. Here are some interesting flower stand ideas.
An interesting hinged butterfly-shaped stand can be made of wire.
The work is simple, just draw a sketch in detail.

An original wooden bicycle under a flower pot can be placed both in the room and in the garden. You can paint in any color based on the general style of the room or yard.

The original decorative cart will decorate the garden and replace the standard flower bed.

Plaster allows you to work wonders. A medium sized single pot stand will amaze relatives and guests of the house.
Birds will look great in pairs.

This unusual metal stand for one flower looks cute and funny. Will look great in the garden, among flowers. You can make several different cats and put their family on the lawn.

These funny single flower stands are made using plaster of Paris and a plastic cup.
You can decorate such products with drawings and put them in different places of the apartment.

Beautiful and sophisticated coasters can be made from any material. The design can be diluted with paints. Better do the drawings with acrylic and cover with a special varnish. You can glue the stand with rhinestones or sequins. The appearance of your product depends on imagination and skills.
For a master class on making a simple flower stand, see the following video.


The comment was sent successfully.